Owner's Manual
Page 1
U HTR-6130 AV Receiver OWNER'S MANUAL
U HTR-6130 AV Receiver OWNER'S MANUAL

Owner's Manual
Page 7
... position (upper or lower) according to this unit must be set up the remote control code. Notes • Change all of the batteries if you received all of the memory may be cleared. Read the packaging carefully as alkaline and manganese batteries) together. When the memory is cleared, insert new batteries...
... position (upper or lower) according to this unit must be set up the remote control code. Notes • Change all of the batteries if you received all of the memory may be cleared. Read the packaging carefully as alkaline and manganese batteries) together. When the memory is cleared, insert new batteries...

Owner's Manual
Page 9
... connect the left speaker 1 2 3 4 1 Make sure that this unit. Connect the striped (grooved, etc.) cable to the corresponding speaker terminal on this unit. Subwoofer AV receiver Input jack Subwoofer cable SUBWOOFER OUTPUT jack English 5 En INTRODUCTION Step 1: Set up your speakers Place your speakers in the room. 2 Connect speaker cables to...
... connect the left speaker 1 2 3 4 1 Make sure that this unit. Connect the striped (grooved, etc.) cable to the corresponding speaker terminal on this unit. Subwoofer AV receiver Input jack Subwoofer cable SUBWOOFER OUTPUT jack English 5 En INTRODUCTION Step 1: Set up your speakers Place your speakers in the room. 2 Connect speaker cables to...

Owner's Manual
Page 10
...DVD VIDEO jack • Connecting an outdoor FM/AM antenna ☞ P. 19 • Connecting an iPod/Bluetooth dock ☞ P. 18 6 En DVD player AV receiver Video input jack Video cable VIDEO MONITOR OUT jack 4 Connect the power plug of this unit and the DVD player are unplugged from the AC... coaxial audio cable to the digital coaxial audio output jack on your DVD player and the DVD VIDEO jack on this unit. Video monitor AV receiver Make sure that this unit and other components into the AC wall outlet. ■ For further connections • Using the other components DOCK ...
...DVD VIDEO jack • Connecting an outdoor FM/AM antenna ☞ P. 19 • Connecting an iPod/Bluetooth dock ☞ P. 18 6 En DVD player AV receiver Video input jack Video cable VIDEO MONITOR OUT jack 4 Connect the power plug of this unit and the DVD player are unplugged from the AC... coaxial audio cable to the digital coaxial audio output jack on your DVD player and the DVD VIDEO jack on this unit. Video monitor AV receiver Make sure that this unit and other components into the AC wall outlet. ■ For further connections • Using the other components DOCK ...

Owner's Manual
Page 12
See page 24 for your iPod with this unit from the remote control. ■ Adjusting the parameters of power in order to receive infrared signals from the standby mode, press ASTANDBY/ON (or DPOWER) on the front panel. Note In the standby mode, this unit consumes a small amount ...
See page 24 for your iPod with this unit from the remote control. ■ Adjusting the parameters of power in order to receive infrared signals from the standby mode, press ASTANDBY/ON (or DPOWER) on the front panel. Note In the standby mode, this unit consumes a small amount ...
Owner's Manual
Page 23
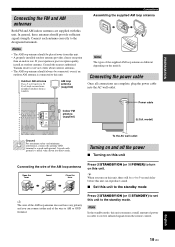
...16 to a good earth ground. AM loop antenna (supplied) Connections Assembling the supplied AM loop antenna Note The types of power in order to receive infrared signals from this unit to AM or GND terminal. A good earth ground is different depending on this unit, there will be a 4 to...provides clearer reception than an indoor one. Connecting the power cable Once all connections are supplied with this unit. Consult the nearest authorized Yamaha dealer or service center about outdoor antennas. • The AM loop antenna should always be placed away from the remote control. Press ...
...16 to a good earth ground. AM loop antenna (supplied) Connections Assembling the supplied AM loop antenna Note The types of power in order to receive infrared signals from this unit to AM or GND terminal. A good earth ground is different depending on this unit, there will be a 4 to...provides clearer reception than an indoor one. Connecting the power cable Once all connections are supplied with this unit. Consult the nearest authorized Yamaha dealer or service center about outdoor antennas. • The AM loop antenna should always be placed away from the remote control. Press ...

Owner's Manual
Page 41
... A AM 1530 kHz English 37 En BASIC OPERATION FM/AM TUNING FM/AM tuning There are strong and there is no interference. If the signal received from the front panel display. Press BPRESET/TUNING to turn the colon (:) off . 4 Press EPRESET/TUNING l / h to store up and the frequency of the...
... A AM 1530 kHz English 37 En BASIC OPERATION FM/AM TUNING FM/AM tuning There are strong and there is no interference. If the signal received from the front panel display. Press BPRESET/TUNING to turn the colon (:) off . 4 Press EPRESET/TUNING l / h to store up and the frequency of the...

Owner's Manual
Page 42
... in the front panel display for tuning instructions. 2 Press FMEMORY. y You can select the preset station group and the preset station number where the first received station will be stored by pressing DA/B/C/D/E and then EPRESET/TUNING l / h. Notes • Any stored station data existing under a preset station number is cleared when...
... in the front panel display for tuning instructions. 2 Press FMEMORY. y You can select the preset station group and the preset station number where the first received station will be stored by pressing DA/B/C/D/E and then EPRESET/TUNING l / h. Notes • Any stored station data existing under a preset station number is cleared when...


