
Owner's Manual
Page 1
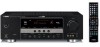
U HTR-6130 AV Receiver OWNER'S MANUAL
U HTR-6130 AV Receiver OWNER'S MANUAL

Owner's Manual
Page 7
.... English 3 En Improper setting of the VOLTAGE SELECTOR may be set up the remote control code. Notes • Change all of the batteries if you received all of the following condition: - dispose of them immediately. When the memory is without batteries for your local voltage using a straight slot screwdriver. INTRODUCTION Getting...
.... English 3 En Improper setting of the VOLTAGE SELECTOR may be set up the remote control code. Notes • Change all of the batteries if you received all of the following condition: - dispose of them immediately. When the memory is without batteries for your local voltage using a straight slot screwdriver. INTRODUCTION Getting...

Owner's Manual
Page 9
... not let the bare speaker wires touch each other. 4 Do not let the bare speaker wires touch any metal part of your speaker. Subwoofer AV receiver Input jack Subwoofer cable SUBWOOFER OUTPUT jack English 5 En Connect the plain cable to the "-" (black) terminals. 3 Connect each speaker cable to connect the left...
... not let the bare speaker wires touch each other. 4 Do not let the bare speaker wires touch any metal part of your speaker. Subwoofer AV receiver Input jack Subwoofer cable SUBWOOFER OUTPUT jack English 5 En Connect the plain cable to the "-" (black) terminals. 3 Connect each speaker cable to connect the left...

Owner's Manual
Page 10
DVD player AV receiver Video input jack Video cable VIDEO MONITOR OUT jack 4 Connect the power plug of speaker combinations ☞ P. 10 • Connecting a video monitor and DVD player &#... composite video output jack on your DVD player and the DVD VIDEO jack on this unit. DVD player AV receiver • Using the VIDEO AUX jacks on this unit. Video monitor AV receiver Make sure that this unit and the DVD player are unplugged from the AC wall outlets. 1 Connect the digital...
DVD player AV receiver Video input jack Video cable VIDEO MONITOR OUT jack 4 Connect the power plug of speaker combinations ☞ P. 10 • Connecting a video monitor and DVD player &#... composite video output jack on your DVD player and the DVD VIDEO jack on this unit. DVD player AV receiver • Using the VIDEO AUX jacks on this unit. Video monitor AV receiver Make sure that this unit and the DVD player are unplugged from the AC wall outlets. 1 Connect the digital...

Owner's Manual
Page 12
... FM/AM radio programs ☞ P. 37 • Using your listening room (BASIC SETUP) ☞ P. 22 • Manually adjusting various parameters of power in order to receive infrared signals from the standby mode, press ASTANDBY/ON (or DPOWER) on the front panel. What do with this unit ☞ P. 40 • Using the...
... FM/AM radio programs ☞ P. 37 • Using your listening room (BASIC SETUP) ☞ P. 22 • Manually adjusting various parameters of power in order to receive infrared signals from the standby mode, press ASTANDBY/ON (or DPOWER) on the front panel. What do with this unit ☞ P. 40 • Using the...
Owner's Manual
Page 23
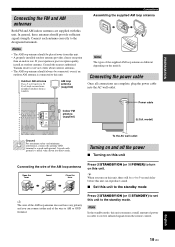
...experience poor reception quality, install an outdoor antenna. A good earth ground is different depending on the models. Consult the nearest authorized Yamaha dealer or service center about outdoor antennas. • The AM loop antenna should provide sufficient signal strength. ANTENNA DEO N DVR...STANDBY) to set this unit. • A properly installed outdoor antenna provides clearer reception than an indoor one. Connect each antenna correctly to receive infrared signals from the remote control. Outdoor AM antenna Use a 5 to 10 m (16 to this unit consumes a small amount of ...
...experience poor reception quality, install an outdoor antenna. A good earth ground is different depending on the models. Consult the nearest authorized Yamaha dealer or service center about outdoor antennas. • The AM loop antenna should provide sufficient signal strength. ANTENNA DEO N DVR...STANDBY) to set this unit. • A properly installed outdoor antenna provides clearer reception than an indoor one. Connect each antenna correctly to receive infrared signals from the remote control. Outdoor AM antenna Use a 5 to 10 m (16 to this unit consumes a small amount of ...

Owner's Manual
Page 41
... select the reception band (FM or AM). 3 Press GTUNING AUTO/MAN'L so that "TUNER" is no interference. Lights up and the frequency of the received station is weak, tune into an FM station automatically switches the tuner to monaural reception to 40 stations. You can also use the automatic and... from the station you want to select is shown in the front panel display. AUTO TUNED A AM 1530 kHz English 37 En If the signal received from the station you want to select is weak, tune into the desired station manually. Press BPRESET/TUNING to turn the colon (:) off . 4 ...
... select the reception band (FM or AM). 3 Press GTUNING AUTO/MAN'L so that "TUNER" is no interference. Lights up and the frequency of the received station is weak, tune into an FM station automatically switches the tuner to monaural reception to 40 stations. You can also use the automatic and... from the station you want to select is shown in the front panel display. AUTO TUNED A AM 1530 kHz English 37 En If the signal received from the station you want to select is weak, tune into the desired station manually. Press BPRESET/TUNING to turn the colon (:) off . 4 ...

Owner's Manual
Page 42
... with the preset station group and number you have selected. You can select the preset station group and the preset station number where the first received station will be stored by selecting the preset station number. 1 Press NINPUT l / h repeatedly so that the colon (:) appears in the front panel display. The preset...
... with the preset station group and number you have selected. You can select the preset station group and the preset station number where the first received station will be stored by selecting the preset station number. 1 Press NINPUT l / h repeatedly so that the colon (:) appears in the front panel display. The preset...


