
MCXSP10 Manual
Page 1
U HTR-6080 AV Receiver OWNER'S MANUAL
U HTR-6080 AV Receiver OWNER'S MANUAL

MCXSP10 Manual
Page 7
...jacks for discrete multi- Remote control CODE SET TRANSMIT POWER TV POWER AV STANDBY POWER CD DVD DOCK V-AUX MD CD-R CBL DTV MULTI CH...preset SCENE templates for various situations ◆ 4 original SCENE templates for customizing capability ◆ Controlling Yamaha SCENE control signal support component (some models only) working with preset remote control codes capability ◆...; Bi-amplification connection capability ◆ Sleep timer Check that allow you received all of the following parts. channel input ◆ S-video signal input/output capability...
...jacks for discrete multi- Remote control CODE SET TRANSMIT POWER TV POWER AV STANDBY POWER CD DVD DOCK V-AUX MD CD-R CBL DTV MULTI CH...preset SCENE templates for various situations ◆ 4 original SCENE templates for customizing capability ◆ Controlling Yamaha SCENE control signal support component (some models only) working with preset remote control codes capability ◆...; Bi-amplification connection capability ◆ Sleep timer Check that allow you received all of the following parts. channel input ◆ S-video signal input/output capability...

MCXSP10 Manual
Page 10
... cable to the SUBWOOFER PRE OUT jack of this unit and your speakers and subwoofer in the room and connect them to this unit. Subwoofer AV receiver 6 En Input jack Subwoofer cable SUBWOOFER PRE OUT jack
... cable to the SUBWOOFER PRE OUT jack of this unit and your speakers and subwoofer in the room and connect them to this unit. Subwoofer AV receiver 6 En Input jack Subwoofer cable SUBWOOFER PRE OUT jack
MCXSP10 Manual
Page 11
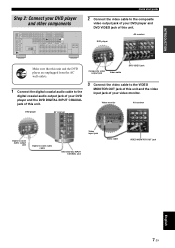
... DIGITAL INPUT Y PB PR MONITOR OUT Y PB DVR C PR COMPONENT VIDEO FRONT B/PRESENCE R EXTRA SP L ANTENNA FM GND AM 75 UNBAL. AV receiver DVD player Make sure that this unit. INTRODUCTION Step 2: Connect your DVD player and the DVD DIGITAL INPUT COAXIAL jack of this unit. 3 Connect ...and the video input jack of this unit and the DVD player are unplugged from the AC wall outlets. Video monitor AV receiver DVD player AV receiver Digital coaxial audio output jack Digital coaxial audio cable Video input jack Video cable DVD DIGITAL INPUT COAXIAL jack VIDEO MONITOR ...
... DIGITAL INPUT Y PB PR MONITOR OUT Y PB DVR C PR COMPONENT VIDEO FRONT B/PRESENCE R EXTRA SP L ANTENNA FM GND AM 75 UNBAL. AV receiver DVD player Make sure that this unit. INTRODUCTION Step 2: Connect your DVD player and the DVD DIGITAL INPUT COAXIAL jack of this unit. 3 Connect ...and the video input jack of this unit and the DVD player are unplugged from the AC wall outlets. Video monitor AV receiver DVD player AV receiver Digital coaxial audio output jack Digital coaxial audio cable Video input jack Video cable DVD DIGITAL INPUT COAXIAL jack VIDEO MONITOR ...
MCXSP10 Manual
Page 13
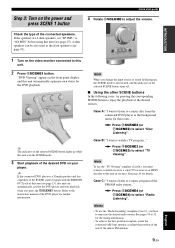
... Turn on the power and press SCENE 1 button Quick start playback when you change the input source or sound field program, the SCENE mode is a Yamaha product and has capability of the SCENE control signals with the REMOTE OUT jack of this unit (see page 91). 1 Turn on the video monitor...0VOLUME to adjust the volume. Note When you press the ESCENE1 button. Note To use the "Radio Listening" template (Case C), you must connect a satellite receiver, a cable TV receiver or an HDTV decoder to watch a TV program..." See page 20 for this unit is in the front panel display, and this unit can...
... Turn on the power and press SCENE 1 button Quick start playback when you change the input source or sound field program, the SCENE mode is a Yamaha product and has capability of the SCENE control signals with the REMOTE OUT jack of this unit (see page 91). 1 Turn on the video monitor...0VOLUME to adjust the volume. Note When you press the ESCENE1 button. Note To use the "Radio Listening" template (Case C), you must connect a satellite receiver, a cable TV receiver or an HDTV decoder to watch a TV program..." See page 20 for this unit is in the front panel display, and this unit can...

MCXSP10 Manual
Page 14
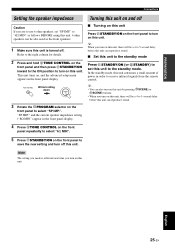
... the speaker parameters for the SCENE buttons. Press ASTANDBY/ON to set to the standby mode and consumes a small amount of power in order to receive infrared signals from the standby mode, press the desired ESCENE buttons (or FSCENE) or ASTANDBY/ON on the front panel (or HPOWER on this unit...
... the speaker parameters for the SCENE buttons. Press ASTANDBY/ON to set to the standby mode and consumes a small amount of power in order to receive infrared signals from the standby mode, press the desired ESCENE buttons (or FSCENE) or ASTANDBY/ON on the front panel (or HPOWER on this unit...
MCXSP10 Manual
Page 24
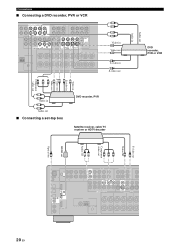
Audio out Audio in Video in S-video in L R Audio out ■ Connecting a set-top box DVD recorder, PVR Satellite receiver, cable TV receiver or HDTV decoder DVD recorder, PVR or VCR S-video out Video out Component video out Audio out HDMI out Optical out O L R DTV /CBL IN2 DTV/...
Audio out Audio in Video in S-video in L R Audio out ■ Connecting a set-top box DVD recorder, PVR Satellite receiver, cable TV receiver or HDTV decoder DVD recorder, PVR or VCR S-video out Video out Component video out Audio out HDMI out Optical out O L R DTV /CBL IN2 DTV/...
MCXSP10 Manual
Page 29
... order to "6Ω MIN" as the front speakers. 1 Make sure this unit is reflected next time you turn on and off . English 25 En to receive infrared signals from the remote control. Refer to the right column for details. 2 Press and hold BTONE CONTROL on the front panel and then press...
... order to "6Ω MIN" as the front speakers. 1 Make sure this unit is reflected next time you turn on and off . English 25 En to receive infrared signals from the remote control. Refer to the right column for details. 2 Press and hold BTONE CONTROL on the front panel and then press...

MCXSP10 Manual
Page 54
.... Lights up in the front panel display. You can recall any preset stations and exchange the assignment of two preset stations with each of the received station is shown in the front panel display. • Press 5h to tune into a higher frequency. • Press 5l to tune into a ...the front panel display. Automatic tuning Manual tuning Automatic tuning is effective when station signals are 2 tuning methods: automatic and manual. If the signal received from the station you want to select is weak, tune into it manually. 1 Rotate the HINPUT selector on the front "FM" or "AM"...
.... Lights up in the front panel display. You can recall any preset stations and exchange the assignment of two preset stations with each of the received station is shown in the front panel display. • Press 5h to tune into a higher frequency. • Press 5l to tune into a ...the front panel display. Automatic tuning Manual tuning Automatic tuning is effective when station signals are 2 tuning methods: automatic and manual. If the signal received from the station you want to select is weak, tune into it manually. 1 Rotate the HINPUT selector on the front "FM" or "AM"...

MCXSP10 Manual
Page 55
... to select "FM" as the reception band. If the station you store a new station under the same preset station number. • If the number of received stations does not reach 40 (E8), automatic preset tuning automatically stops after you perform step 3 to select the preset station number under a preset station number...
... to select "FM" as the reception band. If the station you store a new station under the same preset station number. • If the number of received stations does not reach 40 (E8), automatic preset tuning automatically stops after you perform step 3 to select the preset station number under a preset station number...
MCXSP10 Manual
Page 58
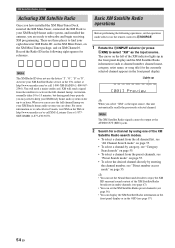
... XM PHONO [001] Preview y When you select "XM" as channel number, channel name, category, artist name, or song title) for up to subscribe and begin receiving XM programming. Note The XM Satellite Radio signals cannot be output at the AUDIO OUT (REC) jacks. 2 Search for reference. online at http://www.xmradio...
... XM PHONO [001] Preview y When you select "XM" as channel number, channel name, category, artist name, or song title) for up to subscribe and begin receiving XM programming. Note The XM Satellite Radio signals cannot be output at the AUDIO OUT (REC) jacks. 2 Search for reference. online at http://www.xmradio...

MCXSP10 Manual
Page 95
... the remote control AMP ID code is set the AMP ID of each speaker must be 8 Ω or higher. CODE SET TRANSMIT POWER TV POWER AV STANDBY POWER TRANSMIT Flashes 6Ω MIN Front Center Surround Surround back If you use one set to "8Ω MIN". ■ User presets PRESET Use this... (initial setting) the default code. 00002 To operate this unit. 2 Press the numeric buttons (B) to reset all the parameters of this unit and the other Yamaha receivers/ amplifiers in the same room separately.
... the remote control AMP ID code is set the AMP ID of each speaker must be 8 Ω or higher. CODE SET TRANSMIT POWER TV POWER AV STANDBY POWER TRANSMIT Flashes 6Ω MIN Front Center Surround Surround back If you use one set to "8Ω MIN". ■ User presets PRESET Use this... (initial setting) the default code. 00002 To operate this unit. 2 Press the numeric buttons (B) to reset all the parameters of this unit and the other Yamaha receivers/ amplifiers in the same room separately.

MCXSP10 Manual
Page 97
... automatically sends the remote control signals to the component. • Select "OFF" when the component connected to the REMOTE OUT jack is the Yamaha component and has the capability of the SCENE control signals. Note If noises are output when you operate the SCENE function, set to "YES",... this unit receives the information of the available video signal resolutions from the video monitor connected via HDMI (see page 81). When this parameter is set "SCENE...
... automatically sends the remote control signals to the component. • Select "OFF" when the component connected to the REMOTE OUT jack is the Yamaha component and has the capability of the SCENE control signals. Note If noises are output when you operate the SCENE function, set to "YES",... this unit receives the information of the available video signal resolutions from the video monitor connected via HDMI (see page 81). When this parameter is set "SCENE...
MCXSP10 Manual
Page 107
... existing 5.1-channel format. ■ HDMI HDMI (High-Definition Multimedia Interface) is digitized, recorded and transmitted without using any source (such as a set-top box or AV receiver) and an audio/video monitor (such as a digital television), HDMI supports standard, enhanced or high-definition video as well as a method of recording CDs and...
... existing 5.1-channel format. ■ HDMI HDMI (High-Definition Multimedia Interface) is digitized, recorded and transmitted without using any source (such as a set-top box or AV receiver) and an audio/video monitor (such as a digital television), HDMI supports standard, enhanced or high-definition video as well as a method of recording CDs and...

MCXSP10 Manual
Page 117
List of remote control codes CABLE TV RECEIVER 3M 10033 A-MARK 10008, 10144 ABC 10237, 10003, 10008, 10033 ACCUPHASE 10003 ACORN 10237 ACTION 10237 ACTIVE 10237 AMERICAST 10899 ARCHER 10237 BCC 10276... ECHOSTAR 11505, 10775 EXPRESSVU 10775 HUGHES NETWORK SYSTEMS 11142, 11442 PHILIPS 11142, 11442 PROSCAN 10392 RCA 11392 SAMSUNG 11442 SHARP 11489 SONY 10639, 11640 SATELLITE RECEIVER AIWA 11514, 11515 ALPHASTAR 10772 AUSTAR 10879 BELL EXPRESSVU 10775 CHAPARRAL 10216 DIRECTV 11377, 10392, 10566, 10639, 11639, 11142, 10247, 10749, 11749, 10724, 10819,...
List of remote control codes CABLE TV RECEIVER 3M 10033 A-MARK 10008, 10144 ABC 10237, 10003, 10008, 10033 ACCUPHASE 10003 ACORN 10237 ACTION 10237 ACTIVE 10237 AMERICAST 10899 ARCHER 10237 BCC 10276... ECHOSTAR 11505, 10775 EXPRESSVU 10775 HUGHES NETWORK SYSTEMS 11142, 11442 PHILIPS 11142, 11442 PROSCAN 10392 RCA 11392 SAMSUNG 11442 SHARP 11489 SONY 10639, 11640 SATELLITE RECEIVER AIWA 11514, 11515 ALPHASTAR 10772 AUSTAR 10879 BELL EXPRESSVU 10775 CHAPARRAL 10216 DIRECTV 11377, 10392, 10566, 10639, 11639, 11142, 10247, 10749, 11749, 10724, 10819,...


