
MCXSP10 Manual
Page 5
...of this manual for the SCENE feature .... 85 Controlling this unit, a TV, or other components.... 86 Setting remote control codes 88 Resetting all remote control codes 89 Advanced setup 90 Using the advanced setup 90 ADDITIONAL INFORMATION Troubleshooting 94 Resetting the system 101 Glossary 102... program information 104 Parametric equalizer information 105 Specifications 106 Index 107 APPENDIX (at the end of this manual) Front panel i Remote control ii List of remote control codes iii "1SPEAKER" or "ADVD" (example) indicates the name of the parts on a video monitor 39 Using ...
...of this manual for the SCENE feature .... 85 Controlling this unit, a TV, or other components.... 86 Setting remote control codes 88 Resetting all remote control codes 89 Advanced setup 90 Using the advanced setup 90 ADDITIONAL INFORMATION Troubleshooting 94 Resetting the system 101 Glossary 102... program information 104 Parametric equalizer information 105 Specifications 106 Index 107 APPENDIX (at the end of this manual) Front panel i Remote control ii List of remote control codes iii "1SPEAKER" or "ADVD" (example) indicates the name of the parts on a video monitor 39 Using ...
MCXSP10 Manual
Page 6
...tip for the information about each position of Dolby Laboratories. Design and specifications are trademarks owned by playing it is too late, Yamaha and the Electronic Industries Association's Consumer Electronics Group recommend you to change in the U.S. One that lets the sound come through ...differences between the front panel and the remote control, the button name on the remote control is given in parentheses. • This manual is a trademark of the parts on the remote control. We Want You Listening For A Lifetime Yamaha and the Electronic Industries Association's Consumer ...
...tip for the information about each position of Dolby Laboratories. Design and specifications are trademarks owned by playing it is too late, Yamaha and the Electronic Industries Association's Consumer Electronics Group recommend you to change in the U.S. One that lets the sound come through ...differences between the front panel and the remote control, the button name on the remote control is given in parentheses. • This manual is a trademark of the parts on the remote control. We Want You Listening For A Lifetime Yamaha and the Electronic Industries Association's Consumer ...

MCXSP10 Manual
Page 7
...mode for pure hi-fi sound for discrete multi- Remote control CODE SET TRANSMIT POWER TV POWER AV STANDBY POWER CD DVD DOCK V-AUX MD CD-R CBL...◆ Playback information displaying capability ◆ Battery charging capability Other features ◆ YPAO (Yamaha Parametric Room Acoustic Optimizer) for automatic speaker setup ◆ 192-kHz/24-bit D/A converter...music night listening modes ◆ Remote control with preset remote control codes capability ◆ Bi-amplification connection capability ◆ Sleep timer Check that you received all of the supplied accessories varies...
...mode for pure hi-fi sound for discrete multi- Remote control CODE SET TRANSMIT POWER TV POWER AV STANDBY POWER CD DVD DOCK V-AUX MD CD-R CBL...◆ Playback information displaying capability ◆ Battery charging capability Other features ◆ YPAO (Yamaha Parametric Room Acoustic Optimizer) for automatic speaker setup ◆ 192-kHz/24-bit D/A converter...music night listening modes ◆ Remote control with preset remote control codes capability ◆ Bi-amplification connection capability ◆ Sleep timer Check that you received all of the supplied accessories varies...
MCXSP10 Manual
Page 8
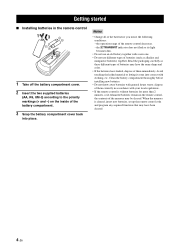
...the batteries have leaked, dispose of them correctly in accordance with your local regulations. • If the remote control is cleared, insert new batteries, set up the remote control code and program any acquired functions that may be cleared. Read the packaging carefully as alkaline and manganese... batteries) together. When the memory is without batteries for more than 2 minutes, or if exhausted batteries remain in the remote control, the contents of the memory may have been cleared. 4 En Avoid touching the leaked material or letting it come into place....
...the batteries have leaked, dispose of them correctly in accordance with your local regulations. • If the remote control is cleared, insert new batteries, set up the remote control code and program any acquired functions that may be cleared. Read the packaging carefully as alkaline and manganese... batteries) together. When the memory is without batteries for more than 2 minutes, or if exhausted batteries remain in the remote control, the contents of the memory may have been cleared. 4 En Avoid touching the leaked material or letting it come into place....

MCXSP10 Manual
Page 10
...shaped differently, perhaps with a stripe, groove or ridge. Connect the plain cable to the "-" (black) terminals. 3 Connect each speaker. Subwoofer AV receiver 6 En Input jack Subwoofer cable SUBWOOFER PRE OUT jack GND L AUDIO MULTI CH INPUT FRONT(6CH) CENTER L L PRE OUT SINGLE CENTER ... DTV/CBL IN DVR OUT VIDEO SPEAKERS FRONT A CENTER R L IN VCR OUT MONITOR OUT SURROUND R L SURROUND BACK/ BI-AMP R SINGLE L REMOTE OUT AC OUTLETS 1 Place your speaker. Connect the striped (grooved, etc.) cable to the "+" (red) terminals of the subwoofer. Quick start guide ...
...shaped differently, perhaps with a stripe, groove or ridge. Connect the plain cable to the "-" (black) terminals. 3 Connect each speaker. Subwoofer AV receiver 6 En Input jack Subwoofer cable SUBWOOFER PRE OUT jack GND L AUDIO MULTI CH INPUT FRONT(6CH) CENTER L L PRE OUT SINGLE CENTER ... DTV/CBL IN DVR OUT VIDEO SPEAKERS FRONT A CENTER R L IN VCR OUT MONITOR OUT SURROUND R L SURROUND BACK/ BI-AMP R SINGLE L REMOTE OUT AC OUTLETS 1 Place your speaker. Connect the striped (grooved, etc.) cable to the "+" (red) terminals of the subwoofer. Quick start guide ...
MCXSP10 Manual
Page 11
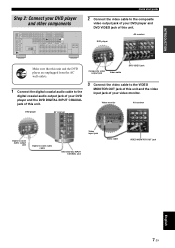
...MONITOR OUT Y PB DVR C PR COMPONENT VIDEO FRONT B/PRESENCE R EXTRA SP L ANTENNA FM GND AM 75 UNBAL. Video monitor AV receiver DVD player AV receiver Digital coaxial audio output jack Digital coaxial audio cable Video input jack Video cable DVD DIGITAL INPUT COAXIAL jack VIDEO MONITOR OUT jack ...CBL IN DVR OUT VIDEO SPEAKERS FRONT A CENTER R L IN VCR OUT MONITOR OUT SURROUND R L SURROUND BACK/ BI-AMP R SINGLE L REMOTE OUT AC OUTLETS Quick start guide 2 Connect the video cable to the VIDEO MONITOR OUT jack of your DVD player and other components GND L...
...MONITOR OUT Y PB DVR C PR COMPONENT VIDEO FRONT B/PRESENCE R EXTRA SP L ANTENNA FM GND AM 75 UNBAL. Video monitor AV receiver DVD player AV receiver Digital coaxial audio output jack Digital coaxial audio cable Video input jack Video cable DVD DIGITAL INPUT COAXIAL jack VIDEO MONITOR OUT jack ...CBL IN DVR OUT VIDEO SPEAKERS FRONT A CENTER R L IN VCR OUT MONITOR OUT SURROUND R L SURROUND BACK/ BI-AMP R SINGLE L REMOTE OUT AC OUTLETS Quick start guide 2 Connect the video cable to the VIDEO MONITOR OUT jack of your DVD player and other components GND L...
MCXSP10 Manual
Page 12
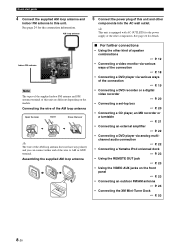
...; P. 21 • Connecting an external amplifier ☞ P. 22 • Connecting a DVD player via analog multichannel audio connection ☞ P. 22 • Connecting a Yamaha iPod universal dock ☞ P. 23 • Using the REMOTE OUT jack ☞ P. 23 • Using the VIDEO AUX jacks on the models. y This unit is equipped with AC OUTLETS for...
...; P. 21 • Connecting an external amplifier ☞ P. 22 • Connecting a DVD player via analog multichannel audio connection ☞ P. 22 • Connecting a Yamaha iPod universal dock ☞ P. 23 • Using the REMOTE OUT jack ☞ P. 23 • Using the VIDEO AUX jacks on the models. y This unit is equipped with AC OUTLETS for...
MCXSP10 Manual
Page 13
...Case C: "I want to listen to adjust the volume. English 9 En y If the connected DVD player is a Yamaha product and has capability of the SCENE control signals with the REMOTE OUT jack of this unit (see page 25). 4 ohm speakers can automatically activate the DVD player and start guide ...ESCENE2 (or FSCENE2) to watch a TV program..." Notes • To use the "TV Viewing" template (Case B), you must connect a satellite receiver, a cable TV receiver or an HDTV decoder to 52 for details. "DVD Viewing" appears in the front panel display, and this room..." Press ESCENE4 (or FSCENE4) ...
...Case C: "I want to listen to adjust the volume. English 9 En y If the connected DVD player is a Yamaha product and has capability of the SCENE control signals with the REMOTE OUT jack of this unit (see page 25). 4 ohm speakers can automatically activate the DVD player and start guide ...ESCENE2 (or FSCENE2) to watch a TV program..." Notes • To use the "TV Viewing" template (Case B), you must connect a satellite receiver, a cable TV receiver or an HDTV decoder to 52 for details. "DVD Viewing" appears in the front panel display, and this room..." Press ESCENE4 (or FSCENE4) ...

MCXSP10 Manual
Page 14
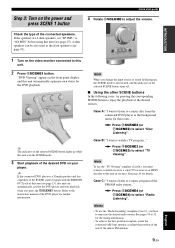
... this unit • Automatically optimizing the speaker parameters for your original SCENE templates ☞ P. 36 This unit is set this unit to receive infrared signals from the standby mode, press the desired ESCENE buttons (or FSCENE) or ASTANDBY/ON on the front panel (or HPOWER on ...this unit... Press ASTANDBY/ON to set to the standby mode and consumes a small amount of this unit ☞ P. 71 • Setting the remote control ☞ P. 85 • Adjusting the advanced parameters ☞ P. 90 ■ Additional feature Automatically turning off this unit ☞ P. 41 10...
... this unit • Automatically optimizing the speaker parameters for your original SCENE templates ☞ P. 36 This unit is set this unit to receive infrared signals from the standby mode, press the desired ESCENE buttons (or FSCENE) or ASTANDBY/ON on the front panel (or HPOWER on ...this unit... Press ASTANDBY/ON to set to the standby mode and consumes a small amount of this unit ☞ P. 71 • Setting the remote control ☞ P. 85 • Adjusting the advanced parameters ☞ P. 90 ■ Additional feature Automatically turning off this unit ☞ P. 41 10...
MCXSP10 Manual
Page 15
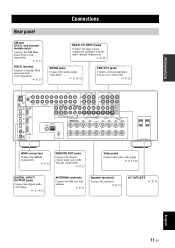
...IN VCR OUT MONITOR OUT SURROUND R L SURROUND BACK/ BI-AMP R SINGLE L REMOTE OUT AC OUTLETS HDMI connectors Connect the HDMI components. ☞ P. 16 REMOTE OUT jacks Connect the remote control input jack of the Yamaha components. ☞ P. 23 Video jacks Connect the video cable plugs. ☞ ...FM GND AM 75 UNBAL. and Canada models only) Connect the XM MiniTuner Dock (sold separately). ☞ P. 53 DOCK terminal Connect a Yamaha iPod universal dock (sold separately). ☞ P. 23 MULTI CH INPUT jacks Connect the input source component equipped with the multi-channel output ...
...IN VCR OUT MONITOR OUT SURROUND R L SURROUND BACK/ BI-AMP R SINGLE L REMOTE OUT AC OUTLETS HDMI connectors Connect the HDMI components. ☞ P. 16 REMOTE OUT jacks Connect the remote control input jack of the Yamaha components. ☞ P. 23 Video jacks Connect the video cable plugs. ☞ ...FM GND AM 75 UNBAL. and Canada models only) Connect the XM MiniTuner Dock (sold separately). ☞ P. 53 DOCK terminal Connect a Yamaha iPod universal dock (sold separately). ☞ P. 23 MULTI CH INPUT jacks Connect the input source component equipped with the multi-channel output ...
MCXSP10 Manual
Page 27
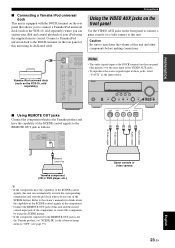
...your iPod and control playback of your iPod using the SCENE feature. • If the component connected to the REMOTE OUT jack is not the Yamaha product, set "SCENE IR" in Yamaha component (CD or DVD player, etc.) y • If the components have the capability of the SCENE control... MIC VIDEO AUX SILENT CINEMA EFFECT S VIDEO VIDEO L AUDIO R OPTICAL ■ Using REMOTE OUT jacks Connect the component which is the Yamaha product and have the capability of this unit. Connect a Yamaha iPod universal dock to turn down the volume of the SCENE control signals, this unit using...
...your iPod and control playback of your iPod using the SCENE feature. • If the component connected to the REMOTE OUT jack is not the Yamaha product, set "SCENE IR" in Yamaha component (CD or DVD player, etc.) y • If the components have the capability of the SCENE control... MIC VIDEO AUX SILENT CINEMA EFFECT S VIDEO VIDEO L AUDIO R OPTICAL ■ Using REMOTE OUT jacks Connect the component which is the Yamaha product and have the capability of this unit. Connect a Yamaha iPod universal dock to turn down the volume of the SCENE control signals, this unit using...
MCXSP10 Manual
Page 29
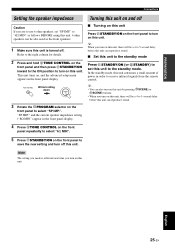
... you turn off . and the current speaker impedance setting ("8Ω MIN") appear in order to 5-second delay before this unit can be a 4 to receive infrared signals from the remote control. to "6Ω MIN" as the front speakers. 1 Make sure this unit consumes a small amount of power in the front panel display. 4 Press...
... you turn off . and the current speaker impedance setting ("8Ω MIN") appear in order to 5-second delay before this unit can be a 4 to receive infrared signals from the remote control. to "6Ω MIN" as the front speakers. 1 Make sure this unit consumes a small amount of power in the front panel display. 4 Press...

MCXSP10 Manual
Page 31
...of extremely low temperatures - places of high humidity, such as near a bath - L SLEEP indicator Lights up according to this window at the remote control sensor on the operation mode selector position. Presence and surround back speaker indicators Light up while the sleep timer is input to the number... Surround back speaker indicators LFE indicator Lights up when a DTS 96/24 signal is on (see page 86). Be sure to aim the remote control directly at the component you want to "PRESENCE" (see page 87). Notes • Do not spill water or other information when ...
...of extremely low temperatures - places of high humidity, such as near a bath - L SLEEP indicator Lights up according to this window at the remote control sensor on the operation mode selector position. Presence and surround back speaker indicators Light up while the sleep timer is input to the number... Surround back speaker indicators LFE indicator Lights up when a DTS 96/24 signal is on (see page 86). Be sure to aim the remote control directly at the component you want to "PRESENCE" (see page 87). Notes • Do not spill water or other information when ...
MCXSP10 Manual
Page 32
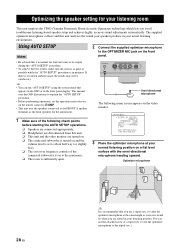
... set to about half way (or slightly less). ❏ The crossover frequency controls of the connected subwoofer is set the operation mode selector on the remote control to KAMP. • This unit uses the speakers connected to the FRONT A speaker terminals as the front speakers for the adjustment. 1 Make sure of... your actual listening environment. OPTIMIZING THE SPEAKER SETTING FOR YOUR LISTENING ROOM Optimizing the speaker setting for your listening room This unit employs the YPAO (Yamaha Parametric Room Acoustic Optimizer) technology which lets you are seated in your listening position.
... set to about half way (or slightly less). ❏ The crossover frequency controls of the connected subwoofer is set the operation mode selector on the remote control to KAMP. • This unit uses the speakers connected to the FRONT A speaker terminals as the front speakers for the adjustment. 1 Make sure of... your actual listening environment. OPTIMIZING THE SPEAKER SETTING FOR YOUR LISTENING ROOM Optimizing the speaker setting for your listening room This unit employs the YPAO (Yamaha Parametric Room Acoustic Optimizer) technology which lets you are seated in your listening position.
MCXSP10 Manual
Page 37
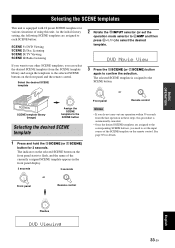
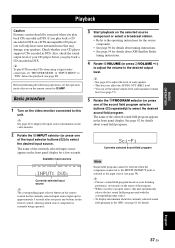
.... 1 or 1 SCENE template library (Image) 1 Assign the SCENE template to the SCENE button Selecting the desired SCENE template Front panel Remote control Notes • If you do not carry out any operation within 30 seconds from the SCENE template library and assign the templates to...If you can select the desired SCENE templates from the last operation in the front panel display. 3 seconds 3 seconds 1 or 1 Front panel Remote control English 1 Flashes DVD Viewing 33 En Select the desired SCENE template 2 Rotate the HINPUT selector (or set the input source of the currently...
.... 1 or 1 SCENE template library (Image) 1 Assign the SCENE template to the SCENE button Selecting the desired SCENE template Front panel Remote control Notes • If you do not carry out any operation within 30 seconds from the SCENE template library and assign the templates to...If you can select the desired SCENE templates from the last operation in the front panel display. 3 seconds 3 seconds 1 or 1 Front panel Remote control English 1 Flashes DVD Viewing 33 En Select the desired SCENE template 2 Rotate the HINPUT selector (or set the input source of the currently...
MCXSP10 Manual
Page 39
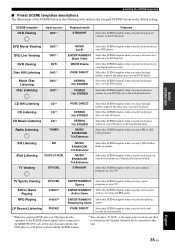
... CD player has the capability of the SCENE control signals and is stationed in the Yamaha Universal Dock connected to the REMOTE OUT jack of the SCENE button in the following table indicate the assigned SCENE buttons in a Yamaha iPod universal dock. SCENE template DVD Viewing 1 Input source DVD*1 DVD Movie Viewing DVD...
... CD player has the capability of the SCENE control signals and is stationed in the Yamaha Universal Dock connected to the REMOTE OUT jack of the SCENE button in the following table indicate the assigned SCENE buttons in a Yamaha iPod universal dock. SCENE template DVD Viewing 1 Input source DVD*1 DVD Movie Viewing DVD...
MCXSP10 Manual
Page 40
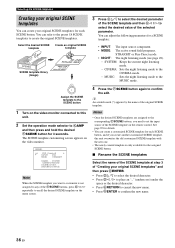
The SCENE template customizing screen appears on the remote control. y An asterisk mark (*) appears by the name of the SCENE template on the video monitor. [ SCENE1 .p DVD Viewing [ INPUT: DVD MODE: STRAIGHT NIGHT: SYSTEM [...
The SCENE template customizing screen appears on the remote control. y An asterisk mark (*) appears by the name of the SCENE template on the video monitor. [ SCENE1 .p DVD Viewing [ INPUT: DVD MODE: STRAIGHT NIGHT: SYSTEM [...
MCXSP10 Manual
Page 41
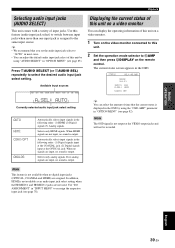
... DVR V-AUX DTV/CBL DVD MD/CD-R TUNER CD XM PHONO INPUT: DVD Currently selected input source y The corresponding input selector button on the remote control for the currently selected input source lights up for approximately 5 seconds after you play back a CD encoded in DTS. See page 42 for... page 54 for details about the currently selected sound field program in the front panel display for details. If you press any buttons on the remote control, showing which source component is currently being operated. 3 Start playback on your CD player before the playback (see page 61 for a few ...
... DVR V-AUX DTV/CBL DVD MD/CD-R TUNER CD XM PHONO INPUT: DVD Currently selected input source y The corresponding input selector button on the remote control for the currently selected input source lights up for approximately 5 seconds after you play back a CD encoded in DTS. See page 42 for... page 54 for details about the currently selected sound field program in the front panel display for details. If you press any buttons on the remote control, showing which source component is currently being operated. 3 Start playback on your CD player before the playback (see page 61 for a few ...
MCXSP10 Manual
Page 43
... a video monitor You can select the amount of time that you set the audio input jack select to KAMP and then press ODISPLAY on the remote control. In addition, HDMI is assigned to select the desired audio input jack select setting. English 39 En
... a video monitor You can select the amount of time that you set the audio input jack select to KAMP and then press ODISPLAY on the remote control. In addition, HDMI is assigned to select the desired audio input jack select setting. English 39 En
MCXSP10 Manual
Page 44
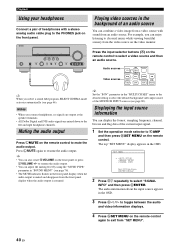
... PURE DIRECT AUDIO SELECT INPUT OPTIMIZER MIC VIDEO AUX SILENT CINEMA EFFECT S VIDEO VIDEO L AUDIO R OPTICAL Press the input selector buttons (A) on the remote control to KAMP and then press NSET MENU on the front panel or press JVOLUME +/- Notes • When you select a sound field program, SILENT...video sources in the OSD. 3 Press Dl / h to toggle between the audio and video information displays. 4 Press NSET MENU on the remote control again to exit from a video source with a stereo analog audio cable plug to the left and right headphone channels. For example, you...
... PURE DIRECT AUDIO SELECT INPUT OPTIMIZER MIC VIDEO AUX SILENT CINEMA EFFECT S VIDEO VIDEO L AUDIO R OPTICAL Press the input selector buttons (A) on the remote control to KAMP and then press NSET MENU on the front panel or press JVOLUME +/- Notes • When you select a sound field program, SILENT...video sources in the OSD. 3 Press Dl / h to toggle between the audio and video information displays. 4 Press NSET MENU on the remote control again to exit from a video source with a stereo analog audio cable plug to the left and right headphone channels. For example, you...

