MCXSP10 Manual
Page 5
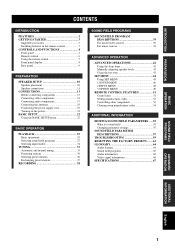
... FUNCTIONS 4 Front panel 4 Remote control 6 Using the remote control 7 Front panel display 8 Rear panel 9 PREPARATION SPEAKER SETUP 10 Speaker placement 10 Speaker connections 11 CONNECTIONS 13 Before connecting components 13 Connecting video components 14 Connecting audio components 17 Connecting ...48 3 OPTION MENU 49 REMOTE CONTROL FEATURES 51 Control area 51 Setting manufacturer codes 52 Controlling other components 53 Clearing setup manufacturer codes 54 ADDITIONAL INFORMATION EDITING SOUND FIELD PARAMETERS ......55 What is a sound field 55 Changing parameter settings 55...
... FUNCTIONS 4 Front panel 4 Remote control 6 Using the remote control 7 Front panel display 8 Rear panel 9 PREPARATION SPEAKER SETUP 10 Speaker placement 10 Speaker connections 11 CONNECTIONS 13 Before connecting components 13 Connecting video components 14 Connecting audio components 17 Connecting ...48 3 OPTION MENU 49 REMOTE CONTROL FEATURES 51 Control area 51 Setting manufacturer codes 52 Controlling other components 53 Clearing setup manufacturer codes 54 ADDITIONAL INFORMATION EDITING SOUND FIELD PARAMETERS ......55 What is a sound field 55 Changing parameter settings 55...

MCXSP10 Manual
Page 14
SPEAKER SETUP SPEAKER SETUP Speaker placement The speaker layout below ...front speakers. The distance of each speaker from each side of the LFE (lowfrequency effect) channel included in Dolby Digital and DTS software. Center speaker (C) The center speaker is not practical to use a ...center speaker, you can use of a subwoofer, such as directly over or under it to -back transitions. Place the speaker centrally between the front speakers and as close to the monitor as possible, such as the YAMAHA...
SPEAKER SETUP SPEAKER SETUP Speaker placement The speaker layout below ...front speakers. The distance of each speaker from each side of the LFE (lowfrequency effect) channel included in Dolby Digital and DTS software. Center speaker (C) The center speaker is not practical to use a ...center speaker, you can use of a subwoofer, such as directly over or under it to -back transitions. Place the speaker centrally between the front speakers and as close to the monitor as possible, such as the YAMAHA...

MCXSP10 Manual
Page 15
...unnatural and lack bass. Connect the plain cable to the "-" (black) terminals. 10 mm (3/8") 5 Tighten the knob to connect the left channel (L), right channel (R), "+" (red) and "-" (black) properly. If the connections are faulty, no sound will use 6 ohm speakers, be heard from ...grooved, etc.) cable to prevent short circuits. 3 Unscrew the knob. 4 Insert one bare wire into the end of the corresponding terminal. PREPARATION SPEAKER SETUP Speaker connections Be sure to secure the wire. 3 4 5 Red: positive (+) Black: negative (-) ■ Banana plug connections (With the exception ...
...unnatural and lack bass. Connect the plain cable to the "-" (black) terminals. 10 mm (3/8") 5 Tighten the knob to connect the left channel (L), right channel (R), "+" (red) and "-" (black) properly. If the connections are faulty, no sound will use 6 ohm speakers, be heard from ...grooved, etc.) cable to prevent short circuits. 3 Unscrew the knob. 4 Insert one bare wire into the end of the corresponding terminal. PREPARATION SPEAKER SETUP Speaker connections Be sure to secure the wire. 3 4 5 Red: positive (+) Black: negative (-) ■ Banana plug connections (With the exception ...

MCXSP10 Manual
Page 16
... Connect surround speakers to these terminals. ■ SUB WOOFER jack Connect a subwoofer with built-in amplifier, such as the YAMAHA Active Servo Processing Subwoofer System, to this jack. ■ SURROUND BACK terminals Connect a surround back speaker to these terminals....you use only one or two speaker systems to either the FRONT A or B terminals. SURROUND - SPEAKER SETUP Subwoofer system 1 Front speakers (A) Right Left Surround speakers Right Left 2 3 6 7 (HTR-5750 U.S.A. FRONT - SURROUND BACK + Front speakers (B) 4 Center speaker 5 Surround back speaker ■ ...
... Connect surround speakers to these terminals. ■ SUB WOOFER jack Connect a subwoofer with built-in amplifier, such as the YAMAHA Active Servo Processing Subwoofer System, to this jack. ■ SURROUND BACK terminals Connect a surround back speaker to these terminals....you use only one or two speaker systems to either the FRONT A or B terminals. SURROUND - SPEAKER SETUP Subwoofer system 1 Front speakers (A) Right Left Surround speakers Right Left 2 3 6 7 (HTR-5750 U.S.A. FRONT - SURROUND BACK + Front speakers (B) 4 Center speaker 5 Surround back speaker ■ ...
MCXSP10 Manual
Page 26
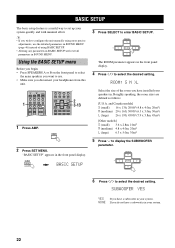
... sure you do not have a subwoofer in your system. 22 BASIC SETUP BASIC SETUP The basic setup feature is a useful way to enter BASIC SETUP. y • If you have a subwoofer in your system. SET MENU MENU A/B/C/D/E BASIC SETUP 3 Press SELECT to set up your speakers in SOUND MENU. Roughly ...the detailed parameters in SOUND MENU (page 46) instead of the room you wish to configure the unit manually using BASIC SETUP. • Altering any parameters in BASIC SETUP will reset all parameters in . SUBWOOFER YES YES If you want to select the desired setting. "BASIC...
... sure you do not have a subwoofer in your system. 22 BASIC SETUP BASIC SETUP The basic setup feature is a useful way to enter BASIC SETUP. y • If you have a subwoofer in your system. SET MENU MENU A/B/C/D/E BASIC SETUP 3 Press SELECT to set up your speakers in SOUND MENU. Roughly ...the detailed parameters in SOUND MENU (page 46) instead of the room you wish to configure the unit manually using BASIC SETUP. • Altering any parameters in BASIC SETUP will reset all parameters in . SUBWOOFER YES YES If you want to select the desired setting. "BASIC...

MCXSP10 Manual
Page 27
YES YES NO To complete the setup process if the test tone levels from each speaker in the front panel display. PRESET/CH SELECT SELECT 10 Press j / i to display SET/CANCEL. "CHECK:... from each speaker. 13 Press SELECT to display the SPEAKERS parameter. CHECK OK? PRESET/CH SELECT 8 Press j / i to confirm your selection. PRESET/CH SELECT BASIC SETUP 11 Press SELECT to select the number of each speaker were satisfactory. YES 12 Press j / i to select the desired setting. SPEAKERS 6spk If you selected...
YES YES NO To complete the setup process if the test tone levels from each speaker in the front panel display. PRESET/CH SELECT SELECT 10 Press j / i to display SET/CANCEL. "CHECK:... from each speaker. 13 Press SELECT to display the SPEAKERS parameter. CHECK OK? PRESET/CH SELECT 8 Press j / i to confirm your selection. PRESET/CH SELECT BASIC SETUP 11 Press SELECT to select the number of each speaker were satisfactory. YES 12 Press j / i to select the desired setting. SPEAKERS 6spk If you selected...

MCXSP10 Manual
Page 28
BASIC SETUP ■ To balance the speaker levels Perform the following steps after balancing the speakers. The indicator of the speaker currently outputting the test tone flashes ... between the front left and right speakers. SR-----||----- t 96 24 VCR V-AUX DTV/CBL DVD MD/CD-R TUNER CD FR MATRIX DISCRETE SILENT CINEMA VIRTUAL q DIGITAL SP A B NIGHT ZONE2 SLEEP q EX q PL q PL q PL x PCM HiFi DSP PTY HOLD AUTO TUNED STEREO MEMORY MUTE VOLUME PS PTY RT CT EON dB...
BASIC SETUP ■ To balance the speaker levels Perform the following steps after balancing the speakers. The indicator of the speaker currently outputting the test tone flashes ... between the front left and right speakers. SR-----||----- t 96 24 VCR V-AUX DTV/CBL DVD MD/CD-R TUNER CD FR MATRIX DISCRETE SILENT CINEMA VIRTUAL q DIGITAL SP A B NIGHT ZONE2 SLEEP q EX q PL q PL q PL x PCM HiFi DSP PTY HOLD AUTO TUNED STEREO MEMORY MUTE VOLUME PS PTY RT CT EON dB...

MCXSP10 Manual
Page 47
Please note that this operation will override the level adjustments made in "BASIC SETUP" (page 22), "SP LEVEL" (page 47) and "Using the test tone" (page 43). Press NEXT repeatedly to select the speaker you want to a music source. ... adjust. y This operation can use the test tone feature to set speaker levels so that this operation will override the level adjustments made in "BASIC SETUP" (page 22), "SP LEVEL" (page 47) and "Manually adjusting speaker levels" (page 43). Use the test tone to manually balance your speaker levels. ADVANCED OPERATION...
Please note that this operation will override the level adjustments made in "BASIC SETUP" (page 22), "SP LEVEL" (page 47) and "Using the test tone" (page 43). Press NEXT repeatedly to select the speaker you want to a music source. ... adjust. y This operation can use the test tone feature to set speaker levels so that this operation will override the level adjustments made in "BASIC SETUP" (page 22), "SP LEVEL" (page 47) and "Manually adjusting speaker levels" (page 43). Use the test tone to manually balance your speaker levels. ADVANCED OPERATION...

MCXSP10 Manual
Page 48
...of each speaker. 47 C)SP DISTANCE Adjusts the delay time of each parameter) to reflect the needs of your listening environment. ■ BASIC SETUP Use to quickly setup basic system parameters (see page 22). Locks sound field program parameters and other SET MENU settings. Page 48 49 3 OPTION MENU Use to... under each speaker. 47 D)CENTER GEQ Adjusts the tonal quality of the center speaker. 47 E)LFE LEVEL Adjusts the output level of the LFE channel for Dolby Digital or DTS signals. 47 G)AUDIO SET Customizes the muting level and audio delay. 48 2 INPUT MENU Use to reassign...
...of each speaker. 47 C)SP DISTANCE Adjusts the delay time of each parameter) to reflect the needs of your listening environment. ■ BASIC SETUP Use to quickly setup basic system parameters (see page 22). Locks sound field program parameters and other SET MENU settings. Page 48 49 3 OPTION MENU Use to... under each speaker. 47 D)CENTER GEQ Adjusts the tonal quality of the center speaker. 47 E)LFE LEVEL Adjusts the output level of the LFE channel for Dolby Digital or DTS signals. 47 G)AUDIO SET Customizes the muting level and audio delay. 48 2 INPUT MENU Use to reassign...
MCXSP10 Manual
Page 49
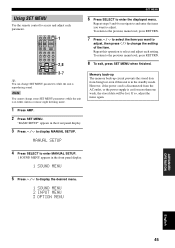
...to select and adjust each parameter. If so, adjust the items again. 4 Press SELECT to enter MANUAL SETUP. 1 SOUND MENU appears in the front panel display. 3 Press u / d to display MANUAL SETUP. MANUAL SETUP SET MENU 6 Press SELECT to the previous menu level, press RETURN. 8 To exit, press SET ...MENU when finished. Repeat this unit is in the standby mode. "BASIC SETUP" appears in the front panel display. 1 SOUND MENU 5 Press u / d to display the desired menu. 1 SOUND MENU 2 INPUT MENU 3 OPTION MENU ...
...to select and adjust each parameter. If so, adjust the items again. 4 Press SELECT to enter MANUAL SETUP. 1 SOUND MENU appears in the front panel display. 3 Press u / d to display MANUAL SETUP. MANUAL SETUP SET MENU 6 Press SELECT to the previous menu level, press RETURN. 8 To exit, press SET ...MENU when finished. Repeat this unit is in the standby mode. "BASIC SETUP" appears in the front panel display. 1 SOUND MENU 5 Press u / d to display the desired menu. 1 SOUND MENU 2 INPUT MENU 3 OPTION MENU ...

MCXSP10 Manual
Page 50
... the frequency signals are also directed to the subwoofer according to the speaker settings. The low-frequency signals of the surround channel are set automatically when you perform "BASIC SETUP" (see page 31) and automatically set the front speakers to SMALL). • Select BOTH if you connect a subwoofer... to the front left and right speakers. The unit directs the low-frequency signals of the LFE (lowfrequency effect) signals found in Dolby Digital or DTS sources. Surround back speaker SURR B Choices: LRG, SML, NONE • Select LRG if you have a large surround back speaker. •...
... the frequency signals are also directed to the subwoofer according to the speaker settings. The low-frequency signals of the surround channel are set automatically when you perform "BASIC SETUP" (see page 31) and automatically set the front speakers to SMALL). • Select BOTH if you connect a subwoofer... to the front left and right speakers. The unit directs the low-frequency signals of the LFE (lowfrequency effect) signals found in Dolby Digital or DTS sources. Surround back speaker SURR B Choices: LRG, SML, NONE • Select LRG if you have a large surround back speaker. •...

MCXSP10 Manual
Page 56
...Press the numeric buttons to enter the four digit manufacturer's code for the component to operate your component has more than one code, try to "LIST OF MANUFACTURER CODES" at the end of your YAMAHA component even if a YAMAHA manufacturer code is canceled. STEREO 1 HALL ...preset component (Library: component category) and the manufacturer code for more than 30 seconds during step 3, the setup process is initially set up for each area. Manufacturer YAMAHA YAMAHA YAMAHA YAMAHA - - - - - REMOTE CONTROL FEATURES Setting manufacturer codes You can be used. For a complete list...
...Press the numeric buttons to enter the four digit manufacturer's code for the component to operate your component has more than one code, try to "LIST OF MANUFACTURER CODES" at the end of your YAMAHA component even if a YAMAHA manufacturer code is canceled. STEREO 1 HALL ...preset component (Library: component category) and the manufacturer code for more than 30 seconds during step 3, the setup process is initially set up for each area. Manufacturer YAMAHA YAMAHA YAMAHA YAMAHA - - - - - REMOTE CONTROL FEATURES Setting manufacturer codes You can be used. For a complete list...

MCXSP10 Manual
Page 58
... VCR AMP 2 Press CODE SET using a ballpoint pen or similar object. y You can clear all setup manufacturer codes at once by entering the code number "9990". 54 REMOTE CONTROL FEATURES Clearing setup manufacturer codes ■ Clearing a setup manufacturer code for component control 1 Press an input selector button or / to clear the manufacturer code...
... VCR AMP 2 Press CODE SET using a ballpoint pen or similar object. y You can clear all setup manufacturer codes at once by entering the code number "9990". 54 REMOTE CONTROL FEATURES Clearing setup manufacturer codes ■ Clearing a setup manufacturer code for component control 1 Press an input selector button or / to clear the manufacturer code...

