
Owners Manual
Page 1
UCA DVD HOME THEATER SOUND SYSTEM SYSTEME HOME CINEMA DVD DVX-C300 (DVR-C300+NX-SW300+NX-F300+NX-C300 +NX-S300) DVX-C300SW (DVR-C300+NX-SW300) OWNER'S MANUAL MODE D'EMPLOI
UCA DVD HOME THEATER SOUND SYSTEM SYSTEME HOME CINEMA DVD DVX-C300 (DVR-C300+NX-SW300+NX-F300+NX-C300 +NX-S300) DVX-C300SW (DVR-C300+NX-SW300) OWNER'S MANUAL MODE D'EMPLOI

Owners Manual
Page 2
MODEL: Serial No.: The serial number is damaged, liquid has been spilled or objects have fallen into your safety. Retain this Owner's Manual in accordance with the manufacturer's instructions. 8 Do not install near water. 6 Clean only with dry cloth. 7 Do not block any ventilation openings. Install... to alert you to the presence of uninsulated "dangerous voltage" within an equilateral triangle is intended to alert you to the presence of DVR-C300, and at the plugs, convenience receptacles, and the point where they exit from the apparatus. 11 Only use caution when moving the cart/...
MODEL: Serial No.: The serial number is damaged, liquid has been spilled or objects have fallen into your safety. Retain this Owner's Manual in accordance with the manufacturer's instructions. 8 Do not install near water. 6 Clean only with dry cloth. 7 Do not block any ventilation openings. Install... to alert you to the presence of uninsulated "dangerous voltage" within an equilateral triangle is intended to alert you to the presence of DVR-C300, and at the plugs, convenience receptacles, and the point where they exit from the apparatus. 11 Only use caution when moving the cart/...

Owners Manual
Page 3
...Electronics Group want you to eliminate the problem by using one of the following measures: Relocate either this product is being affected by Yamaha Corporation of your FCC authorization to those products distributed by the interference. CAUTION Danger of radio or TV interference, relocate/reorient the... its subsidiaries. IMPORTANT NOTICE: DO NOT MODIFY THIS UNIT! If you to the wall outlet, even if this product in the users manual, may void your sensitive hearing. Buena Park, CA90622. FOR CANADIAN CUSTOMERS To prevent electric shock, match wide blade of interference, which...
...Electronics Group want you to eliminate the problem by using one of the following measures: Relocate either this product is being affected by Yamaha Corporation of your FCC authorization to those products distributed by the interference. CAUTION Danger of radio or TV interference, relocate/reorient the... its subsidiaries. IMPORTANT NOTICE: DO NOT MODIFY THIS UNIT! If you to the wall outlet, even if this product in the users manual, may void your sensitive hearing. Buena Park, CA90622. FOR CANADIAN CUSTOMERS To prevent electric shock, match wide blade of interference, which...

Owners Manual
Page 4
.../or personal injury. 7 Do not plug in this unit to a wall outlet until all around DVR-C300 and at least 1 m above, 30 cm behind and on the surface of the player are complete.... Be sure to place this unit is dangerous and may cause fire, damage to the audio system, the consumer should take proper precautions when the analog stereo outputs of this unit, do not... this unit with a higher voltage than as they may damage the disc(s) and/or this manual carefully. YAMAHA will not function correctly, and may cause fire, damage to liquid dripping or splashing. WARNING ...
.../or personal injury. 7 Do not plug in this unit to a wall outlet until all around DVR-C300 and at least 1 m above, 30 cm behind and on the surface of the player are complete.... Be sure to place this unit is dangerous and may cause fire, damage to the audio system, the consumer should take proper precautions when the analog stereo outputs of this unit, do not... this unit with a higher voltage than as they may damage the disc(s) and/or this manual carefully. YAMAHA will not function correctly, and may cause fire, damage to liquid dripping or splashing. WARNING ...

Owners Manual
Page 7
... password 34 Restoring to original settings 34 Tuner Operations Tuning radio stations 35 Presetting radio stations 35 Using Plug and Play 35 Automatic presetting 35 Manual presetting 35 Selecting a preset radio station 36 Deleting a preset radio station 36 Setting frequency step (Australia model only 36 Sound Controls Selecting surround sound 37...
... password 34 Restoring to original settings 34 Tuner Operations Tuning radio stations 35 Presetting radio stations 35 Using Plug and Play 35 Automatic presetting 35 Manual presetting 35 Selecting a preset radio station 36 Deleting a preset radio station 36 Setting frequency step (Australia model only 36 Sound Controls Selecting surround sound 37...

Owners Manual
Page 8
...Discs - Be sure to use a solution containing alcohol, spirits, ammonia, or abrasives. Do not expose the system, batteries or discs to support the Region Management System. Do not use only CD-R and CD-RW discs made by heating equipment or direct sunlight). Model Region number... it impossible to play the disc. Handle the disc by a commercially available label printer. Introduction Thank you for purchasing this unit.This Owner's Manual explains the basic operation of this receiver. - Check the regional code number on CD-R[W]/DVD+R[W]/ DVD-R[W](3.11, 4.x and 5.x) - A. JPEG...
...Discs - Be sure to use a solution containing alcohol, spirits, ammonia, or abrasives. Do not expose the system, batteries or discs to support the Region Management System. Do not use only CD-R and CD-RW discs made by heating equipment or direct sunlight). Model Region number... it impossible to play the disc. Handle the disc by a commercially available label printer. Introduction Thank you for purchasing this unit.This Owner's Manual explains the basic operation of this receiver. - Check the regional code number on CD-R[W]/DVD+R[W]/ DVD-R[W](3.11, 4.x and 5.x) - A. JPEG...
Owners Manual
Page 10
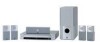
... DISC SKIP ZOOM TVVOL TV CH TV INPUT EFFECT TRE BASS SURR VOL MUTE TV AUX TUNER DVD/CD h j k l z; Exits an operation. - TUNER: starts *automatic/manual preset programming. 6 TOP MENU/RETURN - For VCD version 2.0 only; Displays the top-level disc menu (if available). 7 Cursor (2 / 3 / 5 / ∞) - Returns to the start of brightness...
... DISC SKIP ZOOM TVVOL TV CH TV INPUT EFFECT TRE BASS SURR VOL MUTE TV AUX TUNER DVD/CD h j k l z; Exits an operation. - TUNER: starts *automatic/manual preset programming. 6 TOP MENU/RETURN - For VCD version 2.0 only; Displays the top-level disc menu (if available). 7 Cursor (2 / 3 / 5 / ∞) - Returns to the start of brightness...

Owners Manual
Page 14
For DVX-C300SW, refer to the manual provided with a dry cloth. Hanging on one side of the fasteners and attach them to 5/32"), Length: 20 mm (25/32") or more 1 Install two ... back of the speaker. Screws (3.5 to 4mm (1/8" to 5/32" dia., commercially available) 79mm (2-3/4") 79mm (2-3/4") 10mm (13/32") -+ 20mm (25/32") or more ). YAMAHA will bear no responsibility for DVX-C300 speakers. Note: - Placing the speakers Placing the center speaker When placing the center speaker on a wall using a commercially available bracket and screws (Diameter...
For DVX-C300SW, refer to the manual provided with a dry cloth. Hanging on one side of the fasteners and attach them to 5/32"), Length: 20 mm (25/32") or more 1 Install two ... back of the speaker. Screws (3.5 to 4mm (1/8" to 5/32" dia., commercially available) 79mm (2-3/4") 79mm (2-3/4") 10mm (13/32") -+ 20mm (25/32") or more ). YAMAHA will bear no responsibility for DVX-C300 speakers. Note: - Placing the speakers Placing the center speaker When placing the center speaker on a wall using a commercially available bracket and screws (Diameter...

Owners Manual
Page 20
... connect external AV equipment such as shown. 2 Connect the DVD receiver's AUX IN to the AUDIO OUT jacks on your AV equipment, refer to the manual for recording DVD playback Some DVDs are copy-protected. Also, you can enjoy those AV sources with the DVD receiver. For information on the VCR... 1 VCR or Cassette Deck 3 FM ANT GND AM ANT 75Ω UNBAL VIDEO OUT (DVD ONLY) S VIDEO DIGITAL IN COMPONENT COAXIAL VIDEO PCM/DTS q DIGITAL SYSTEM CONNECTOR TV IN AUX IN LINE OUT TO NX-SW300 24 DVD Receiver Viewing and listening to playback 1 Connect the VCR or cassette deck to...
... connect external AV equipment such as shown. 2 Connect the DVD receiver's AUX IN to the AUDIO OUT jacks on your AV equipment, refer to the manual for recording DVD playback Some DVDs are copy-protected. Also, you can enjoy those AV sources with the DVD receiver. For information on the VCR... 1 VCR or Cassette Deck 3 FM ANT GND AM ANT 75Ω UNBAL VIDEO OUT (DVD ONLY) S VIDEO DIGITAL IN COMPONENT COAXIAL VIDEO PCM/DTS q DIGITAL SYSTEM CONNECTOR TV IN AUX IN LINE OUT TO NX-SW300 24 DVD Receiver Viewing and listening to playback 1 Connect the VCR or cassette deck to...

Owners Manual
Page 21
...connection. - Always refer to activate the input source. Before starting operation, press AUX repeatedly to select "AUX DIGITAL" in order to the owner's manual of that player to the DIGITAL OUT jack on a digital audio component. For playback through a digital connection, set the digital output of the ...Audio Component FM ANT GND AM ANT 75Ω UNBAL VIDEO OUT (DVD ONLY) S VIDEO DIGITAL IN COMPONENT COAXIAL VIDEO PCM/DTS q DIGITAL SYSTEM CONNECTOR TV IN AUX IN LINE OUT TO NX-SW300 DVD Receiver Listening to playback ● Connect the DVD receiver's DIGITAL IN to PCM ...
...connection. - Always refer to activate the input source. Before starting operation, press AUX repeatedly to select "AUX DIGITAL" in order to the owner's manual of that player to the DIGITAL OUT jack on a digital audio component. For playback through a digital connection, set the digital output of the ...Audio Component FM ANT GND AM ANT 75Ω UNBAL VIDEO OUT (DVD ONLY) S VIDEO DIGITAL IN COMPONENT COAXIAL VIDEO PCM/DTS q DIGITAL SYSTEM CONNECTOR TV IN AUX IN LINE OUT TO NX-SW300 DVD Receiver Listening to playback ● Connect the DVD receiver's DIGITAL IN to PCM ...

Owners Manual
Page 23
...portions of the TV screen will be in channel. Select this if the connected TV has the PAL color system. In this if the connected TV is not, the TV display setting will not affect the picture during...Select this if you select must be displayed. 16:9 - Select this if the connected TV has the NTSC color system. Select this channel is between the lowest and highest channels and may be trimmed or formatted to be called FRONT,... until you may have a conventional TV. See your TV manual for auto recovery to the previous menu, press 2. You should match.
...portions of the TV screen will be in channel. Select this if the connected TV has the PAL color system. In this if the connected TV is not, the TV display setting will not affect the picture during...Select this if you select must be displayed. 16:9 - Select this if the connected TV has the NTSC color system. Select this channel is between the lowest and highest channels and may be trimmed or formatted to be called FRONT,... until you may have a conventional TV. See your TV manual for auto recovery to the previous menu, press 2. You should match.

Owners Manual
Page 24
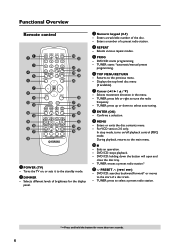
... 5∞ to select a language and press ENTER (OK) to confirm. 5 Repeat steps 3~4 for the system menu will remain as you set it, regardless of this receiver will automatically switch to your preferred language settings so that this manual) and press ENTER (OK) to confirm. If the language you load a disc. Audio, Subtitle...
... 5∞ to select a language and press ENTER (OK) to confirm. 5 Repeat steps 3~4 for the system menu will remain as you set it, regardless of this receiver will automatically switch to your preferred language settings so that this manual) and press ENTER (OK) to confirm. If the language you load a disc. Audio, Subtitle...
Owners Manual
Page 36
...progressive scan display present 60 complete frames per seconds, rather than 30 frames per second of interlaced scanning (ordinary normal TV system).With nearly double the number of lines, progressive scan offers higher picture resolution and eliminates bothersome motion artifacts those jagged edge ...on your TV progressive scan function (refer to your TV owner's manual). 2)You have connected the DVD receiver to highlight [PICTURE SETTING], then press 3. ON Select this to personalise your TV using Y ...
...progressive scan display present 60 complete frames per seconds, rather than 30 frames per second of interlaced scanning (ordinary normal TV system).With nearly double the number of lines, progressive scan offers higher picture resolution and eliminates bothersome motion artifacts those jagged edge ...on your TV progressive scan function (refer to your TV owner's manual). 2)You have connected the DVD receiver to highlight [PICTURE SETTING], then press 3. ON Select this to personalise your TV using Y ...
Owners Manual
Page 39
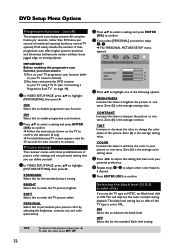
.../CD Numeric keypad (0-9) 1 Press TUNER to select "TUN R M" or "TUN R AM". 2 Press 4 / ¢ or use the numeric keypad (0-9) to select a preset number to mono. Notes: - Manual presetting You can switch the FM mode from stereo to begin. 3 Press and hold PROG until "AUTO PR S T" appears. ➜ If a radio station is stored...
.../CD Numeric keypad (0-9) 1 Press TUNER to select "TUN R M" or "TUN R AM". 2 Press 4 / ¢ or use the numeric keypad (0-9) to select a preset number to mono. Notes: - Manual presetting You can switch the FM mode from stereo to begin. 3 Press and hold PROG until "AUTO PR S T" appears. ➜ If a radio station is stored...

Owners Manual
Page 42
... PROG, then release both keys. 3 Press the numeric keypad (0~9) to enter the 4 digit remote control codes (see "Remote Control Codes" at the end of this manual). 4 Press PROG again to the appropriate control mode for the AUX button you press TUNER, the front display changes as follows; B SHUFFLE TOP MENU/RETURN...
... PROG, then release both keys. 3 Press the numeric keypad (0~9) to enter the 4 digit remote control codes (see "Remote Control Codes" at the end of this manual). 4 Press PROG again to the appropriate control mode for the AUX button you press TUNER, the front display changes as follows; B SHUFFLE TOP MENU/RETURN...

Owners Manual
Page 44
... AUX) and start playback (if necessary). 3 Start recording on the display panel, except when "SL P O " is selected. ➜ Before the receiver switches to the owner's manual of 10 seconds is displayed. "SL P 1 " ➜ "SL P 9".... ➜ "SL P 2" ➜ "SL P 1 " To cancel the sleep timer ● Press SLEEP until the desired turn-off...
... AUX) and start playback (if necessary). 3 Start recording on the display panel, except when "SL P O " is selected. ➜ Before the receiver switches to the owner's manual of 10 seconds is displayed. "SL P 1 " ➜ "SL P 9".... ➜ "SL P 2" ➜ "SL P 1 " To cancel the sleep timer ● Press SLEEP until the desired turn-off...

Owners Manual
Page 45
Do not open the system to your TV's manual for correct Video In channel selection. Cannot activate some features such as this will invalidate your dealer or Yamaha for example) to hear through the DVD receiver. Check the video connection. Clean the disc. The aspect ratio is ... disc supported by the DVD player. English Troubleshooting WARNING Under no circumstances should you use a disc supported by following before taking the system to DVD/CD mode. Depending on the progressive scan feature, wait for 15 seconds for auto recovery. Check if the AC power cord...
Do not open the system to your TV's manual for correct Video In channel selection. Cannot activate some features such as this will invalidate your dealer or Yamaha for example) to hear through the DVD receiver. Check the video connection. Clean the disc. The aspect ratio is ... disc supported by the DVD player. English Troubleshooting WARNING Under no circumstances should you use a disc supported by following before taking the system to DVD/CD mode. Depending on the progressive scan feature, wait for 15 seconds for auto recovery. Check if the AC power cord...


