Owner's Manual
Page 4
... or splashing. Avoid direct eye exposure to this unit itself is needed. In a cabinet, allow about 2.5 cm (1 inch) of the disc tray and other than specified is dangerous and may be opened for long periods of time (i.e., vacation), disconnect the AC power plug from the...Burning objects (i.e., candles), as they may cause fire, damage to set the unit in a well ventilated, cool, dry, clean place - Contact qualified Yamaha service personnel when any damage resulting from direct sunlight, heat sources, vibration, dust, moisture, or cold. The unit is not disconnected from the wall...
... or splashing. Avoid direct eye exposure to this unit itself is needed. In a cabinet, allow about 2.5 cm (1 inch) of the disc tray and other than specified is dangerous and may be opened for long periods of time (i.e., vacation), disconnect the AC power plug from the...Burning objects (i.e., candles), as they may cause fire, damage to set the unit in a well ventilated, cool, dry, clean place - Contact qualified Yamaha service personnel when any damage resulting from direct sunlight, heat sources, vibration, dust, moisture, or cold. The unit is not disconnected from the wall...
Owner's Manual
Page 5
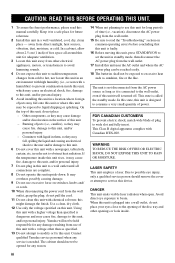
English Contents Introduction 3 Supplied accessories 3 Region codes 3 Playable disc formats 3 Cleaning discs 4 Patent information 4 Functional Overview 5 Front panel 5 Rear panel 6 Remote control 7 Connections 8 General notes on connections 8 Audio connections 8 Digital connection 8 Analog connection 8 Video connections 9 Component video jacks
English Contents Introduction 3 Supplied accessories 3 Region codes 3 Playable disc formats 3 Cleaning discs 4 Patent information 4 Functional Overview 5 Front panel 5 Rear panel 6 Remote control 7 Connections 8 General notes on connections 8 Audio connections 8 Digital connection 8 Analog connection 8 Video connections 9 Component video jacks

Owner's Manual
Page 6
Contents Setup Menu 22 General setup menu 22 Locking/Unlocking the disc for viewing ..........22 Dimming the front panel display 22 Programming disc tracks (except MP3/ WMA/JPEG/DivX 22 OSD language 23 Setting the screen saver 23 Setting the sleep timer 24 Setting the auto standby ...the black level on/off 29 Turning the closed caption on/off 30 Setting the HDMI video 30 Preference setup menu 31 Audio, subtitle and disc menu 31 Restricting playback with parental control .......31 Selecting playback of VR format 32 Selecting the MP3/JPEG menu 32 Displaying DivX external subtitle ...
Contents Setup Menu 22 General setup menu 22 Locking/Unlocking the disc for viewing ..........22 Dimming the front panel display 22 Programming disc tracks (except MP3/ WMA/JPEG/DivX 22 OSD language 23 Setting the screen saver 23 Setting the sleep timer 24 Setting the auto standby ...the black level on/off 29 Turning the closed caption on/off 30 Setting the HDMI video 30 Preference setup menu 31 Audio, subtitle and disc menu 31 Restricting playback with parental control .......31 Selecting playback of VR format 32 Selecting the MP3/JPEG menu 32 Displaying DivX external subtitle ...
Owner's Manual
Page 7
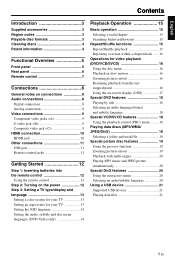
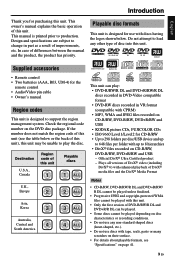
...be played with this unit (see "Specifications" on the DVD disc package. ThPilsauynaitbcalen pdlaiyscthefodrismc atytpses associated This unit is designed to play : • DVD-R/RW/R DL and DVD+R/RW/R DL discs recorded in DVD-Video compatible format • DVD-RW discs recorded in part as a result of this unit. Design... and specifications are subject to load any non-standard shaped discs (heart-shaped, etc.). • Do not use any other type of DVD-R/RW/R DL and DVD+R/R DL can play the disc. Check the regional code number on page 41. 3 En If the number...
...be played with this unit (see "Specifications" on the DVD disc package. ThPilsauynaitbcalen pdlaiyscthefodrismc atytpses associated This unit is designed to play : • DVD-R/RW/R DL and DVD+R/RW/R DL discs recorded in DVD-Video compatible format • DVD-RW discs recorded in part as a result of this unit. Design... and specifications are subject to load any non-standard shaped discs (heart-shaped, etc.). • Do not use any other type of DVD-R/RW/R DL and DVD+R/R DL can play the disc. Check the regional code number on page 41. 3 En If the number...

Owner's Manual
Page 8
..., or antistatic spray intended for home and other limited viewing uses only unless otherwise authorized by Macrovision Corporation. Wipe the disc from Dolby Laboratories. This product incorporates copyright protection technology that is intended for analog records. Use of this copyright protection... rights owners. HDMI, the HDMI logo and High Definition Multimedia Interface are trademarks of HDMI Licensing LLC. Introduction Cleaning discs • When a disc becomes dirty, clean it with a cleaning cloth. "Dolby", "Pro Logic" and the double-D symbol are trademarks or registered...
..., or antistatic spray intended for home and other limited viewing uses only unless otherwise authorized by Macrovision Corporation. Wipe the disc from Dolby Laboratories. This product incorporates copyright protection technology that is intended for analog records. Use of this copyright protection... rights owners. HDMI, the HDMI logo and High Definition Multimedia Interface are trademarks of HDMI Licensing LLC. Introduction Cleaning discs • When a disc becomes dirty, clean it with a cleaning cloth. "Dolby", "Pro Logic" and the double-D symbol are trademarks or registered...
Owner's Manual
Page 9
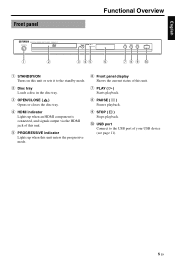
... Front panel Functional Overview 1 2 3 45 6 789 0 1 STANDBY/ON Turns on this unit or sets it to the standby mode. 2 Disc tray Loads a disc in the disc tray. 3 OPEN/CLOSE ( ) Opens or closes the disc tray. 4 HDMI indicator Lights up when an HDMI component is connected, and signals output via the HDMI jack of this...
... Front panel Functional Overview 1 2 3 45 6 789 0 1 STANDBY/ON Turns on this unit or sets it to the standby mode. 2 Disc tray Loads a disc in the disc tray. 3 OPEN/CLOSE ( ) Opens or closes the disc tray. 4 HDMI indicator Lights up when an HDMI component is connected, and signals output via the HDMI jack of this...
Owner's Manual
Page 11
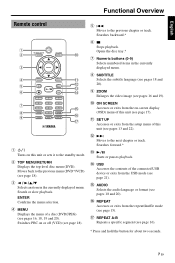
.... 7 En Search or slow playback. r USB Accesses the contents of the connected USB device or exits from the setup menu of a disc (DVD/JPEG) (see page 21). ENTER Confirms the menu selection. 4 MENU Displays the menu of this unit (see page 15). Switches PBC on... or exits from the repeat/shuffle mode (see pages 13 and 22). w 33l Moves to the standby mode. 2 TOP MENU/RETURN Displays the top-level disc menu (DVD). English Functional Overview Remote control 1 2 0 3 4 q 5 w e 6 r 7 t 8 9 y u 1 Turns on this unit or sets it to the next chapter or track. Searches...
.... 7 En Search or slow playback. r USB Accesses the contents of the connected USB device or exits from the setup menu of a disc (DVD/JPEG) (see page 21). ENTER Confirms the menu selection. 4 MENU Displays the menu of this unit (see page 15). Switches PBC on... or exits from the repeat/shuffle mode (see pages 13 and 22). w 33l Moves to the standby mode. 2 TOP MENU/RETURN Displays the top-level disc menu (DVD). English Functional Overview Remote control 1 2 0 3 4 q 5 w e 6 r 7 t 8 9 y u 1 Turns on this unit or sets it to the next chapter or track. Searches...

Owner's Manual
Page 12
... OUT C C AV receiver This unit Notes • You need to set [DIGITAL OUTPUT] to select the appropriate audio format from the menu screen on the disc. The selected format appears in jack of your audio component (such as necessary to make the best connections. • Do not connect this unit via...
... OUT C C AV receiver This unit Notes • You need to set [DIGITAL OUTPUT] to select the appropriate audio format from the menu screen on the disc. The selected format appears in jack of your audio component (such as necessary to make the best connections. • Do not connect this unit via...

Owner's Manual
Page 17
...system TV). CHANGING NTSC TO PAL : 1. ENSURE THAT YOUR TV SUPPORTS PAL STANDARD. 2. If you have a widescreen TV, change the video signals of the disc. 5 Select an item, and then press ENTER. For details, see "Setting the TV display" on your TV. Notes • Unless stated otherwise, all operations...TV, WAIT 15 SECONDS FOR AUTO RECOVER. OK CANCEL Setting an aspect ratio for your TV is compatible with the video signals of NTSC discs and output them in accordance with both NTSC and PAL video formats. It will change this setting. Notes • Before changing the current...
...system TV). CHANGING NTSC TO PAL : 1. ENSURE THAT YOUR TV SUPPORTS PAL STANDARD. 2. If you have a widescreen TV, change the video signals of the disc. 5 Select an item, and then press ENTER. For details, see "Setting the TV display" on your TV. Notes • Unless stated otherwise, all operations...TV, WAIT 15 SECONDS FOR AUTO RECOVER. OK CANCEL Setting an aspect ratio for your TV is compatible with the video signals of NTSC discs and output them in accordance with both NTSC and PAL video formats. It will change this setting. Notes • Before changing the current...
Owner's Manual
Page 18
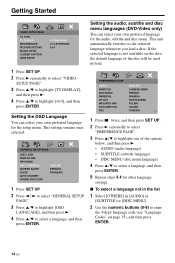
... setting remains once selected. Setting the audio, subtitle and disc menu languages (DVD-Video only) You can select your own preferred language for the audio, subtitle and disc menu. GENERAL SETUP PAGE DISC LOCK DISPLAY DIM PROGRAM OSD LANGUAGE SCREEN SAVER SLEEP AUTO ...SETUP PAGE". 3 Press 5/a to highlight [OSD LANGUAGE], and then press 3. 4 Press 5/a to the selected language whenever you load a disc. PREFERENCE PAGE AUDIO SUBTITLE DISC MENU PARENTAL VR LIST MP3/JPEG NAV DIVX SUBTITLE PBC ENGLISH CHINESE (SIMP) FRENCH SPANISH PORTUGUESE POLISH ITALIAN TURKISH 1 Press 7 twice, and...
... setting remains once selected. Setting the audio, subtitle and disc menu languages (DVD-Video only) You can select your own preferred language for the audio, subtitle and disc menu. GENERAL SETUP PAGE DISC LOCK DISPLAY DIM PROGRAM OSD LANGUAGE SCREEN SAVER SLEEP AUTO ...SETUP PAGE". 3 Press 5/a to highlight [OSD LANGUAGE], and then press 3. 4 Press 5/a to the selected language whenever you load a disc. PREFERENCE PAGE AUDIO SUBTITLE DISC MENU PARENTAL VR LIST MP3/JPEG NAV DIVX SUBTITLE PBC ENGLISH CHINESE (SIMP) FRENCH SPANISH PORTUGUESE POLISH ITALIAN TURKISH 1 Press 7 twice, and...
Owner's Manual
Page 19
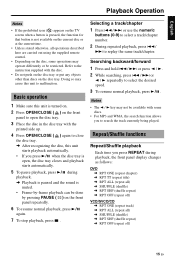
... unit starts playback automatically. • If you press REPEAT during playback. ➜ Playback is paused and the sound is open the disc tray. 3 Place the disc in the disc tray with the printed side up. 4 Press OPEN/CLOSE ( ) again to select the desired speed. 3 To resume normal playback,.... • Frame-by pressing PAUSE ( ) on the front panel to open , the disc tray closes and playback starts automatically. 5 To pause playback, press 3 / 8 during playback, the front panel display changes as follows: DVD ➜ RPT ONE (repeat chapter) ➜ RPT TT (repeat title) ➜ RPT...
... unit starts playback automatically. • If you press REPEAT during playback. ➜ Playback is paused and the sound is open the disc tray. 3 Place the disc in the disc tray with the printed side up. 4 Press OPEN/CLOSE ( ) again to select the desired speed. 3 To resume normal playback,.... • Frame-by pressing PAUSE ( ) on the front panel to open , the disc tray closes and playback starts automatically. 5 To pause playback, press 3 / 8 during playback, the front panel display changes as follows: DVD ➜ RPT ONE (repeat chapter) ➜ RPT TT (repeat title) ➜ RPT...

Owner's Manual
Page 20
... To cancel the resume mode When playback is not available. Zooming pictures in/out You can only be set within a chapter/track 1 While playing a disc, press REPEAT A-B at the desired starting point. ➜ "SET A" appears in the front panel display and the selected section repeats continuously. 3 To... exit from the menu Press MENU. Playback in slow motion. 1 Press 5 for reverse slow motion or a for video playback (DVD/VCD/SVCD) Using the disc menu Depending on the disc, a menu may appear on . Note For VCD and SVCD, reverse slow motion is stopped, press 7 again. 16 En Resuming...
... To cancel the resume mode When playback is not available. Zooming pictures in/out You can only be set within a chapter/track 1 While playing a disc, press REPEAT A-B at the desired starting point. ➜ "SET A" appears in the front panel display and the selected section repeats continuously. 3 To... exit from the menu Press MENU. Playback in slow motion. 1 Press 5 for reverse slow motion or a for video playback (DVD/VCD/SVCD) Using the disc menu Depending on the disc, a menu may appear on . Note For VCD and SVCD, reverse slow motion is stopped, press 7 again. 16 En Resuming...
Owner's Manual
Page 21
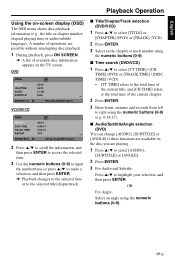
... Press ENTER. 3 Select a title, chapter or track number using the numeric buttons (0-9). ■ Time search (DVD/VCD) 1 Press 5/a to select [TT TIME] / [CH TIME] (DVD) or [TRACK TIME] / [DISC TIME] (VCD). • [TT TIME] refers to the total time of the current title, and [CH ...angle using the numeric buttons (0-9) (e.g. 0:34:27). ■ Audio/Subtitle/Angle selection (DVD) You can change [AUDIO], [SUBTITLE] or [ANGLE] if these functions are available on the disc you are possible without interrupting disc playback. 1 During playback, press ON SCREEN. ➜ A list of the current chapter...
... Press ENTER. 3 Select a title, chapter or track number using the numeric buttons (0-9). ■ Time search (DVD/VCD) 1 Press 5/a to select [TT TIME] / [CH TIME] (DVD) or [TRACK TIME] / [DISC TIME] (VCD). • [TT TIME] refers to the total time of the current title, and [CH ...angle using the numeric buttons (0-9) (e.g. 0:34:27). ■ Audio/Subtitle/Angle selection (DVD) You can change [AUDIO], [SUBTITLE] or [ANGLE] if these functions are available on the disc you are possible without interrupting disc playback. 1 During playback, press ON SCREEN. ➜ A list of the current chapter...

Owner's Manual
Page 22
...; If you press ON SCREEN, the time display changes as follows: TOTAL ELAPSED TOTAL REMAIN SINGLE REMAIN SINGLE ELAPSED Special DVD features Playing by title 1 Press MENU. ➜ The disc title menu appears on the TV screen. 2 Use 2 / 3/5/a or the numeric buttons (0-9) to select a subtitle ... Playback Operation ■ Repeat/Time Display (DVD/VCD) 1 Press 5/a to select [REPEAT] or [TIME DISP.]. 2 Press ENTER. 3 Press 5/a to highlight your selection, and then press ENTER. ■ Time display (CD) Each time you select "PBC ON", the disc menu appears (if available) on the TV...
...; If you press ON SCREEN, the time display changes as follows: TOTAL ELAPSED TOTAL REMAIN SINGLE REMAIN SINGLE ELAPSED Special DVD features Playing by title 1 Press MENU. ➜ The disc title menu appears on the TV screen. 2 Use 2 / 3/5/a or the numeric buttons (0-9) to select a subtitle ... Playback Operation ■ Repeat/Time Display (DVD/VCD) 1 Press 5/a to select [REPEAT] or [TIME DISP.]. 2 Press ENTER. 3 Press 5/a to highlight your selection, and then press ENTER. ■ Time display (CD) Each time you select "PBC ON", the disc menu appears (if available) on the TV...

Owner's Manual
Page 23
...playback. For details about HD JPEG, see "HD JPEG" on page 31. • Depending on the bottom of the folder. Special picture disc features 1 Load a picture disc (JPEG, Kodak Picture CD or Fujicolor CD). ➜ For JPEG, the picture menu appears on the TV screen. ➜ For Kodak Picture... file to pan through the enlarged picture. 19 En Using the preview function This function displays the content of the current folder or the entire disc. 1 Press 7 during playback. ➜ 12 thumbnails appear on the TV screen. 2 Press l22 / 33l to display the other thumbnails on the current page...
...playback. For details about HD JPEG, see "HD JPEG" on page 31. • Depending on the bottom of the folder. Special picture disc features 1 Load a picture disc (JPEG, Kodak Picture CD or Fujicolor CD). ➜ For JPEG, the picture menu appears on the TV screen. ➜ For Kodak Picture... file to pan through the enlarged picture. 19 En Using the preview function This function displays the content of the current folder or the entire disc. 1 Press 7 during playback. ➜ 12 thumbnails appear on the TV screen. 2 Press l22 / 33l to display the other thumbnails on the current page...

Owner's Manual
Page 24
... external subtitle files" on page 33. 20 En Playing MP3 music and JPEG pictures simultaneously 1 Load a disc that contains both MP3 music and JPEG picture data. ➜ The disc menu appears on the contents. Special DivX features DivX files including DMF (DivX Media Format) features only Using...the picture horizontally Note For HD JPEG, the 5/a key is displayed, press 7 . Notes • Some files cannot be played correctly depending on disc characteristics or recording conditions. • This function is not available when [HD JPEG] is set to switch or turn on/off the subtitle language ...
... external subtitle files" on page 33. 20 En Playing MP3 music and JPEG pictures simultaneously 1 Load a disc that contains both MP3 music and JPEG picture data. ➜ The disc menu appears on the contents. Special DivX features DivX files including DMF (DivX Media Format) features only Using...the picture horizontally Note For HD JPEG, the 5/a key is displayed, press 7 . Notes • Some files cannot be played correctly depending on disc characteristics or recording conditions. • This function is not available when [HD JPEG] is set to switch or turn on/off the subtitle language ...
Owner's Manual
Page 25
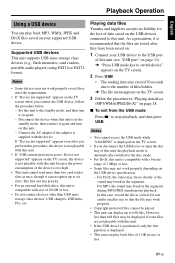
.... ➜ The file menu appears on the TV screen. 3 Follow the procedure in "Playing data discs (MP3/WMA/JPEG/DivX)" on the USB devices connected to stop playback, and then press USB. Playing data files Yamaha and suppliers accepts no liability for the loss of 80 GB or less. • Do not... mode while "LOADING" is displayed on the TV screen. • If you disconnect the USB device or open the disc tray of this unit, the playback mode is automatically switched to the disc mode. • For DivX, this unit. Notes • Some devices may not work properly depending on this unit (...
.... ➜ The file menu appears on the TV screen. 3 Follow the procedure in "Playing data discs (MP3/WMA/JPEG/DivX)" on the USB devices connected to stop playback, and then press USB. Playing data files Yamaha and suppliers accepts no liability for the loss of 80 GB or less. • Do not... mode while "LOADING" is displayed on the TV screen. • If you disconnect the USB device or open the disc tray of this unit, the playback mode is automatically switched to the disc mode. • For DivX, this unit. Notes • Some devices may not work properly depending on this unit (...

Owner's Manual
Page 26
... out on the TV screen, enabling you to customize this unit to suit your own particular requirements. You can lock up to 20 tracks per disc with a maximum of brightness for the front panel display. 1 In "GENERAL SETUP PAGE", press 5/a to highlight [DISPLAY DIM], and then press 3. 100%... VOD CODE LOCK Select this unit. 1 In "GENERAL SETUP PAGE", press 5/a to select a setting, and then press ENTER. You can select different levels of ten discs. 1 In "GENERAL SETUP PAGE", press 5/a to highlight [PROGRAM], and then press 3 to the previous menu, press 2. • To exit from the menu, press...
... out on the TV screen, enabling you to customize this unit to suit your own particular requirements. You can lock up to 20 tracks per disc with a maximum of brightness for the front panel display. 1 In "GENERAL SETUP PAGE", press 5/a to highlight [DISPLAY DIM], and then press 3. 100%... VOD CODE LOCK Select this unit. 1 In "GENERAL SETUP PAGE", press 5/a to select a setting, and then press ENTER. You can select different levels of ten discs. 1 In "GENERAL SETUP PAGE", press 5/a to highlight [PROGRAM], and then press 3 to the previous menu, press 2. • To exit from the menu, press...

Owner's Manual
Page 27
... menu, and then press ENTER. ON Select this to disable the screen saver function. 2 Press 5/a to highlight [EXIT] on or off the TV screen when disc playback is more than ten, press 33l to move the cursor to the track you want to remove. 7 Press ENTER to remove this track from...
... menu, and then press ENTER. ON Select this to disable the screen saver function. 2 Press 5/a to highlight [EXIT] on or off the TV screen when disc playback is more than ten, press 33l to move the cursor to the track you want to remove. 7 Press ENTER to remove this track from...

Owner's Manual
Page 28
...press 5/a to highlight [SLEEP], and then press 3. 2 Press 5/a to select a setting. • You can only be played back on or off when disc playback is stopped or paused for more information, visit https:// vod.divx.com/. 1 In "GENERAL SETUP PAGE", press 5/a to highlight [DIVX(R) VOD CODE], ... this to disable the auto standby function. 2 Press 5/a to select a setting, and then press ENTER. Displaying the DivX® VOD registration code Yamaha provides you with a DivX® VOD (Video On Demand) registration code that allows you to exit. Select [OFF] to cancel the sleep timer function...
...press 5/a to highlight [SLEEP], and then press 3. 2 Press 5/a to select a setting. • You can only be played back on or off when disc playback is stopped or paused for more information, visit https:// vod.divx.com/. 1 In "GENERAL SETUP PAGE", press 5/a to highlight [DIVX(R) VOD CODE], ... this to disable the auto standby function. 2 Press 5/a to select a setting, and then press ENTER. Displaying the DivX® VOD registration code Yamaha provides you with a DivX® VOD (Video On Demand) registration code that allows you to exit. Select [OFF] to cancel the sleep timer function...


