
Owner's Manual
Page 5
Introduction Region Codes 2 Supplied accessories 2 Notes about discs 2 Cleaning discs 2 Patent information 2 Functional Overview Front and Rear Panels 3 Remote Control 4 Preparation General Notes on connections 5 Digital Connections 5 Analog Connections 5 Video Connections 6 S-Video terminal
Introduction Region Codes 2 Supplied accessories 2 Notes about discs 2 Cleaning discs 2 Patent information 2 Functional Overview Front and Rear Panels 3 Remote Control 4 Preparation General Notes on connections 5 Digital Connections 5 Analog Connections 5 Video Connections 6 S-Video terminal
Owner's Manual
Page 6
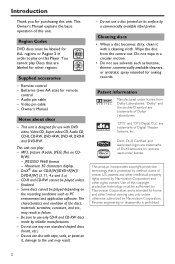
... other rights owners. Remote control - Audio pin cable - JPEG/ISO 9660 format - Maximum 30 characters display. - DivX® disc on CD- Do not use disc with DVD video, Video CD, Super video CD, Audio CD, CD-R, CD-RW, DVD+RW, DVD+R, DVD-R and DVD-RW. Use of ...by Macrovision Corporation and other limited viewing uses only unless otherwise authorized by Macrovision Corporation. "DTS" and "DTS Digital Out" are labeled for remote control - Be sure to play : - Patent information Manufactured under license. Do not wipe in failure. - Cleaning discs • When a...
... other rights owners. Remote control - Audio pin cable - JPEG/ISO 9660 format - Maximum 30 characters display. - DivX® disc on CD- Do not use disc with DVD video, Video CD, Super video CD, Audio CD, CD-R, CD-RW, DVD+RW, DVD+R, DVD-R and DVD-RW. Use of ...by Macrovision Corporation and other limited viewing uses only unless otherwise authorized by Macrovision Corporation. "DTS" and "DTS Digital Out" are labeled for remote control - Be sure to play : - Patent information Manufactured under license. Do not wipe in failure. - Cleaning discs • When a...
Owner's Manual
Page 8
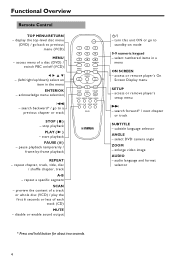
... 3 4 5 6 7 8 TOP MENU RETURN 0 MENU 9 ON SCREEN SETUP ENTER OK STOP PLAY PAUSE SUBTITLE ANGLE ZOOM AUDIO REPEAT A B SCAN MUTE DVD B/ | - access or remove player's setup menu T - audio language and format selector * Press and hold button for about two seconds. 4 select numbered...on /off (VCD) 1 2 3 4 - (left/right/up/down) select an item in a menu ON SCREEN - select DVD camera angle ZOOM - Functional Overview Remote Control TOP MENU/RETURN - pause playback temporarily / frame-by-frame playback REPEAT - repeat chapter, track, title, disc / shuffle chapter, ...
... 3 4 5 6 7 8 TOP MENU RETURN 0 MENU 9 ON SCREEN SETUP ENTER OK STOP PLAY PAUSE SUBTITLE ANGLE ZOOM AUDIO REPEAT A B SCAN MUTE DVD B/ | - access or remove player's setup menu T - audio language and format selector * Press and hold button for about two seconds. 4 select numbered...on /off (VCD) 1 2 3 4 - (left/right/up/down) select an item in a menu ON SCREEN - select DVD camera angle ZOOM - Functional Overview Remote Control TOP MENU/RETURN - pause playback temporarily / frame-by-frame playback REPEAT - repeat chapter, track, title, disc / shuffle chapter, ...
Owner's Manual
Page 11
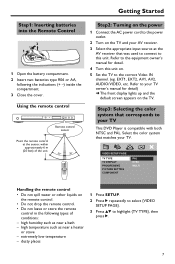
...DVD Player is compatible with both NTSC and PAL. high temperature such as near a heater or stove - VIDEO SETUP PAGE TV TYPE TV DISPLAY PROGRESSIVE PICTURE SETTING COMPONENT PAL NTSC MULTI Handling the remote control • Do not spill water or other liquids on the TV. Using the remote control Remote control sensor Point the remote control...; The front display lights up and the default screen appears on the remote control. • Do not drop the remote control. • Do not leave or store the remote control in the following the indications (+ -) inside the compartment. 3 Close ...
...DVD Player is compatible with both NTSC and PAL. high temperature such as near a heater or stove - VIDEO SETUP PAGE TV TYPE TV DISPLAY PROGRESSIVE PICTURE SETTING COMPONENT PAL NTSC MULTI Handling the remote control • Do not spill water or other liquids on the TV. Using the remote control Remote control sensor Point the remote control...; The front display lights up and the default screen appears on the remote control. • Do not drop the remote control. • Do not leave or store the remote control in the following the indications (+ -) inside the compartment. 3 Close ...
Owner's Manual
Page 14
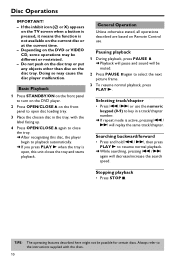
Depending on Remote Control use the numeric keypad (0-9) to key in the tray, with the discs. 10 General Operation Unless otherwise stated, all operations described are based on the DVD or VIDEO CD, some operations may cause the disc player malfunction. Searching backward/forward • Press and hold S / T, then press PLAY...other than disc on the current disc or at the current time. - Basic Playback 1 Press STANDBY/ON on the front panel to turn on the DVD player. 2 Press OPEN/CLOSE / on the front panel to open disc loading tray. 3 Place the chosen disc in a track/chapter number. &#...
Depending on Remote Control use the numeric keypad (0-9) to key in the tray, with the discs. 10 General Operation Unless otherwise stated, all operations described are based on the DVD or VIDEO CD, some operations may cause the disc player malfunction. Searching backward/forward • Press and hold S / T, then press PLAY...other than disc on the current disc or at the current time. - Basic Playback 1 Press STANDBY/ON on the front panel to turn on the DVD player. 2 Press OPEN/CLOSE / on the front panel to open disc loading tray. 3 Place the chosen disc in a track/chapter number. &#...
Owner's Manual
Page 17
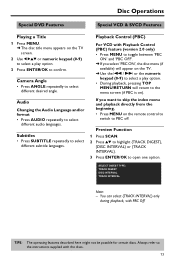
...and 'PBC OFF'. ➜ If you want to skip the index menu and playback directly from the beginning, • Press MENU on the remote control to switch to PBC off. Audio Changing the Audio Language and/or format • Press AUDIO repeatedly to open one option. Disc Operations Special... DVD Features Special VCD & SVCD Features Playing a Title 1 Press MENU. ➜ The disc title menu appears on ). Camera Angle • Press ANGLE ...
...and 'PBC OFF'. ➜ If you want to skip the index menu and playback directly from the beginning, • Press MENU on the remote control to switch to PBC off. Audio Changing the Audio Language and/or format • Press AUDIO repeatedly to open one option. Disc Operations Special... DVD Features Special VCD & SVCD Features Playing a Title 1 Press MENU. ➜ The disc title menu appears on ). Camera Angle • Press ANGLE ...
Owner's Manual
Page 18
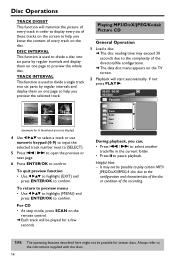
... these tracks on the screen to help you can; • Press S / T to divide a disc into six parts by regular intervals and display them on the remote control. ➜ Each track will start automatically. It may exceed 30 seconds due to the complexity of every track on the disc. To return to preview...
... these tracks on the screen to help you can; • Press S / T to divide a disc into six parts by regular intervals and display them on the remote control. ➜ Each track will start automatically. It may exceed 30 seconds due to the complexity of every track on the disc. To return to preview...
Owner's Manual
Page 32
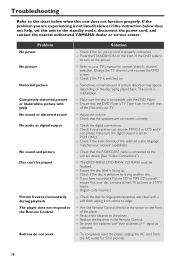
... standby mode, disconnect the power cord, and contact the nearest authorized YAMAHA dealer or service center. This is properly connected. - Check if your TV's manual for correct Video In channel selection. Replace the batteries in the Remote Control. - If the problem you are connected correctly. - Check the ...Distorted picture Completely distorted picture or black/white picture with a soft cloth wiping from the AC outlet for fingerprints/scratches and clean with DVD No sound or distorted sound No audio at least 10 pictures or 5 MP3 tracks. - Press the STANDBY/ON on the front of...
... standby mode, disconnect the power cord, and contact the nearest authorized YAMAHA dealer or service center. This is properly connected. - Check if your TV's manual for correct Video In channel selection. Replace the batteries in the Remote Control. - If the problem you are connected correctly. - Check the ...Distorted picture Completely distorted picture or black/white picture with a soft cloth wiping from the AC outlet for fingerprints/scratches and clean with DVD No sound or distorted sound No audio at least 10 pictures or 5 MP3 tracks. - Press the STANDBY/ON on the front of...