Owner's Manual
Page 3
... to use only high quality shielded cables. Since hearing damage from excessive volume levels. DO NOT STARE INTO BEAM OR VIEW DIRECTLY WITH OPTICAL INSTRUMENTS. Serial No CAUTION Use of controls or adjustments or performance of the following measures: Relocate either this product MUST be determined by turning the product "OFF" and "ON", please try to eliminate the problem by Yamaha may...
... to use only high quality shielded cables. Since hearing damage from excessive volume levels. DO NOT STARE INTO BEAM OR VIEW DIRECTLY WITH OPTICAL INSTRUMENTS. Serial No CAUTION Use of controls or adjustments or performance of the following measures: Relocate either this product MUST be determined by turning the product "OFF" and "ON", please try to eliminate the problem by Yamaha may...
Owner's Manual
Page 4
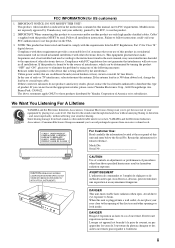
... batteries shall not be exposed to set the unit in standby mode, then disconnect the AC power plug from use this unit for any service is designed to liquid dripping or splashing. This Class B digital apparatus complies with a higher voltage than as they may be opened ...Install this unit. - This state is turned off. LASER Type Wave length Output Power Beam divergence Semiconductor laser GaAlAs 650 nm (DVD) 790 nm (VCD/CD) 1.45 mW (DVD) 1.13 mW (VCD/CD) 60 degrees iii It may overheat, possibly causing damage. 9 Do not use excessive force on this unit upside-down. YAMAHA...
... batteries shall not be exposed to set the unit in standby mode, then disconnect the AC power plug from use this unit for any service is designed to liquid dripping or splashing. This Class B digital apparatus complies with a higher voltage than as they may be opened ...Install this unit. - This state is turned off. LASER Type Wave length Output Power Beam divergence Semiconductor laser GaAlAs 650 nm (DVD) 790 nm (VCD/CD) 1.45 mW (DVD) 1.13 mW (VCD/CD) 60 degrees iii It may overheat, possibly causing damage. 9 Do not use excessive force on this unit upside-down. YAMAHA...

Owner's Manual
Page 5
... Connecting an AV receiver with 5.1ch/ digital input jacks 10 Video connections 11 Connecting the power cable 12 GETTING STARTED 13 Step 1: Inserting batteries into the remote control 13 Using the remote control 13 Step 2: Turning on the power 13 Step 3: Setting a TV type 14 Step 4: Setting a language preference ...... 15 Setting the OSD (On-Screen Display) language 15 Setting the audio, subtitle and disc menu languages 15 DISC OPERATION 16 Basic operation 16 Pausing playback 16 Selecting a track/chapter 16 Searching backward/forward 17 Repeat playback 17 Repeating playback...
... Connecting an AV receiver with 5.1ch/ digital input jacks 10 Video connections 11 Connecting the power cable 12 GETTING STARTED 13 Step 1: Inserting batteries into the remote control 13 Using the remote control 13 Step 2: Turning on the power 13 Step 3: Setting a TV type 14 Step 4: Setting a language preference ...... 15 Setting the OSD (On-Screen Display) language 15 Setting the audio, subtitle and disc menu languages 15 DISC OPERATION 16 Basic operation 16 Pausing playback 16 Selecting a track/chapter 16 Searching backward/forward 17 Repeat playback 17 Repeating playback...
Owner's Manual
Page 6
... TV display 31 Setting the TV type 31 Selecting the black level (U.S.A. and Canada models only 32 Setting the still mode 32 Selecting the progressive scan function 32 Switching the SCART video out (U.K. and Europe models only 33 Adjusting picture settings 33 HDMI setup menu 33 Setting the HDMI video 33 Selecting the wide screen format 34 Selecting the DVI output range 34 Setting the HDMI audio 35 DISC setup menu 35 Selecting the default audio/subtitle/ DVD menu language 35 Selecting an angle mark display 35 Selecting the PBC (playback control) function ... 35...
... TV display 31 Setting the TV type 31 Selecting the black level (U.S.A. and Canada models only 32 Setting the still mode 32 Selecting the progressive scan function 32 Switching the SCART video out (U.K. and Europe models only 33 Adjusting picture settings 33 HDMI setup menu 33 Setting the HDMI video 33 Selecting the wide screen format 34 Selecting the DVI output range 34 Setting the HDMI audio 35 DISC setup menu 35 Selecting the default audio/subtitle/ DVD menu language 35 Selecting an angle mark display 35 Selecting the PBC (playback control) function ... 35...

Owner's Manual
Page 10
... number or elapsed playing time. RANDOM ALL A B 7 1 P.SCAN indicator Lights up when the progressive scan function is activated. 2 Playback mode indicators Display the icon for the selected playback mode. 3 Decoder indicators Display the icon for the selected internal decoder. 4 MULTI indicator Lights up when playing the multi-channel audio source. 5 D.MIX indicator (DVD-Audio only) Lights up when playing the disc that allows down mixing of the front panel display using DIMMER on the remote control. 6 En FUNCTIONAL OVERVIEW Front panel display 1 2 3 45 2 SVCD WMA P.SCAN...
... number or elapsed playing time. RANDOM ALL A B 7 1 P.SCAN indicator Lights up when the progressive scan function is activated. 2 Playback mode indicators Display the icon for the selected playback mode. 3 Decoder indicators Display the icon for the selected internal decoder. 4 MULTI indicator Lights up when playing the multi-channel audio source. 5 D.MIX indicator (DVD-Audio only) Lights up when playing the disc that allows down mixing of the front panel display using DIMMER on the remote control. 6 En FUNCTIONAL OVERVIEW Front panel display 1 2 3 45 2 SVCD WMA P.SCAN...

Owner's Manual
Page 13
...i AUDIO DIRECT Switches the video output on -screen display (OSD) menu of a disc. l ZOOM Enlarges the video image. ; This function is not available for HDMI output. k RETURN Returns to program disc tracks or exit from the on or off during playback. d A-B Repeats a specific segment. English e MENU Accesses the menu of this unit. t AUDIO Selects the audio language or format. g SLOW / SEARCH (22 / 33) Searches backward or forward. h PLAY ( 3 ) Starts playback. ANGLE Selects the DVD camera angle. o MULTI / 2CH Selects a sound mode: Stereo or Multi-channel...
...i AUDIO DIRECT Switches the video output on -screen display (OSD) menu of a disc. l ZOOM Enlarges the video image. ; This function is not available for HDMI output. k RETURN Returns to program disc tracks or exit from the on or off during playback. d A-B Repeats a specific segment. English e MENU Accesses the menu of this unit. t AUDIO Selects the audio language or format. g SLOW / SEARCH (22 / 33) Searches backward or forward. h PLAY ( 3 ) Starts playback. ANGLE Selects the DVD camera angle. o MULTI / 2CH Selects a sound mode: Stereo or Multi-channel...
Owner's Manual
Page 15
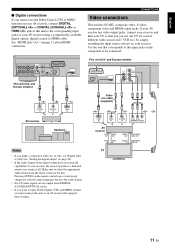
..., VCR etc.) by simply switching the input source selector on the disc. If your AV receiver has video output jacks, connect your receiver and then your TV so that you can use the Dolby Digital, DTS or MPEG function on your AV receiver, connect DIGITAL (OPTICAL) or DIGITAL (COAXIAL) or HDMI jack of this unit to select the appropriate audio format from the menu screen on your receiver. and Europe models) AV RS 232C ONTROL HDMI VIDEO...
..., VCR etc.) by simply switching the input source selector on the disc. If your AV receiver has video output jacks, connect your receiver and then your TV so that you can use the Dolby Digital, DTS or MPEG function on your AV receiver, connect DIGITAL (OPTICAL) or DIGITAL (COAXIAL) or HDMI jack of this unit to select the appropriate audio format from the menu screen on your receiver. and Europe models) AV RS 232C ONTROL HDMI VIDEO...

Owner's Manual
Page 16
... achieve a better video image by connecting the component output jacks of this unit directly to the component input jacks of your TV. ■ SCART terminal (U.K. and Europe models only) If your AV receiver, and then to those of each jack when you can use an HDMI-DVI converter cable in addition to this connection because no audio signals are complete, plug the supplied power cable into MAINS...
... achieve a better video image by connecting the component output jacks of this unit directly to the component input jacks of your TV. ■ SCART terminal (U.K. and Europe models only) If your AV receiver, and then to those of each jack when you can use an HDMI-DVI converter cable in addition to this connection because no audio signals are complete, plug the supplied power cable into MAINS...

Owner's Manual
Page 17
... it toward the remote control sensor. The batteries inserted in accordance with new ones. • Do not use old batteries together with your TV for details. 4 Press STANDBY/ON on the front panel or POWER ( l ) on the remote control to an AC outlet. 2 Turn on your AV receiver for details). ➜ The default screen appears on the power 1 Make sure that the power cable is not used for more...
... it toward the remote control sensor. The batteries inserted in accordance with new ones. • Do not use old batteries together with your TV for details. 4 Press STANDBY/ON on the front panel or POWER ( l ) on the remote control to an AC outlet. 2 Turn on your AV receiver for details). ➜ The default screen appears on the power 1 Make sure that the power cable is not used for more...
Owner's Manual
Page 18
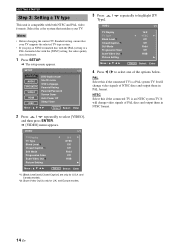
... U.S.A. VIDEO 1/1 TV Display TV Type Black Level*1 Closed Caption*1 Still Mode Progressive Scan Scart Video Out*2 Picture Setting 16:9 NTSC Off Off Field Off RGB Move : Return Select : Enter *1: [Black Level] and [Closed Caption] are only for U.K. It will change video signals of the options below. and Europe models. 14 En GETTING STARTED Step 3: Setting a TV type This unit is a PAL system TV. SETUP 1/2 GENERAL AUDIO SPEAKER VIDEO HDMI DISC Move : DVD-Audio mode SA-CD mode OSD Language Parental Rating Parental Password Screen Saver Auto Power...
... U.S.A. VIDEO 1/1 TV Display TV Type Black Level*1 Closed Caption*1 Still Mode Progressive Scan Scart Video Out*2 Picture Setting 16:9 NTSC Off Off Field Off RGB Move : Return Select : Enter *1: [Black Level] and [Closed Caption] are only for U.K. It will change video signals of the options below. and Europe models. 14 En GETTING STARTED Step 3: Setting a TV type This unit is a PAL system TV. SETUP 1/2 GENERAL AUDIO SPEAKER VIDEO HDMI DISC Move : DVD-Audio mode SA-CD mode OSD Language Parental Rating Parental Password Screen Saver Auto Power...
Owner's Manual
Page 25
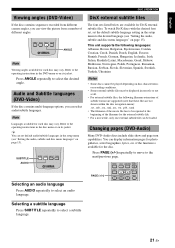
... default subtitle language setting in the setup menu to the operating instructions in the disc menu or on page 15). if the function is available for each disc may be played depending on disc characteristics or recording conditions. • Some external subtitle files may vary. PAGE (+/ ) DIMMER HDMI AUDIODIRECT STANDBY GROUP PAGE MULTI 2CH PROG Selecting an audio language Press AUDIO repeatedly to select the desired angle. Refer to be loaded. y You can view the picture from a number of subtitle format are supported...
... default subtitle language setting in the setup menu to the operating instructions in the disc menu or on page 15). if the function is available for each disc may be played depending on disc characteristics or recording conditions. • Some external subtitle files may vary. PAGE (+/ ) DIMMER HDMI AUDIODIRECT STANDBY GROUP PAGE MULTI 2CH PROG Selecting an audio language Press AUDIO repeatedly to select the desired angle. Refer to be loaded. y You can view the picture from a number of subtitle format are supported...

Owner's Manual
Page 30
...contain both DVD-Audio and DVD-Video contents. Notes • This setting is only available when no disc is loaded in the disc tray. • Selected mode becomes effective after you close the setup menu. SETUP MENU General setup menu SETUP GENERAL AUDIO SPEAKER VIDEO HDMI DISC Move : 1/2 DVD-Audio mode SA-CD mode OSD Language Parental Rating Parental Password Screen Saver Auto Power Off Sleep Timer Return Select : Enter Selecting DVD-Audio mode Some DVD-Audio discs contain the DVD-Video content in [GENERAL] menu. 2 Enter your old four-digit password using the numeric buttons...
...contain both DVD-Audio and DVD-Video contents. Notes • This setting is only available when no disc is loaded in the disc tray. • Selected mode becomes effective after you close the setup menu. SETUP MENU General setup menu SETUP GENERAL AUDIO SPEAKER VIDEO HDMI DISC Move : 1/2 DVD-Audio mode SA-CD mode OSD Language Parental Rating Parental Password Screen Saver Auto Power Off Sleep Timer Return Select : Enter Selecting DVD-Audio mode Some DVD-Audio discs contain the DVD-Video content in [GENERAL] menu. 2 Enter your old four-digit password using the numeric buttons...
Owner's Manual
Page 31
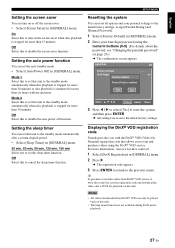
... initial factory settings, except [Parental Rating] and [Parental Password]. 1 Select [Factory Default] in [GENERAL] menu. 2 Enter your four-digit password using the DivX® VOD service. Setting the sleep timer You can turn on this unit. Off Select this to cancel the sleep timer function. Off Select this to disable the auto power off the screen saver. • Select [Screen Saver] in [GENERAL] menu. Off Select this to disable the screen saver function. Mode 1 Select this to set this unit to the standby mode automatically when disc playback is stopped...
... initial factory settings, except [Parental Rating] and [Parental Password]. 1 Select [Factory Default] in [GENERAL] menu. 2 Enter your four-digit password using the DivX® VOD service. Setting the sleep timer You can turn on this unit. Off Select this to cancel the sleep timer function. Off Select this to disable the auto power off the screen saver. • Select [Screen Saver] in [GENERAL] menu. Off Select this to disable the screen saver function. Mode 1 Select this to set this unit to the standby mode automatically when disc playback is stopped...
Owner's Manual
Page 36
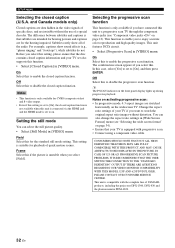
... without distortion. Off Select this to disable the closed caption function. Setting the still mode You can also change the aspect ratio settings in [Wide Screen Format] menu (see "Component video jacks " on . Selecting the progressive scan function This function is only available if you select [Field]. On Select this to disable the progressive scan function. IN CASE OF 525 OR 625 PROGRESSIVE SCAN PICTURE PROBLEMS, IT IS RECOMMENDED THAT THE USER SWITCH THE CONNECTION TO THE "STANDARD DEFINITION" OUTPUT. Subtitles rarely show sound effects (e.g., "phone...
... without distortion. Off Select this to disable the closed caption function. Setting the still mode You can also change the aspect ratio settings in [Wide Screen Format] menu (see "Component video jacks " on . Selecting the progressive scan function This function is only available if you select [Field]. On Select this to disable the progressive scan function. IN CASE OF 525 OR 625 PROGRESSIVE SCAN PICTURE PROBLEMS, IT IS RECOMMENDED THAT THE USER SWITCH THE CONNECTION TO THE "STANDARD DEFINITION" OUTPUT. Subtitles rarely show sound effects (e.g., "phone...

Owner's Manual
Page 37
Control range: 0 to +6 Contrast Set this to output composite video signals. HDMI setup menu SETUP GENERAL AUDIO SPEAKER VIDEO HDMI DISC Move : 1/1 HDMI Video Wide Screen Format DVI Output Range HDMI Audio Return Select : Enter Setting the HDMI video You can adjust the resolution depending on the monitor you can define yourself. • Select [Picture Setting] in [VIDEO] menu. CVBS Select this to adjust the overall brightness of picture color settings that you are not available for HDMI output. • The [True Life] setting is only available for the intermediate...
Control range: 0 to +6 Contrast Set this to output composite video signals. HDMI setup menu SETUP GENERAL AUDIO SPEAKER VIDEO HDMI DISC Move : 1/1 HDMI Video Wide Screen Format DVI Output Range HDMI Audio Return Select : Enter Setting the HDMI video You can adjust the resolution depending on the monitor you can define yourself. • Select [Picture Setting] in [VIDEO] menu. CVBS Select this to adjust the overall brightness of picture color settings that you are not available for HDMI output. • The [True Life] setting is only available for the intermediate...
Owner's Manual
Page 38
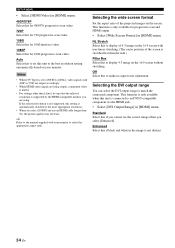
... display of the screen is stretched less than the side.) Pillar Box Select this unit to an DVI-D-compatible component via the HDMI jack. • Select [DVI Output Range] in [HDMI] menu. Selecting the DVI output range You can select the DVI output range to make no aspect ratio adjustment. NL Stretch Select this to match the connected component. Enhanced Select this for 1080 progressive-scan video. Notes • When [TV Type] is set this to [NTSC] or [PAL], video signals...
... display of the screen is stretched less than the side.) Pillar Box Select this unit to an DVI-D-compatible component via the HDMI jack. • Select [DVI Output Range] in [HDMI] menu. Selecting the DVI output range You can select the DVI output range to make no aspect ratio adjustment. NL Stretch Select this to match the connected component. Enhanced Select this for 1080 progressive-scan video. Notes • When [TV Type] is set this to [NTSC] or [PAL], video signals...

Owner's Manual
Page 39
...not want to display an angle mark. Selecting the PBC (playback control) function You can also use the MENU button on the remote control to on page 41. • Select [HDMI Audio] in [DISC] menu. English SETUP MENU Setting the HDMI audio Set the HDMI audio output to display a disc menu. Auto Select this unit is displayed continuously. DISC setup menu SETUP GENERAL AUDIO SPEAKER VIDEO HDMI DISC Move : 1/1 AUDIO Language Subtitle Language DVD Menu Language Angle Mark PBC Time Interval Return Select : Enter Selecting the default audio/subtitle/ DVD menu language These menus contain...
...not want to display an angle mark. Selecting the PBC (playback control) function You can also use the MENU button on the remote control to on page 41. • Select [HDMI Audio] in [DISC] menu. English SETUP MENU Setting the HDMI audio Set the HDMI audio output to display a disc menu. Auto Select this unit is displayed continuously. DISC setup menu SETUP GENERAL AUDIO SPEAKER VIDEO HDMI DISC Move : 1/1 AUDIO Language Subtitle Language DVD Menu Language Angle Mark PBC Time Interval Return Select : Enter Selecting the default audio/subtitle/ DVD menu language These menus contain...
Owner's Manual
Page 41
... the remote control. 4. Check that the resolution is not listed below or if the instruction below to change the setting to an HDCP-compatible component. Press on the power. Otherwise, follow the steps below to turn off this unit to open the disc tray. 2. Press CLEAR on the remote control to a progressive scan TV through the component video jacks. No picture Refer to the manual supplied with this unit to stop playback. 2. If [HDMI Video] is set...
... the remote control. 4. Check that the resolution is not listed below or if the instruction below to change the setting to an HDCP-compatible component. Press on the power. Otherwise, follow the steps below to turn off this unit to open the disc tray. 2. Press CLEAR on the remote control to a progressive scan TV through the component video jacks. No picture Refer to the manual supplied with this unit to stop playback. 2. If [HDMI Video] is set...
Owner's Manual
Page 42
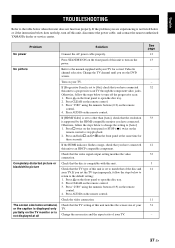
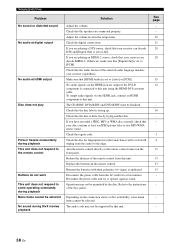
... digital connections. Check that the disc label is set to [All]. The CD-R/RW, DVD+R/RW and DVD-R/RW must be selected. Check that the audio format of the disc jacket. signs) as usual. TROUBLESHOOTING Problem No sound or distorted sound No audio at digital output No audio at HDMI output Disc does not play Picture freezes momentarily during DivX movies playback Solution Adjust the volume. Adjust the volume level in the remote control. Otherwise, make sure that your receiver capabilities. Reconnect the power cable...
... digital connections. Check that the disc label is set to [All]. The CD-R/RW, DVD+R/RW and DVD-R/RW must be selected. Check that the audio format of the disc jacket. signs) as usual. TROUBLESHOOTING Problem No sound or distorted sound No audio at digital output No audio at HDMI output Disc does not play Picture freezes momentarily during DivX movies playback Solution Adjust the volume. Adjust the volume level in the remote control. Otherwise, make sure that your receiver capabilities. Reconnect the power cable...
Owner's Manual
Page 44
... are six regions codes, which enable to distribute. channel ■ Progressive Scan A method of displaying all scanning lines in televisions. GLOSSARY ■ Interlace The most common type of scanning used on video CDs. It can control DVD software distribution only to about 10% of their original sizes, and works on digital photographs effectively. ■ MP3 (MPEG Audio Layer-3) An audio file compression technology. MPEG-2 offers S-VHS level video quality and...
... are six regions codes, which enable to distribute. channel ■ Progressive Scan A method of displaying all scanning lines in televisions. GLOSSARY ■ Interlace The most common type of scanning used on video CDs. It can control DVD software distribution only to about 10% of their original sizes, and works on digital photographs effectively. ■ MP3 (MPEG Audio Layer-3) An audio file compression technology. MPEG-2 offers S-VHS level video quality and...


