
Owner's Manual
Page 2
... a User Song 53 Deleting a Recorded Performance 54 Basic Techniques Basic DTX502 Operations 15 Striking the Drum Pads 16 Snare 16 Hi-hats 17 Cymbals 18 Selecting & Playing a Kit 19 Selecting a Kit 19 Adjusting Pad Sensitivity 19 Balancing Instrument Volumes 19 Building Your Own ...Unique Kits 20 Assigning Voices to a Computer 79 Making Connections 79 DTX502 Reference Manual 79 Reference Error Messages 80 Troubleshooting 81...
... a User Song 53 Deleting a Recorded Performance 54 Basic Techniques Basic DTX502 Operations 15 Striking the Drum Pads 16 Snare 16 Hi-hats 17 Cymbals 18 Selecting & Playing a Kit 19 Selecting a Kit 19 Adjusting Pad Sensitivity 19 Balancing Instrument Volumes 19 Building Your Own ...Unique Kits 20 Assigning Voices to a Computer 79 Making Connections 79 DTX502 Reference Manual 79 Reference Error Messages 80 Troubleshooting 81...
Owner's Manual
Page 6
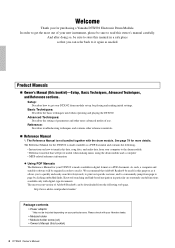
...Manual *: The Reference Manual is not bundled together with digital-type documents. Basic Techniques: Describes the basic techniques used for purchasing a Yamaha DTX502 Electronic Drum Module. See page 79 for more advanced modes of Adobe® Reader® can refer back to page by clicking ...operating and playing the DTX502. In order to get your DTX502 is made available in a safe place so that Adobe® Reader® be included depending on how to transfer kit data, song data, and audio data from the following . • Instructions on your Yamaha dealer. •...
...Manual *: The Reference Manual is not bundled together with digital-type documents. Basic Techniques: Describes the basic techniques used for purchasing a Yamaha DTX502 Electronic Drum Module. See page 79 for more advanced modes of Adobe® Reader® can refer back to page by clicking ...operating and playing the DTX502. In order to get your DTX502 is made available in a safe place so that Adobe® Reader® be included depending on how to transfer kit data, song data, and audio data from the following . • Instructions on your Yamaha dealer. •...
Owner's Manual
Page 7
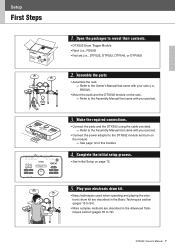
... (i.e., RS502). • Mount the pads and the DTX502 module on the module. See page 12 of this booklet. 4. DTX502 Owner's Manual 7 Play your kit DtX562K 1. Setup First Steps Setup 120 Select your electronic drum kit. • Basic techniques used when operating and playing ...the electronic drum kit are described in the Basic Techniques section (pages 15 to...
... (i.e., RS502). • Mount the pads and the DTX502 module on the module. See page 12 of this booklet. 4. DTX502 Owner's Manual 7 Play your kit DtX562K 1. Setup First Steps Setup 120 Select your electronic drum kit. • Basic techniques used when operating and playing ...the electronic drum kit are described in the Basic Techniques section (pages 15 to...
Owner's Manual
Page 8
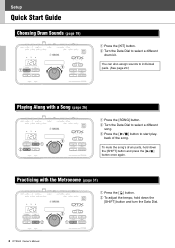
...sounds to select a different drum kit. w Turn the Data Dial to start play- Practicing with a Song (page 26) 120 w q e q Press the [SONG] button. back of the song. w To adjust the tempo, hold down the [SHIFT] button and turn the Data Dial. 8 DTX502 Owner's Manual e Press the... [ ] button to select a different song. Setup Quick Start Guide Choosing Drum Sounds (page 19) 120 w q q Press the [KIT] button. w Turn the Data Dial to individual pads. (See page 20...
...sounds to select a different drum kit. w Turn the Data Dial to start play- Practicing with a Song (page 26) 120 w q e q Press the [SONG] button. back of the song. w To adjust the tempo, hold down the [SHIFT] button and turn the Data Dial. 8 DTX502 Owner's Manual e Press the... [ ] button to select a different song. Setup Quick Start Guide Choosing Drum Sounds (page 19) 120 w q q Press the [KIT] button. w Turn the Data Dial to individual pads. (See page 20...
Owner's Manual
Page 9
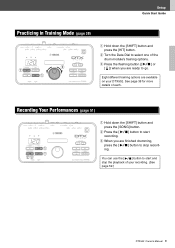
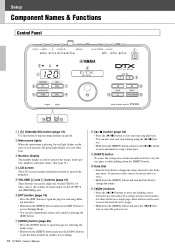
...Recording Your Performances (page 51) 120 q q we q Hold down the [SHIFT] button and press the [KIT] button. You can use the [ ] button to start recording. See page 38 for more details of your DTX502. e Press the flashing button ([ ] or [ ]) when you are finished drumming, press the [ ]...options. Eight different training options are ready to stop the playback of each. e When you are available on your recording. (See page 52.) DTX502 Owner's Manual 9 Setup Quick Start Guide Practicing in Training Mode (page 38) 120 w q q q Hold down the [SHIFT] button ...
...Recording Your Performances (page 51) 120 q q we q Hold down the [SHIFT] button and press the [KIT] button. You can use the [ ] button to start recording. See page 38 for more details of your DTX502. e Press the flashing button ([ ] or [ ]) when you are finished drumming, press the [ ]...options. Eight different training options are ready to stop the playback of each. e When you are available on your recording. (See page 52.) DTX502 Owner's Manual 9 Setup Quick Start Guide Practicing in Training Mode (page 38) 120 w q q q Hold down the [SHIFT] button ...
Owner's Manual
Page 10
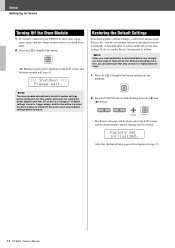
...the red light flashes on and off. u [SONG] button (page 26) • Press the [SONG] button to open the page for recording. 10 DTX502 Owner's Manual i[ ] button (page 26) • Press the [ ] button to start of sound output via the OUTPUT and [PHONES] jacks. ters...y u i o !0 !2 q t !1 !3 !4 !5 q [ ] (Standby/On) button (page 13) Use this button to turn the Data Dial to change the value selected by pressing the [KIT] button. the green light flashes on -screen items. If a setting area has more parame- t VOLUME [+] and [-] buttons (page 15) These buttons are used to move...
...the red light flashes on and off. u [SONG] button (page 26) • Press the [SONG] button to open the page for recording. 10 DTX502 Owner's Manual i[ ] button (page 26) • Press the [ ] button to start of sound output via the OUTPUT and [PHONES] jacks. ters...y u i o !0 !2 q t !1 !3 !4 !5 q [ ] (Standby/On) button (page 13) Use this button to turn the Data Dial to change the value selected by pressing the [KIT] button. the green light flashes on -screen items. If a setting area has more parame- t VOLUME [+] and [-] buttons (page 15) These buttons are used to move...

Owner's Manual
Page 13
..., DTXP4STD (DTXPRESS IV STD SET), DTXP4SP (DTXPRESS IV SP SET), DTXPL (DTXPLORER), DrumTrig, and UserTrig NOTE • Your drum kit's model number is set time has elapsed. DTX502 Owner's Manual 13 Press the [ ] (Standby/On) button. 2. Auto Power Off timer= 30min Initial Setup When you have connected... The Auto Power-Off function automatically turns off the DTX502 after a certain period of inactivity. Identify your drum kit using it. • If you expect your DTX502 to other audio equipment, we recommend that you turn on your DTX502 for the first time, the Initial Setup page will...
..., DTXP4STD (DTXPRESS IV STD SET), DTXP4SP (DTXPRESS IV SP SET), DTXPL (DTXPLORER), DrumTrig, and UserTrig NOTE • Your drum kit's model number is set time has elapsed. DTX502 Owner's Manual 13 Press the [ ] (Standby/On) button. 2. Auto Power Off timer= 30min Initial Setup When you have connected... The Auto Power-Off function automatically turns off the DTX502 after a certain period of inactivity. Identify your drum kit using it. • If you expect your DTX502 to other audio equipment, we recommend that you turn on your DTX502 for the first time, the Initial Setup page will...
Owner's Manual
Page 14
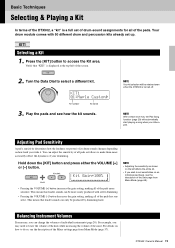
Setup Setting Up for Sound Turning Off the Drum Module 1. Press the [ ] (Standby/On) button. The Shutdown page will be displayed on those devices is turned down fully. 2. If you have connected your DTX502 to other audio equip- ment, ensure that the volume on the LCD screen, and the drum module will turn off. >>> Shutdown
Setup Setting Up for Sound Turning Off the Drum Module 1. Press the [ ] (Standby/On) button. The Shutdown page will be displayed on those devices is turned down fully. 2. If you have connected your DTX502 to other audio equip- ment, ensure that the volume on the LCD screen, and the drum module will turn off. >>> Shutdown
Owner's Manual
Page 19
...KIT1" is displayed at the top-left affects the entire kit. • If you can adjust the sensitivity of all of the pads less sensitive. This means that louder sounds can only be retained even when the DTX502 is a full set up. Balancing Instrument Volumes If ...necessary, you wish to make them more sensitive. Turn the Data Dial to access the Kit area. Basic Techniques Selecting & Playing a Kit In terms of the DTX502, a "kit" is turned off. You can change the volumes of individual instruments (page 20). Your drum module comes ...
...KIT1" is displayed at the top-left affects the entire kit. • If you can adjust the sensitivity of all of the pads less sensitive. This means that louder sounds can only be retained even when the DTX502 is a full set up. Balancing Instrument Volumes If ...necessary, you wish to make them more sensitive. Turn the Data Dial to access the Kit area. Basic Techniques Selecting & Playing a Kit In terms of the DTX502, a "kit" is turned off. You can change the volumes of individual instruments (page 20). Your drum module comes ...
Owner's Manual
Page 20
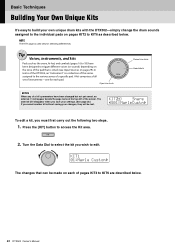
...(or sounds) depending on the zone of the pad that can be lost. Tip Voices, instruments, and kits Pads such as described below . 20 DTX502 Owner's Manual KIt2* Snare "S01:MapleCustm, To edit a kit, you wish to edit. KIt1 01:Maple Custom, The changes that is struck (see Input Sources on ... are described below . The asterisk will disappear when you save your settings. (See page 25.) If you select another kit without saving your own unique drum kits with the DTX502-simply change the drum sounds assigned to the individual pads on pages KIT2 to KIT6 as the snare, hi-hat, and...
...(or sounds) depending on the zone of the pad that can be lost. Tip Voices, instruments, and kits Pads such as described below . 20 DTX502 Owner's Manual KIt2* Snare "S01:MapleCustm, To edit a kit, you wish to edit. KIt1 01:Maple Custom, The changes that is struck (see Input Sources on ... are described below . The asterisk will disappear when you save your settings. (See page 25.) If you select another kit without saving your own unique drum kits with the DTX502-simply change the drum sounds assigned to the individual pads on pages KIT2 to KIT6 as the snare, hi-hat, and...
Owner's Manual
Page 21
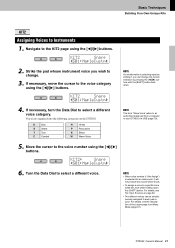
... buttons. Voices are organized into the following categories on page 29. • Two different voices can change . 3. If necessary, move the cursor to your DTX502 via USB (page 79). 5. K Kick S Snare T Tom C Cymbal H Hi-hat P Percussion E Effect W Wave Voice NOTE The term "Wave ..., 2. If necessary, turn the Data Dial to Instruments 1. KIt2* Snare "S01:MapleCustm, 6. Basic Techniques Building Your Own Unique Kits KIT2 Assigning Voices to select a different voice category. Navigate to select a different voice. Turn the Data Dial to the KIT2 page...
... buttons. Voices are organized into the following categories on page 29. • Two different voices can change . 3. If necessary, move the cursor to your DTX502 via USB (page 79). 5. K Kick S Snare T Tom C Cymbal H Hi-hat P Percussion E Effect W Wave Voice NOTE The term "Wave ..., 2. If necessary, turn the Data Dial to Instruments 1. KIt2* Snare "S01:MapleCustm, 6. Basic Techniques Building Your Own Unique Kits KIT2 Assigning Voices to select a different voice category. Navigate to select a different voice. Turn the Data Dial to the KIT2 page...

Owner's Manual
Page 22
... [SHIFT] button held down. Strike the pad whose instrument tuning or cymbal size you can change the tuning (i.e., pitch) of changing the cymbal size. 22 DTX502 Owner's Manual Basic Techniques Building Your Own Unique Kits KIT3 Tuning & Changing Cymbal Sizes 1. Navigate to the KIT3 page using the [] buttons. 2.
... [SHIFT] button held down. Strike the pad whose instrument tuning or cymbal size you can change the tuning (i.e., pitch) of changing the cymbal size. 22 DTX502 Owner's Manual Basic Techniques Building Your Own Unique Kits KIT3 Tuning & Changing Cymbal Sizes 1. Navigate to the KIT3 page using the [] buttons. 2.
Owner's Manual
Page 23
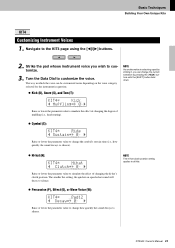
... Tom (T): NOTE As an alternative to the KIT4 page using the [] buttons. 2. Basic Techniques Building Your Own Unique Kits KIT4 Customizing Instrument Voices 1. DTX502 Owner's Manual 23 Navigate to selecting a pad by striking it, you wish to silence. NOTE The hi-hat clutch ...position setting applies to all kits. Percussion (P), Effect (E), or Wave Voice (W): KIt4* Pad12 " Decay=+ 0 , Raise or lower ...
... Tom (T): NOTE As an alternative to the KIT4 page using the [] buttons. 2. Basic Techniques Building Your Own Unique Kits KIT4 Customizing Instrument Voices 1. DTX502 Owner's Manual 23 Navigate to selecting a pad by striking it, you wish to silence. NOTE The hi-hat clutch ...position setting applies to all kits. Percussion (P), Effect (E), or Wave Voice (W): KIt4* Pad12 " Decay=+ 0 , Raise or lower ...

Owner's Manual
Page 24
Basic Techniques Building Your Own Unique Kits KIT5 Adjusting Instrument Volumes 1. Turn the data dial to the KIT6 page using the [] buttons. 2. Navigate to change the instrument volume. NOTE As an alternative ... change the current selection by pressing the [] buttons with the [SHIFT] button held down . KIT6 Adjusting the Stereo Panning of Instruments 1. KIt6* Snare " Pan= C 24 DTX502 Owner's Manual KIt5* Snare " Volume=110 , NOTE As an alternative to selecting a pad by striking it , you can change the current selection by pressing the...
Basic Techniques Building Your Own Unique Kits KIT5 Adjusting Instrument Volumes 1. Turn the data dial to the KIT6 page using the [] buttons. 2. Navigate to change the instrument volume. NOTE As an alternative ... change the current selection by pressing the [] buttons with the [SHIFT] button held down . KIT6 Adjusting the Stereo Panning of Instruments 1. KIt6* Snare " Pan= C 24 DTX502 Owner's Manual KIt5* Snare " Volume=110 , NOTE As an alternative to selecting a pad by striking it , you can change the current selection by pressing the...
Owner's Manual
Page 25
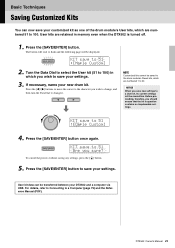
...Dial to 100. Press the [] buttons to move the cursor to flash and the following page will be displayed. DTX502 Owner's Manual 25 NOTE Customized kits cannot be transferred between your new drum kit. Press the [SAVE/ENTER] button once again. To cancel the process without saving any settings, press the [ ... you sure? Turn the Data Dial to select the User kit (51 to save your customized kit as one of the drum module's User kits, which are retained in memory even when the DTX502 is turned off. 1. If necessary, name your DTX502 and a computer via USB. Press the [SAVE/ENTER]...
...Dial to 100. Press the [] buttons to move the cursor to flash and the following page will be displayed. DTX502 Owner's Manual 25 NOTE Customized kits cannot be transferred between your new drum kit. Press the [SAVE/ENTER] button once again. To cancel the process without saving any settings, press the [ ... you sure? Turn the Data Dial to select the User kit (51 to save your customized kit as one of the drum module's User kits, which are retained in memory even when the DTX502 is turned off. 1. If necessary, name your DTX502 and a computer via USB. Press the [SAVE/ENTER]...
Owner's Manual
Page 26
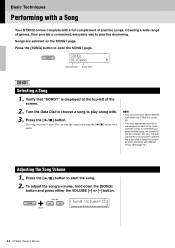
...the [ ] button to open the SONG1 page. You can , however, use the Kit Lock function to prevent this if you select another song, the current kit will be retained even when the DTX502 is turned off. • The most appropriate drum kit is displayed at the top-left of the drum module's songs, so... whenever you wish to keep the current kit when practicing with different songs. (See page 73...
...the [ ] button to open the SONG1 page. You can , however, use the Kit Lock function to prevent this if you select another song, the current kit will be retained even when the DTX502 is turned off. • The most appropriate drum kit is displayed at the top-left of the drum module's songs, so... whenever you wish to keep the current kit when practicing with different songs. (See page 73...
Owner's Manual
Page 29
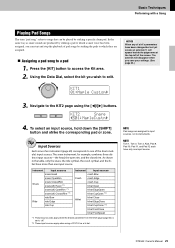
DTX502 Owner's Manual 29 NOTICE When any of a kit's parameters have only one input source. Basic Techniques Performing with a Song Playing Pad Songs The term "pad song" refers to songs that can start and stop the playback of pad songs by striking a specific drum pad. Press the [KIT] button to one ... Pad songs are assigned. Assigning a pad song to edit. In the same way as a hi-hat. Using the Data Dial, select the kit you save your settings. (See page 25.) KIt1 01:Maple Custom, 3. Navigate to the KIT2 page using a PCY100 as snare sounds are produced by ...
DTX502 Owner's Manual 29 NOTICE When any of a kit's parameters have only one input source. Basic Techniques Performing with a Song Playing Pad Songs The term "pad song" refers to songs that can start and stop the playback of pad songs by striking a specific drum pad. Press the [KIT] button to one ... Pad songs are assigned. Assigning a pad song to edit. In the same way as a hi-hat. Using the Data Dial, select the kit you save your settings. (See page 25.) KIt1 01:Maple Custom, 3. Navigate to the KIT2 page using a PCY100 as snare sounds are produced by ...
Owner's Manual
Page 31
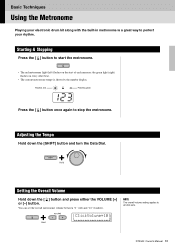
... the metronome. • The red metronome light (left) flashes on the start of each measure; Starting & Stopping Press the [ ] button to perfect your electronic drum kit along with the built-in metronome is shown by the number display. aClickVolume=10b c d Hold...
... the metronome. • The red metronome light (left) flashes on the start of each measure; Starting & Stopping Press the [ ] button to perfect your electronic drum kit along with the built-in metronome is shown by the number display. aClickVolume=10b c d Hold...
Owner's Manual
Page 38
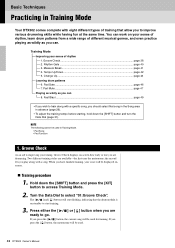
..., indicating that the drum module is on standby to improving your score will start training. 3. The [ ] and [ ] buttons will be used . 38 DTX502 Owner's Manual Measure Break page 41 4. Change Up ...page 44 Learning drum patterns 6. NOTE The following cannot be displayed onscreen. Training procedure 1. Turn...Song area in advance (page 26). • To adjust the training tempo before starting, hold down the [SHIFT] button and press the [KIT] button to improve various drumming skills while having fun at the same time. You can work on -screen how early or late you are...
..., indicating that the drum module is on standby to improving your score will start training. 3. The [ ] and [ ] buttons will be used . 38 DTX502 Owner's Manual Measure Break page 41 4. Change Up ...page 44 Learning drum patterns 6. NOTE The following cannot be displayed onscreen. Training procedure 1. Turn...Song area in advance (page 26). • To adjust the training tempo before starting, hold down the [SHIFT] button and press the [KIT] button to improve various drumming skills while having fun at the same time. You can work on -screen how early or late you are...
Owner's Manual
Page 40
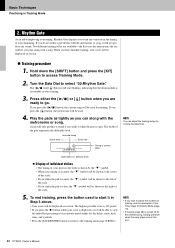
... will be used for the hi-hat, snare, kick, toms, and cymbals. • Press the [SAVE/ENTER] button to return to the end. 40 DTX502 Owner's Manual To end training, press the button used to select "02:Rhythm Gate". Two different training styles are If you press the [ ] button, the...used . 4. If you press the [ ] button, the current song will be displayed on -screen any sound. Hold down the [SHIFT] button and press the [KIT] button to go. ] or [ ] button when you have finished training, your score will be shown to start it while the gate is displayed, you strike...
... will be used for the hi-hat, snare, kick, toms, and cymbals. • Press the [SAVE/ENTER] button to return to the end. 40 DTX502 Owner's Manual To end training, press the button used to select "02:Rhythm Gate". Two different training styles are If you press the [ ] button, the...used . 4. If you press the [ ] button, the current song will be displayed on -screen any sound. Hold down the [SHIFT] button and press the [KIT] button to go. ] or [ ] button when you have finished training, your score will be shown to start it while the gate is displayed, you strike...


