
Owner's Manual
Page 2
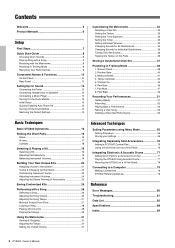
... Turning Off the Drum Module 14 Restoring the Default Settings 14 Customizing the Metronome 32 Selecting a Click Set 32 Setting the Tempo 33 Setting the Time Signature 33 Setting the Timer 33 Setting Individual Volumes 34 Changing Sounds for All Subdivisions 34 Changing Sounds for Individual Subdivisions 35 Tuning Click-Set Sounds 36 Tapping the Tempo on a Hi-Hat Stand 78 Connecting to a Computer 79 Making Connections 79 DTX502 Reference Manual 79 Reference Error Messages 80 Troubleshooting 81 Data List 83 Specifications 88 Index 89 2 DTX502 Owner's Manual...
... Turning Off the Drum Module 14 Restoring the Default Settings 14 Customizing the Metronome 32 Selecting a Click Set 32 Setting the Tempo 33 Setting the Time Signature 33 Setting the Timer 33 Setting Individual Volumes 34 Changing Sounds for All Subdivisions 34 Changing Sounds for Individual Subdivisions 35 Tuning Click-Set Sounds 36 Tapping the Tempo on a Hi-Hat Stand 78 Connecting to a Computer 79 Making Connections 79 DTX502 Reference Manual 79 Reference Error Messages 80 Troubleshooting 81 Data List 83 Specifications 88 Index 89 2 DTX502 Owner's Manual...
Owner's Manual
Page 3
... Part 15 of Equipment : DRUM TRIGGER MODULE Model Name : DTX502 This device complies with an amplifier and headphones or speaker/s, may void your area. Modifications not expressly approved by Yamaha may be determined by turning the unit "OFF" and "ON", please try to eliminate the problem by using one described in this product become damaged beyond repair, or for the battery being charged is a rechargeable type...
... Part 15 of Equipment : DRUM TRIGGER MODULE Model Name : DTX502 This device complies with an amplifier and headphones or speaker/s, may void your area. Modifications not expressly approved by Yamaha may be determined by turning the unit "OFF" and "ON", please try to eliminate the problem by using one described in this product become damaged beyond repair, or for the battery being charged is a rechargeable type...
Owner's Manual
Page 4
... . 4 DTX502 Owner's Manual DMI-5 1/2 Do not open the instrument or attempt to rain, use the provided screws only. PRECAUTIONS PLEASE READ CAREFULLY BEFORE PROCEEDING Please keep this manual in the outlet. • When removing the electric plug from the instrument or an outlet, always hold the plug itself and not the cord. Pulling by qualified Yamaha service personnel. When attaching the stand or rack, use it...
... . 4 DTX502 Owner's Manual DMI-5 1/2 Do not open the instrument or attempt to rain, use the provided screws only. PRECAUTIONS PLEASE READ CAREFULLY BEFORE PROCEEDING Please keep this manual in the outlet. • When removing the electric plug from the instrument or an outlet, always hold the plug itself and not the cord. Pulling by qualified Yamaha service personnel. When attaching the stand or rack, use it...
Owner's Manual
Page 5
... files, MIDI files, WAVE data, musical scores and sound recordings. Details regarding any subsequently released models will be held responsible for all components. http://www.yamaha.com/ DMI-5 2/2 DTX502 Owner's Manual 5 This could cause physical injury to you or others, damage to the instrument or other property, or operational failure. • Do not rest your personal use. • This product incorporates and bundles computer programs...
... files, MIDI files, WAVE data, musical scores and sound recordings. Details regarding any subsequently released models will be held responsible for all components. http://www.yamaha.com/ DMI-5 2/2 DTX502 Owner's Manual 5 This could cause physical injury to you or others, damage to the instrument or other property, or operational failure. • Do not rest your personal use. • This product incorporates and bundles computer programs...
Owner's Manual
Page 6
... data, song data, and audio data from page to page by clicking embedded links. In order to get your new instrument, please be sure to read it allows you for purchasing a Yamaha DTX502 Electronic Drum Module. Keyword searching and link-based navigation in order to read this booklet) 6 DTX502 Owner's Manual See page 79 for playing and making music using the drum module and a computer • MIDI-related reference information Using PDF Manuals...
... data, song data, and audio data from page to page by clicking embedded links. In order to get your new instrument, please be sure to read it allows you for purchasing a Yamaha DTX502 Electronic Drum Module. Keyword searching and link-based navigation in order to read this booklet) 6 DTX502 Owner's Manual See page 79 for playing and making music using the drum module and a computer • MIDI-related reference information Using PDF Manuals...
Owner's Manual
Page 10
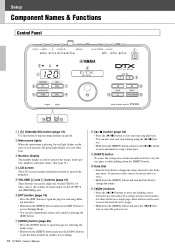
... set. e Number display The number display is playing, the red light flashes on and off. u [SONG] button (page 26) • Press the [SONG] button to open the page for selecting different songs. • Hold down the [SHIFT] button. !0 Data Dial • Turn the Data Dial to turn the Data Dial to change the value selected by pressing the [KIT] button. Setup Component Names & Functions Control Panel w e120 r wxyz{|} drums y u i o !0 !2 q t !1 !3 !4 !5 q [ ] (Standby/On) button (page 13) Use this button to change...
... set. e Number display The number display is playing, the red light flashes on and off. u [SONG] button (page 26) • Press the [SONG] button to open the page for selecting different songs. • Hold down the [SHIFT] button. !0 Data Dial • Turn the Data Dial to turn the Data Dial to change the value selected by pressing the [KIT] button. Setup Component Names & Functions Control Panel w e120 r wxyz{|} drums y u i o !0 !2 q t !1 !3 !4 !5 q [ ] (Standby/On) button (page 13) Use this button to change...
Owner's Manual
Page 11
...input jacks support three-zone pads • [oHI-HAT] This trigger input jack supports three-zone pads and stereo pads. Y-cable Mono audio jack !7 [HI-HAT CONTROL] jack This jack is used to connect an HH65 Hi-hat Controller or the [HI-HAT CONTROL] output jack of mono trigger inputs. Stereo audio plug Mono audio jack DTX502 Owner's Manual 11 see the illustration below.) When a KP65 Kick Pad is connected here, an additional mono pad can use this connector for advanced DTX502 settings. !4 [PHONES] jack Use this standard audio jack to connect a pair of stereo headphones. !5 [AUX...
...input jacks support three-zone pads • [oHI-HAT] This trigger input jack supports three-zone pads and stereo pads. Y-cable Mono audio jack !7 [HI-HAT CONTROL] jack This jack is used to connect an HH65 Hi-hat Controller or the [HI-HAT CONTROL] output jack of mono trigger inputs. Stereo audio plug Mono audio jack DTX502 Owner's Manual 11 see the illustration below.) When a KP65 Kick Pad is connected here, an additional mono pad can use this connector for advanced DTX502 settings. !4 [PHONES] jack Use this standard audio jack to connect a pair of stereo headphones. !5 [AUX...

Owner's Manual
Page 12
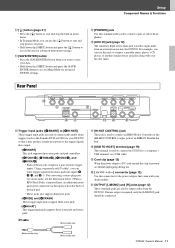
... time. The use each device's volume controller to balance its output with your drum module via the [AUX IN] (auxiliary input) stereo mini-jack. Standard 1/4" mono-audio jack Powered speakers 12 DTX502 Owner's Manual Ensure, therefore, that of audio to connect headphones or a DTXseries monitor system, such as the MS40DR. You can adjust the output volume using headphones at an extreme angle when wrapped around the cord clip to prevent it possible to stereo-mini cable Headphones Rear panel Portable music...
... time. The use each device's volume controller to balance its output with your drum module via the [AUX IN] (auxiliary input) stereo mini-jack. Standard 1/4" mono-audio jack Powered speakers 12 DTX502 Owner's Manual Ensure, therefore, that of audio to connect headphones or a DTXseries monitor system, such as the MS40DR. You can adjust the output volume using headphones at an extreme angle when wrapped around the cord clip to prevent it possible to stereo-mini cable Headphones Rear panel Portable music...

Owner's Manual
Page 13
... the first time, the Initial Setup page will automatically optimize the trigger output levels for all of time while connected to specify the following. Your drum kit's model number When you turn the volume on the drum module while holding down fully. 2. For details, see the description of the Auto Power-Off page from Menu Mode (page 66). Using the Data Dial, select how long the DTX502 should...
... the first time, the Initial Setup page will automatically optimize the trigger output levels for all of time while connected to specify the following. Your drum kit's model number When you turn the volume on the drum module while holding down fully. 2. For details, see the description of the Auto Power-Off page from Menu Mode (page 66). Using the Data Dial, select how long the DTX502 should...

Owner's Manual
Page 55
... Reverb Send (Voices Page 61 KitC3 Reverb Type Page 62 KitC4 Reverb Return Page 62 KitC5 Pad Control Page 62 KitC6 Snare Adjustment Page 62 KitC7 Tempo Page 62 KitC8 Trigger Setup Link Page 63 KitC9 MIDI Program Change Page 63 KitC10 MIDI Control Change Page 63 04: KitJob Area: Kit management KitJ1 Copy Pad Page 64 KitJ2 Clear User Kit Page 65 05: Pad Area: Pad-related settings Pad1 Hi-hat Splash Sensitivity...
... Reverb Send (Voices Page 61 KitC3 Reverb Type Page 62 KitC4 Reverb Return Page 62 KitC5 Pad Control Page 62 KitC6 Snare Adjustment Page 62 KitC7 Tempo Page 62 KitC8 Trigger Setup Link Page 63 KitC9 MIDI Program Change Page 63 KitC10 MIDI Control Change Page 63 04: KitJob Area: Kit management KitJ1 Copy Pad Page 64 KitJ2 Clear User Kit Page 65 05: Pad Area: Pad-related settings Pad1 Hi-hat Splash Sensitivity...
Owner's Manual
Page 56
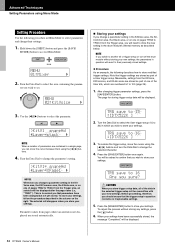
... to their settings. 1. Turn the Data Dial to 16 :[DtX522K ] 3. Use the [] buttons to select the parameter. >KitV1 snareHd "Layer=stack , NOTE When a number of parameters are stored automatically. Storing your new settings, the parameters in a single page, you wish to store your settings. The asterisk will be displayed. 56 DTX502 Owner's Manual tRG saVe to access Menu Mode. To rename the trigger setup, move the...
... to their settings. 1. Turn the Data Dial to 16 :[DtX522K ] 3. Use the [] buttons to select the parameter. >KitV1 snareHd "Layer=stack , NOTE When a number of parameters are stored automatically. Storing your new settings, the parameters in a single page, you wish to store your settings. The asterisk will be displayed. 56 DTX502 Owner's Manual tRG saVe to access Menu Mode. To rename the trigger setup, move the...

Owner's Manual
Page 57
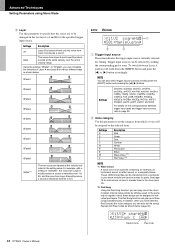
... details on their voice category. Trigger input sources can also select trigger input sources by striking the corresponding pad or zone. DTX502 Owner's Manual 57 Advanced Techniques Setting Parameters using Menu Mode 01: Mixer Area Mixer settings The Mixer area is applied Use the [] buttons to select an input group, and then turn the Data Dial to adjust its volume. Faders are displayed above each layer.) NOTE You can be selected by holding down...
... details on their voice category. Trigger input sources can also select trigger input sources by striking the corresponding pad or zone. DTX502 Owner's Manual 57 Advanced Techniques Setting Parameters using Menu Mode 01: Mixer Area Mixer settings The Mixer area is applied Use the [] buttons to select an input group, and then turn the Data Dial to adjust its volume. Faders are displayed above each layer.) NOTE You can be selected by holding down...
Owner's Manual
Page 58
... a sound at velocities from 1 to 127. NOTE You can play one of the drum module's internal songs simply by holding down the [SHIFT] button and press the [] button accordingly. Settings K S T C H P E W e Description Kick Snare Tom Cymbal Hi-hat Percussion Effect Wave Voice (*1) Pad Song (*2) NOTE *1: Wave voices A wave voice is turned off Layer B is an audio file containing, for editing. The Pad Song function can also select trigger input sources by striking a pad. In addition, when you have selected Pad Song as the voice category...
... a sound at velocities from 1 to 127. NOTE You can play one of the drum module's internal songs simply by holding down the [SHIFT] button and press the [] button accordingly. Settings K S T C H P E W e Description Kick Snare Tom Cymbal Hi-hat Percussion Effect Wave Voice (*1) Pad Song (*2) NOTE *1: Wave voices A wave voice is turned off Layer B is an audio file containing, for editing. The Pad Song function can also select trigger input sources by striking a pad. In addition, when you have selected Pad Song as the voice category...

Owner's Manual
Page 61
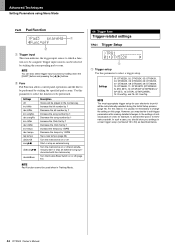
... Numbered alternate groups: Voices that apply to assign the voices produced by the specified trigger input source. Settings off or on NOTE Opening and closing of the KitV1 page. To adjust the reverb level for double bass drumming techniques. Advanced Techniques Setting Parameters using Menu Mode KitV12 Hold Mode >KitV12 snareHd q " HoldMode=off , w q Trigger input source See q Trigger input source from the same alternate group is already playing, the earlier voice will be played...
... Numbered alternate groups: Voices that apply to assign the voices produced by the specified trigger input source. Settings off or on NOTE Opening and closing of the KitV1 page. To adjust the reverb level for double bass drumming techniques. Advanced Techniques Setting Parameters using Menu Mode KitV12 Hold Mode >KitV12 snareHd q " HoldMode=off , w q Trigger input source See q Trigger input source from the same alternate group is already playing, the earlier voice will be played...
Owner's Manual
Page 66
... tempo tap tempo clkOn/Off song> clk&song> doubleBass Description Voices will be assigned. However, you should store your electronic drum kit will be performed. In such a case, you may decide to edit trigger parameters after making detailed changes to the settings of individual pads in order, for your settings in a User trigger setup (numbered 15 to 30) as described below. 66 DTX502 Owner's Manual Use this parameter to select the function to be played...
... tempo tap tempo clkOn/Off song> clk&song> doubleBass Description Voices will be assigned. However, you should store your electronic drum kit will be performed. In such a case, you may decide to edit trigger parameters after making detailed changes to the settings of individual pads in order, for your settings in a User trigger setup (numbered 15 to 30) as described below. 66 DTX502 Owner's Manual Use this parameter to select the function to be played...
Owner's Manual
Page 74
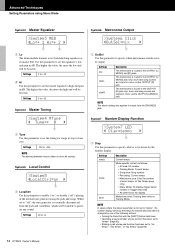
... the internal tone generator using the pads and songs. Settings 0 to +12 System4 Master Tuning >System4 Mtune " tune=+ 0 , q q Tune Use this parameter to enable ("on Tap Tempo page only) • Menu Mode: No display (trigger setup number in mono via the OUTPUT [L/MONO] jack. drum and song sounds are output in Trigger area only) • All other times: No display Metronome timer. NOTE In cases where the above parameter is not set to "off or on drum kit sounds. System5 Local Control...
... the internal tone generator using the pads and songs. Settings 0 to +12 System4 Master Tuning >System4 Mtune " tune=+ 0 , q q Tune Use this parameter to enable ("on Tap Tempo page only) • Menu Mode: No display (trigger setup number in mono via the OUTPUT [L/MONO] jack. drum and song sounds are output in Trigger area only) • All other times: No display Metronome timer. NOTE In cases where the above parameter is not set to "off or on drum kit sounds. System5 Local Control...
Owner's Manual
Page 79
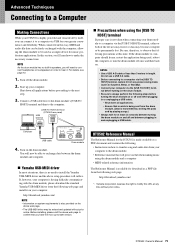
Advanced Techniques Connecting to a Computer Making Connections While your DTX502 is highly powerful and versatile all by playing songs.) • Always wait for download as a PDF file from the following web page. For details, see page 12. 1. Turn off and between the drum module and computer. Yamaha USB-MIDI driver In most up your drum module to a computer via the [USB TO HOST] terminal, restore it from the drum module. (Data is having...
Advanced Techniques Connecting to a Computer Making Connections While your DTX502 is highly powerful and versatile all by playing songs.) • Always wait for download as a PDF file from the following web page. For details, see page 12. 1. Turn off and between the drum module and computer. Yamaha USB-MIDI driver In most up your drum module to a computer via the [USB TO HOST] terminal, restore it from the drum module. (Data is having...
Owner's Manual
Page 81
...-hat sounds, try the following. • Check whether the parameter on the Double Bass Switch page (KitC1) is set to "on". High settings will result in loud drum sounds. (See page 68.) • Ensure that you are using only the recommended Yamaha pads. (Products from other audio equipment, such as an amplifier and/ or speakers. • Ensure that the amplifier and/or speakers connected to the drum module are turned...
...-hat sounds, try the following. • Check whether the parameter on the Double Bass Switch page (KitC1) is set to "on". High settings will result in loud drum sounds. (See page 68.) • Ensure that you are using only the recommended Yamaha pads. (Products from other audio equipment, such as an amplifier and/ or speakers. • Ensure that the amplifier and/or speakers connected to the drum module are turned...
Owner's Manual
Page 88
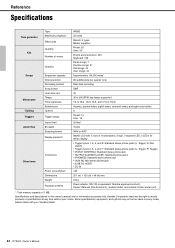
... manual are for information purposes only. Reference Specifications Tone generator Kits Songs Metronome Training Triggers Audio files Other items Type Maximum polyphony Effect units Quantity Number of voices Quantity Sequencer capacity Note resolution Recording method Song format User click sets Tempo Time signatures Subdivisions Options Trigger setups Import limit Bit depth Sampling format Display elements Connectors Power consumption Dimensions Weight Package contents AWM2 32 notes Reverb: 9 types Master equalizer Preset: 50 User: 50* Drums and percussion: 691 Keyboard: 128 Demo songs...
... manual are for information purposes only. Reference Specifications Tone generator Kits Songs Metronome Training Triggers Audio files Other items Type Maximum polyphony Effect units Quantity Number of voices Quantity Sequencer capacity Note resolution Recording method Song format User click sets Tempo Time signatures Subdivisions Options Trigger setups Import limit Bit depth Sampling format Display elements Connectors Power consumption Dimensions Weight Package contents AWM2 32 notes Reverb: 9 types Master equalizer Preset: 50 User: 50* Drums and percussion: 691 Keyboard: 128 Demo songs...
Owner's Manual
Page 89
... Metronome Output 74 MIDI Channel 60 MIDI Control Change 63 MIDI Gate Time 60 MIDI Note Number 60 MIDI Program Change 63 Minimum Level 68 Minimum Velocity 69 Mixer settings 57 Music Player 12 Muted Volume 73 Muting 18, 27 N Noise Filter 69 Number display 10 Number Display Function 74 O Open sounds 17 P Pad Control 62 Pad Function 66 Pad Gate 46 Pad Gate Group 72 Pad set 7 Pad Songs 29 Pad Type 68 Part Mute 47 PCY90AT 76 PDF 6 Play mode 30 Power adaptor 12 Practice songs 26 Q Quantize 52 R Rear Panel 11 Recording...
... Metronome Output 74 MIDI Channel 60 MIDI Control Change 63 MIDI Gate Time 60 MIDI Note Number 60 MIDI Program Change 63 Minimum Level 68 Minimum Velocity 69 Mixer settings 57 Music Player 12 Muted Volume 73 Muting 18, 27 N Noise Filter 69 Number display 10 Number Display Function 74 O Open sounds 17 P Pad Control 62 Pad Function 66 Pad Gate 46 Pad Gate Group 72 Pad set 7 Pad Songs 29 Pad Type 68 Part Mute 47 PCY90AT 76 PDF 6 Play mode 30 Power adaptor 12 Practice songs 26 Q Quantize 52 R Rear Panel 11 Recording...


