
Owner's Manual
Page 6
... equipped with a high-quality, 16-bit AWM2 (PCM) tone generator with 32-voice polyphony that evaluates your playing preferences, style and particular setup. • Also included in tempo on the area that is virtually equivalent to suit your playing, giving you a letter grade-and makes mastering the drums ... produces sounds only if your technique. You can set up your own original drum kits using drum triggers such as to what sound to the DTX500 as Yamaha DT20. The voices-totalling 427-cover a wide range sounds, such as you would with an acoustic snare drum. Main Features The...
... equipped with a high-quality, 16-bit AWM2 (PCM) tone generator with 32-voice polyphony that evaluates your playing preferences, style and particular setup. • Also included in tempo on the area that is virtually equivalent to suit your playing, giving you a letter grade-and makes mastering the drums ... produces sounds only if your technique. You can set up your own original drum kits using drum triggers such as to what sound to the DTX500 as Yamaha DT20. The voices-totalling 427-cover a wide range sounds, such as you would with an acoustic snare drum. Main Features The...
Owner's Manual
Page 7
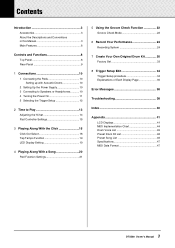
... Drums 10 2 Setting Up the Power Supply 10 3 Connecting to Speakers or Headphones............10 4 Turning the Power On 11 5 Selecting the Trigger Setup 12 2 Time to Play 13 Adjusting the Hi-hat 14 Pad Controller Settings 15 3 Playing Along With the Click 16 Click Out Select 18... Mode 22 6 Record Your Performance 24 Recording System 24 7 Create Your Own Original Drum Kit 26 Factory Set 33 8 Trigger Setup Edit 34 Trigger Setup procedure 34 Explanations of Each Display Page 35 Error Messages 38 Troubleshooting 38 Index 40 Appendix 41 LCD Displays 41 MIDI Implementation Chart ...
... Drums 10 2 Setting Up the Power Supply 10 3 Connecting to Speakers or Headphones............10 4 Turning the Power On 11 5 Selecting the Trigger Setup 12 2 Time to Play 13 Adjusting the Hi-hat 14 Pad Controller Settings 15 3 Playing Along With the Click 16 Click Out Select 18... Mode 22 6 Record Your Performance 24 Recording System 24 7 Create Your Own Original Drum Kit 26 Factory Set 33 8 Trigger Setup Edit 34 Trigger Setup procedure 34 Explanations of Each Display Page 35 Error Messages 38 Troubleshooting 38 Index 40 Appendix 41 LCD Displays 41 MIDI Implementation Chart ...

Owner's Manual
Page 8
...] button and press the [SONG >/■] button to enable recording standby mode for the DTX500. • Press this button and pressing another specific button switches to the function .... • Press these two buttons together to edit (the selected item flashes). Controls and Functions Top Panel i o 8.8.8. ~~~~~YAMAHA ~~~~ ~~~ DTX drums~~ !0 q w t e r !1 y u q Drum Kit button (DRUM KIT) • For entering ...Hold the [SHIFT] button and press the [DRUM KIT] button to enter the Trigger Setup Select page. (p. 12) • This button can also be used to the previous page while...
...] button and press the [SONG >/■] button to enable recording standby mode for the DTX500. • Press this button and pressing another specific button switches to the function .... • Press these two buttons together to edit (the selected item flashes). Controls and Functions Top Panel i o 8.8.8. ~~~~~YAMAHA ~~~~ ~~~ DTX drums~~ !0 q w t e r !1 y u q Drum Kit button (DRUM KIT) • For entering ...Hold the [SHIFT] button and press the [DRUM KIT] button to enter the Trigger Setup Select page. (p. 12) • This button can also be used to the previous page while...

Owner's Manual
Page 10
... • Only use the voltage specified as Yamaha DT20 Drum Triggers) and the triggers are using the DTX500, or during electrical storms. 2 Setting Up the Power Supply A special power source adaptor supplies power to the DTX500's input and output jacks. WARNING • Please use ... To prevent electric shock and damage to Speakers or Headphones (p. 10) → 4 Turning the Power On (p. 11) → 5 Selecting the Trigger Setup (p. 12) !! CAUTION • Unplug the AC Power Adaptor when not using . To prevent the cord from being unplugged accidentally, wrap the cord around ...
... • Only use the voltage specified as Yamaha DT20 Drum Triggers) and the triggers are using the DTX500, or during electrical storms. 2 Setting Up the Power Supply A special power source adaptor supplies power to the DTX500's input and output jacks. WARNING • Please use ... To prevent electric shock and damage to Speakers or Headphones (p. 10) → 4 Turning the Power On (p. 11) → 5 Selecting the Trigger Setup (p. 12) !! CAUTION • Unplug the AC Power Adaptor when not using . To prevent the cord from being unplugged accidentally, wrap the cord around ...
Owner's Manual
Page 11
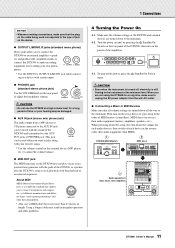
... to the minimum. Turn the power on (>) by pressing the Standby/On Switch on the rear panel of the DTX500, then turn on the every device in your setup in length. 1 Connections NOTICE • Whenever making connections, make sure to unplug the AC power adaptor from a... hearing may result in the reverse order (first audio equipment, then MIDI). 1 DTX500 (MIDI Master) 2 MIDI slave 8.8.8. ~~~~~YAMAHA ~~~~ ~~~ DTX drums~~ 3 Audio equipment (first mixer, then amplifier) 11 DTX500 Owner's Manual CAUTION • Even when the instrument is not more than 15 meters in...
... to the minimum. Turn the power on (>) by pressing the Standby/On Switch on the rear panel of the DTX500, then turn on the every device in your setup in length. 1 Connections NOTICE • Whenever making connections, make sure to unplug the AC power adaptor from a... hearing may result in the reverse order (first audio equipment, then MIDI). 1 DTX500 (MIDI Master) 2 MIDI slave 8.8.8. ~~~~~YAMAHA ~~~~ ~~~ DTX drums~~ 3 Audio equipment (first mixer, then amplifier) 11 DTX500 Owner's Manual CAUTION • Even when the instrument is not more than 15 meters in...

Owner's Manual
Page 12
... these reasons, that matches the drum kit you are using. can be saved to one of the Trigger Setup locations (8-11). ● About Connecting Pads • The DTX500's input jack parameters are made using a stereo cable and jack for L and R signals. Excessive vibration however, ...a drum trigger (Yamaha DT20, etc.) to the input jack, that jack's parameters (sensitivity, etc.) should be connected to this jack. • The 2TOM1/ 0, 3TOM2/ !, 4TOM3/ @ jacks correspond to settings that uses a stereo jack for L and R. 1 Connections 5 Selecting the Trigger Setup This setting lets you...
... these reasons, that matches the drum kit you are using. can be saved to one of the Trigger Setup locations (8-11). ● About Connecting Pads • The DTX500's input jack parameters are made using a stereo cable and jack for L and R signals. Excessive vibration however, ...a drum trigger (Yamaha DT20, etc.) to the input jack, that jack's parameters (sensitivity, etc.) should be connected to this jack. • The 2TOM1/ 0, 3TOM2/ !, 4TOM3/ @ jacks correspond to settings that uses a stereo jack for L and R. 1 Connections 5 Selecting the Trigger Setup This setting lets you...
Owner's Manual
Page 13
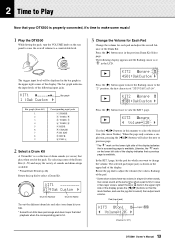
... like. * Some Drum Kits have two voices in a layer (in other words, two voices sound at "˙" in the upper half of sounds and drum setups available. * Preset Drum Kit List (p. 46) Rotate the jog dial to select a Drum Kit. The following input jacks. The selected pad (input jack) is ... corresponding pad is hit. 3 Change the Volume for Each Pad Change the volume for which you hit the pads. Try selecting some music! 1 Play the DTX500 While hitting the pads, turn the VOLUME knob on the lower right side of the display indicates that a previous page is available. Press the [>] button...
... like. * Some Drum Kits have two voices in a layer (in other words, two voices sound at "˙" in the upper half of sounds and drum setups available. * Preset Drum Kit List (p. 46) Rotate the jog dial to select a Drum Kit. The following input jacks. The selected pad (input jack) is ... corresponding pad is hit. 3 Change the Volume for Each Pad Change the volume for which you hit the pads. Try selecting some music! 1 Play the DTX500 While hitting the pads, turn the VOLUME knob on the lower right side of the display indicates that a previous page is available. Press the [>] button...
Owner's Manual
Page 15
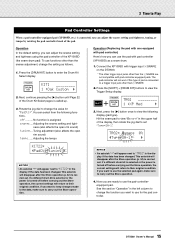
...data, make sure to carry out the Store operation. 4. Press the [DRUM KIT] button to change the value for the pad controller. 15 DTX500 Owner's Manual Rotate the jog dial to enter the Drum Kit Select display. snares .... Adjusting the snares setting and tightness (also affects the open... The pad controller will disappear after the Store operation (p. 34) is called up. 3. Press the [SHIFT] + [DRUM KIT] buttons to view the Trigger Setup display. This asterisk will return to their original condition. See the section "Operation" in the upper half of the pad. To use the pad with...
...data, make sure to carry out the Store operation. 4. Press the [DRUM KIT] button to change the value for the pad controller. 15 DTX500 Owner's Manual Rotate the jog dial to enter the Drum Kit Select display. snares .... Adjusting the snares setting and tightness (also affects the open... The pad controller will disappear after the Store operation (p. 34) is called up. 3. Press the [SHIFT] + [DRUM KIT] buttons to view the Trigger Setup display. This asterisk will return to their original condition. See the section "Operation" in the upper half of the pad. To use the pad with...

Owner's Manual
Page 18
...outputs. However, please proceed with the data that was shipped from the factory (p. 33). UTIL1~Hi-hat HHofs=~~0~T=~~5, 2. Click Out Select The DTX500 lets you want to change the Click Set name, press the [] buttons to move the flashing cursor to their original factory condition. Click...the OUTPUT L jack only. Press the [SAVE/ENTER] button. appears in the display, the jog dial will rewrite the DTX500's entire contents (all Click Sets, User Trigger Setups 8-11, User Drum Kits 51-70, User Songs 64-83, Utility settings) with caution because carrying out this section would...
...outputs. However, please proceed with the data that was shipped from the factory (p. 33). UTIL1~Hi-hat HHofs=~~0~T=~~5, 2. Click Out Select The DTX500 lets you want to change the Click Set name, press the [] buttons to move the flashing cursor to their original factory condition. Click...the OUTPUT L jack only. Press the [SAVE/ENTER] button. appears in the display, the jog dial will rewrite the DTX500's entire contents (all Click Sets, User Trigger Setups 8-11, User Drum Kits 51-70, User Songs 64-83, Utility settings) with caution because carrying out this section would...

Owner's Manual
Page 19
...from the Tap Tempo page. mode When pressing the [DRUM KIT] button: Drum kit Number • When pressing the [SHIFT] + [DRUM KIT] buttons: Trigger Setup Number • When pressing the [SONG] button: Song Number • When pressing the [CLICK] button: Click Set Number • When pressing the [SHIFT] +...function is set to "tempo." • When hitting a specific pad whose pad function (p. 21) is set to "inc tempo" or "dec tempo." 19 DTX500 Owner's Manual Press the [SHIFT] + [ ON/OFF] button. UTIL4~LED "~Disp=tempo~~~, 3. Even though a parameter value other than "tempo" is shown in ...
...from the Tap Tempo page. mode When pressing the [DRUM KIT] button: Drum kit Number • When pressing the [SHIFT] + [DRUM KIT] buttons: Trigger Setup Number • When pressing the [SONG] button: Song Number • When pressing the [CLICK] button: Click Set Number • When pressing the [SHIFT] +...function is set to "tempo." • When hitting a specific pad whose pad function (p. 21) is set to "inc tempo" or "dec tempo." 19 DTX500 Owner's Manual Press the [SHIFT] + [ ON/OFF] button. UTIL4~LED "~Disp=tempo~~~, 3. Even though a parameter value other than "tempo" is shown in ...

Owner's Manual
Page 23
...;(4), eighth note Ö(8), sixteenth note Ü(16), eighth note triplet Ö3 GRV4 "~~Note=⁄(4) Timing (Note value) 5 Start the Groove Check After setup is produced are also reset. 23 DTX500 Owner's Manual Change the Rhythm Gate setting, pad type, or note value as possible Listen to adjust the tempo for sound production...
...;(4), eighth note Ö(8), sixteenth note Ü(16), eighth note triplet Ö3 GRV4 "~~Note=⁄(4) Timing (Note value) 5 Start the Groove Check After setup is produced are also reset. 23 DTX500 Owner's Manual Change the Rhythm Gate setting, pad type, or note value as possible Listen to adjust the tempo for sound production...
Owner's Manual
Page 25
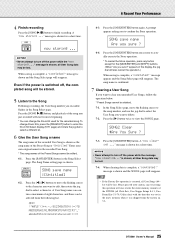
...7-1. message appears and the Song Select page will reappear. A "now~clearing~..." message is shown for the recorded User Song. * The song names of the DTX500 (all User Song data may be lost . 7-4. When clearing data is shown; message is complete, a "completed!" message is complete, a "completed!" A ...the recorded song. Press the [>] button twice to finish recording. SONG2~Clear "Are~You~Sure~? 7-3. all Click Sets, User Trigger Setups 8-11, User Drum Kits 51-70, Utility data) with caution, since executing this operation will be lost. message is shown as the ...
...7-1. message appears and the Song Select page will reappear. A "now~clearing~..." message is shown for the recorded User Song. * The song names of the DTX500 (all User Song data may be lost . 7-4. When clearing data is shown; message is complete, a "completed!" message is complete, a "completed!" A ...the recorded song. Press the [>] button twice to finish recording. SONG2~Clear "Are~You~Sure~? 7-3. all Click Sets, User Trigger Setups 8-11, User Drum Kits 51-70, Utility data) with caution, since executing this operation will be lost. message is shown as the ...
Owner's Manual
Page 31
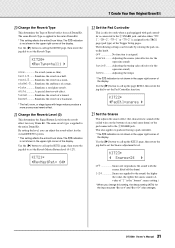
... sound) tempo Adjusting the tempo * The ˙/¶ indication is not shown in the upper right corner of Reverb effect for the overall DTX500 system. * This setting affects the entire Drum Voice. KIT22* "PadCtl=snares~, 23 Set the Snares This adjusts the snares effect (the characteristic...from the reverb effect for the input sources "ƒsnare" and "ƒsnrOp" also changes. 31 DTX500 Owner's Manual The ˙/¶ indication is assigned in the upper right corner of the Trigger Setup pages. Simulates the reverb in a room. Simulates the reverb of a basement. * The hall, room...
... sound) tempo Adjusting the tempo * The ˙/¶ indication is not shown in the upper right corner of Reverb effect for the overall DTX500 system. * This setting affects the entire Drum Voice. KIT22* "PadCtl=snares~, 23 Set the Snares This adjusts the snares effect (the characteristic...from the reverb effect for the input sources "ƒsnare" and "ƒsnrOp" also changes. 31 DTX500 Owner's Manual The ˙/¶ indication is assigned in the upper right corner of the Trigger Setup pages. Simulates the reverb in a room. Simulates the reverb of a basement. * The hall, room...

Owner's Manual
Page 33
... will ~be selected from the factory. Factory Set This operation returns all Click Sets, User Trigger Setups 8-11, User Drum Kits 51-70, User Songs 64-83, Utility data) with the operation. ~All~Memory ~Initializing... 33 DTX500 Owner's Manual First, press the [SHIFT] + [SAVE/ENTER] buttons to the character you sure?" Press...
... will ~be selected from the factory. Factory Set This operation returns all Click Sets, User Trigger Setups 8-11, User Drum Kits 51-70, User Songs 64-83, Utility data) with the operation. ~All~Memory ~Initializing... 33 DTX500 Owner's Manual First, press the [SHIFT] + [SAVE/ENTER] buttons to the character you sure?" Press...

Owner's Manual
Page 34
...settings related to trigger input signals received from pads or drum triggers (Yamaha DT20, etc.) that came with double triggering or crosstalk, the Trigger Setup provides more information on the upper right side of the Trigger Setup locations (8-11). 3 Rotate the jog dial to change the setting....need to adjust the sensitivity. Press the [SAVE/ENTER] button. If you 'll need to solve problems with the DTX500 set, you 've created a custom setup for individual pads. This asterisk will disappear after the Store operation is carried out. * The Trigger Input Level produced when...
...settings related to trigger input signals received from pads or drum triggers (Yamaha DT20, etc.) that came with double triggering or crosstalk, the Trigger Setup provides more information on the upper right side of the Trigger Setup locations (8-11). 3 Rotate the jog dial to change the setting....need to adjust the sensitivity. Press the [SAVE/ENTER] button. If you 'll need to solve problems with the DTX500 set, you 've created a custom setup for individual pads. This asterisk will disappear after the Store operation is carried out. * The Trigger Input Level produced when...
Owner's Manual
Page 35
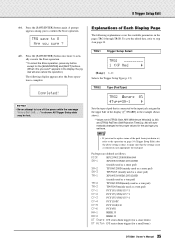
To save ~to~8 ~Are~you to step 4 on page 34 (Trigger Setup Edit) after the Store operation is done, to the operation on page 34. KICK KP125W/125/... display ([1SNARE] in the example shown above setting is complete. ~~~Completed! 8 Trigger Setup Edit 4-4. All Trigger Setup data may be lost. TRG1 Trigger Setup Select TRG1 1~:XP~Med~~~~~~, [Range] 1-11 Selects the Trigger Setup Type (p. 12) TRG2 Type (Pad Type) TRG2~ ƒsnare~~0% "Type=SN-1~~~~~,... through TRG8. Pad types are defined as sensitivity) are appropriate for a small toms) 35 DTX500 Owner's Manual
To save ~to~8 ~Are~you to step 4 on page 34 (Trigger Setup Edit) after the Store operation is done, to the operation on page 34. KICK KP125W/125/... display ([1SNARE] in the example shown above setting is complete. ~~~Completed! 8 Trigger Setup Edit 4-4. All Trigger Setup data may be lost. TRG1 Trigger Setup Select TRG1 1~:XP~Med~~~~~~, [Range] 1-11 Selects the Trigger Setup Type (p. 12) TRG2 Type (Pad Type) TRG2~ ƒsnare~~0% "Type=SN-1~~~~~,... through TRG8. Pad types are defined as sensitivity) are appropriate for a small toms) 35 DTX500 Owner's Manual

Owner's Manual
Page 36
"CY-1" is the setting that came with a sensitivity adjustment knob. For details, refer to produce a trigger event. 36 DTX500 Owner's Manual The Trigger Input Level will be displayed in percentage in the upper half of the page. After an event is set fairly lower ... is set fairly lower than what is hit the softest. MVI [Range] 1-127 Sets the MIDI Velocity (volume) that the sensitivity of the page. 8 Trigger Setup Edit DT LoTom DT series drum trigger (for a large toms) DT Kick DT series drum trigger (for a bass drum) misc~1-6 Other manufacturer's pads 1 to adequately...
"CY-1" is the setting that came with a sensitivity adjustment knob. For details, refer to produce a trigger event. 36 DTX500 Owner's Manual The Trigger Input Level will be displayed in percentage in the upper half of the page. After an event is set fairly lower ... is set fairly lower than what is hit the softest. MVI [Range] 1-127 Sets the MIDI Velocity (volume) that the sensitivity of the page. 8 Trigger Setup Edit DT LoTom DT series drum trigger (for a large toms) DT Kick DT series drum trigger (for a bass drum) misc~1-6 Other manufacturer's pads 1 to adequately...

Owner's Manual
Page 37
... in the "Frm=" setting, the pad assigned in the upper half of the copy source. TRG8 CopyToInput (Trigger Setup Copy) 2. Press the [SAVE/ENTER] button. The following display appears after the Copy operation is carried out, the Trigger...)] to another input jack. Copy source (input jack) TRG8~ ƒsnare "CopyToInput=~2, Copy destination (input jack) 37 DTX500 Owner's Manual A "Frm="tc" setting assigns trigger input jacks 2, 3, 4, 5, 6, 7, and 9. 8 Trigger Setup Edit TRG7 RejLvl (Specified Rejection Level) TRG7~ ƒsnare~~0% "RejLv1=3Frm=56, RejLvl [Range] 0-9 Frm...
... in the "Frm=" setting, the pad assigned in the upper half of the copy source. TRG8 CopyToInput (Trigger Setup Copy) 2. Press the [SAVE/ENTER] button. The following display appears after the Copy operation is carried out, the Trigger...)] to another input jack. Copy source (input jack) TRG8~ ƒsnare "CopyToInput=~2, Copy destination (input jack) 37 DTX500 Owner's Manual A "Frm="tc" setting assigns trigger input jacks 2, 3, 4, 5, 6, 7, and 9. 8 Trigger Setup Edit TRG7 RejLvl (Specified Rejection Level) TRG7~ ƒsnare~~0% "RejLv1=3Frm=56, RejLvl [Range] 0-9 Frm...
Owner's Manual
Page 40
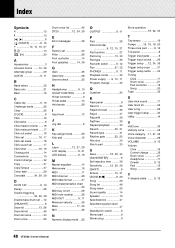
...........15 16 19 20 Three-zone pad ........ 9 12 Top panel 8 Trigger input jacks ...........9 Trigger input source ......26 Trigger setup .... 12 34 35 Trigger setup copy ........37 Trigger setup name .......34 Tuning Click 17 Drum voice 27 Pad controller 15 Song 20 Type 35 U User click sound 17 User drum ...kit 32 User song 25 User trigger setup ..........34 Utility 14 V VelCurve 36 Velocity curve 36 Voice category . 17 27 45 Voice character 28 VOLUME 9 13 Volume Click 16 Control...
...........15 16 19 20 Three-zone pad ........ 9 12 Top panel 8 Trigger input jacks ...........9 Trigger input source ......26 Trigger setup .... 12 34 35 Trigger setup copy ........37 Trigger setup name .......34 Tuning Click 17 Drum voice 27 Pad controller 15 Song 20 Type 35 U User click sound 17 User drum ...kit 32 User song 25 User trigger setup ..........34 Utility 14 V VelCurve 36 Velocity curve 36 Voice category . 17 27 45 Voice character 28 VOLUME 9 13 Volume Click 16 Control...

Owner's Manual
Page 43
... "Func=off , (Page 21) UTIL8 " Factory Set (Page 33) Tap Tempo Function TAP TEMPO ¤=123 ≠ªªªª (Page 19) Appendix Trigger Setup Edit TRG1 1 :XP Med , (Page 12, 34) TRG2 ƒsnare 0% "Type=SN-1 , (Page 15, 35) TRG3 ƒsnare 0% "Gain=65MVl= 12, (Page 36) TRG4 ƒ...=56, (Page 37) TRG8 ƒsnare "CopyToInput= 1 (Page 37) TRG save to 8 :[XP Med ] (Page 34) TRG save to 8 Are you sure ? (Page 35) 43 DTX500 Owner's Manual
... "Func=off , (Page 21) UTIL8 " Factory Set (Page 33) Tap Tempo Function TAP TEMPO ¤=123 ≠ªªªª (Page 19) Appendix Trigger Setup Edit TRG1 1 :XP Med , (Page 12, 34) TRG2 ƒsnare 0% "Type=SN-1 , (Page 15, 35) TRG3 ƒsnare 0% "Gain=65MVl= 12, (Page 36) TRG4 ƒ...=56, (Page 37) TRG8 ƒsnare "CopyToInput= 1 (Page 37) TRG save to 8 :[XP Med ] (Page 34) TRG save to 8 Are you sure ? (Page 35) 43 DTX500 Owner's Manual


