

Owner's Manual
Page 3
... Placement 20 Speaker Settings ...21 Speaker Output Levels 22 Basic Operation 24 Basic Playback ...25 Basic Recording ...29 Advanced Operation 30 SET MENU Items 31 Remote Control Features 40 Adjusting the Levels of the Effect Speakers 51 Setting the Sleep Timer 51 Additional Information 52 Digital Sound Field Processing...
... Placement 20 Speaker Settings ...21 Speaker Output Levels 22 Basic Operation 24 Basic Playback ...25 Basic Recording ...29 Advanced Operation 30 SET MENU Items 31 Remote Control Features 40 Adjusting the Levels of the Effect Speakers 51 Setting the Sleep Timer 51 Additional Information 52 Digital Sound Field Processing...

Owner's Manual
Page 4
... and DTS decoder Dolby Digital Matrix 6.1/DTS ES decoder Digital Sound Fields (DSP) CINEMA-DSP: Dolby Digital + DSP and DTS + DSP Virtual CINEMA DSP and HP CINEMA DSP Multi-function remote control Built-in 8-channel power amplifier Advanced Operation Additional Information Appendix Getting Started 3...home theater. Incorporated state-of this unit brings to feature films in the Remote Control 3 Using the Remote Control 3 Controls and Functions 4 Front Panel ...4 Display Indicators ...5 Rear panel ...6 Remote Control ...7 2 Take some of the more about these features and enjoy the ...
... and DTS decoder Dolby Digital Matrix 6.1/DTS ES decoder Digital Sound Fields (DSP) CINEMA-DSP: Dolby Digital + DSP and DTS + DSP Virtual CINEMA DSP and HP CINEMA DSP Multi-function remote control Built-in 8-channel power amplifier Advanced Operation Additional Information Appendix Getting Started 3...home theater. Incorporated state-of this unit brings to feature films in the Remote Control 3 Using the Remote Control 3 Controls and Functions 4 Front Panel ...4 Display Indicators ...5 Rear panel ...6 Remote Control ...7 2 Take some of the more about these features and enjoy the ...

Owner's Manual
Page 5
... the manufacturer code for the TV Area. Sound program selector/ Numeric buttons MUTE VOLUME +/- Be sure to extremely low temperatures. 3 s About handling the remote control NATURAL SOUND AV AMPLIFIER DSP-AX2 STANDBY /ON INPUT MODE INPUT VOLUME SPEAKERS A B SILENT BASS PROCESSOR EXTENSION DIRECT PHONES BASS TREBLE SOURCE DVD MD/TAPE D-TV/LD CD-R EFFECT...
... the manufacturer code for the TV Area. Sound program selector/ Numeric buttons MUTE VOLUME +/- Be sure to extremely low temperatures. 3 s About handling the remote control NATURAL SOUND AV AMPLIFIER DSP-AX2 STANDBY /ON INPUT MODE INPUT VOLUME SPEAKERS A B SILENT BASS PROCESSOR EXTENSION DIRECT PHONES BASS TREBLE SOURCE DVD MD/TAPE D-TV/LD CD-R EFFECT...
Owner's Manual
Page 6
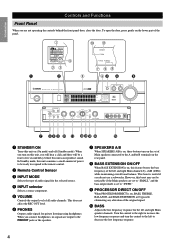
...bypassed, eliminating any alteration of the panel. 1 0q 4 23 MEMORY STEREO BASS P.DIRECT ZONE 2 SLEEP 7 98 1 2 5 63 4 5 NATURAL SOUND AV AMPLIFIER DSP-AX2 STANDBY /ON INPUT MODE INPUT MEMORY D-TV/LD CABLE STEREO SAT VCR 1 BASS P.DIRECT VCR2/DVR SLEEP V-AUX DVD MD/TAPE CD-R TUNER CD PHONO... DIRECT ON/OFF When PROCESSOR DIRECT is useful if you will hear a click and there will be ready to respond to the remote control. 2 Remote Control Sensor 3 INPUT MODE Selects the type of audio signal for the selected source. 4 INPUT selector Selects a source component. 5 VOLUME...
...bypassed, eliminating any alteration of the panel. 1 0q 4 23 MEMORY STEREO BASS P.DIRECT ZONE 2 SLEEP 7 98 1 2 5 63 4 5 NATURAL SOUND AV AMPLIFIER DSP-AX2 STANDBY /ON INPUT MODE INPUT MEMORY D-TV/LD CABLE STEREO SAT VCR 1 BASS P.DIRECT VCR2/DVR SLEEP V-AUX DVD MD/TAPE CD-R TUNER CD PHONO... DIRECT ON/OFF When PROCESSOR DIRECT is useful if you will hear a click and there will be ready to respond to the remote control. 2 Remote Control Sensor 3 INPUT MODE Selects the type of audio signal for the selected source. 4 INPUT selector Selects a source component. 5 VOLUME...

Owner's Manual
Page 9
...about ten seconds. u SYSTEM POWER Turns on and off the light. p 10 KEY/DSP Selects the numeric button mode or DSP program mode. j Cover k Å button Switches the control area. 7 English q MUTE Mutes the sound. s ON SCREEN Selects the On-Screen... Selects the input source for your video monitor. Increases or decreases the volume level. r PARAMETER/SET MENU Selects the PARAMETER mode or SET MENU mode. Remote Control g 1 4 2 5 3 y 6 u k 7 8 i o h p 9 0 q w e a s r t d f j 1 CLEAR Erases the content of PARAMETER/SET MENU. Press again to be adjusted...
...about ten seconds. u SYSTEM POWER Turns on and off the light. p 10 KEY/DSP Selects the numeric button mode or DSP program mode. j Cover k Å button Switches the control area. 7 English q MUTE Mutes the sound. s ON SCREEN Selects the On-Screen... Selects the input source for your video monitor. Increases or decreases the volume level. r PARAMETER/SET MENU Selects the PARAMETER mode or SET MENU mode. Remote Control g 1 4 2 5 3 y 6 u k 7 8 i o h p 9 0 q w e a s r t d f j 1 CLEAR Erases the content of PARAMETER/SET MENU. Press again to be adjusted...

Owner's Manual
Page 19
To listen to the sound from the main amplifier of this unit or the remote control. e SUBWOOFER jacks Main, Center, and Rear channel frequencies below 90 Hz are output through these jacks. Subwoofer volume cannot be output from your external decoder .... Connecting External Amplifiers If you want to increase the power output to the speakers, or want to use another amplifier, connect an external amplifier to DSP programs. • When you select 6CH INPUT as the input source, this output. w REAR (Surround) jacks Rear channel line output jacks. Notes: • When you...
To listen to the sound from the main amplifier of this unit or the remote control. e SUBWOOFER jacks Main, Center, and Rear channel frequencies below 90 Hz are output through these jacks. Subwoofer volume cannot be output from your external decoder .... Connecting External Amplifiers If you want to increase the power output to the speakers, or want to use another amplifier, connect an external amplifier to DSP programs. • When you select 6CH INPUT as the input source, this output. w REAR (Surround) jacks Rear channel line output jacks. Notes: • When you...

Owner's Manual
Page 21
... and will not be recorded with any video signal. • The SET MENU, TEST DOLBY SUR and TEST DSP appear regardless of the OSD mode. If no changes to operations appear on the remote control repeatedly to turn on the power, the video monitor and front panel display shows the level of the...you turn on (blue background) or off with a lot of noise may produce unstable images. 19 Notes: • When you display the SET MENU and DSP sound field program parameter settings on a screen, it is by reading this information on the SET MENU. Short Display ........ If a video source is not ...
... and will not be recorded with any video signal. • The SET MENU, TEST DOLBY SUR and TEST DSP appear regardless of the OSD mode. If no changes to operations appear on the remote control repeatedly to turn on the power, the video monitor and front panel display shows the level of the...you turn on (blue background) or off with a lot of noise may produce unstable images. 19 Notes: • When you display the SET MENU and DSP sound field program parameter settings on a screen, it is by reading this information on the SET MENU. Short Display ........ If a video source is not ...
Owner's Manual
Page 24
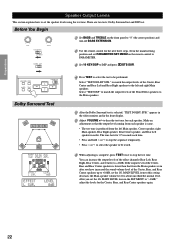
...TREBLE 1 Set BASS and TREBLE on the remote control to PARAMETER. 3 Set 10 KEY/DSP to +10dB. EFFECT L SUR. Select "TEST DSP" to match the output levels of the Front Effect speakers to "0" (the center position) and turn off BASS EXTENSION. 2 Use the remote control for each speaker. You can increase the output...up to set the speaker levels using the test tone. MAIN LEVEL item in the front display. 2 Adjust VOLUME +/- Dolby Surround test and DSP test. Make an adjustment so that from the left and right Main speakers. The tone lasts for the Center, Rear, and Rear Center ...
...TREBLE 1 Set BASS and TREBLE on the remote control to PARAMETER. 3 Set 10 KEY/DSP to +10dB. EFFECT L SUR. Select "TEST DSP" to match the output levels of the Front Effect speakers to "0" (the center position) and turn off BASS EXTENSION. 2 Use the remote control for each speaker. You can increase the output...up to set the speaker levels using the test tone. MAIN LEVEL item in the front display. 2 Adjust VOLUME +/- Dolby Surround test and DSP test. Make an adjustment so that from the left and right Main speakers. The tone lasts for the Center, Rear, and Rear Center ...

Owner's Manual
Page 27
...button names are noted in memory before the power is described with buttons on the remote control) to this unit and the remote control. STANDBY SYSTEM POWER Input buttons STANDBY/ON NATURAL SOUND AV AMPLIFIER DSP-AX2 STANDBY /ON EFFECT INPUT selector INPUT MODE VOLUME INPUT MODE INPUT VOLUME SPEAKERS A... 1 VCR 2/DVR VIDEO AUX CD 6CH PHONO INPUT REC OUT DSP PROGRAM S VIDEO VIDEO L AUDIO R OPTICAL VIDEO AUX VOLUME EFFECT Power Control STANDBY /ON STANDBY /ON 1 Press STANDBY/ON (or SYSTEM POWER on the remote control) to turn on the power. • The front panel (and...
...button names are noted in memory before the power is described with buttons on the remote control) to this unit and the remote control. STANDBY SYSTEM POWER Input buttons STANDBY/ON NATURAL SOUND AV AMPLIFIER DSP-AX2 STANDBY /ON EFFECT INPUT selector INPUT MODE VOLUME INPUT MODE INPUT VOLUME SPEAKERS A... 1 VCR 2/DVR VIDEO AUX CD 6CH PHONO INPUT REC OUT DSP PROGRAM S VIDEO VIDEO L AUDIO R OPTICAL VIDEO AUX VOLUME EFFECT Power Control STANDBY /ON STANDBY /ON 1 Press STANDBY/ON (or SYSTEM POWER on the remote control) to turn on the power. • The front panel (and...

Owner's Manual
Page 28
... OUT jacks is indicated on the front panel display with an arrow. • The current source name and input mode appear on the remote control to the operation instructions for a few seconds. Use the input buttons on the front panel display and the video monitor for the component.... 3 Adjust VOLUME (or VOLUME +/- Caution: • If the power of the input buttons on the remote control. • The current source is turned off, reproduced sound may be distorted or the volume may be lowered. Introduction Preparations Basic Playback Selecting ...
... OUT jacks is indicated on the front panel display with an arrow. • The current source name and input mode appear on the remote control to the operation instructions for a few seconds. Use the input buttons on the front panel display and the video monitor for the component.... 3 Adjust VOLUME (or VOLUME +/- Caution: • If the power of the input buttons on the remote control. • The current source is turned off, reproduced sound may be distorted or the volume may be lowered. Introduction Preparations Basic Playback Selecting ...

Owner's Manual
Page 29
... signal, this unit reproduces no sound. • If you can be interrupted for some LD and DVD players in any way, you turn on the remote control to display or change the input mode. • AUTO AUTO:DOLBY D. Change the input mode as LD players output different audio signals through the OPTICAL...
... signal, this unit reproduces no sound. • If you can be interrupted for some LD and DVD players in any way, you turn on the remote control to display or change the input mode. • AUTO AUTO:DOLBY D. Change the input mode as LD players output different audio signals through the OPTICAL...

Owner's Manual
Page 32
... 36 4. DTS SET ...38 12. 6.1/ES AUTO 38 13. DISPLAY SET 39 15. MEMORY GUARD 39 Remote Control Features 40 Using the Remote Control 40 Each Component Control Area 42 Setting the Manufacturer Code in the Remote Control 45 Programming a New Remote Control Function 46 Using the Macro Feature 47 Changing the Source Name in the Display Window 49...
... 36 4. DTS SET ...38 12. 6.1/ES AUTO 38 13. DISPLAY SET 39 15. MEMORY GUARD 39 Remote Control Features 40 Using the Remote Control 40 Each Component Control Area 42 Setting the Manufacturer Code in the Remote Control 45 Programming a New Remote Control Function 46 Using the Macro Feature 47 Changing the Source Name in the Display Window 49...

Owner's Manual
Page 34
... + or - or Basic Operation Advanced Operation Additional Information Appendix 32 Introduction Preparations SET MENU Items Operating the SET MENU Adjustment should be performed with the remote control. PARAMETER / SET MENU Cursor buttons 1 Set PARAMETER/SET MENU to SET MENU. 2 Press h or g repeatedly to enter the setting of SET MENU, then press + or... setting of the item. 2 LOW FREQ.TEST ≥ TEST TONE.........OFF OUTPUT...MAIN L/R FREQ 88Hz 2 LOW FREQ.TEST TEST TONE.........OFF 4 Press h or g repeatedly or a DSP program button to the desired setting.
... + or - or Basic Operation Advanced Operation Additional Information Appendix 32 Introduction Preparations SET MENU Items Operating the SET MENU Adjustment should be performed with the remote control. PARAMETER / SET MENU Cursor buttons 1 Set PARAMETER/SET MENU to SET MENU. 2 Press h or g repeatedly to enter the setting of SET MENU, then press + or... setting of the item. 2 LOW FREQ.TEST ≥ TEST TONE.........OFF OUTPUT...MAIN L/R FREQ 88Hz 2 LOW FREQ.TEST TEST TONE.........OFF 4 Press h or g repeatedly or a DSP program button to the desired setting.

Owner's Manual
Page 37
... test tone depends on the Subwoofer so it matches the volume of the speaker you cannot match the volume of your Main speakers using the controls on the settings of noise centered at a specified frequency by the tone generator. Notes: • Do not turn up the VOLUME too high.... You can change the center frequency from the Subwoofer. The initial setting is produced by the band pass filter. Change the setting using the remote control while sitting in your Main speakers using VOLUME + so you cannot match the sound volume of the Front, Rear, and Center speakers with ...
... test tone depends on the Subwoofer so it matches the volume of the speaker you cannot match the volume of your Main speakers using the controls on the settings of noise centered at a specified frequency by the tone generator. Notes: • Do not turn up the VOLUME too high.... You can change the center frequency from the Subwoofer. The initial setting is produced by the band pass filter. Change the setting using the remote control while sitting in your Main speakers using VOLUME + so you cannot match the sound volume of the Front, Rear, and Center speakers with ...

Owner's Manual
Page 39
...9 10 11 12 Use this unit to any program groups. • You cannot initialize the individual DSP programs within the selected program group are shown on the remote control for General and China models only.) Initial settings are initialized. When you want to the previous settings ...automatically. 37 Notes: • The asterisk (*) mark next to a DSP program group number indicates that you have ...
...9 10 11 12 Use this unit to any program groups. • You cannot initialize the individual DSP programs within the selected program group are shown on the remote control for General and China models only.) Initial settings are initialized. When you want to the previous settings ...automatically. 37 Notes: • The asterisk (*) mark next to a DSP program group number indicates that you have ...
Owner's Manual
Page 42
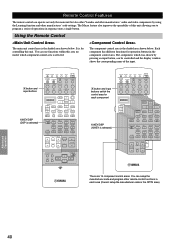
... component control areas. Introduction Preparations Basic Operation Remote Control Features The remote control can operate not only the main unit but also other Yamaha and other manufactures' audio and video components by pressing an input button, can be controlled and the display window shows the corresponding name of the input. Å button and input buttons 10KEY/DSP (DSP is...
... component control areas. Introduction Preparations Basic Operation Remote Control Features The remote control can operate not only the main unit but also other Yamaha and other manufactures' audio and video components by pressing an input button, can be controlled and the display window shows the corresponding name of the input. Å button and input buttons 10KEY/DSP (DSP is...

Owner's Manual
Page 43
s About OPTN OPTN is an extra component control area to be programmed with other remote control functions. (You cannot setup the manufacturer code in this area.) s Light up function The buttons which are active and the display window light up for... CD, VCR 1, VCR 2, DVD, CD-R, CABLE (Cable TV), SAT (Satellite TV), A, TV/LD (digital and regular TV/LD player), OPTN (Option). English s SOURCE SELECT Remote Control Features You can control another component independently from the input you selected by pressing an input button. 1 Press SOURCE SELECT h or g to choose a component and set the...
s About OPTN OPTN is an extra component control area to be programmed with other remote control functions. (You cannot setup the manufacturer code in this area.) s Light up function The buttons which are active and the display window light up for... CD, VCR 1, VCR 2, DVD, CD-R, CABLE (Cable TV), SAT (Satellite TV), A, TV/LD (digital and regular TV/LD player), OPTN (Option). English s SOURCE SELECT Remote Control Features You can control another component independently from the input you selected by pressing an input button. 1 Press SOURCE SELECT h or g to choose a component and set the...

Owner's Manual
Page 44
... The general operational buttons are shown for TAPE before using the remote control. s TUNER button (Tuner area) s CD button (CD area) (Set 10KEY) POWER Preset number 1 to 9 Numeric button +10 Numeric button 0 TV VOL +/-, TV INPUT, and TV ...
... The general operational buttons are shown for TAPE before using the remote control. s TUNER button (Tuner area) s CD button (CD area) (Set 10KEY) POWER Preset number 1 to 9 Numeric button +10 Numeric button 0 TV VOL +/-, TV INPUT, and TV ...

Owner's Manual
Page 45
...and VCR2/DVR button (VCR areas*4) REC (Press twice) POWER DISPLAY You can control your VCR, if you have set up the code for TV before using the remote control. English s PHONO and V-AUX buttons, and OPTN area*2 Remote Control Features s DVD button (DVD area) DISPLAY MENU TITLE (Set 10KEY) POWER (Set... up the manufacturer code for the TV Area. *2 Operational buttons do not work without setting the manufacturer code for VCR before using the remote control. Set TV code in PHONO button if necessary. TV VOL +/-, TV INPUT, and TV MUTE function if you have set the manufacturer ...
...and VCR2/DVR button (VCR areas*4) REC (Press twice) POWER DISPLAY You can control your VCR, if you have set up the code for TV before using the remote control. English s PHONO and V-AUX buttons, and OPTN area*2 Remote Control Features s DVD button (DVD area) DISPLAY MENU TITLE (Set 10KEY) POWER (Set... up the manufacturer code for the TV Area. *2 Operational buttons do not work without setting the manufacturer code for VCR before using the remote control. Set TV code in PHONO button if necessary. TV VOL +/-, TV INPUT, and TV MUTE function if you have set the manufacturer ...

Owner's Manual
Page 46
...) TV VOL +/-, TV INPUT, and TV MUTE function if you have set up the code for Cable TV Tuner and Satellite Tuner before using the remote control. Introduction Remote Control Features s CABLE and SAT buttons (CABLE and SAT areas*5) s Å button (ex. Enter (Set 10KEY) TV VOL +/-, TV INPUT, and TV ...MUTE function if you have set up the manufacturer code for the TV Area. *6 You can control your VCR, if you have set up the manufacturer code...
...) TV VOL +/-, TV INPUT, and TV MUTE function if you have set up the code for Cable TV Tuner and Satellite Tuner before using the remote control. Introduction Remote Control Features s CABLE and SAT buttons (CABLE and SAT areas*5) s Å button (ex. Enter (Set 10KEY) TV VOL +/-, TV INPUT, and TV ...MUTE function if you have set up the manufacturer code for the TV Area. *6 You can control your VCR, if you have set up the manufacturer code...


