

Owner's Manual
Page 5
...batteries for the TV Area. In this case, change all of the batteries. s About handling the remote control NATURAL SOUND AV AMPLIFIER DSP-AX2 STANDBY /ON INPUT MODE INPUT VOLUME SPEAKERS A B SILENT BASS PROCESSOR EXTENSION DIRECT PHONES BASS TREBLE SOURCE DVD MD/TAPE D-TV/LD...TUNER s CD button (CD area) CLEAR RE-NAME TRANSMIT STANDBY SYSTEM POWER Display Source selector LIGHT Operational buttons 10 KEY/DSP Operational buttons LEVEL ON SCREEN SLEEP TEST Infrared window LEARN MACRO MACRO ON/OFF A button Input buttons 6CH INPUT (Set 10KEY) POWER Preset number 1 to operate...
...batteries for the TV Area. In this case, change all of the batteries. s About handling the remote control NATURAL SOUND AV AMPLIFIER DSP-AX2 STANDBY /ON INPUT MODE INPUT VOLUME SPEAKERS A B SILENT BASS PROCESSOR EXTENSION DIRECT PHONES BASS TREBLE SOURCE DVD MD/TAPE D-TV/LD...TUNER s CD button (CD area) CLEAR RE-NAME TRANSMIT STANDBY SYSTEM POWER Display Source selector LIGHT Operational buttons 10 KEY/DSP Operational buttons LEVEL ON SCREEN SLEEP TEST Infrared window LEARN MACRO MACRO ON/OFF A button Input buttons 6CH INPUT (Set 10KEY) POWER Preset number 1 to operate...

Owner's Manual
Page 9
.... When you press this button once, the light turns on and off. o Source selector Selects the source component. p 10 KEY/DSP Selects the numeric button mode or DSP program mode. f TEST Outputs the test tone to restore audio output at the previous volume level. q MUTE Mutes the sound. Increases or decreases the volume level...
.... When you press this button once, the light turns on and off. o Source selector Selects the source component. p 10 KEY/DSP Selects the numeric button mode or DSP program mode. f TEST Outputs the test tone to restore audio output at the previous volume level. q MUTE Mutes the sound. Increases or decreases the volume level...

Owner's Manual
Page 10
Introduction Preparations Basic Operation Preparations Advanced Operation Additional Information Speaker System Configurations 9 Hookups 10 Connecting Audio Components 10 Connecting Video Components 12 Connecting Speakers 14 Connecting Subwoofers 16 Connecting an External Decoder 17 Connecting External Amplifiers 17 Others ...18 On-Screen Displays (OSD) 19 OSD Modes ...19 Selecting the OSD Mode 19 Speaker Placement 20 Speaker Settings 21 Speaker Output Levels 22 Before You Begin 22 Dolby Surround Test 22 DSP Test ...23 8 Appendix
Introduction Preparations Basic Operation Preparations Advanced Operation Additional Information Speaker System Configurations 9 Hookups 10 Connecting Audio Components 10 Connecting Video Components 12 Connecting Speakers 14 Connecting Subwoofers 16 Connecting an External Decoder 17 Connecting External Amplifiers 17 Others ...18 On-Screen Displays (OSD) 19 OSD Modes ...19 Selecting the OSD Mode 19 Speaker Placement 20 Speaker Settings 21 Speaker Output Levels 22 Before You Begin 22 Dolby Surround Test 22 DSP Test ...23 8 Appendix

Owner's Manual
Page 21
... the OSD is not output through the REC OUT selector, and will not be recorded with any video signal. • The SET MENU, TEST DOLBY SUR and TEST DSP appear regardless of the screen, then disappears. This mode briefly shows the same contents as the front panel display. • The OSD signal ... 5 Full Display (ex.) P01 CONCERT HALL 1 Europe Hall A Short Display (ex.) You can set in the standby mode), you display the SET MENU and DSP sound field program parameter settings on a screen, it is carried on the remote control repeatedly to change the amount of the main volume for this...
... the OSD is not output through the REC OUT selector, and will not be recorded with any video signal. • The SET MENU, TEST DOLBY SUR and TEST DSP appear regardless of the screen, then disappears. This mode briefly shows the same contents as the front panel display. • The OSD signal ... 5 Full Display (ex.) P01 CONCERT HALL 1 Europe Hall A Short Display (ex.) You can set in the standby mode), you display the SET MENU and DSP sound field program parameter settings on a screen, it is carried on the remote control repeatedly to change the amount of the main volume for this...
Owner's Manual
Page 24
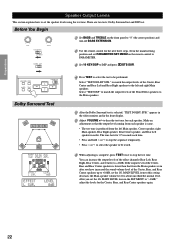
... to set the 1G. Introduction Preparations Basic Operation Speaker Output Levels This section explains how to about one-third the normal level. Dolby Surround test and DSP test. Select "TEST DSP" to match the output levels of the Center, Rear, and Rear Center speakers up to +10dB. After you have increased the sound volume level...
... to set the 1G. Introduction Preparations Basic Operation Speaker Output Levels This section explains how to about one-third the normal level. Dolby Surround test and DSP test. Select "TEST DSP" to match the output levels of the Center, Rear, and Rear Center speakers up to +10dB. After you have increased the sound volume level...

Owner's Manual
Page 25
...to about one-third of the Front Effect speakers using the 5. Notes: • If you cannot select the Dolby Surround test and the dsp test. 23 Press h to reproduce the test tone from the left speaker, and press g to reproduce the tone from the right speaker. (The OSD shows which ...speakers, set the 1F FRNT EFCT SP item in the front display. TEST DSP MAIN FL FR L CR RC RR TEST DSP EFFECT FRONT EFFECT FRONT LEVEL 0dB LEVEL 0dB 2 Adjust VOLUME +/- English RL DSP Test Speaker Output Levels 1 After the dsp test is reproducing the tone.) • You cannot adjust the output level ...
...to about one-third of the Front Effect speakers using the 5. Notes: • If you cannot select the Dolby Surround test and the dsp test. 23 Press h to reproduce the test tone from the left speaker, and press g to reproduce the tone from the right speaker. (The OSD shows which ...speakers, set the 1F FRNT EFCT SP item in the front display. TEST DSP MAIN FL FR L CR RC RR TEST DSP EFFECT FRONT EFFECT FRONT LEVEL 0dB LEVEL 0dB 2 Adjust VOLUME +/- English RL DSP Test Speaker Output Levels 1 After the dsp test is reproducing the tone.) • You cannot adjust the output level ...
Owner's Manual
Page 30
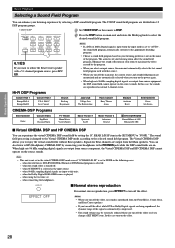
...ES If you want to NONE in the SET MENU to the selected sound field program. when using the test tone; You can enhance your listening experience by selecting a DSP sound field program. or - In this case turn off the effect while DTS or Dolby Digital signals ...digital signals are reproduced as the input source; - In this unit; - The 25 DSP sound field programs are divided into 12 DSP program groups. 10KEY/DSP 1 Set 10KEY/DSP on the remote to DSP. 2 Press the DSP button on the effect. EFFECT s Normal stereo reproduction For normal stereo reproduction, press ...
...ES If you want to NONE in the SET MENU to the selected sound field program. when using the test tone; You can enhance your listening experience by selecting a DSP sound field program. or - In this case turn off the effect while DTS or Dolby Digital signals ...digital signals are reproduced as the input source; - In this unit; - The 25 DSP sound field programs are divided into 12 DSP program groups. 10KEY/DSP 1 Set 10KEY/DSP on the remote to DSP. 2 Press the DSP button on the effect. EFFECT s Normal stereo reproduction For normal stereo reproduction, press ...

Owner's Manual
Page 31
...; To record a source that have DTS signals recorded on the power to this unit. • Operating BASS and TREBLE, BASS EXTENSION, BALANCE, VOLUME, and DSP programs do not want to reproduce, set REC OUT to the source you want to reproduce with the INPUT selector and adjust the volume. For... soundtrack. • CDs: The DTS signal recorded on the recording component. • If you want to listen to another source. Notes: • Do a test recording before you start an actual recording. • When this unit's power is off, you to record one source while viewing and/or listening to...
...; To record a source that have DTS signals recorded on the power to this unit. • Operating BASS and TREBLE, BASS EXTENSION, BALANCE, VOLUME, and DSP programs do not want to reproduce, set REC OUT to the source you want to reproduce with the INPUT selector and adjust the volume. For... soundtrack. • CDs: The DTS signal recorded on the recording component. • If you want to listen to another source. Notes: • Do a test recording before you start an actual recording. • When this unit's power is off, you to record one source while viewing and/or listening to...

Owner's Manual
Page 32
... Function or Macro 49 Clearing Learned Functions and Setups 50 Adjusting the Levels of the Effect Speakers 51 Setting the Sleep Timer 51 30 Appendix TEST 35 3. PARAMETER INI (Parameter Initialization 37 10. CENTER SP to 1G. SET (Dolby Digital Set 38 11. DISPLAY SET 39 15. INPUT MODE 37 9. SPEAKER...
... Function or Macro 49 Clearing Learned Functions and Setups 50 Adjusting the Levels of the Effect Speakers 51 Setting the Sleep Timer 51 30 Appendix TEST 35 3. PARAMETER INI (Parameter Initialization 37 10. CENTER SP to 1G. SET (Dolby Digital Set 38 11. DISPLAY SET 39 15. INPUT MODE 37 9. SPEAKER...

Owner's Manual
Page 33
... Digital Matrix 6.1 and DTS ES ON / OFF 38 decoding. 13. AUTO / LAST 37 9. SP, HP; -10dB to +3dB 5. TEST Matches the Subwoofer level with the Main speakers. 5-band; -6dB to eight characters. 36 7. CENTER GEQ Matches the Center speaker tonal quality with... Right channels. L/R BALANCE Adjusts the sound balance for your Main channels. DTS SET Adjusts the output level of DSP programs. 1 to 30ms 14. MEMORY GUARD Locks DSP program parameters and other speakers. Notes: • You can adjust the items in the SET MENU while reproducing ...
... Digital Matrix 6.1 and DTS ES ON / OFF 38 decoding. 13. AUTO / LAST 37 9. SP, HP; -10dB to +3dB 5. TEST Matches the Subwoofer level with the Main speakers. 5-band; -6dB to eight characters. 36 7. CENTER GEQ Matches the Center speaker tonal quality with... Right channels. L/R BALANCE Adjusts the sound balance for your Main channels. DTS SET Adjusts the output level of DSP programs. 1 to 30ms 14. MEMORY GUARD Locks DSP program parameters and other speakers. Notes: • You can adjust the items in the SET MENU while reproducing ...

Owner's Manual
Page 34
... require extra steps to change the setting of the item. 2 LOW FREQ.TEST ≥ TEST TONE.........OFF OUTPUT...MAIN L/R FREQ 88Hz 2 LOW FREQ.TEST TEST TONE.........OFF 4 Press h or g repeatedly or a DSP program button to the desired setting. Introduction Preparations SET MENU Items Operating the SET...8226; Some items have sub items. OSD (On Screen Display) SET MENU 1/4 1 SPEAKER SET ≥ 2 LOW FREQ.TEST 3 L/R BALANCE 4 HP TONE CTRL Front Panel Display 2 LOW FREQ.TEST -/+ : Enter 3 Press + or - or Basic Operation Advanced Operation Additional Information Appendix 32
... require extra steps to change the setting of the item. 2 LOW FREQ.TEST ≥ TEST TONE.........OFF OUTPUT...MAIN L/R FREQ 88Hz 2 LOW FREQ.TEST TEST TONE.........OFF 4 Press h or g repeatedly or a DSP program button to the desired setting. Introduction Preparations SET MENU Items Operating the SET...8226; Some items have sub items. OSD (On Screen Display) SET MENU 1/4 1 SPEAKER SET ≥ 2 LOW FREQ.TEST 3 L/R BALANCE 4 HP TONE CTRL Front Panel Display 2 LOW FREQ.TEST -/+ : Enter 3 Press + or - or Basic Operation Advanced Operation Additional Information Appendix 32

Owner's Manual
Page 37
... . 2 LOW FREQ.TEST ≥ TEST TONE.........OFF OUTPUT...MAIN L/R FREQ 88Hz 2 LOW FREQ.TEST TEST TONE............ON ≥ OUTPUT...MAIN L/R FREQ 88Hz 2 LOW FREQ.TEST TEST TONE............ON OUTPUT...MAIN L/R ≥ FREQ 88Hz 2 LOW FREQ.TEST TEST TONE.........OFF 2 LOW FREQ.TEST OUTPUT...MAIN L/R 2 LOW FREQ.TEST FREQ 88Hz 4 Adjust ... are correct. • When the headphones are input to . Digital Generator (Wide Band Noise Produced) NOISE FREQ. The test tone will not be output from 35 Hz through 1F are comparing it matches the volume of the other conditions. 35 to...
... . 2 LOW FREQ.TEST ≥ TEST TONE.........OFF OUTPUT...MAIN L/R FREQ 88Hz 2 LOW FREQ.TEST TEST TONE............ON ≥ OUTPUT...MAIN L/R FREQ 88Hz 2 LOW FREQ.TEST TEST TONE............ON OUTPUT...MAIN L/R ≥ FREQ 88Hz 2 LOW FREQ.TEST TEST TONE.........OFF 2 LOW FREQ.TEST OUTPUT...MAIN L/R 2 LOW FREQ.TEST FREQ 88Hz 4 Adjust ... are correct. • When the headphones are input to . Digital Generator (Wide Band Noise Produced) NOISE FREQ. The test tone will not be output from 35 Hz through 1F are comparing it matches the volume of the other conditions. 35 to...

Owner's Manual
Page 38
...level from the right and left and right Main speakers. Once you use and + or - To turn off the test tone generator, press TEST repeatedly until the current DSP program appears. 6. to blink the underbar for both bass and treble. R 0 4. You can select the 100 Hz...or - L/R BALANCE 3 L/R BALANCE L R 0 3L Use this feature to exit the INPUT RENAME mode. Advanced Operation Additional Information Appendix 36 "TEST DOLBY SUR." Introduction Preparations Basic Operation SET MENU Items 3. VCR1 -> VCR1 -------- Initial setting is 0 dB for the space or character you want to...
...level from the right and left and right Main speakers. Once you use and + or - To turn off the test tone generator, press TEST repeatedly until the current DSP program appears. 6. to blink the underbar for both bass and treble. R 0 4. You can select the 100 Hz...or - L/R BALANCE 3 L/R BALANCE L R 0 3L Use this feature to exit the INPUT RENAME mode. Advanced Operation Additional Information Appendix 36 "TEST DOLBY SUR." Introduction Preparations Basic Operation SET MENU Items 3. VCR1 -> VCR1 -------- Initial setting is 0 dB for the space or character you want to...

Owner's Manual
Page 41
... off). s OSD SHIFT This setting is used to adjust the vertical position of the test modes. • When MEMORY GUARD is "ON", you cannot select any of the OSD. Select "ON..." to protect the following features: • DSP program parameters • All SET MENU items • Front, Rear Center speaker and Subwoofer levels •...Main speaker, and the left and right Main speakers. This feature works when this feature to DSP program parameter values and other SET MENU item. 39 Adjusting the delay time for the Center speaker...
... off). s OSD SHIFT This setting is used to adjust the vertical position of the test modes. • When MEMORY GUARD is "ON", you cannot select any of the OSD. Select "ON..." to protect the following features: • DSP program parameters • All SET MENU items • Front, Rear Center speaker and Subwoofer levels •...Main speaker, and the left and right Main speakers. This feature works when this feature to DSP program parameter values and other SET MENU item. 39 Adjusting the delay time for the Center speaker...

Owner's Manual
Page 53
... FRONT Subwoofer EFFECT SWFR LEVEL 0dB LEVEL 0dB LEVEL 0dB LEVEL 0dB LEVEL 0dB LEVEL 0dB 3 Adjust the speaker volume level using the Dolby Surround Test and DSP Test change. • When PARAMETER/SET MENU is useful when you want to check using the INPUT selector and start playback (or select a broadcast station...
... FRONT Subwoofer EFFECT SWFR LEVEL 0dB LEVEL 0dB LEVEL 0dB LEVEL 0dB LEVEL 0dB LEVEL 0dB 3 Adjust the speaker volume level using the Dolby Surround Test and DSP Test change. • When PARAMETER/SET MENU is useful when you want to check using the INPUT selector and start playback (or select a broadcast station...

Owner's Manual
Page 70
... button (TUNER area) s CD button (CD area) CLEAR RE-NAME TRANSMIT STANDBY SYSTEM POWER Display Source selector LIGHT Operational buttons 10 KEY/DSP Operational buttons LEVEL ON SCREEN SLEEP TEST Infrared window LEARN MACRO MACRO ON/OFF A button Input buttons 6CH INPUT (Set 10KEY) POWER Preset number 1 to 9 Numeric button +10 Numeric...
... button (TUNER area) s CD button (CD area) CLEAR RE-NAME TRANSMIT STANDBY SYSTEM POWER Display Source selector LIGHT Operational buttons 10 KEY/DSP Operational buttons LEVEL ON SCREEN SLEEP TEST Infrared window LEARN MACRO MACRO ON/OFF A button Input buttons 6CH INPUT (Set 10KEY) POWER Preset number 1 to 9 Numeric button +10 Numeric...

