

Owner's Manual
Page 2
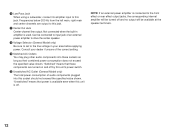
...-anything from Dolby-Surround encoded video sources using the built-in a safe place for later reference. Seven built-in the field of a Yamaha Digital Sound Field Processing (DSP) System-an extremely sophisticated audio component. The DSP system takes full advantage of Yamaha's undisputed leadership in channels of amplification on the DSP-A990 mean that no additional amplifiers are the proud owner of digital audio processing to enjoy advanced digital sound field processing...
...-anything from Dolby-Surround encoded video sources using the built-in a safe place for later reference. Seven built-in the field of a Yamaha Digital Sound Field Processing (DSP) System-an extremely sophisticated audio component. The DSP system takes full advantage of Yamaha's undisputed leadership in channels of amplification on the DSP-A990 mean that no additional amplifiers are the proud owner of digital audio processing to enjoy advanced digital sound field processing...
Owner's Manual
Page 3
... plug fitted. The wire which is coloured BROWN must be connected to the terminal which could cause mechanical damage. 2. INSTALL THE UNIT IN WELL-VENTILATED CONDITION The openings on the rear of the three pin plug. Handle it with the following code. DO NOT OPEN THE UNIT OR ATTEMPT REPAIRS OR MODIFICATIONS YOURSELF This product contains no user-serviceable parts. Wipe...
... plug fitted. The wire which is coloured BROWN must be connected to the terminal which could cause mechanical damage. 2. INSTALL THE UNIT IN WELL-VENTILATED CONDITION The openings on the rear of the three pin plug. Handle it with the following code. DO NOT OPEN THE UNIT OR ATTEMPT REPAIRS OR MODIFICATIONS YOURSELF This product contains no user-serviceable parts. Wipe...
Owner's Manual
Page 7
... for any Audio/Video source with conventional analog signal processing systems. In addition, this unit features a built-in effect only three channels: left, right, and rear. This combination is used on sound field programs No. 8 through No. 11, and "Enhanced DOLBY PRO LOGIC" of Dolby Pro Logic and YAMAHA DSP. CINEMA DSP 7ch The YAMAHA "CINEMA DSP" logo indicates these programs are precisely recreated on the screen while experiencing good stereo imaging. Dolby Pro Logic gets...
... for any Audio/Video source with conventional analog signal processing systems. In addition, this unit features a built-in effect only three channels: left, right, and rear. This combination is used on sound field programs No. 8 through No. 11, and "Enhanced DOLBY PRO LOGIC" of Dolby Pro Logic and YAMAHA DSP. CINEMA DSP 7ch The YAMAHA "CINEMA DSP" logo indicates these programs are precisely recreated on the screen while experiencing good stereo imaging. Dolby Pro Logic gets...
Owner's Manual
Page 9
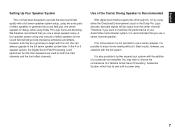
... your Audio/Video home theater system, it . We therefore recommend that you want to use a seven-speaker setup. A four-speaker system using only one center speaker for both the main channels and the front effect channels. Best results, however, are used for dialog, when using Dolby Pro Logic Surround decoding. It is still performed, but the main speakers are obtained with the addition of a subwoofer and amplifier.You may be output from the center channel...
... your Audio/Video home theater system, it . We therefore recommend that you want to use a seven-speaker setup. A four-speaker system using only one center speaker for both the main channels and the front effect channels. Best results, however, are used for dialog, when using Dolby Pro Logic Surround decoding. It is still performed, but the main speakers are obtained with the addition of a subwoofer and amplifier.You may be output from the center channel...
Owner's Manual
Page 13
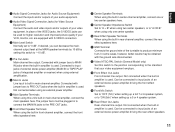
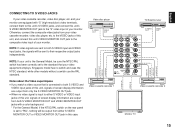
... wire disconnected. Not connected when the built-in center-channel amplifier, connect one or two center speakers here. 9 Center Speaker Impedance Switch Set to "A + B" when using two center speakers, or to input jacks of an external stereo power amplifier driving the front effect speakers. E Rear Effect Out Jacks Rear-channel line output. English 1 Audio Signal Connection Jacks (for Audio Source Equipment) Connect the inputs and/or outputs of your audio equipment. 2 Audio/Video Signal Connection Jacks (for higher resolution and improved picture quality if your VCR, monitor...
... wire disconnected. Not connected when the built-in center-channel amplifier, connect one or two center speakers here. 9 Center Speaker Impedance Switch Set to "A + B" when using two center speakers, or to input jacks of an external stereo power amplifier driving the front effect speakers. E Rear Effect Out Jacks Rear-channel line output. English 1 Audio Signal Connection Jacks (for Audio Source Equipment) Connect the inputs and/or outputs of your audio equipment. 2 Audio/Video Signal Connection Jacks (for higher resolution and improved picture quality if your VCR, monitor...
Owner's Manual
Page 14
... or rear effect output jacks, the corresponding internal amplifier will be turned off and no output will be connected to input jack of the correct setting. Not connected when the built-in your dealer if unsure of an external power amplifier to drive the center speaker. F Low Pass Jack When using a subwoofer, connect its amplifier input to this unit is off. Frequencies below 200 Hz from the left main, right main and center channels are turned...
... or rear effect output jacks, the corresponding internal amplifier will be turned off and no output will be connected to input jack of the correct setting. Not connected when the built-in your dealer if unsure of an external power amplifier to drive the center speaker. F Low Pass Jack When using a subwoofer, connect its amplifier input to this unit is off. Frequencies below 200 Hz from the left main, right main and center channels are turned...
Owner's Manual
Page 17
... NTSC/PAL switch on the rear panel is the General Model, be output from both S VIDEO MONITOR OUT and VIDEO MONITOR OUT jacks with "S" (high-resolution) video terminals, connect them to the "S" video input of screen display information are sent to both S VIDEO and VIDEO input jacks of this unit, signals of your monitor. Singapore model has no video signal is connected to both S VIDEO input and VIDEO input jacks, the signals will be sure the NTSC/PAL switch has been correctly set to...
... NTSC/PAL switch on the rear panel is the General Model, be output from both S VIDEO MONITOR OUT and VIDEO MONITOR OUT jacks with "S" (high-resolution) video terminals, connect them to the "S" video input of screen display information are sent to both S VIDEO and VIDEO input jacks of this unit, signals of your monitor. Singapore model has no video signal is connected to both S VIDEO input and VIDEO input jacks, the signals will be sure the NTSC/PAL switch has been correctly set to...

Owner's Manual
Page 23
... monitor screen (when the monitor is on ). 9 Input Selector Switches for room acoustics. The selected input source is also shown by lights up . The selected source is also shown by speaker positions or listening room conditions. direction. H Master Volume Control Simultaneously controls signal level at all outputs: front effect, main, rear effect, center, and subwoofer. (This does not affect TAPE REC OUT level.) 21 F Balance Control Adjusts the left and right output volume to the Main Speakers to these jacks. English 6 Remote Control Sensor Signals...
... monitor screen (when the monitor is on ). 9 Input Selector Switches for room acoustics. The selected input source is also shown by lights up . The selected source is also shown by speaker positions or listening room conditions. direction. H Master Volume Control Simultaneously controls signal level at all outputs: front effect, main, rear effect, center, and subwoofer. (This does not affect TAPE REC OUT level.) 21 F Balance Control Adjusts the left and right output volume to the Main Speakers to these jacks. English 6 Remote Control Sensor Signals...
Owner's Manual
Page 24
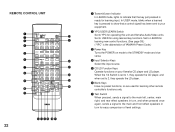
... player. 6 Blank Keys Have no preset functions, so are used for learning other remote controller's functions only. 7 Test Switch When pressed, sends a signal to the main left, center, main right, and rear effect speakers in turn for easy comparison of YAMAHA Preset Code.) 3 Power Key Turns the POWER on mode to the STANDBY mode and vice versa. 4 Input Selector Keys Select the input source. 5 CD/LD Function Keys Operate functions on your equipment. 2 YPC/USER/LEARN Switch Set to YPC for using learned key functions. Set...
... player. 6 Blank Keys Have no preset functions, so are used for learning other remote controller's functions only. 7 Test Switch When pressed, sends a signal to the main left, center, main right, and rear effect speakers in turn for easy comparison of YAMAHA Preset Code.) 3 Power Key Turns the POWER on mode to the STANDBY mode and vice versa. 4 Input Selector Keys Select the input source. 5 CD/LD Function Keys Operate functions on your equipment. 2 YPC/USER/LEARN Switch Set to YPC for using learned key functions. Set...

Owner's Manual
Page 25
... the master VOLUME control flashes on the connected monitor's screen. Keys are used for settings and adjustments in the SET MENU mode. E Parameter Select Keys Select DSP program parameters, or titles of display showing the program name and parameters, or information about various settings and adjustments on and off the sound's output from those speakers, press this switch selects the group 1 or 2 of the front effect speakers. 9 Center Level +/- H Master Volume +/- When set to USER or LEARN, this key again. J Program Select Keys (1 through 12) Select DSP programs...
... the master VOLUME control flashes on the connected monitor's screen. Keys are used for settings and adjustments in the SET MENU mode. E Parameter Select Keys Select DSP program parameters, or titles of display showing the program name and parameters, or information about various settings and adjustments on and off the sound's output from those speakers, press this switch selects the group 1 or 2 of the front effect speakers. 9 Center Level +/- H Master Volume +/- When set to USER or LEARN, this key again. J Program Select Keys (1 through 12) Select DSP programs...
Owner's Manual
Page 26
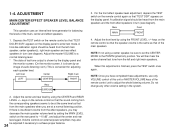
... the center channel test tone from the main speakers and the front effect speakers in turn (see diagram). keys on the remote control so that the sound coming from the corresponding speakers seems to be sure to set the CENTER MODE to a normal listening level. * The state of test-tone output is shown by the display panel and the monitor screen. (On the monitor screen, it is finished, press the TEST switch once again. ADJUSTMENT MAIN/CENTER/EFFECT SPEAKER LEVEL BALANCE ADJUSTMENT This operation uses...
... the center channel test tone from the main speakers and the front effect speakers in turn (see diagram). keys on the remote control so that the sound coming from the corresponding speakers seems to be sure to set the CENTER MODE to a normal listening level. * The state of test-tone output is shown by the display panel and the monitor screen. (On the monitor screen, it is finished, press the TEST switch once again. ADJUSTMENT MAIN/CENTER/EFFECT SPEAKER LEVEL BALANCE ADJUSTMENT This operation uses...

Owner's Manual
Page 28
... IMPORTANT SETTINGS AND ADJUSTMENTS IN THE "SET MENU" MODE Make the following five types of frequencies for the center channel are output to the center speaker. Select any desired position or edit parameters on any frequency below 100 Hz will make these settings and adjustments cannot be done without monitoring the display information (or the information displayed on . 1. In Wide (WD) position, all range of settings and adjustments before enjoying audio and video sources. INPUT...
... IMPORTANT SETTINGS AND ADJUSTMENTS IN THE "SET MENU" MODE Make the following five types of frequencies for the center channel are output to the center speaker. Select any desired position or edit parameters on any frequency below 100 Hz will make these settings and adjustments cannot be done without monitoring the display information (or the information displayed on . 1. In Wide (WD) position, all range of settings and adjustments before enjoying audio and video sources. INPUT...
Owner's Manual
Page 29
... - Input level adjustment (INPUT LVL TRIM) This function is provided for all parameter settings on page 26. 27 Adjusting method After selecting the item (title) in step 2 on a DSP program. keys • TEST switch 5. The sound level of each frequency individually. Adjustment should be done to each input source should be changed is used to display the condition of the center channel. all parameters on the remote control to tailor, over a ±6 dB range, the overall output frequency...
... - Input level adjustment (INPUT LVL TRIM) This function is provided for all parameter settings on page 26. 27 Adjusting method After selecting the item (title) in step 2 on a DSP program. keys • TEST switch 5. The sound level of each frequency individually. Adjustment should be done to each input source should be changed is used to display the condition of the center channel. all parameters on the remote control to tailor, over a ±6 dB range, the overall output frequency...
Owner's Manual
Page 30
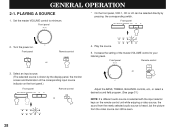
... sound from the video source can be seen. 28 Play the source. PLAYING A SOURCE 1. Increase the setting of the corresponding input source indicator on the front panel.) Front panel Remote control INPUT SELECTOR VCR I CD LD 2. Set the master VOLUME control to your listening level. Front panel * On the front panel, VCR 1, CD or LD can still be selected directly by the display panel, the monitor screen and illumination of the master VOLUME control to minimum. TV/DBS PHONO 5. Front panel Remote control or MASTER VOLUME Adjust the BASS, TREBLE, BALANCE controls...
... sound from the video source can be seen. 28 Play the source. PLAYING A SOURCE 1. Increase the setting of the corresponding input source indicator on the front panel.) Front panel Remote control INPUT SELECTOR VCR I CD LD 2. Set the master VOLUME control to your listening level. Front panel * On the front panel, VCR 1, CD or LD can still be selected directly by the display panel, the monitor screen and illumination of the master VOLUME control to minimum. TV/DBS PHONO 5. Front panel Remote control or MASTER VOLUME Adjust the BASS, TREBLE, BALANCE controls...

Owner's Manual
Page 31
... panel 3. Select an input source to be played (and to the recording mode. * Adjust the recording level on the tape deck or VCR. Front panel TV/DBS PHONO or INPUT SELECTOR VCR I CD LD CD 2. REC OUT SOURCE NOTE: To record picture from a video source and sound from the display). * The same result will be recorded). (See page 28 for recording to be obtained after 5 seconds without any operation...
... panel 3. Select an input source to be played (and to the recording mode. * Adjust the recording level on the tape deck or VCR. Front panel TV/DBS PHONO or INPUT SELECTOR VCR I CD LD CD 2. REC OUT SOURCE NOTE: To record picture from a video source and sound from the display). * The same result will be recorded). (See page 28 for recording to be obtained after 5 seconds without any operation...

Owner's Manual
Page 32
.../or video signals to be recorded stops flashing). * The same result will flash.) Front panel INPUT SELECTOR VCR I CD LD TV/DBS PHONO 5. While recording a source, you can enjoy listening to and/or watching another source selected with the input selector switch. Press the REC OUT switch (so that "REC OUT..." Set the tape deck or VCR used for recording to the recording mode. * Adjust the recording level on the display...
.../or video signals to be recorded stops flashing). * The same result will flash.) Front panel INPUT SELECTOR VCR I CD LD TV/DBS PHONO 5. While recording a source, you can enjoy listening to and/or watching another source selected with the input selector switch. Press the REC OUT switch (so that "REC OUT..." Set the tape deck or VCR used for recording to the recording mode. * Adjust the recording level on the display...

Owner's Manual
Page 33
...Video sources including sources encoded with Dolby Pro Logic surround. SELECTING SOUND FIELD PROGRAMS 1. NOTE: Composite video and S video signals pass independently through this unit's video circuits. For stereo audio source For audio/video sources HALL 1 1 HALL 2 2 HALL 3 3 CHURCH 4 ROCK CONCERT 5 JAZZ CLUB 6 ENTERTAINMENT 7 TV THEATER 8 CONCERT VIDEO 9 VIDEO THEATER 10 MOVIE THEATER 11 PRO LOGIC 12 31 If you can be a case that display information superimposed on the material being recorded. English NOTE: Adjusting the master VOLUME, BASS, TREBLE controls...
...Video sources including sources encoded with Dolby Pro Logic surround. SELECTING SOUND FIELD PROGRAMS 1. NOTE: Composite video and S video signals pass independently through this unit's video circuits. For stereo audio source For audio/video sources HALL 1 1 HALL 2 2 HALL 3 3 CHURCH 4 ROCK CONCERT 5 JAZZ CLUB 6 ENTERTAINMENT 7 TV THEATER 8 CONCERT VIDEO 9 VIDEO THEATER 10 MOVIE THEATER 11 PRO LOGIC 12 31 If you can be a case that display information superimposed on the material being recorded. English NOTE: Adjusting the master VOLUME, BASS, TREBLE controls...

Owner's Manual
Page 40
.../SET MENU switch will now perform the assigned function. CENTER LEVEL VIDEO 9 THEATER 10 THEATER 11 PRO LOGIC 12 ON SCREEN PARAMETER REAR LEVEL EFFECT ON/OFF SET MENU MASTER VOLUME MUTING PARAMETER/SET MENU switch RESET CLEAR Learning a New Remote Control Function 1. Select the learning group number (1 or 2) by the various keys. 2. Provided user program sheets should be learned. REMOTE CONTROL "LEARNING" FUNCTION The remote control unit, in addition to controlling the most commonly used to it to "LEARN", all keys will light up. 5. Set the YPC/USER...
.../SET MENU switch will now perform the assigned function. CENTER LEVEL VIDEO 9 THEATER 10 THEATER 11 PRO LOGIC 12 ON SCREEN PARAMETER REAR LEVEL EFFECT ON/OFF SET MENU MASTER VOLUME MUTING PARAMETER/SET MENU switch RESET CLEAR Learning a New Remote Control Function 1. Select the learning group number (1 or 2) by the various keys. 2. Provided user program sheets should be learned. REMOTE CONTROL "LEARNING" FUNCTION The remote control unit, in addition to controlling the most commonly used to it to "LEARN", all keys will light up. 5. Set the YPC/USER...

Owner's Manual
Page 41
... indicator will flash on and off three times. The function learned by another remote control unit, that the keys return to "USER". 2. NOTE: When the remote control freezes, press the RESET button to "LEARN". 2. Use the point of a pencil or other similar object to press and hold any key can be programmed again. Press and hold the CLEAR button. 3. In this remote control unit will...
... indicator will flash on and off three times. The function learned by another remote control unit, that the keys return to "USER". 2. NOTE: When the remote control freezes, press the RESET button to "LEARN". 2. Use the point of a pencil or other similar object to press and hold any key can be programmed again. Press and hold the CLEAR button. 3. In this remote control unit will...
Owner's Manual
Page 47
... by using the headphones connected to the compact disc player or cassette deck which , due to this unit. The protection circuit has activated because of 6 meters, no more than 30 degrees off . Direct sunlight or lighting (of an inverter type of the main unit. Set the FRONT MIX switch to turn it on a tape deck connected to the signal-coding and modulation systems employed by another remote control unit...
... by using the headphones connected to the compact disc player or cassette deck which , due to this unit. The protection circuit has activated because of 6 meters, no more than 30 degrees off . Direct sunlight or lighting (of an inverter type of the main unit. Set the FRONT MIX switch to turn it on a tape deck connected to the signal-coding and modulation systems employed by another remote control unit...


