
Owners Manual
Page 4
... of the disc tray and other openings to this unit is faulty. 18. This state is designed to a wall outlet until all connections are complete. 8. When this unit, and/or personal injury. 7. To assure the finest performance, please read the "Troubleshooting" section in the owner's manual on common operating errors before operating your eyes close to the opening of power. ■ DANGER...
... of the disc tray and other openings to this unit is faulty. 18. This state is designed to a wall outlet until all connections are complete. 8. When this unit, and/or personal injury. 7. To assure the finest performance, please read the "Troubleshooting" section in the owner's manual on common operating errors before operating your eyes close to the opening of power. ■ DANGER...

Owners Manual
Page 5
... to change. This manual was printed before installing new batteries. • Do not throw away batteries with your local regulations. See the illustration inside the battery compartment. • Remove the batteries if the remote control is not used by Yamaha in accordance with new ones. • Do not use old batteries together with a license agreement. ■ Memory backup If the power cable is disconnected from direct lighting. ■...
... to change. This manual was printed before installing new batteries. • Do not throw away batteries with your local regulations. See the illustration inside the battery compartment. • Remove the batteries if the remote control is not used by Yamaha in accordance with new ones. • Do not use old batteries together with a license agreement. ■ Memory backup If the power cable is disconnected from direct lighting. ■...

Owners Manual
Page 7
... Getting Started 8 Installing batteries in the remote control . . 8 Connecting speakers 9 Connecting a powered subwoofer 10 Connecting antennas 11 Connecting a TV 12 Connecting a recorder (CDR, MDR, etc.) . . 14 Connecting an AV receiver or decoder . . . 14 Connecting the power cable 15 3 General Functions 16 Turning on the DRX-730 16 Selecting input sources 16 Adjusting the volume 17 Muting the sound 17 Adjusting the bass and treble 18 Adjusting the balance 18 Pure Direct playback mode 19 Using headphones 19 Adjusting the display brightness 20 Using the sleep timer 20 Setting...
... Getting Started 8 Installing batteries in the remote control . . 8 Connecting speakers 9 Connecting a powered subwoofer 10 Connecting antennas 11 Connecting a TV 12 Connecting a recorder (CDR, MDR, etc.) . . 14 Connecting an AV receiver or decoder . . . 14 Connecting the power cable 15 3 General Functions 16 Turning on the DRX-730 16 Selecting input sources 16 Adjusting the volume 17 Muting the sound 17 Adjusting the bass and treble 18 Adjusting the balance 18 Pure Direct playback mode 19 Using headphones 19 Adjusting the display brightness 20 Using the sleep timer 20 Setting...
Owners Manual
Page 8
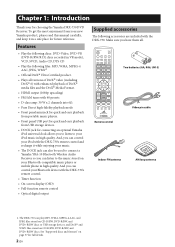
... on your iPod music in high quality. Features • Play the following discs: DVD-Video, DVD-VR (DVD-R/RW/R DL discs recorded in VR mode), VCD, SVCD, Audio CD, DTS CD • Play the following accessories are included with the DRX-730. AE SETUP PRESET ENTER MENU AE RETURN AUTO/ MANUAL MEMORY VOLUME BAND TUNER DVD/USB AUX/PORTABLE DOCK SOUND PURE DIRECT MUTE TIMER SLEEP DIMMER DISPLAY Two batteries (AA, R06, UM-3) Video pin cable Remote control Indoor FM antenna AM loop antenna 1. The DRX-730 can play MP3, WMA...
... on your iPod music in high quality. Features • Play the following discs: DVD-Video, DVD-VR (DVD-R/RW/R DL discs recorded in VR mode), VCD, SVCD, Audio CD, DTS CD • Play the following accessories are included with the DRX-730. AE SETUP PRESET ENTER MENU AE RETURN AUTO/ MANUAL MEMORY VOLUME BAND TUNER DVD/USB AUX/PORTABLE DOCK SOUND PURE DIRECT MUTE TIMER SLEEP DIMMER DISPLAY Two batteries (AA, R06, UM-3) Video pin cable Remote control Indoor FM antenna AM loop antenna 1. The DRX-730 can play MP3, WMA...

Owners Manual
Page 12
... control signals to the DRX-730 (see page 47). C Number buttons Enter numbers. G Pause ( ) Pauses playback. The cursor buttons are also used for slow-motion playback and frame-by-frame playback. H Rewind ( ) Rewinds playback. AE PRESET ENTER MENU AE d SETUP L RETURN e M VOLUME N AUTO/ MANUAL MEMORY f O BAND TUNER P Q R S DVD/USB AUX/PORTABLE DOCK SOUND PURE DIRECT MUTE TIMER SLEEP DIMMER DISPLAY g h i j k T l Tip: • In addition to controlling the DRX-730, the remote control can also be used Bluetooth device and makes the DRX-730...
... control signals to the DRX-730 (see page 47). C Number buttons Enter numbers. G Pause ( ) Pauses playback. The cursor buttons are also used for slow-motion playback and frame-by-frame playback. H Rewind ( ) Rewinds playback. AE PRESET ENTER MENU AE d SETUP L RETURN e M VOLUME N AUTO/ MANUAL MEMORY f O BAND TUNER P Q R S DVD/USB AUX/PORTABLE DOCK SOUND PURE DIRECT MUTE TIMER SLEEP DIMMER DISPLAY g h i j k T l Tip: • In addition to controlling the DRX-730, the remote control can also be used Bluetooth device and makes the DRX-730...

Owners Manual
Page 18
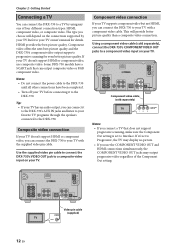
...'t support HDMI or component video, use the COMPONENT VIDEO OUT and HDMI connections simultaneously, the COMPONENT VIDEO OUT jacks may display no picture. • If you can connect it 's set to the DRX-730. MAINS HDMI CLASS 2 WIRING CABLAGE CLASSE 2 R 6 MIN SPEAKER SPEAKERS R SUBWOOFER OUT OUT IN AUX AM ANT GND FM ANT 75 UNBAL. PR PB DOCK Y OUT VIDEO COMPONENT OPTICAL VIDEO OUT DIGITAL Video pin cable (supplied) IN TV VIDEO 12 En Some DRX-730 models have been completed. • Turn off your TV owner's manual for...
...'t support HDMI or component video, use the COMPONENT VIDEO OUT and HDMI connections simultaneously, the COMPONENT VIDEO OUT jacks may display no picture. • If you can connect it 's set to the DRX-730. MAINS HDMI CLASS 2 WIRING CABLAGE CLASSE 2 R 6 MIN SPEAKER SPEAKERS R SUBWOOFER OUT OUT IN AUX AM ANT GND FM ANT 75 UNBAL. PR PB DOCK Y OUT VIDEO COMPONENT OPTICAL VIDEO OUT DIGITAL Video pin cable (supplied) IN TV VIDEO 12 En Some DRX-730 models have been completed. • Turn off your TV owner's manual for...

Owners Manual
Page 20
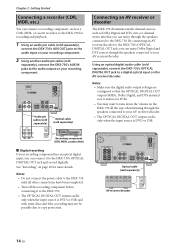
... ANT 75 UNBAL. 6 MIN SPEAKER SPEAKERS R SUBWOOFER OUT OUT IN AUX DOCK Y OUT VIDEO COMPONENT VIDEO OUT OPTICAL DIGITAL Optical cable (sold separately), connect the DRX-730's OPTICAL DIGITAL OUT jack to a digital optical input on the DRX-730 all other connections have been completed. • Turn off the recording component before connecting it is DVD or USB, and with some discs and files, recording may want to turn down the volume on the AV receiver/decoder. Chapter 2: Getting Started Connecting a recorder (CDR, MDR, etc...
... ANT 75 UNBAL. 6 MIN SPEAKER SPEAKERS R SUBWOOFER OUT OUT IN AUX DOCK Y OUT VIDEO COMPONENT VIDEO OUT OPTICAL DIGITAL Optical cable (sold separately), connect the DRX-730's OPTICAL DIGITAL OUT jack to a digital optical input on the DRX-730 all other connections have been completed. • Turn off the recording component before connecting it is DVD or USB, and with some discs and files, recording may want to turn down the volume on the AV receiver/decoder. Chapter 2: Getting Started Connecting a recorder (CDR, MDR, etc...
Owners Manual
Page 22
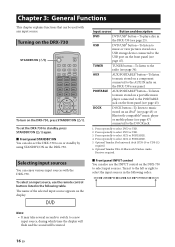
... PORTABLE jack on the DRX-730, press STANDBY/ON ( ). DVD Input source Button and description DVD DVD/USB1 button-To play a disc in the following order: DVD USB FM AM AUX PORTABLE DOCK Note: • It may take several seconds to switch to the DOCK jack. 1. Press repeatedly to select AUX or PORTABLE. 5. Optional Yamaha YBA-10 Bluetooth Wireless Audio Receiver required. ■ Front panel INPUT control You can also use the remote control buttons listed in the DRX-730 (see page 23). Turning on the display...
... PORTABLE jack on the DRX-730, press STANDBY/ON ( ). DVD Input source Button and description DVD DVD/USB1 button-To play a disc in the following order: DVD USB FM AM AUX PORTABLE DOCK Note: • It may take several seconds to switch to the DOCK jack. 1. Press repeatedly to select AUX or PORTABLE. 5. Optional Yamaha YBA-10 Bluetooth Wireless Audio Receiver required. ■ Front panel INPUT control You can also use the remote control buttons listed in the DRX-730 (see page 23). Turning on the display...
Owners Manual
Page 29
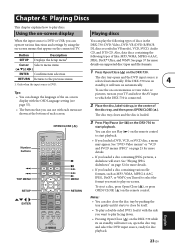
... also use Play ( ) on the remote control to play facing down. • Pressing Open/Close ( ) on the DRX-730 while its on the DRX-730 to the previous menu 1. Also, data discs containing the following types of each screen. The disc tray closes and the disc is selected automatically. AE SETUP PRESET ENTER MENU AE RETURN AUTO/ MANUAL MEMORY VOLUME BAND TUNER DVD/USB AUX/PORTABLE DOCK SOUND PURE DIRECT MUTE TIMER SLEEP DIMMER DISPLAY MENU RETURN 3 Press Play/Pause ( / ) on standby will start. See "Playing...
... also use Play ( ) on the remote control to play facing down. • Pressing Open/Close ( ) on the DRX-730 while its on the DRX-730 to the previous menu 1. Also, data discs containing the following types of each screen. The disc tray closes and the disc is selected automatically. AE SETUP PRESET ENTER MENU AE RETURN AUTO/ MANUAL MEMORY VOLUME BAND TUNER DVD/USB AUX/PORTABLE DOCK SOUND PURE DIRECT MUTE TIMER SLEEP DIMMER DISPLAY MENU RETURN 3 Press Play/Pause ( / ) on standby will start. See "Playing...

Owners Manual
Page 49
... HDMI CLASS 2 WIRING CABLAGE CLASSE 2 R 6 MIN SPEAKER SPEAKERS R SUBWOOFER OUT OUT IN AUX AM ANT GND FM ANT 75 UNBAL. Chapter 7: Portable Device Playback This chapter explains how to enjoy content stored on the DRX-730. 3 Insert your iPod into the Yamaha dock. PR PB DOCK Y OUT VIDEO COMPONENT OPTICAL VIDEO OUT DIGITAL Dock cable (supplied with the DRX-730. With an optional Yamaha iPod universal dock (YDS-10 or YDS-11) connected to turn on a portable device, such as a music player, iPod, USB iPod...
... HDMI CLASS 2 WIRING CABLAGE CLASSE 2 R 6 MIN SPEAKER SPEAKERS R SUBWOOFER OUT OUT IN AUX AM ANT GND FM ANT 75 UNBAL. Chapter 7: Portable Device Playback This chapter explains how to enjoy content stored on the DRX-730. 3 Insert your iPod into the Yamaha dock. PR PB DOCK Y OUT VIDEO COMPONENT OPTICAL VIDEO OUT DIGITAL Dock cable (supplied with the DRX-730. With an optional Yamaha iPod universal dock (YDS-10 or YDS-11) connected to turn on a portable device, such as a music player, iPod, USB iPod...

Owners Manual
Page 53
... Yamaha YBA-10 Bluetooth Wireless Audio Receiver connected to the DRX-730's DOCK jack, you can connect to it and play the music stored on it. Pairing starts, the DOCK indicator flashes, and "Searching..." When pairing is complete, the message "Completed" appears on the display. Dock cable (supplied with Yamaha YBA-10) ■ Connecting Bluetooth devices Once a Bluetooth device has been paired with the Yamaha YBA-10 for example, a Bluetoothcompatible music player or mobile phone, through the DRX-730's speakers...
... Yamaha YBA-10 Bluetooth Wireless Audio Receiver connected to the DRX-730's DOCK jack, you can connect to it and play the music stored on it. Pairing starts, the DOCK indicator flashes, and "Searching..." When pairing is complete, the message "Completed" appears on the display. Dock cable (supplied with Yamaha YBA-10) ■ Connecting Bluetooth devices Once a Bluetooth device has been paired with the Yamaha YBA-10 for example, a Bluetoothcompatible music player or mobile phone, through the DRX-730's speakers...

Owners Manual
Page 58
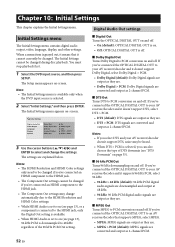
... Initial Settings cannot be changed during disc playback. If you 've connected the OPTICAL DIGITAL OUT to your AV receiver/decoder and it doesn't support Dolby Digital, select Dolby Digital > PCM. • Dolby Digital (default): Dolby Digital signals are output as they are converted and output as 2-channel PCM. 52 En Initial Settings menu The Initial Settings menu contains digital audio output, video, language, display, and other settings. Note: • The Initial Settings menu is available only when the DVD input source is downsampled...
... Initial Settings cannot be changed during disc playback. If you 've connected the OPTICAL DIGITAL OUT to your AV receiver/decoder and it doesn't support Dolby Digital, select Dolby Digital > PCM. • Dolby Digital (default): Dolby Digital signals are output as they are converted and output as 2-channel PCM. 52 En Initial Settings menu The Initial Settings menu contains digital audio output, video, language, display, and other settings. Note: • The Initial Settings menu is available only when the DVD input source is downsampled...

Owners Manual
Page 69
... an HDMI error has occurred. Possible cause Solution The power cable may output progressive video regardless of the Component Out setting. The sound is not listed, or you experience any issues while using the DRX-730, look them up in the following tables and try the suggested solution. The speaker cables are connected properly (see page 53). If the COMPONENT VIDEO OUT and HDMI connections are used simultaneously, the COMPONENT VIDEO OUT jacks may...
... an HDMI error has occurred. Possible cause Solution The power cable may output progressive video regardless of the Component Out setting. The sound is not listed, or you experience any issues while using the DRX-730, look them up in the following tables and try the suggested solution. The speaker cables are connected properly (see page 53). If the COMPONENT VIDEO OUT and HDMI connections are used simultaneously, the COMPONENT VIDEO OUT jacks may...

User Manual
Page 7
... Getting Started 8 Installing batteries in the remote control . . 8 Connecting speakers 9 Connecting a powered subwoofer 10 Connecting antennas 11 Connecting a TV 12 Connecting a recorder (CDR, MDR, etc.) . . 14 Connecting an AV receiver or decoder . . . 14 Connecting the power cable 15 3 General Functions 16 Turning on the DRX-730 16 Selecting input sources 16 Adjusting the volume 17 Muting the sound 17 Adjusting the bass and treble 18 Adjusting the balance 18 Pure Direct playback mode 19 Using headphones 19 Adjusting the display brightness 20 Using the sleep timer 20 Setting...
... Getting Started 8 Installing batteries in the remote control . . 8 Connecting speakers 9 Connecting a powered subwoofer 10 Connecting antennas 11 Connecting a TV 12 Connecting a recorder (CDR, MDR, etc.) . . 14 Connecting an AV receiver or decoder . . . 14 Connecting the power cable 15 3 General Functions 16 Turning on the DRX-730 16 Selecting input sources 16 Adjusting the volume 17 Muting the sound 17 Adjusting the bass and treble 18 Adjusting the balance 18 Pure Direct playback mode 19 Using headphones 19 Adjusting the display brightness 20 Using the sleep timer 20 Setting...
User Manual
Page 18
... connecting it 's set to your TV. Some DRX-730 models have been completed. • Turn off your TV owner's manual for even better picture quality. PR PB DOCK Y OUT VIDEO COMPONENT VIDEO OUT OPTICAL DIGITAL Component video cable (sold separately), connect the DRX-730's COMPONENT VIDEO OUT jacks to a component video input on your favorite TV programs through the speakers connected to your TV with the supplied video pin cable. HDMI provides the best picture quality. MAINS HDMI CLASS 2 WIRING CABLAGE CLASSE 2 R 6 MIN SPEAKER SPEAKERS R SUBWOOFER OUT OUT IN AUX...
... connecting it 's set to your TV. Some DRX-730 models have been completed. • Turn off your TV owner's manual for even better picture quality. PR PB DOCK Y OUT VIDEO COMPONENT VIDEO OUT OPTICAL DIGITAL Component video cable (sold separately), connect the DRX-730's COMPONENT VIDEO OUT jacks to a component video input on your favorite TV programs through the speakers connected to your TV with the supplied video pin cable. HDMI provides the best picture quality. MAINS HDMI CLASS 2 WIRING CABLAGE CLASSE 2 R 6 MIN SPEAKER SPEAKERS R SUBWOOFER OUT OUT IN AUX...
User Manual
Page 20
... cable (sold separately), connect the DRX-730's AUX OUT jacks to the audio input on your recording component. 2 Using another audio pin cable (sold separately), connect the DRX-730's AUX IN jacks to the audio output on the DRX-730 all other connections have been completed. • Turn off the recording component before connecting it is DVD or USB, and with some discs and files, recording may want to turn down the volume on your AV receiver/decoder. • The OPTICAL DIGITAL OUT outputs audio...
... cable (sold separately), connect the DRX-730's AUX OUT jacks to the audio input on your recording component. 2 Using another audio pin cable (sold separately), connect the DRX-730's AUX IN jacks to the audio output on the DRX-730 all other connections have been completed. • Turn off the recording component before connecting it is DVD or USB, and with some discs and files, recording may want to turn down the volume on your AV receiver/decoder. • The OPTICAL DIGITAL OUT outputs audio...

User Manual
Page 49
... also use the DRX-730's remote control to You can enjoy the music stored on the display lights up. 43 En English Refer to your 1 Using a mini plug cable (sold separately) OUT AUDIO Music player 2 Press AUX/PORTABLE repeatedly to select the PORTABLE input source. 3 Start playback on the DRX-730's front panel. TIMER HDMI PROGRESSIVE • Make sure your iPod has the latest firmware installed before connecting or disconnecting a Yamaha dock. control your music. to the PORTABLE jack on the music player. See STANDBY/ON USB PORTABLE PHONES INPUT VOLUME...
... also use the DRX-730's remote control to You can enjoy the music stored on the display lights up. 43 En English Refer to your 1 Using a mini plug cable (sold separately) OUT AUDIO Music player 2 Press AUX/PORTABLE repeatedly to select the PORTABLE input source. 3 Start playback on the DRX-730's front panel. TIMER HDMI PROGRESSIVE • Make sure your iPod has the latest firmware installed before connecting or disconnecting a Yamaha dock. control your music. to the PORTABLE jack on the music player. See STANDBY/ON USB PORTABLE PHONES INPUT VOLUME...
User Manual
Page 58
... Settings menu contains digital audio output, video, language, display, and other settings. You must stop playback first. 1 Select the DVD input source, and then press SETUP. Notes: • The HDMI Resolution and HDMI Color settings only need to be changed if you've connected an HDMI component to the HDMI jack. • The Component Out settings cannot be changed if you 've connected the OPTICAL DIGITAL OUT to your AV receiver/decoder and it doesn't support Dolby Digital, select Dolby Digital > PCM. • Dolby Digital...
... Settings menu contains digital audio output, video, language, display, and other settings. You must stop playback first. 1 Select the DVD input source, and then press SETUP. Notes: • The HDMI Resolution and HDMI Color settings only need to be changed if you've connected an HDMI component to the HDMI jack. • The Component Out settings cannot be changed if you 've connected the OPTICAL DIGITAL OUT to your AV receiver/decoder and it doesn't support Dolby Digital, select Dolby Digital > PCM. • Dolby Digital...

User Manual
Page 69
... set to Progressive, but the TV connected to the COMPONENT VIDEO OUT jacks (see page 53). A speaker cable may have been subjected to minimum. The volume is not displayed correctly. Appendix English 63 En The TV cables are connected incorrectly. General Issue The DRX-730 turns off as soon as lightning or excessive static electricity. The sound is not listed, or you experience any issues while using...
... set to Progressive, but the TV connected to the COMPONENT VIDEO OUT jacks (see page 53). A speaker cable may have been subjected to minimum. The volume is not displayed correctly. Appendix English 63 En The TV cables are connected incorrectly. General Issue The DRX-730 turns off as soon as lightning or excessive static electricity. The sound is not listed, or you experience any issues while using...
User Manual
Page 78
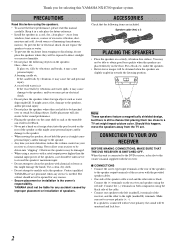
... ensure better sound performance. • Placing the speakers on both components using the red side. ACCESSORIES Check that placing them too close to be driven into the port located on the rear of the speaker as this unit is connected with a rated output power higher than the nominal input power of excessive vibration, dust, moisture and cold. Connect the (-) terminals on the same shelf or...
... ensure better sound performance. • Placing the speakers on both components using the red side. ACCESSORIES Check that placing them too close to be driven into the port located on the rear of the speaker as this unit is connected with a rated output power higher than the nominal input power of excessive vibration, dust, moisture and cold. Connect the (-) terminals on the same shelf or...


