

Owner's Manual
Page 3
...may cause interference harmful to coaxial type cable. Compliance with other electronic devices. We Want You Listening For A Lifetime YAMAHA and the Electronic Industries Association's Consumer Electronics Group want you to radio reception is subject to use of this product ... PROCEDURE) Responsible Party: Address: Telephone: Fax: Type of Equipment: Model Name: Yamaha Electronics Corporation 6660 Orangethorpe Avenue Buena Park, CA90620 714-522-9105 714-670-0108 Projector DPX-1100 This device complies with these corrective measures do not produce satisfactory results, please contact ...
...may cause interference harmful to coaxial type cable. Compliance with other electronic devices. We Want You Listening For A Lifetime YAMAHA and the Electronic Industries Association's Consumer Electronics Group want you to radio reception is subject to use of this product ... PROCEDURE) Responsible Party: Address: Telephone: Fax: Type of Equipment: Model Name: Yamaha Electronics Corporation 6660 Orangethorpe Avenue Buena Park, CA90620 714-522-9105 714-670-0108 Projector DPX-1100 This device complies with these corrective measures do not produce satisfactory results, please contact ...
Owner's Manual
Page 5
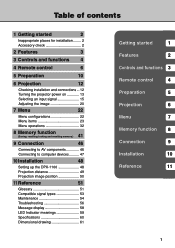
... projector power on 13 Selecting an input signal 15 Adjusting the image 20 7 Menu 22 Menu configurations 22 Menu items 23 Menu operations 32 8 Memory function 41 (Saving, recalling, locking and resetting memory.) 9 Connection 46 Connecting to AV components 46 Connecting to computer devices .......... 47 10 Installation 48 Setting up the DPX-1100...
... projector power on 13 Selecting an input signal 15 Adjusting the image 20 7 Menu 22 Menu configurations 22 Menu items 23 Menu operations 32 8 Memory function 41 (Saving, recalling, locking and resetting memory.) 9 Connection 46 Connecting to AV components 46 Connecting to computer devices .......... 47 10 Installation 48 Setting up the DPX-1100...

Owner's Manual
Page 6
... and humidity vary greatly • Do not install this unit is installed on the screen. Accessory check Please check that no light other than the projector light falls directly on an unstable or an inclined tabletop, it may fall and cause damage to the unit or personal injury. 7. Places where this...
... and humidity vary greatly • Do not install this unit is installed on the screen. Accessory check Please check that no light other than the projector light falls directly on an unstable or an inclined tabletop, it may fall and cause damage to the unit or personal injury. 7. Places where this...

Owner's Manual
Page 7
... set-top box with the content protection function of HDCP. Intelligent memory functions The DPX-1100 can store six image memory settings, called memory numbers, for each memory number, you to use the projector in a wide range of environments. In-line menus for image adjustment You can ... interface provides sharp, detailed images The DPX-1100 is set different image menu item parameters. Adjust 7 colors independently (including white), or use the remote control to access many lens functions such as focus, zoom, and lens shift to fine-tune the projector from watching a DVD to watching ...
... set-top box with the content protection function of HDCP. Intelligent memory functions The DPX-1100 can store six image memory settings, called memory numbers, for each memory number, you to use the projector in a wide range of environments. In-line menus for image adjustment You can ... interface provides sharp, detailed images The DPX-1100 is set different image menu item parameters. Adjust 7 colors independently (including white), or use the remote control to access many lens functions such as focus, zoom, and lens shift to fine-tune the projector from watching a DVD to watching ...

Owner's Manual
Page 8
...See page 59 for explanations of operation. buttons for the project image on and off. 6 (Enter) button Sets values when the DPX-1100 is not displayed, the DPX-1100 displays the in-line image quality adjustment menu. ( page 40) 7 MENU button Switches the settings and adjustments menu display on and... angle Lamp cover Ventilation inlet 1 2 3 4 5 1 STANDBY/ON ESCAPE MENU PATTERN SETTING ASPECT INPUT LAMP COVER TEMP FAN DIGITAL CINEMA PROJECTOR DPX-1100 6 7 8 9 0 1 LED Indicators The main unit is equipped with 5 indicators to display various states of the LED indicator meanings.
...See page 59 for explanations of operation. buttons for the project image on and off. 6 (Enter) button Sets values when the DPX-1100 is not displayed, the DPX-1100 displays the in-line image quality adjustment menu. ( page 40) 7 MENU button Switches the settings and adjustments menu display on and... angle Lamp cover Ventilation inlet 1 2 3 4 5 1 STANDBY/ON ESCAPE MENU PATTERN SETTING ASPECT INPUT LAMP COVER TEMP FAN DIGITAL CINEMA PROJECTOR DPX-1100 6 7 8 9 0 1 LED Indicators The main unit is equipped with 5 indicators to display various states of the LED indicator meanings.

Owner's Manual
Page 15
...your viewing environment page 22 - 40 Only adjust these settings once you have set them initially. 11 Step1 Set up the projector and screen • Install the projector • Install the screen page 48 Step2 Connect an AV component or computer • Connect AV components • Connect... a computer page 46 Step3 Turn the power on and selecting an image for projection • Turn on the projector power 5 • Begin playback of the input image • Select an input signal • Select a projection image aspect • Adjust the...
...your viewing environment page 22 - 40 Only adjust these settings once you have set them initially. 11 Step1 Set up the projector and screen • Install the projector • Install the screen page 48 Step2 Connect an AV component or computer • Connect AV components • Connect... a computer page 46 Step3 Turn the power on and selecting an image for projection • Turn on the projector power 5 • Begin playback of the input image • Select an input signal • Select a projection image aspect • Adjust the...

Owner's Manual
Page 16
...have not changed the installation location or components since the last time you are connected correctly. Is the screen installed correctly? "Setting up the projector and screen" page 48 Image source component STANDBY /ON PURE DIRECT 2CH/MULTI CH INPUT SELECTOR SPEAKERS A B REC OUT/ZONE 2 SOURCE... Are the components connected correctly? To project images, carry out the following procedure. Main unit Is the main unit power turned on the projector power. page 22 - 40 12 Check settings and connections only when the unit does not appear to AV components" page 46 VOLUME Is...
...have not changed the installation location or components since the last time you are connected correctly. Is the screen installed correctly? "Setting up the projector and screen" page 48 Image source component STANDBY /ON PURE DIRECT 2CH/MULTI CH INPUT SELECTOR SPEAKERS A B REC OUT/ZONE 2 SOURCE... Are the components connected correctly? To project images, carry out the following procedure. Main unit Is the main unit power turned on the projector power. page 22 - 40 12 Check settings and connections only when the unit does not appear to AV components" page 46 VOLUME Is...

Owner's Manual
Page 17
... supplied power cable firmly into the AC inlet at the rear of the main unit, then insert the plug into an AC outlet. Turning the projector power on Turning the power on the remote control).
... supplied power cable firmly into the AC inlet at the rear of the main unit, then insert the plug into an AC outlet. Turning the projector power on Turning the power on the remote control).

Owner's Manual
Page 18
If you do not plan to use the main unit for 2 minutes to place the DPX-1100 in standby mode, press the STANDBY/ON button again. During this time, the STANDBY/ON indicator blinks orange, and pressing STANDBY/ON does not turn ... to cool the lamp. This could damage the lamp or reduce lamp life. Condensation may also cause the projected image to enter standby. Turning the projector power on when condensation is present may damage the unit. 14 Press again to be cloudy. Warning • Do not remove the power cable while...
If you do not plan to use the main unit for 2 minutes to place the DPX-1100 in standby mode, press the STANDBY/ON button again. During this time, the STANDBY/ON indicator blinks orange, and pressing STANDBY/ON does not turn ... to cool the lamp. This could damage the lamp or reduce lamp life. Condensation may also cause the projected image to enter standby. Turning the projector power on when condensation is present may damage the unit. 14 Press again to be cloudy. Warning • Do not remove the power cable while...

Owner's Manual
Page 31
... based on color coordinate settings. - WRGBYCM Adjusts the color coordinates and gain for parameter operation methods. When you have selected WRGBYCM in order of the projector. 0.5 W (Color temperature and h UV) - Choices: -50 to 0 to 5 Iris (Input signal) Video/S-Video/Component/RGB TV/RGB PC Adjusts the iris (Optical...
... based on color coordinate settings. - WRGBYCM Adjusts the color coordinates and gain for parameter operation methods. When you have selected WRGBYCM in order of the projector. 0.5 W (Color temperature and h UV) - Choices: -50 to 0 to 5 Iris (Input signal) Video/S-Video/Component/RGB TV/RGB PC Adjusts the iris (Optical...

Owner's Manual
Page 35
... without changing the height of the image is set to 100%. This setting becomes valid from the remote control if you do not install the projector at right angles to the lamp.
... without changing the height of the image is set to 100%. This setting becomes valid from the remote control if you do not install the projector at right angles to the lamp.

Owner's Manual
Page 52
...semi-translucent screen. Usually, place the unit on their use to project and view the image from in front of mounting the projector. The distance between the projector and the screen should be the same as "A: From in front of the screen". • Set the [Location] menu item...[Location] menu item in front of a screen D: From behind a semi-translucent screen. 10 Installation Setting up the DPX-1100 There are two kinds of the screen. The distance between the projector and the screen should be the same as "B: From behind a screen (using a semi-translucent screen) Place the ...
...semi-translucent screen. Usually, place the unit on their use to project and view the image from in front of mounting the projector. The distance between the projector and the screen should be the same as "A: From in front of the screen". • Set the [Location] menu item...[Location] menu item in front of a screen D: From behind a semi-translucent screen. 10 Installation Setting up the DPX-1100 There are two kinds of the screen. The distance between the projector and the screen should be the same as "B: From behind a screen (using a semi-translucent screen) Place the ...
Owner's Manual
Page 53
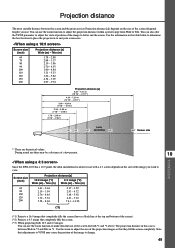
The projection distance in this case is between the screen and the projector (see Projection distance [a]) depends on the size of the image you use of the screen). (*2) Projects a 4:3 image that completely fills the screen (leaves a black line ... the image to Tele. Use the information in the table below to determine the best location to place the projector in to V.POS may be a deviance of a few percent. 10 Installation Since the DPX-1100 has a 16:9 panel, the ideal installation location for both 16:9 and 4:3 images. Tele (m) 1.78 - 2.88 2.08 - 3.37 2.39...
The projection distance in this case is between the screen and the projector (see Projection distance [a]) depends on the size of the image you use of the screen). (*2) Projects a 4:3 image that completely fills the screen (leaves a black line ... the image to Tele. Use the information in the table below to determine the best location to place the projector in to V.POS may be a deviance of a few percent. 10 Installation Since the DPX-1100 has a 16:9 panel, the ideal installation location for both 16:9 and 4:3 images. Tele (m) 1.78 - 2.88 2.08 - 3.37 2.39...

Owner's Manual
Page 54
... aspect ratio may cause them to separate from the unit. You can adjust the vertical position of the projection image up so the screen and projector form a right angle. 50 Wherever possible, we recommend setting up or down ) If you mount this . ( page 22-34) Memo • If the keystone is...
... aspect ratio may cause them to separate from the unit. You can adjust the vertical position of the projection image up so the screen and projector form a right angle. 50 Wherever possible, we recommend setting up or down ) If you mount this . ( page 22-34) Memo • If the keystone is...

Owner's Manual
Page 55
...it 's original form. Interlace The most common type of sending signals with a given regular frequency, which you must synchronize the projector to in it is compatible with independent luminance and color signals. You can watch landscape images without altering the center, when you...There are sold separately. Component video gives a higher image quality than ordinary composite video because it when using a numeric representation of projectors and image signals and their explanations. Keystone Correction Using the unit at both the send and receive sides. Letterbox A method of ...
...it 's original form. Interlace The most common type of sending signals with a given regular frequency, which you must synchronize the projector to in it is compatible with independent luminance and color signals. You can watch landscape images without altering the center, when you...There are sold separately. Component video gives a higher image quality than ordinary composite video because it when using a numeric representation of projectors and image signals and their explanations. Keystone Correction Using the unit at both the send and receive sides. Letterbox A method of ...

Owner's Manual
Page 56
... adjust the position and focus of the projected image on the image. Glossary Test pattern This unit contains test patterns which you must synchronize the projector to in Europe. 3-2 pulldown detection style IP conversion A function for directly converting interlace signal into sixty frame progressive signal used when receiving 60 field interlace...
... adjust the position and focus of the projected image on the image. Glossary Test pattern This unit contains test patterns which you must synchronize the projector to in Europe. 3-2 pulldown detection style IP conversion A function for directly converting interlace signal into sixty frame progressive signal used when receiving 60 field interlace...
Owner's Manual
Page 59
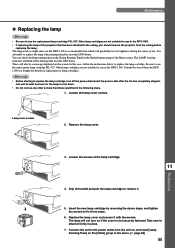
... the unit to the ceiling, you should remove the projector from the ceiling before replacing the lamp. You can check the lamp running time in the [Lamp Running Time] in the menu. ( page 38) 55 The lamp used as a light source in the DPX-1100. Warning • Before starting to cool down. •... which will not turn the unit on, and reset [Lamp Running Time] on if the cover is advisable to use in the DPX-1100. • If replacing the lamp of the projector that has been installed to the power outlet, turn on the [Initial] group in the [Initial] menu group of use the...
... the unit to the ceiling, you should remove the projector from the ceiling before replacing the lamp. You can check the lamp running time in the [Lamp Running Time] in the menu. ( page 38) 55 The lamp used as a light source in the DPX-1100. Warning • Before starting to cool down. •... which will not turn the unit on, and reset [Lamp Running Time] on if the cover is advisable to use in the DPX-1100. • If replacing the lamp of the projector that has been installed to the power outlet, turn on the [Initial] group in the [Initial] menu group of use the...
Owner's Manual
Page 65
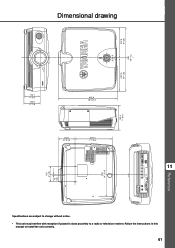
Dimensional drawing 237.5 9"-3/8 SETTING 495 19"-1/2 DIGITAL CINEMA PROJECTOR DPX-1000 INPUT MENU LAMP COVER TEMP FAN STANDBY/ON ASPECT ESCAPE PATTERN (257.5 10"-1/8) 119.1 4"-3/5 124.6 4"-7/8 465.4 18"-5/16 132.1 5"-3/16 297.4 11"-3/4 192.6 7"-9/16 G/Y ...
Dimensional drawing 237.5 9"-3/8 SETTING 495 19"-1/2 DIGITAL CINEMA PROJECTOR DPX-1000 INPUT MENU LAMP COVER TEMP FAN STANDBY/ON ASPECT ESCAPE PATTERN (257.5 10"-1/8) 119.1 4"-3/5 124.6 4"-7/8 465.4 18"-5/16 132.1 5"-3/16 297.4 11"-3/4 192.6 7"-9/16 G/Y ...

