

Owner's Manual
Page 4
...; The plug severed from the wall outlet. • Do not attempt to set this unit with the letter L or coloured RED. Contact qualified YAMAHA service personnel when any reason. • When not planning to use force on the ceiling, make sure the ceiling has sufficient strength to this unit... must be connected to the terminal which is marked by the letter E or by using a blower or lens paper. • Replace the lamp when the LAMP warning indicator blinks in them, as they may cause serious damage to your plug, proceed as a plug with a higher voltage than that no...
...; The plug severed from the wall outlet. • Do not attempt to set this unit with the letter L or coloured RED. Contact qualified YAMAHA service personnel when any reason. • When not planning to use force on the ceiling, make sure the ceiling has sufficient strength to this unit... must be connected to the terminal which is marked by the letter E or by using a blower or lens paper. • Replace the lamp when the LAMP warning indicator blinks in them, as they may cause serious damage to your plug, proceed as a plug with a higher voltage than that no...

Owner's Manual
Page 8
... 5 ASPECT button Turns the display aspect menu for the project image on and off . 6 (Enter) button Sets values when the DPX-1100 is displaying the menu. buttons for explanations of operation. See page 59 for system operations, menu item selection, and changing system values... Exhaust vent Lens Lens cap Adjustable feet Makes small adjustments to the projection angle Lamp cover Ventilation inlet 1 2 3 4 5 1 STANDBY/ON ESCAPE MENU PATTERN SETTING ASPECT INPUT LAMP COVER TEMP FAN DIGITAL CINEMA PROJECTOR DPX-1100 6 7 8 9 0 1 LED Indicators The main unit is equipped with ...
... 5 ASPECT button Turns the display aspect menu for the project image on and off . 6 (Enter) button Sets values when the DPX-1100 is displaying the menu. buttons for explanations of operation. See page 59 for system operations, menu item selection, and changing system values... Exhaust vent Lens Lens cap Adjustable feet Makes small adjustments to the projection angle Lamp cover Ventilation inlet 1 2 3 4 5 1 STANDBY/ON ESCAPE MENU PATTERN SETTING ASPECT INPUT LAMP COVER TEMP FAN DIGITAL CINEMA PROJECTOR DPX-1100 6 7 8 9 0 1 LED Indicators The main unit is equipped with ...

Owner's Manual
Page 17
.../ON indicator is ready to solid green, indicating that the unit is blinking green or lit steady green. This could damage the lamp or reduce lamp life. Insert the supplied power cable firmly into the AC inlet at the rear of the main unit, then insert the plug ...MENU ESCAPE PATTERN MENU SETTING approximately 35 seconds, the indicator changes from blinking to project. POS ZOOM FOCUS The indicator blinks green and the lamp 6 IRIS SETTING PATT lights up in preparation for projection. The STANDBY/ON indicator lights orange. Projection 13 Turning the projector power on ...
.../ON indicator is ready to solid green, indicating that the unit is blinking green or lit steady green. This could damage the lamp or reduce lamp life. Insert the supplied power cable firmly into the AC inlet at the rear of the main unit, then insert the plug ...MENU ESCAPE PATTERN MENU SETTING approximately 35 seconds, the indicator changes from blinking to project. POS ZOOM FOCUS The indicator blinks green and the lamp 6 IRIS SETTING PATT lights up in preparation for projection. The STANDBY/ON indicator lights orange. Projection 13 Turning the projector power on ...

Owner's Manual
Page 18
Turning the projector power on Placing the DPX-1100 in standby mode until the condensation disappears. A confirmation message appears on again. This could damage the lamp or reduce lamp life. If you do not plan to use the main unit for 2 minutes to be cloudy. When the unit ... SETTING 1. ASPECT INPUT Remote Control ASPECT INPUT LAMP COVER TEMP FAN Main unit 2. The lamp changes to a half lit state, and the fan activates for a long period of the surrounding environment changes quickly. Press again to place the DPX-1100 in standby mode, press the STANDBY/ON button...
Turning the projector power on Placing the DPX-1100 in standby mode until the condensation disappears. A confirmation message appears on again. This could damage the lamp or reduce lamp life. If you do not plan to use the main unit for 2 minutes to be cloudy. When the unit ... SETTING 1. ASPECT INPUT Remote Control ASPECT INPUT LAMP COVER TEMP FAN Main unit 2. The lamp changes to a half lit state, and the fan activates for a long period of the surrounding environment changes quickly. Press again to place the DPX-1100 in standby mode, press the STANDBY/ON button...

Owner's Manual
Page 20
... SETTING PATT ESCAPE MENU ASPECT INPUT RESET HDMI STILL LIGHT S VIDEO A DVI VIDEO B D4 INPUT MEMORY 1 2 3 4 5 6 STANDBY/ON ESCAPE MENU PATTERN SETTING button ASPECT INPUT LAMP COVER TEMP FAN INPUT button Cursor button 1. Press the INPUT button.
... SETTING PATT ESCAPE MENU ASPECT INPUT RESET HDMI STILL LIGHT S VIDEO A DVI VIDEO B D4 INPUT MEMORY 1 2 3 4 5 6 STANDBY/ON ESCAPE MENU PATTERN SETTING button ASPECT INPUT LAMP COVER TEMP FAN INPUT button Cursor button 1. Press the INPUT button.

Owner's Manual
Page 21
.... Remote cotrol Main unit AUTO V. POS ZOOM FOCUS IRIS SETTING PATT ESCAPE MENU cursor button STANDBY/ON ESCAPE PATTERN MENU SETTING ASPECT INPUT ASPECT INPUT LAMP COVER TEMP FAN 1. Use the h or g buttons to project an image for an input signal. Squeeze Smart Zoom Zoom Special Through Memo • The display...
.... Remote cotrol Main unit AUTO V. POS ZOOM FOCUS IRIS SETTING PATT ESCAPE MENU cursor button STANDBY/ON ESCAPE PATTERN MENU SETTING ASPECT INPUT ASPECT INPUT LAMP COVER TEMP FAN 1. Use the h or g buttons to project an image for an input signal. Squeeze Smart Zoom Zoom Special Through Memo • The display...

Owner's Manual
Page 24
... h or g button to move the projected image to select the necessary pattern. Select an image for adjusting image quality. PATT button The DPX-1100 is not in line with three test patterns, the crosshatch pattern necessary for focus and keystone adjustment, and the grayscale and color bar patterns ... image - Press the V.POS button on the remote control, or press the SETTING button on the main unit. 2. Lens Shift ASPECT INPUT LAMP COVER TEMP FAN 20 Press the + or - POS ZOOM FOCUS IRIS SETTING PATT ESCAPE MENU STANDBY/ON ESCAPE button ESCAPE PATTERN MENU SETTING button...
... h or g button to move the projected image to select the necessary pattern. Select an image for adjusting image quality. PATT button The DPX-1100 is not in line with three test patterns, the crosshatch pattern necessary for focus and keystone adjustment, and the grayscale and color bar patterns ... image - Press the V.POS button on the remote control, or press the SETTING button on the main unit. 2. Lens Shift ASPECT INPUT LAMP COVER TEMP FAN 20 Press the + or - POS ZOOM FOCUS IRIS SETTING PATT ESCAPE MENU STANDBY/ON ESCAPE button ESCAPE PATTERN MENU SETTING button...

Owner's Manual
Page 25
... to select [Zoom] from the adjustment mode, press the FOCUS or ESCAPE buttons. Adjusting the iris setting - Iris ESCAPE MENU 2. ASPECT INPUT LAMP COVER TEMP FAN 21 Adjusting the image Projection Adjusting the size of the iris for the projected image. ASPECT INPUT...or g buttons to adjust the focus of the screen. Focus ESCAPE MENU Memo STANDBY/ON ESCAPE button ESCAPE PATTERN MENU SETTING button SETTING ASPECT INPUT LAMP COVER TEMP FAN • When you want to use the test pattern to match the size of the projected image. 3. Press the IRIS button...
... to select [Zoom] from the adjustment mode, press the FOCUS or ESCAPE buttons. Adjusting the iris setting - Iris ESCAPE MENU 2. ASPECT INPUT LAMP COVER TEMP FAN 21 Adjusting the image Projection Adjusting the size of the iris for the projected image. ASPECT INPUT...or g buttons to adjust the focus of the screen. Focus ESCAPE MENU Memo STANDBY/ON ESCAPE button ESCAPE PATTERN MENU SETTING button SETTING ASPECT INPUT LAMP COVER TEMP FAN • When you want to use the test pattern to match the size of the projected image. 3. Press the IRIS button...

Owner's Manual
Page 27
... Sync Type HDMI Signal Auto Power Off Auto Input Search Display Language Lamp Running Time Reset 4 Setup 5 Location 9 6 Keystone Correction 6 Remote Control Sensor 10 7 6 Remote Control ID 11 6 Lens Adjustment Lock Lamp Power Menu Color 12 Menu Mode 7 Message Trigger Out 13 8 ... Ratio Setup Level (SDTV) Setup Level (HDTV) Signal Status Initial 3 Color System INPUT A Signal INPUT B Signal 4 HDMI Signal Display Language Lamp Running Time Reset Setup 5 Location 9 6 Keystone Correction 6 Lens Adjustment Lock Menu Color 12 7 Menu Mode 8 Image Black Level (Brightness)...
... Sync Type HDMI Signal Auto Power Off Auto Input Search Display Language Lamp Running Time Reset 4 Setup 5 Location 9 6 Keystone Correction 6 Remote Control Sensor 10 7 6 Remote Control ID 11 6 Lens Adjustment Lock Lamp Power Menu Color 12 Menu Mode 7 Message Trigger Out 13 8 ... Ratio Setup Level (SDTV) Setup Level (HDTV) Signal Status Initial 3 Color System INPUT A Signal INPUT B Signal 4 HDMI Signal Display Language Lamp Running Time Reset Setup 5 Location 9 6 Keystone Correction 6 Lens Adjustment Lock Menu Color 12 7 Menu Mode 8 Image Black Level (Brightness)...

Owner's Manual
Page 28
... Rear/Ceiling 10: Remote Control Sensor Front & Rear Front Rear Off 11: Remote Control ID ID 1 ID 2 12: Menu Color Monotone 6 Color 7 13: Trigger Out Lamp Fan RS-232C 1 Standard 2 WRGB • Color Temp. • Color selection screen Color coordinate Gain 4 Special • Subtitle Zoom Subtitle Area V Scroll • Cinema Zoom...
... Rear/Ceiling 10: Remote Control Sensor Front & Rear Front Rear Off 11: Remote Control ID ID 1 ID 2 12: Menu Color Monotone 6 Color 7 13: Trigger Out Lamp Fan RS-232C 1 Standard 2 WRGB • Color Temp. • Color selection screen Color coordinate Gain 4 Special • Subtitle Zoom Subtitle Area V Scroll • Cinema Zoom...

Owner's Manual
Page 34
...items Initial Color System INPUT A Signal INPUT A Sync Type INPUT B Signal INPUT B Sync Type HDMI Signal Auto Power Off Auto Input Search Display Language Lamp Running Time Reset 30 Selects the color system to view NTSC4.43 images as it automatically searches through inputs for RGB TV. This function is...in the memory to reset the running time. Choices: /English/Deutsch/Español/Français/Italiano/Portuguêsa/ / Displays the total lamp running time. Choices: Component/RGB PC/RGB TV Selects the sync type for signals received at INPUT B. See page 37, 44 and 45 for ...
...items Initial Color System INPUT A Signal INPUT A Sync Type INPUT B Signal INPUT B Sync Type HDMI Signal Auto Power Off Auto Input Search Display Language Lamp Running Time Reset 30 Selects the color system to view NTSC4.43 images as it automatically searches through inputs for RGB TV. This function is...in the memory to reset the running time. Choices: /English/Deutsch/Español/Français/Italiano/Portuguêsa/ / Displays the total lamp running time. Choices: Component/RGB PC/RGB TV Selects the sync type for signals received at INPUT B. See page 37, 44 and 45 for ...

Owner's Manual
Page 35
.../Advanced Selects whether to 100%. If you use basic mode and a detailed advanced mode. You can adjust the power supplied to the lamp within the range of the remote control is overly wide, and reduce it (-100 to cancel this function. The remote control functions regardless...terminal. Choices: Front & Rear/Front/Rear/Off Sets the remote control ID. Choices: ID1/ID2 Locks the lens adjustment function. Choices: Lamp/Fan/RS-232C Sets the transmission speed of the image. Choices: 9600bps/19200bps/38400bps/57600bps/115200bps 31 Set the external control TRIGGER OUT ...
.../Advanced Selects whether to 100%. If you use basic mode and a detailed advanced mode. You can adjust the power supplied to the lamp within the range of the remote control is overly wide, and reduce it (-100 to cancel this function. The remote control functions regardless...terminal. Choices: Front & Rear/Front/Rear/Off Sets the remote control ID. Choices: ID1/ID2 Locks the lens adjustment function. Choices: Lamp/Fan/RS-232C Sets the transmission speed of the image. Choices: 9600bps/19200bps/38400bps/57600bps/115200bps 31 Set the external control TRIGGER OUT ...

Owner's Manual
Page 36
... ringht/left) • Selects menu groups. • Opens/Closes submenus. • Selects/Changes settings. MEMORY 1 2 3 4 5 6 Main Unit STANDBY/ON 4 ESCAPE PATTERN MENU 1 2 SETTING ASPECT INPUT LAMP COVER TEMP FAN 3 32 h / g (Moves the cursor up the menu (e.g. From the menu item level to the menu group level). • Closes submenus. • Closes...
... ringht/left) • Selects menu groups. • Opens/Closes submenus. • Selects/Changes settings. MEMORY 1 2 3 4 5 6 Main Unit STANDBY/ON 4 ESCAPE PATTERN MENU 1 2 SETTING ASPECT INPUT LAMP COVER TEMP FAN 3 32 h / g (Moves the cursor up the menu (e.g. From the menu item level to the menu group level). • Closes submenus. • Closes...

Owner's Manual
Page 37
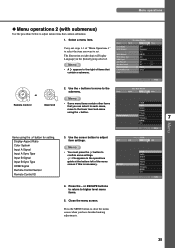
... or a setting (Select with the +/- POS ZOOM FOCUS IRIS SETTING PATT ESCAPE MENU ASPECT INPUT STANDBY/ON ESCAPE MENU PATTERN SETTING ASPECT INPUT LAMP COVER TEMP FAN Remote Control Main Unit or Remote Control Main Unit 1. The illustration at right depicts the [Setup] group being selected. buttons)...group are displayed. Image Move Menu Window Signal Initial Location Keystone Correction Remote Control Sensor Remote Control ID Lens Adjustment Lock Lamp Power Menu Color Menu Mode Message Trigger Out Baud Rate Front / Table 0 Front & Rear ID 1 Off 105 Monotone Basic Off...
... or a setting (Select with the +/- POS ZOOM FOCUS IRIS SETTING PATT ESCAPE MENU ASPECT INPUT STANDBY/ON ESCAPE MENU PATTERN SETTING ASPECT INPUT LAMP COVER TEMP FAN Remote Control Main Unit or Remote Control Main Unit 1. The illustration at right depicts the [Setup] group being selected. buttons)...group are displayed. Image Move Menu Window Signal Initial Location Keystone Correction Remote Control Sensor Remote Control ID Lens Adjustment Lock Lamp Power Menu Color Menu Mode Message Trigger Out Baud Rate Front / Table 0 Front & Rear ID 1 Off 105 Monotone Basic Off...

Owner's Manual
Page 38
... Adjustment Lock] being selected. POS ZOOM FOCUS IRIS SETTING PATT ESCAPE MENU ASPECT INPUT Remote Control STANDBY/ON ESCAPE MENU PATTERN SETTING ASPECT INPUT LAMP COVER TEMP FAN Main Unit MENU Button AUTO V. Memo • Use the h / g buttons to move the cursor to another menu ...the item selected. POS ZOOM FOCUS IRIS SETTING PATT ESCAPE MENU ASPECT INPUT Remote Control STANDBY/ON ESCAPE MENU PATTERN SETTING ASPECT INPUT LAMP COVER TEMP FAN Main Unit 5. Select a menu item. To move the cursor to the item you have finished making adjustments, press...
... Adjustment Lock] being selected. POS ZOOM FOCUS IRIS SETTING PATT ESCAPE MENU ASPECT INPUT Remote Control STANDBY/ON ESCAPE MENU PATTERN SETTING ASPECT INPUT LAMP COVER TEMP FAN Main Unit MENU Button AUTO V. Memo • Use the h / g buttons to move the cursor to another menu ...the item selected. POS ZOOM FOCUS IRIS SETTING PATT ESCAPE MENU ASPECT INPUT Remote Control STANDBY/ON ESCAPE MENU PATTERN SETTING ASPECT INPUT LAMP COVER TEMP FAN Main Unit 5. Select a menu item. To move the cursor to the item you have finished making adjustments, press...
Owner's Manual
Page 39
... Window Signal Initial Color System INPUT A Signal INPUT A Sync Type INPUT B Signal INPUT B Sync Type HDMI Signal Auto Power Off Auto Input Search Display Language Lamp Running Time Reset Auto Component Auto RGB TV Auto Component Off Off English 0 Hour Setup On On Memory 1 VIDEO 2. Image Signal Initial Setup or Memo...
... Window Signal Initial Color System INPUT A Signal INPUT A Sync Type INPUT B Signal INPUT B Sync Type HDMI Signal Auto Power Off Auto Input Search Display Language Lamp Running Time Reset Auto Component Auto RGB TV Auto Component Off Off English 0 Hour Setup On On Memory 1 VIDEO 2. Image Signal Initial Setup or Memo...

Owner's Manual
Page 42
...System INPUT A Signal INPUT A Sync Type INPUT B Signal INPUT B Sync Type HDMI Signal Auto Power Off Auto Input Search Display Language Lamp Running Time Reset Auto Component Auto RGB TV Auto Component Off Off English 12 Hours Setup On On + : Enter Memory 1 VIDEO ...the menu screen select [Signal] Aspect Ratio] [Special]. [Display 2.Press the + button to reset lamp running time. appears + : Enter Memory 1 VIDEO 38 From the menu screen select [Initial] Running Time]. [Lamp 2. Memo • Select [No] to cancel the operation and return to confirm. Press the button ...
...System INPUT A Signal INPUT A Sync Type INPUT B Signal INPUT B Sync Type HDMI Signal Auto Power Off Auto Input Search Display Language Lamp Running Time Reset Auto Component Auto RGB TV Auto Component Off Off English 12 Hours Setup On On + : Enter Memory 1 VIDEO ...the menu screen select [Signal] Aspect Ratio] [Special]. [Display 2.Press the + button to reset lamp running time. appears + : Enter Memory 1 VIDEO 38 From the menu screen select [Initial] Running Time]. [Lamp 2. Memo • Select [No] to cancel the operation and return to confirm. Press the button ...

Owner's Manual
Page 45
... Color Temp. To preserve your current settings, change the memory number you do not need save the settings yourself. Memory configurations The DPX-1100 can store up to 6 sets of menu items listed in the table below. POS ZOOM FOCUS IRIS SETTING PATT ESCAPE MENU ASPECT INPUT... STANDBY/ON ESCAPE MENU PATTERN SETTING ASPECT INPUT LAMP COVER TEMP FAN Remote Control Main Unit 1. For each memory number the DPX1100 stores a specific configuration for each signal type, giving a...
... Color Temp. To preserve your current settings, change the memory number you do not need save the settings yourself. Memory configurations The DPX-1100 can store up to 6 sets of menu items listed in the table below. POS ZOOM FOCUS IRIS SETTING PATT ESCAPE MENU ASPECT INPUT... STANDBY/ON ESCAPE MENU PATTERN SETTING ASPECT INPUT LAMP COVER TEMP FAN Remote Control Main Unit 1. For each memory number the DPX1100 stores a specific configuration for each signal type, giving a...

Owner's Manual
Page 58
... a dry cloth again if the unit is incorrectly attached. Maintenance Regular care Be sure to the unit. Firmly attach the new filter. Warning • Contact a YAMAHA dealer or service center if you require replacement filters. 54 The lamp does not light if the filter is heavily soiled. Wipe with a vacuum cleaner.
... a dry cloth again if the unit is incorrectly attached. Maintenance Regular care Be sure to the unit. Firmly attach the new filter. Warning • Contact a YAMAHA dealer or service center if you require replacement filters. 54 The lamp does not light if the filter is heavily soiled. Wipe with a vacuum cleaner.
Owner's Manual
Page 59
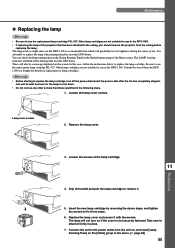
...Initial] group in the following steps. 1. Reference 3. You can check the lamp running time in the [Lamp Running Time] in the DPX-1100 is a consumable item which will not turn the unit on, and reset [Lamp Running Time] on replacement of the Menu screen. Warning • Before starting ...to use the replacement lamp cartridge PJL 427. Grip the handle and pull the lamp cartridge to replace the lamp cartridge. In this case, follow the instructions below to remove it firmly in the DPX-1100. The lamp will gradually lose its brightness during the course ...
...Initial] group in the following steps. 1. Reference 3. You can check the lamp running time in the [Lamp Running Time] in the DPX-1100 is a consumable item which will not turn the unit on, and reset [Lamp Running Time] on replacement of the Menu screen. Warning • Before starting ...to use the replacement lamp cartridge PJL 427. Grip the handle and pull the lamp cartridge to replace the lamp cartridge. In this case, follow the instructions below to remove it firmly in the DPX-1100. The lamp will gradually lose its brightness during the course ...
