Owner's Manual
Page 4
...prevent adequate ventilation of the internal components, and possibly result in the instrument overheating. 4 DGX-530/YPG-535 Owner's Manual (3)-11 1/2 Even when the power switch is turned off,...it, or place it inspected by it . When attaching the stand or rack, use the instrument in the vicinity of serious injury or even..., discontinue use of sound during use immediately and have the instrument inspected by Yamaha) only. Location • Do not expose the instrument to , the following...screws only. These precautions include, but are using the product for future reference.
...prevent adequate ventilation of the internal components, and possibly result in the instrument overheating. 4 DGX-530/YPG-535 Owner's Manual (3)-11 1/2 Even when the power switch is turned off,...it, or place it inspected by it . When attaching the stand or rack, use the instrument in the vicinity of serious injury or even..., discontinue use of sound during use immediately and have the instrument inspected by Yamaha) only. Location • Do not expose the instrument to , the following...screws only. These precautions include, but are using the product for future reference.
Owner's Manual
Page 10
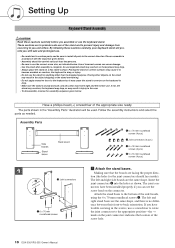
... to the appropriate position-the → mark on the joint connectors indicates the location of the screw hole. 10 DGX-530/YPG-535 Owner's Manual Placing other than its designed purpose. w Joint connectors The left and right stand bases are to the bottom of the appropriate size ready. nectors have been installed properly if...
... to the appropriate position-the → mark on the joint connectors indicates the location of the screw hole. 10 DGX-530/YPG-535 Owner's Manual Placing other than its designed purpose. w Joint connectors The left and right stand bases are to the bottom of the appropriate size ready. nectors have been installed properly if...
Owner's Manual
Page 11
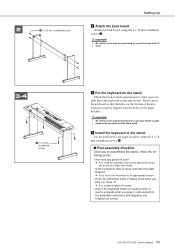
... the back-to-front orientation for stand, and carefully place the keyboard on the stand. Slowly move it? ➔ If so, properly tighten all screws. Fix the keyboard to the angle brackets, using the 6 x 30 mm roundhead screws e. tings. 3-4 r 5 x 16 mm roundhead screws c Put the keyboard on the ...move the keyboard so that the holes on the angle brackets. DGX-530/YPG-535 Owner's Manual 11 Attach the back board, using the 5 x 16 mm roundhead screws r. ■ Post-assembly checklist Once you've assembled the stand, check the following points: • Are there any parts ...
... the back-to-front orientation for stand, and carefully place the keyboard on the stand. Slowly move it? ➔ If so, properly tighten all screws. Fix the keyboard to the angle brackets, using the 6 x 30 mm roundhead screws e. tings. 3-4 r 5 x 16 mm roundhead screws c Put the keyboard on the ...move the keyboard so that the holes on the angle brackets. DGX-530/YPG-535 Owner's Manual 11 Attach the back board, using the 5 x 16 mm roundhead screws r. ■ Post-assembly checklist Once you've assembled the stand, check the following points: • Are there any parts ...


