
Owner's Manual
Page 6
...Drum Stick (x2) • Foot Pedal 1 & 2 • Owner's Manual 6 DD-65/YDD-60 Owner's Manual Before you use instrument with greater ease, flexibility and sophisticated functions. The DD-65/YDD-60 has been developed to -use the instrument, we recommend that you hit the pads-for purchasing the Yamaha DD-65.../YDD-60. Congratulations! Thank you for example, changing a pad to five of percussion voices is a sophisticated yet easy-to respond and play 100 different Songs The 100 songs include Demos, Drum patterns and Fill in patterns....
...Drum Stick (x2) • Foot Pedal 1 & 2 • Owner's Manual 6 DD-65/YDD-60 Owner's Manual Before you use instrument with greater ease, flexibility and sophisticated functions. The DD-65/YDD-60 has been developed to -use the instrument, we recommend that you hit the pads-for purchasing the Yamaha DD-65.../YDD-60. Congratulations! Thank you for example, changing a pad to five of percussion voices is a sophisticated yet easy-to respond and play 100 different Songs The 100 songs include Demos, Drum patterns and Fill in patterns....
Owner's Manual
Page 7
...VOLUME 12 Play the Pads/Pedals 13 Pad Names 13 Setting the Hand Percussion ON/OFF 14 Lock the Hand Percussion ON 14 Selecting a Drum Kit and play it 15 Assigning Voices to Individual Pads and Pedals and saving to and from a connected computer 34 Appendix 36 Backup ...and Initialization 36 Troubleshooting 37 Drum Voice List 38 Song List 40 Drum Kit List 41 Voice List 44 Drum Map 48 MIDI Implementation Chart 52 Specifications 55 Drum Score 56 DD-65/YDD-60 Owner's Manual 7 CO3").......16 Setting the Reverb ON/OFF 17 ...
...VOLUME 12 Play the Pads/Pedals 13 Pad Names 13 Setting the Hand Percussion ON/OFF 14 Lock the Hand Percussion ON 14 Selecting a Drum Kit and play it 15 Assigning Voices to Individual Pads and Pedals and saving to and from a connected computer 34 Appendix 36 Backup ...and Initialization 36 Troubleshooting 37 Drum Voice List 38 Song List 40 Drum Kit List 41 Voice List 44 Drum Map 48 MIDI Implementation Chart 52 Specifications 55 Drum Score 56 DD-65/YDD-60 Owner's Manual 7 CO3").......16 Setting the Reverb ON/OFF 17 ...
Owner's Manual
Page 9
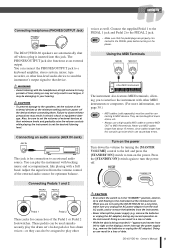
... the volume controls while playing the instrument to set 's hi-hat pedal or bass drum voices-or they can result in a loss of data. NOTE • Make sure that the pedal plugs are not using the DD-65/YDD-60 for connection to that device. You can cause data errors. doing so...When you to interface the instrument with other line-level audio device to send the instrument's output signal to an external audio source. DD-65/YDD-60 Owner's Manual 9 The DD-65/YDD-60 speakers are automatically shut off when a plug is being recorded ("-"appears and moves from left and press the [STANDBY/ON...
... the volume controls while playing the instrument to set 's hi-hat pedal or bass drum voices-or they can result in a loss of data. NOTE • Make sure that the pedal plugs are not using the DD-65/YDD-60 for connection to that device. You can cause data errors. doing so...When you to interface the instrument with other line-level audio device to send the instrument's output signal to an external audio source. DD-65/YDD-60 Owner's Manual 9 The DD-65/YDD-60 speakers are automatically shut off when a plug is being recorded ("-"appears and moves from left and press the [STANDBY/ON...
Owner's Manual
Page 10
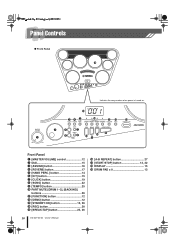
... 15 e [ASSIGN] button 16 r [REVERB] button 17 t [HAND PERC.] button 14 y [KIT] button 15 u [CLICK] button 19 i [SONG] button 22 o [TEMPO] button 25 !0 PART MUTE [DRUM 1-3], [BACKING] buttons 26 !1 [FUNCTION] button 12 !2 [DEMO] button 12 !3 [STANDBY/ON] button 12, 36 !4 [REC] button 28 !5 [BREAK/TAP] button 23, 26 !6 [A-B REPEAT] button 27...
... 15 e [ASSIGN] button 16 r [REVERB] button 17 t [HAND PERC.] button 14 y [KIT] button 15 u [CLICK] button 19 i [SONG] button 22 o [TEMPO] button 25 !0 PART MUTE [DRUM 1-3], [BACKING] buttons 26 !1 [FUNCTION] button 12 !2 [DEMO] button 12 !3 [STANDBY/ON] button 12, 36 !4 [REC] button 28 !5 [BREAK/TAP] button 23, 26 !6 [A-B REPEAT] button 27...
Owner's Manual
Page 11
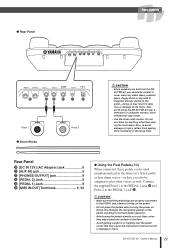
... so may result in data loss or damage to the items. Also avoid using the DD-65/YDD-60 near a television or computer monitor, since they can be used simultaneously play other than playing the instrument. DD-65/YDD-60 Owner's Manual 11 Rear Panel @0 [DC IN 12V] (AC Adaptor) ... kind of the floor. • Avoid getting caught in damage or injury. ● Rear Panel Panel Controls @5 @4 @3 @2 @1 @0 Pedal 1 ● Drum Sticks Pedal 2 CAUTION • Since speakers are properly connected to the PEDAL jacks before turning on the power. • Do not press the pedals while...
... so may result in data loss or damage to the items. Also avoid using the DD-65/YDD-60 near a television or computer monitor, since they can be used simultaneously play other than playing the instrument. DD-65/YDD-60 Owner's Manual 11 Rear Panel @0 [DC IN 12V] (AC Adaptor) ... kind of the floor. • Avoid getting caught in damage or injury. ● Rear Panel Panel Controls @5 @4 @3 @2 @1 @0 Pedal 1 ● Drum Sticks Pedal 2 CAUTION • Since speakers are properly connected to the PEDAL jacks before turning on the power. • Do not press the pedals while...

Owner's Manual
Page 12
...To raise the value, turn the DIAL to the left (counter-clockwise). Volume range is still flowing to 127. Playing the Demo Song The DD-65/YDD-60 features several demonstration songs (001-005), specially created to show you unplug the AC power adaptor from the wall AC outlet, and/or... remove the batteries from the Function mode by pressing the [FUNCTION] button, then press the [DRUM 1] or [DRUM 2] button a number of times until the "SGL" item appears. SGL 12 DD-65/YDD-60 Owner's Manual ● SONG VOLUME The SONG VOLUME can be used to adjust the balance between the...
...To raise the value, turn the DIAL to the left (counter-clockwise). Volume range is still flowing to 127. Playing the Demo Song The DD-65/YDD-60 features several demonstration songs (001-005), specially created to show you unplug the AC power adaptor from the wall AC outlet, and/or... remove the batteries from the Function mode by pressing the [FUNCTION] button, then press the [DRUM 1] or [DRUM 2] button a number of times until the "SGL" item appears. SGL 12 DD-65/YDD-60 Owner's Manual ● SONG VOLUME The SONG VOLUME can be used to adjust the balance between the...
Owner's Manual
Page 13
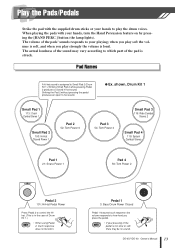
...closed hi-hat sound. the volume responds to how hard you play the drum voices. DD-65/YDD-60 Owner's Manual 13 Pedal 1 3: Bass Drum Power Closed Pedal 1 features touch response; When playing the pads with the supplied drum sticks or your hands to play strongly the volume is loud. NOTE &#... soft, there may vary according to your playing; Play the Pads/Pedals Strike the pad with your pressing of Drum Kit 1.) • When using Pedal NOTE 2, touch response does not function. shown, Drum Kit 1 Small Pad 1 113: Crash Cymbal Stereo 1 Small Pad 2 100: Hi-Hat Closed Power 1 Pad...
...closed hi-hat sound. the volume responds to how hard you play the drum voices. DD-65/YDD-60 Owner's Manual 13 Pedal 1 3: Bass Drum Power Closed Pedal 1 features touch response; When playing the pads with the supplied drum sticks or your hands to play strongly the volume is loud. NOTE &#... soft, there may vary according to your playing; Play the Pads/Pedals Strike the pad with your pressing of Drum Kit 1.) • When using Pedal NOTE 2, touch response does not function. shown, Drum Kit 1 Small Pad 1 113: Crash Cymbal Stereo 1 Small Pad 2 100: Hi-Hat Closed Power 1 Pad...
Owner's Manual
Page 14
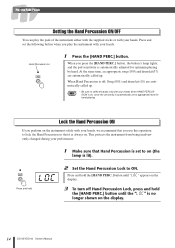
...This protects the instrument from being inadvertently changed during your performance. 1 Make sure that Hand Percussion is set to on the display. 14 DD-65/YDD-60 Owner's Manual Press and set the following button when you play the pads of the instrument either with the supplied sticks or with... PERC.] button until "LOC" appears on 1 Press the [HAND PERC.] button. Hand Percussion on the display. 3 To turn off , Song (001) and drum kit (01) are automatically called up . When Hand Percussion is off Hand Percussion Lock, press and hold 2 Set the Hand Percussion Lock to ON. Play...
...This protects the instrument from being inadvertently changed during your performance. 1 Make sure that Hand Percussion is set to on the display. 14 DD-65/YDD-60 Owner's Manual Press and set the following button when you play the pads of the instrument either with the supplied sticks or with... PERC.] button until "LOC" appears on 1 Press the [HAND PERC.] button. Hand Percussion on the display. 3 To turn off , Song (001) and drum kit (01) are automatically called up . When Hand Percussion is off Hand Percussion Lock, press and hold 2 Set the Hand Percussion Lock to ON. Play...
Owner's Manual
Page 15
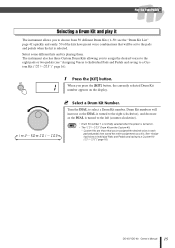
... Pedals and saving to the pads and pedals when the kit is selected. NOTE • Drum Kit number 1 is normally selected when the power is turned to a Custom Kit ("CO1- CO3")" page 16.) DD-65/YDD-60 Owner's Manual 15 Select some different kits and try playing them. Play the Pads.../Pedals Selecting a Drum Kit and play it The instrument allows you press the [KIT] button, the currently selected Drum Kit number appears on . • The " CO1- ...
... Pedals and saving to the pads and pedals when the kit is selected. NOTE • Drum Kit number 1 is normally selected when the power is turned to a Custom Kit ("CO1- CO3")" page 16.) DD-65/YDD-60 Owner's Manual 15 Select some different kits and try playing them. Play the Pads.../Pedals Selecting a Drum Kit and play it The instrument allows you press the [KIT] button, the currently selected Drum Kit number appears on . • The " CO1- ...

Owner's Manual
Page 16
... DIAL to the left (counter-clockwise), and voice numbers will increase. Turn the DIAL to the right (clockwise), and voice numbers will decrease. See the "Drum Voice List" on the display. 2 Turn the dial and select a Custom Kit "CO1-CO3" for saving. Repeat the previous steps 3 and 4 for ... Pads/Pedals Assigning Voices to Individual Pads and Pedals and saving to be assigned. CO3" Custom Drum Kits. • Custom Kit " CO1- CO3") The instrument contains a total of the pads and ped- als. 16 DD-65/YDD-60 Owner's Manual You can hear and select an assigned voice. ● Using the...
... DIAL to the left (counter-clockwise), and voice numbers will increase. Turn the DIAL to the right (clockwise), and voice numbers will decrease. See the "Drum Voice List" on the display. 2 Turn the dial and select a Custom Kit "CO1-CO3" for saving. Repeat the previous steps 3 and 4 for ... Pads/Pedals Assigning Voices to Individual Pads and Pedals and saving to be assigned. CO3" Custom Drum Kits. • Custom Kit " CO1- CO3") The instrument contains a total of the pads and ped- als. 16 DD-65/YDD-60 Owner's Manual You can hear and select an assigned voice. ● Using the...
Owner's Manual
Page 17
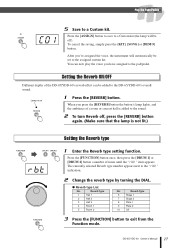
... lamp lights, and the ambience of times until the "rbt" item appears. DD-65/YDD-60 Owner's Manual 17 To cancel the saving, simply press the [KIT], [SONG] or [DEMO] button. Press the [FUNCTION] button once, then press the [DRUM 1] or [DRUM 2] button a number of a room or concert hall is added to the ...that the lamp is on 1 Press the [REVERB] button. Press the [ASSIGN] button to save to a Custom kit. When you have assigned to the DD-65/YDD-60's overall sound. Play the Pads/Pedals CO1 5 Save to a Custom kit (the lamp will automatically be added to the pad/pedal. Reverb Type...
... lamp lights, and the ambience of times until the "rbt" item appears. DD-65/YDD-60 Owner's Manual 17 To cancel the saving, simply press the [KIT], [SONG] or [DEMO] button. Press the [FUNCTION] button once, then press the [DRUM 1] or [DRUM 2] button a number of a room or concert hall is added to the ...that the lamp is on 1 Press the [REVERB] button. Press the [ASSIGN] button to save to a Custom kit. When you have assigned to the DD-65/YDD-60's overall sound. Play the Pads/Pedals CO1 5 Save to a Custom kit (the lamp will automatically be added to the pad/pedal. Reverb Type...
Owner's Manual
Page 18
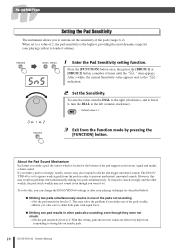
...the sensitivity of times until the "SGL" item appears. Play the Pads/Pedals Setting the Pad Sensitivity The instrument allows you can change the DD-65/YDD-60 settings or alter your playing (softest to loudest volume). NOTE 3 Exit from responding to the "SGL" indication. 2 Set the... Sensitivity. Press the [FUNCTION] button once, then press the [DRUM 1] or [DRUM 2] button a number of the pads (range 0-2). However, this setting, pads that are not struck are effectively kept from the Function mode by ...
...the sensitivity of times until the "SGL" item appears. Play the Pads/Pedals Setting the Pad Sensitivity The instrument allows you can change the DD-65/YDD-60 settings or alter your playing (softest to loudest volume). NOTE 3 Exit from responding to the "SGL" indication. 2 Set the... Sensitivity. Press the [FUNCTION] button once, then press the [DRUM 1] or [DRUM 2] button a number of the pads (range 0-2). However, this setting, pads that are not struck are effectively kept from the Function mode by ...
Owner's Manual
Page 19
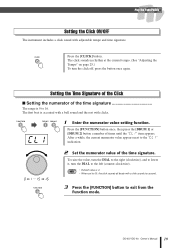
... accent). 3 Press the [FUNCTION] button to the "CL1" indication. 0 1 15 16 2 Set the numerator value of times until the "CL1" item appears. DD-65/YDD-60 Owner's Manual 19 Play the Pads/Pedals Setting the Click ON/OFF The instrument includes a click sound with clicks. Press the [FUNCTION] button... once, then press the [DRUM 1] or [DRUM 2] button a number of the time signature. The click sounds in rhythm at the current tempo. (See "Adjusting the Tempo" on page 25...
... accent). 3 Press the [FUNCTION] button to the "CL1" indication. 0 1 15 16 2 Set the numerator value of times until the "CL1" item appears. DD-65/YDD-60 Owner's Manual 19 Play the Pads/Pedals Setting the Click ON/OFF The instrument includes a click sound with clicks. Press the [FUNCTION] button... once, then press the [DRUM 1] or [DRUM 2] button a number of the time signature. The click sounds in rhythm at the current tempo. (See "Adjusting the Tempo" on page 25...

Owner's Manual
Page 20
...DRUM 1] or [DRUM 2] button a number of times until the "CL2" item appears. Set the denominator value to exit from the Function mode. ■ Setting the click volume Sets the click volume (range: 1-127). After a while, the current denominator value appears next to exit from the Function mode. 20 DD-65...2 126 127 3 Press the [FUNCTION] button to one of the time signature. Press the [FUNCTION] button once, then press the [DRUM 1] or [DRUM 2] button a number of the time signature Set the basic note value for each measure. CL2 1 Enter the denominator value setting function....
...DRUM 1] or [DRUM 2] button a number of times until the "CL2" item appears. Set the denominator value to exit from the Function mode. ■ Setting the click volume Sets the click volume (range: 1-127). After a while, the current denominator value appears next to exit from the Function mode. 20 DD-65...2 126 127 3 Press the [FUNCTION] button to one of the time signature. Press the [FUNCTION] button once, then press the [DRUM 1] or [DRUM 2] button a number of the time signature Set the basic note value for each measure. CL2 1 Enter the denominator value setting function....
Owner's Manual
Page 21
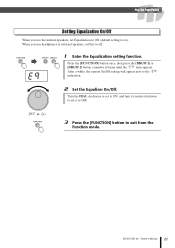
Turn the DIAL clockwise to set to ON, and turn it counter-clockwise to set it to the "Eq" indication. 2 Set the Equalizer On/Off. DD-65/YDD-60 Owner's Manual 21 After a while, the current On/Off setting will appear next to OFF. OFF On 3 Press the [FUNCTION] button to exit... from the Function mode. Press the [FUNCTION] button once, then press the [DRUM 1] or [DRUM 2] button a number of times until the "Eq" item appears. When you use headphones or external speakers, set this to off. Play the Pads/Pedals ...
Turn the DIAL clockwise to set to ON, and turn it counter-clockwise to set it to the "Eq" indication. 2 Set the Equalizer On/Off. DD-65/YDD-60 Owner's Manual 21 After a while, the current On/Off setting will appear next to OFF. OFF On 3 Press the [FUNCTION] button to exit... from the Function mode. Press the [FUNCTION] button once, then press the [DRUM 1] or [DRUM 2] button a number of times until the "Eq" item appears. When you use headphones or external speakers, set this to off. Play the Pads/Pedals ...
Owner's Manual
Page 22
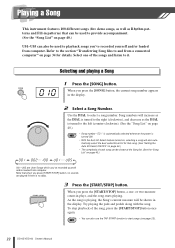
...40.) NOTE • Song number " 001" is automatically selected whenever the power is playing, the Song's current measure will also automatically select the best suited Drum Kit for details. or two-measure count-in the display. 2 Select a Song Number. To stop playback of the song, press the [START/STOP] button... demo songs, as well as the DIAL is no sounds are User Songs which you've recorded yourself and/or loaded from computer. NOTE 22 DD-65/YDD-60 Owner's Manual Refer to the section "Transferring Song files to playback songs you press the [SONG] button, the current song ...
...40.) NOTE • Song number " 001" is automatically selected whenever the power is playing, the Song's current measure will also automatically select the best suited Drum Kit for details. or two-measure count-in the display. 2 Select a Song Number. To stop playback of the song, press the [START/STOP] button... demo songs, as well as the DIAL is no sounds are User Songs which you've recorded yourself and/or loaded from computer. NOTE 22 DD-65/YDD-60 Owner's Manual Refer to the section "Transferring Song files to playback songs you press the [SONG] button, the current song ...
Owner's Manual
Page 23
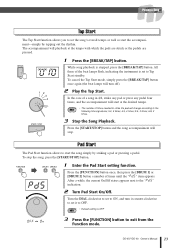
... mode. The accompaniment will stop the song, press the [START/STOP] button. Pad Start The Pad Start function allows to Tap Start standby. DD-65/YDD-60 Owner's Manual 23 While song playback is set to start the song simply by tapping out the rhythm. Press the [FUNCTION] button ...once, then press the [DRUM 1] or [DRUM 2] button a number of the beat lamps flash, indicating the instrument is stopped, press the [BREAK/TAP] button. To stop . PdS 1 ...
... mode. The accompaniment will stop the song, press the [START/STOP] button. Pad Start The Pad Start function allows to Tap Start standby. DD-65/YDD-60 Owner's Manual 23 While song playback is set to start the song simply by tapping out the rhythm. Press the [FUNCTION] button ...once, then press the [DRUM 1] or [DRUM 2] button a number of the beat lamps flash, indicating the instrument is stopped, press the [BREAK/TAP] button. To stop . PdS 1 ...

Owner's Manual
Page 24
... turn it counter-clockwise to set it to the "AtS" indication. NOTE 24 DD-65/YDD-60 Owner's Manual Playing a Song Setting the Auto Kit Select ON/OFF With the Auto Kit Select feature turned on, the best suited Drum Kit for the song will appear next to OFF. AtS 1 Enter the Auto... Kit Select function. Press the [FUNCTION] button once, then press the [DRUM 1] or [DRUM 2] button a number of times until the "AtS" item appears. OFF On 2 Turn Auto Kit Select On/Off. NOTE Auto Kit Select on . After a while, the ...
... turn it counter-clockwise to set it to the "AtS" indication. NOTE 24 DD-65/YDD-60 Owner's Manual Playing a Song Setting the Auto Kit Select ON/OFF With the Auto Kit Select feature turned on, the best suited Drum Kit for the song will appear next to OFF. AtS 1 Enter the Auto... Kit Select function. Press the [FUNCTION] button once, then press the [DRUM 1] or [DRUM 2] button a number of times until the "AtS" item appears. OFF On 2 Turn Auto Kit Select On/Off. NOTE Auto Kit Select on . After a while, the ...

Owner's Manual
Page 26
...along with a Song Use the pads and pedals to the Break standby mode when the Break measure is completed. 26 DD-65/YDD-60 Owner's Manual Setting the Track ON/OFF The instrument's song accompaniment consists of 32 notes simultaneously. You ...liven up songs by song accompaniment, pads, foot pedals, and note data received through the MIDI IN jack. DRUM 1 DRUM 2 DRUM 3 BACKING Bass Drum Snare Drum Cymbal Backing unlit Pressing a Track button ([DRUM 1], [DRUM 2], [DRUM 3], [BACKING]) will mute (turn off the sound) the corresponding track and its indicator lamp will mute until...
...along with a Song Use the pads and pedals to the Break standby mode when the Break measure is completed. 26 DD-65/YDD-60 Owner's Manual Setting the Track ON/OFF The instrument's song accompaniment consists of 32 notes simultaneously. You ...liven up songs by song accompaniment, pads, foot pedals, and note data received through the MIDI IN jack. DRUM 1 DRUM 2 DRUM 3 BACKING Bass Drum Snare Drum Cymbal Backing unlit Pressing a Track button ([DRUM 1], [DRUM 2], [DRUM 3], [BACKING]) will mute (turn off the sound) the corresponding track and its indicator lamp will mute until...
Owner's Manual
Page 28
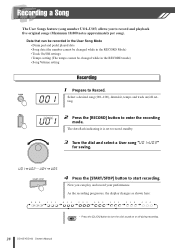
The dots flash indicating it is set to enter the recording mode. NOTE 28 DD-65/YDD-60 Owner's Manual Select a desired song (001-100), drum kit, tempo and track on or off setting. Now you to start recording. U01 2 Press the [RECORD] button to record standby. 3 Turn the dial ...notes approximately per song). Recording a Song The User Songs feature (song number UO1-UO5) allows you can be recorded in the User Song Mode • Drum pad and pedal played data • Song data (the number cannot be changed while in the RECORD Mode) • Track On/Off settings • ...
The dots flash indicating it is set to enter the recording mode. NOTE 28 DD-65/YDD-60 Owner's Manual Select a desired song (001-100), drum kit, tempo and track on or off setting. Now you to start recording. U01 2 Press the [RECORD] button to record standby. 3 Turn the dial ...notes approximately per song). Recording a Song The User Songs feature (song number UO1-UO5) allows you can be recorded in the User Song Mode • Drum pad and pedal played data • Song data (the number cannot be changed while in the RECORD Mode) • Track On/Off settings • ...


