
Owner's Manual
Page 2
... all installations. If you can be used . ENVIRONMENTAL ISSUES: Yamaha strives to coaxial type cable. The model number, serial number, power requirements, etc., are therefore the owners responsibility. IMPORTANT: When connecting this product in a residential environment will not occur in the manual, on the name plate, or specifically recommended by Yamaha. You should be determined by turning the unit "OFF" and "ON", please try to the instructions...
... all installations. If you can be used . ENVIRONMENTAL ISSUES: Yamaha strives to coaxial type cable. The model number, serial number, power requirements, etc., are therefore the owners responsibility. IMPORTANT: When connecting this product in a residential environment will not occur in the manual, on the name plate, or specifically recommended by Yamaha. You should be determined by turning the unit "OFF" and "ON", please try to the instructions...

Owner's Manual
Page 3
... to connecting or disconnecting cables. s Data Backup q Custom data and some settings (see page 21) will give you years of time. Congratulations Thank you use . s Service and Modification q The DD-50 contains no user serviceable parts. q An AC adaptor, if used to avoid deformation, discoloration, or more serious damage. q Excessive humidity. near a window). q High temperatures (e.g. Before you for an extended period of playing pleasure if you to qualified YAMAHA...
... to connecting or disconnecting cables. s Data Backup q Custom data and some settings (see page 21) will give you years of time. Congratulations Thank you use . s Service and Modification q The DD-50 contains no user serviceable parts. q An AC adaptor, if used to avoid deformation, discoloration, or more serious damage. q Excessive humidity. near a window). q High temperatures (e.g. Before you for an extended period of playing pleasure if you to qualified YAMAHA...
Owner's Manual
Page 4
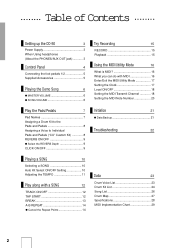
... DD-50 3 Power Supply 3 When Using headphones (About the PHONES/AUX OUT jack 3 Control Panel 4 Connecting the foot pedals 1/2 5 Supplied Accessories 5 Playing the Demo Song 6 q MASTER VOLUME 6 q SONG VOLUME 6 Try Recording 15 RECORD 15 Playback 15 Using the MIDI/Utility Mode 16 What is MIDI 16 What you can do with MIDI 16 Enter/Exit the MIDI/Utility Mode 17 Setting the Clock 17 Local ON/OFF 18 Setting the MIDI Transmit Channel 18 Setting the MIDI Note Number 20 Play the Pads/Pedals 7 Pad Names 7 Assigning a Drum Kit to the Pads and Pedals...
... DD-50 3 Power Supply 3 When Using headphones (About the PHONES/AUX OUT jack 3 Control Panel 4 Connecting the foot pedals 1/2 5 Supplied Accessories 5 Playing the Demo Song 6 q MASTER VOLUME 6 q SONG VOLUME 6 Try Recording 15 RECORD 15 Playback 15 Using the MIDI/Utility Mode 16 What is MIDI 16 What you can do with MIDI 16 Enter/Exit the MIDI/Utility Mode 17 Setting the Clock 17 Local ON/OFF 18 Setting the MIDI Transmit Channel 18 Setting the MIDI Note Number 20 Play the Pads/Pedals 7 Pad Names 7 Assigning a Drum Kit to the Pads and Pedals...

Owner's Manual
Page 5
... time. Batteries left side panel, and plug the AC power adaptor into an AC power outlet. 1 Open the battery compartment cover on the side panel. Follow the instructions below according to the DD-50. When Using Headphones (About the PHONES/AUX OUT Jack) An optional set of six new batteries of the same type. • NEVER mix old and new batteries, different types of batteries (alkaline, magnesium, etc.), batteries by different makers, or batteries from batteries...
... time. Batteries left side panel, and plug the AC power adaptor into an AC power outlet. 1 Open the battery compartment cover on the side panel. Follow the instructions below according to the DD-50. When Using Headphones (About the PHONES/AUX OUT Jack) An optional set of six new batteries of the same type. • NEVER mix old and new batteries, different types of batteries (alkaline, magnesium, etc.), batteries by different makers, or batteries from batteries...
Owner's Manual
Page 7
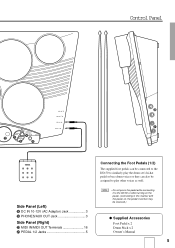
Control Panel @ REC. START/ STOP # A-B REPEAT % BREAK/ TAPSTART $DEMO DD-50 ^ MIDI IN MIDI OUT PEDAL 1 PEDAL 2 ) q Side Panel (Left) * DC IN 10-12V (AC Adaptor) Jack 3 ( PHONES/AUX OUT Jack 3 Side Panel (Right) ) MIDI IN/MIDI OUT Terminals 16 q PEDAL 1/2 Jacks 5 Connecting the Foot Pedals (1/2) The supplied foot pedals can be connected to the DD-50 to similarly play the drum set's hi-hat pedal or bass drum voices or they can also be assigned to play other voices as well. • Do not press the pedal while connecting it...
Control Panel @ REC. START/ STOP # A-B REPEAT % BREAK/ TAPSTART $DEMO DD-50 ^ MIDI IN MIDI OUT PEDAL 1 PEDAL 2 ) q Side Panel (Left) * DC IN 10-12V (AC Adaptor) Jack 3 ( PHONES/AUX OUT Jack 3 Side Panel (Right) ) MIDI IN/MIDI OUT Terminals 16 q PEDAL 1/2 Jacks 5 Connecting the Foot Pedals (1/2) The supplied foot pedals can be connected to the DD-50 to similarly play the drum set's hi-hat pedal or bass drum voices or they can also be assigned to play other voices as well. • Do not press the pedal while connecting it...
Owner's Manual
Page 9
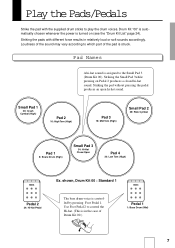
... Small Pad 3 (Drum Kit 00). shown, Drum Kit 00 : Standard 1 Pedal 2 34: Hi-Hat Pedal The bass drum voice is struck. Drum Kit "00" is automatically chosen whenever the power is assigned to which part of Drum Kit 00.) Pedal 1 1: Bass Drum (Mid) 7 Pad Names A hi-hat sound is turned on Pedal 2 produces a closed hi-hat sound. Striking the Small Pad 3while pressing on (see the "Drum Kit List" page 24). Small Pad 1 38...
... Small Pad 3 (Drum Kit 00). shown, Drum Kit 00 : Standard 1 Pedal 2 34: Hi-Hat Pedal The bass drum voice is struck. Drum Kit "00" is automatically chosen whenever the power is assigned to which part of Drum Kit 00.) Pedal 1 1: Bass Drum (Mid) 7 Pad Names A hi-hat sound is turned on Pedal 2 produces a closed hi-hat sound. Striking the Small Pad 3while pressing on (see the "Drum Kit List" page 24). Small Pad 1 38...
Owner's Manual
Page 10
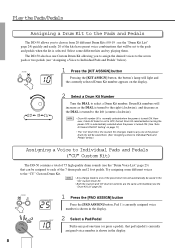
.... Play the Pads/Pedals Assigning a Drum Kit to the Pads and Pedals The DD-50 allows you to assign the desired voices to the seven pads or two pedals (see "Assigning a Voice to Individual Pads and Pedals" below .) Assigning a Voice to Individual Pads and Pedals ("CU" Custom Kit) The DD-50 contains a total of 75 high quality drum sounds (see the "Drum Voice List" page 23) that can be saved in the display. 8 ASSIGN PAD KIT BEAT 10...
.... Play the Pads/Pedals Assigning a Drum Kit to the Pads and Pedals The DD-50 allows you to assign the desired voices to the seven pads or two pedals (see "Assigning a Voice to Individual Pads and Pedals" below .) Assigning a Voice to Individual Pads and Pedals ("CU" Custom Kit) The DD-50 contains a total of 75 high quality drum sounds (see the "Drum Voice List" page 23) that can be saved in the display. 8 ASSIGN PAD KIT BEAT 10...
Owner's Manual
Page 11
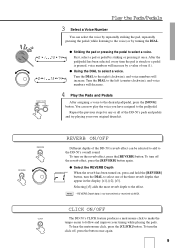
... pad/pedal has been selected, every time the pad is struck or a pedal is not transmitted or received via MIDI. q Select the REVERB Depth BEAT r1 When the reverb has been turned on the reverb effect, press the [REVERB] button. CLICK ON/OFF CLICK The DD-50's CLICK feature produces a metronome click to make the tempo easier to select one of one (1). q Striking the pad or pressing the pedal to the pad/pedal. Repeat...
... pad/pedal has been selected, every time the pad is struck or a pedal is not transmitted or received via MIDI. q Select the REVERB Depth BEAT r1 When the reverb has been turned on the reverb effect, press the [REVERB] button. CLICK ON/OFF CLICK The DD-50's CLICK feature produces a metronome click to make the tempo easier to select one of one (1). q Striking the pad or pressing the pedal to the pad/pedal. Repeat...
Owner's Manual
Page 12
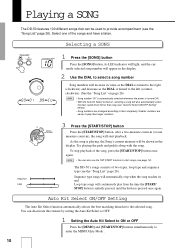
... display. Auto Kit Select ON/OFF Setting The Auto Kit Select function automatically selects the best matching drum kit to enter the MIDI/Utility Mode . 10 Sequence type songs will automatically stop playback of two types, loop type and sequence type (see "Auto Kit Select ON/OFF Setting" below). • Song numbers are easier to their complexity. Playing a SONG The DD-50 features 100 different songs that song (see the "Song List" page 26). Try playing the pads and pedals...
... display. Auto Kit Select ON/OFF Setting The Auto Kit Select function automatically selects the best matching drum kit to enter the MIDI/Utility Mode . 10 Sequence type songs will automatically stop playback of two types, loop type and sequence type (see "Auto Kit Select ON/OFF Setting" below). • Song numbers are easier to their complexity. Playing a SONG The DD-50 features 100 different songs that song (see the "Song List" page 26). Try playing the pads and pedals...
Owner's Manual
Page 14
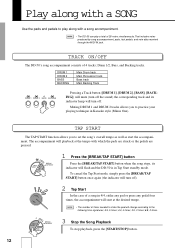
.../TAP START] button once again (the indicator will turn off . REC. Play along with a SONG Use the pads and pedals to play a total of 4 tracks; Drum 1/2, Bass, and Backing tracks. TAP START The TAP START function allows you to practice your playing technique in Tap Start standby mode. The accompaniment will playback at the desired tempo. • The number of a song in 4/4, strike any pad or press any pedal four times, the accompaniment will flash and the DD-50 is...
.../TAP START] button once again (the indicator will turn off . REC. Play along with a SONG Use the pads and pedals to play a total of 4 tracks; Drum 1/2, Bass, and Backing tracks. TAP START The TAP START function allows you to practice your playing technique in Tap Start standby mode. The accompaniment will playback at the desired tempo. • The number of a song in 4/4, strike any pad or press any pedal four times, the accompaniment will flash and the DD-50 is...
Owner's Manual
Page 16
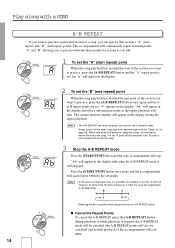
... songs, set both points before the end of the song. START/ STOP A-B REPEAT BREAK/ TAPSTART q Cancel the Repeat Points To cancel the A-B REPEAT, press the [A-B REPEAT] button during the repeat playback. • The A-B REPEAT start repeat) and "B" (end repeat) points. "Ab" will appear in the display and after the song has looped back to the beginning). The accompaniment will appear in the display indicating the A-B REPEAT mode is still engaged. loop type and sequence type (see the "Song List...
... songs, set both points before the end of the song. START/ STOP A-B REPEAT BREAK/ TAPSTART q Cancel the Repeat Points To cancel the A-B REPEAT, press the [A-B REPEAT] button during the repeat playback. • The A-B REPEAT start repeat) and "B" (end repeat) points. "Ab" will appear in the display and after the song has looped back to the beginning). The accompaniment will appear in the display indicating the A-B REPEAT mode is still engaged. loop type and sequence type (see the "Song List...

Owner's Manual
Page 17
... original song (600 notes approximately). START/ STOP A-B REPEAT BREAK/ TAPSTART 3 Stop Recording To stop . BEAT CU Song number "CU" follows Song number "99" (or prior to cancel the metronome during recording. Try Recording The DD-50's Custom Song feature (song number "CU") allows you to Record Select the desired song, drum kit, tempo, track on/off setting, and reverb settings. q Data that can be used in the RECORD mode). • Song Volume setting. • Reverb ON/OFF setting. • Break ON/OFF setting. * MIDI data cannot be recorded to the memory...
... original song (600 notes approximately). START/ STOP A-B REPEAT BREAK/ TAPSTART 3 Stop Recording To stop . BEAT CU Song number "CU" follows Song number "99" (or prior to cancel the metronome during recording. Try Recording The DD-50's Custom Song feature (song number "CU") allows you to Record Select the desired song, drum kit, tempo, track on/off setting, and reverb settings. q Data that can be used in the RECORD mode). • Song Volume setting. • Reverb ON/OFF setting. • Break ON/OFF setting. * MIDI data cannot be recorded to the memory...
Owner's Manual
Page 18
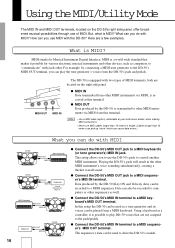
... overall sound. This setup allows you can be used to a MIDI keyboard's (or tone generator's) MIDI IN jack. Playing the DD-50's pads will result in length. (Cables longer than 15 meters can pick up "noise" which can play DD-50 voices that makes it is received at your local music dealer, when making MIDI connections. • Never use MIDI with MIDI? q Connect the DD-50's MIDI OUT jack to control another MIDI instrument. q Connect the DD-50's MIDI IN terminal to a MIDI sequencer's MIDI OUT terminal. q Connect the DD-50's MIDI IN...
... overall sound. This setup allows you can be used to a MIDI keyboard's (or tone generator's) MIDI IN jack. Playing the DD-50's pads will result in length. (Cables longer than 15 meters can pick up "noise" which can play DD-50 voices that makes it is received at your local music dealer, when making MIDI connections. • Never use MIDI with MIDI? q Connect the DD-50's MIDI OUT jack to control another MIDI instrument. q Connect the DD-50's MIDI IN terminal to a MIDI sequencer's MIDI OUT terminal. q Connect the DD-50's MIDI IN...
Owner's Manual
Page 19
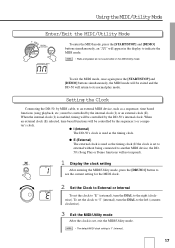
... indicate the MIDI mode. • Pads and pedals do not sound while in the display to the right (clockwise). When an external clock (E) selected, time based functions will appear in the MIDI/Utility mode. Using the MIDI/Utility Mode Enter/Exit the MIDI/Utility Mode REC. START/ STOP A-B REPEAT BREAK/ TAPSTART DEMO BEAT mm To enter the MIDI mode, press the [START/STOP] and [DEMO] buttons simultaneously, an "mm" will be controlled by the DD-50's internal clock...
... indicate the MIDI mode. • Pads and pedals do not sound while in the display to the right (clockwise). When an external clock (E) selected, time based functions will appear in the MIDI/Utility mode. Using the MIDI/Utility Mode Enter/Exit the MIDI/Utility Mode REC. START/ STOP A-B REPEAT BREAK/ TAPSTART DEMO BEAT mm To enter the MIDI mode, press the [START/STOP] and [DEMO] buttons simultaneously, an "mm" will be controlled by the DD-50's internal clock...
Owner's Manual
Page 20
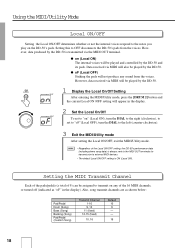
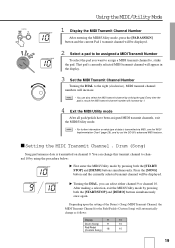
...: Pad/Pedal Drum (Song) Bass (Song) Backing (Song) Pad/Pedal (Custom Song) Transmit Channel 1-16 9, 10 11 (fixed) 12-15 (fixed) 10, 16 Default 10 9 - - 16 18 q on any sound from the voices. Also, song transmit channels are as "oF" in the display. DRUM 2 1 Display the Local On/Off Setting BEAT on the DD-50's pads. Data received via MIDI will be assigned to external MIDI devices. • The default Local ON/OFF setting is transmitted via MIDI will be played by the DD-50 is...
...: Pad/Pedal Drum (Song) Bass (Song) Backing (Song) Pad/Pedal (Custom Song) Transmit Channel 1-16 9, 10 11 (fixed) 12-15 (fixed) 10, 16 Default 10 9 - - 16 18 q on any sound from the voices. Also, song transmit channels are as "oF" in the display. DRUM 2 1 Display the Local On/Off Setting BEAT on the DD-50's pads. Data received via MIDI will be assigned to external MIDI devices. • The default Local ON/OFF setting is transmitted via MIDI will be played by the DD-50 is...
Owner's Manual
Page 21
... [DEMO] buttons simultaneously. Drum (Song) Song performance data is transmitted via MIDI, see the "MIDI Implementation Chart" (page 29), and try out the DD-50's advanced MIDI features. You can select either channel 9 or channel 10. After making a selection, exit the MIDI/Utility mode by pressing both the [START/STOP] and [DEMO] buttons simultaneously once again. Using the MIDI/Utility Mode ASSIGN PAD KIT BEAT 10 1 Display the MIDI Transmit Channel Number After entering the MIDI/Utility mode, press the [PAD ASSIGN] button and...
... [DEMO] buttons simultaneously. Drum (Song) Song performance data is transmitted via MIDI, see the "MIDI Implementation Chart" (page 29), and try out the DD-50's advanced MIDI features. You can select either channel 9 or channel 10. After making a selection, exit the MIDI/Utility mode by pressing both the [START/STOP] and [DEMO] buttons simultaneously once again. Using the MIDI/Utility Mode ASSIGN PAD KIT BEAT 10 1 Display the MIDI Transmit Channel Number After entering the MIDI/Utility mode, press the [PAD ASSIGN] button and...
Owner's Manual
Page 22
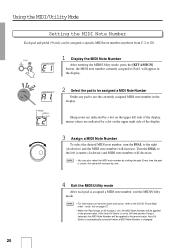
...-clockwise) and MIDI note numbers will decrease. • You can be applied to the DD-50 "Drum Map" (note - If the Auto Kit Select is set to ON and another Song is set, the MIDI Note Number will be assigned a specific MIDI note number anywhere from C-2 to Pad 1 will appear in the display. # (Sharp) -(Minus) BEAT C2 Sharp notes are indicated by one. 4 Exit the MIDI/Utility mode After each pad is changed. 20 voice, list) on page...
...-clockwise) and MIDI note numbers will decrease. • You can be applied to the DD-50 "Drum Map" (note - If the Auto Kit Select is set to ON and another Song is set, the MIDI Note Number will be assigned a specific MIDI note number anywhere from C-2 to Pad 1 will appear in the display. # (Sharp) -(Minus) BEAT C2 Sharp notes are indicated by one. 4 Exit the MIDI/Utility mode After each pad is changed. 20 voice, list) on page...

Owner's Manual
Page 24
...-3B) should be replaced with a complete set to the pad. Troubleshooting In many cases, problems or malfunctions that occur during use can be used to the appropriate pad (see page 6). • A plug is inserted into the PHONES/AUX. Adjust the volume (see page 8). The selected voice does not sound when the pad is damaged. Use the PAD ASSIGN function to program the desired voice to power the DD-50 (see page 17...
...-3B) should be replaced with a complete set to the pad. Troubleshooting In many cases, problems or malfunctions that occur during use can be used to the appropriate pad (see page 6). • A plug is inserted into the PHONES/AUX. Adjust the volume (see page 8). The selected voice does not sound when the pad is damaged. Use the PAD ASSIGN function to program the desired voice to power the DD-50 (see page 17...
Owner's Manual
Page 30
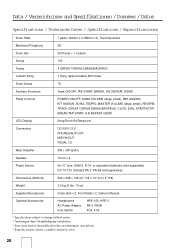
...) Custom Song 1 Song (approximately 600 notes) Drum Voices 75 Auxiliary Functions Track ON/OFF, TAP START, BREAK, A-B REPEAT, DEMO Panel Controls POWER ON/OFF, SONG VOLUME (large, small), PAD ASSIGN, KIT ASSIGN, SONG, TEMPO, MASTER VOLUME (large, small), REVERB, TRACK (DRUM 1/DRUM 2/BASS/BACKING), CLICK, DIAL, START/STOP, BREAK/TAP START, A-B REPEAT, DEMO LED Display Song/Drum Kit/Tempo etc. Connectors DC IN10-12 V PHONES/AUX OUT MIDI IN/OUT PEDAL 1/2 Main Amplifier 3W + 3W (EIAJ) Speaker 10 cm x 2 Power Source Six "C" size, SUM-2, R-14, or equivalent batteries...
...) Custom Song 1 Song (approximately 600 notes) Drum Voices 75 Auxiliary Functions Track ON/OFF, TAP START, BREAK, A-B REPEAT, DEMO Panel Controls POWER ON/OFF, SONG VOLUME (large, small), PAD ASSIGN, KIT ASSIGN, SONG, TEMPO, MASTER VOLUME (large, small), REVERB, TRACK (DRUM 1/DRUM 2/BASS/BACKING), CLICK, DIAL, START/STOP, BREAK/TAP START, A-B REPEAT, DEMO LED Display Song/Drum Kit/Tempo etc. Connectors DC IN10-12 V PHONES/AUX OUT MIDI IN/OUT PEDAL 1/2 Main Amplifier 3W + 3W (EIAJ) Speaker 10 cm x 2 Power Source Six "C" size, SUM-2, R-14, or equivalent batteries...
Owner's Manual
Page 31
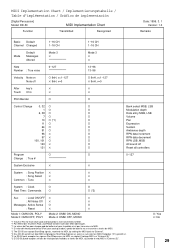
...;n [Digital Percussion] Model: DD-50 MIDI Implementation Chart Function Transmitted Recognized Date: 1996. 3. 1 Version: 1.0 Remarks Basic Default Channel Changed 1~16 CH 1~16 CH 1~16 CH 1~16 CH Mode Default Messages Altered Mode 3 X Mode 3 X X Note Number : True voice 0~127 13~96 13~96 Velocity Note on Note off O 9nH, v=1~127 X 9nH, v=0 O 9nH, v=1~127 X 9nH, v=0 After key's X X Touch Ch's X X Pitch Bender O O Control Change 0, 32 O O 1O O 6, 38 O O 7O O 10 O (*1) O 11 O O 64 O O 91 O O 96 X O 97 X O 100, 101 O O 120 X O 121 X O Bank...
...;n [Digital Percussion] Model: DD-50 MIDI Implementation Chart Function Transmitted Recognized Date: 1996. 3. 1 Version: 1.0 Remarks Basic Default Channel Changed 1~16 CH 1~16 CH 1~16 CH 1~16 CH Mode Default Messages Altered Mode 3 X Mode 3 X X Note Number : True voice 0~127 13~96 13~96 Velocity Note on Note off O 9nH, v=1~127 X 9nH, v=0 O 9nH, v=1~127 X 9nH, v=0 After key's X X Touch Ch's X X Pitch Bender O O Control Change 0, 32 O O 1O O 6, 38 O O 7O O 10 O (*1) O 11 O O 64 O O 91 O O 96 X O 97 X O 100, 101 O O 120 X O 121 X O Bank...


