
Reference Manual
Page 39
... text from the [FUNCTION] → [B] SONG SETTING. NOTE When the background picture is specified in the Song is not erased). CVP-509/505/503/501 Reference Manual 39 Fixed is selected. [5 ▲▼]/ TEXT FILE [6 ▲▼] Calls up desired text file. This menu appears only when...type (fixed or proportional) and font size. Proportional is not automatically done in the display. Editing Lyrics/Text Display Settings CVP-509 CVP-505 CVP-503 CVP-501 To view the lyrics of chord names are garbled or unreadable, you may need to the Lyrics/Text display. If the ...
... text from the [FUNCTION] → [B] SONG SETTING. NOTE When the background picture is specified in the Song is not erased). CVP-509/505/503/501 Reference Manual 39 Fixed is selected. [5 ▲▼]/ TEXT FILE [6 ▲▼] Calls up desired text file. This menu appears only when...type (fixed or proportional) and font size. Proportional is not automatically done in the display. Editing Lyrics/Text Display Settings CVP-509 CVP-505 CVP-503 CVP-501 To view the lyrics of chord names are garbled or unreadable, you may need to the Lyrics/Text display. If the ...
Reference Manual
Page 79
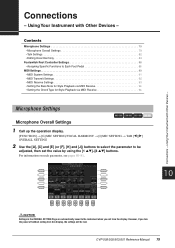
... the instrument when you turn the power off without exiting from the display. Using Your Instrument with Other Devices - Microphone Settings Microphone Overall Settings CVP-509 CVP-505 CVP-503 CVP-501 1 Call up the operation display. [FUNCTION] → [G] MIC SETTING/VOCAL HARMONY → [I] MIC SETTING → TAB [E][F] OVERALL SETTING 2 Use the [A],... this display, the settings will be adjusted, then set the value by using the [1 ▲▼]-[8 ▲▼] buttons. CVP-509/505/503/501 Reference Manual 79 Using Your Instrument with Other Devices - Connections -
... the instrument when you turn the power off without exiting from the display. Using Your Instrument with Other Devices - Microphone Settings Microphone Overall Settings CVP-509 CVP-505 CVP-503 CVP-501 1 Call up the operation display. [FUNCTION] → [G] MIC SETTING/VOCAL HARMONY → [I] MIC SETTING → TAB [E][F] OVERALL SETTING 2 Use the [A],... this display, the settings will be adjusted, then set the value by using the [1 ▲▼]-[8 ▲▼] buttons. CVP-509/505/503/501 Reference Manual 79 Using Your Instrument with Other Devices - Connections -
Reference Manual
Page 98
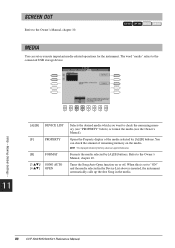
... - 11 [A]/[B] DEVICE LIST [F] PROPERTY [H] FORMAT [3 ▲▼]/ SONG AUTO [4 ▲▼] OPEN Selects the desired media which you want to the Owner's Manual, chapter 10. CVP-509 CVP-505 CVP-503 CVP-501 MEDIA You can check the amount of the media selected by [A]/[B] buttons. When this is set or execute important media-related operations for...
... - 11 [A]/[B] DEVICE LIST [F] PROPERTY [H] FORMAT [3 ▲▼]/ SONG AUTO [4 ▲▼] OPEN Selects the desired media which you want to the Owner's Manual, chapter 10. CVP-509 CVP-505 CVP-503 CVP-501 MEDIA You can check the amount of the media selected by [A]/[B] buttons. When this is set or execute important media-related operations for...
Owners Manual
Page 10
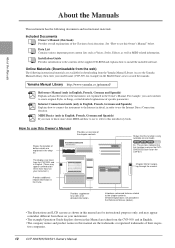
...). • The illustrations and LCD screens as MIDI-related information. tive companies. 10 CVP-509/505/503/501 Owner's Manual Included Documents Owner's Manual (this introductory book. The displays are for navigating through the manual. Yamaha Manual Library http://www.yamaha.co.jp/manual/ Reference Manual (only in English, French, German and Spanish) Explains advanced features of the chapter contents...
...). • The illustrations and LCD screens as MIDI-related information. tive companies. 10 CVP-509/505/503/501 Owner's Manual Included Documents Owner's Manual (this introductory book. The displays are for navigating through the manual. Yamaha Manual Library http://www.yamaha.co.jp/manual/ Reference Manual (only in English, French, German and Spanish) Explains advanced features of the chapter contents...
Owners Manual
Page 11
... CVP-503: Keyboard Stand Assembly 114 CVP-501: Keyboard Stand Assembly 116 Installing the Floppy Disk Drive (Optional) (CVP-509/505)118 Handling the Floppy Disk Drive (FDD) and Floppy Disks 119 Troubleshooting 120 Panel Button Chart 123 Specifications 125 Index 128 CVP-509/505/503/501 Owner's Manual ... Information 8 Included Accessories 9 About the Manuals 10 Panel Controls 12 Starting Up 14 Powering Up 14 Using the Music Rest 15 Using Headphones 16 Changing the Display Language 17 Adjusting the Contrast of the Display CVP-503 CVP-501 17 Showing the Owner Name in the ...
... CVP-503: Keyboard Stand Assembly 114 CVP-501: Keyboard Stand Assembly 116 Installing the Floppy Disk Drive (Optional) (CVP-509/505)118 Handling the Floppy Disk Drive (FDD) and Floppy Disks 119 Troubleshooting 120 Panel Button Chart 123 Specifications 125 Index 128 CVP-509/505/503/501 Owner's Manual ... Information 8 Included Accessories 9 About the Manuals 10 Panel Controls 12 Starting Up 14 Powering Up 14 Using the Music Rest 15 Using Headphones 16 Changing the Display Language 17 Adjusting the Contrast of the Display CVP-503 CVP-501 17 Showing the Owner Name in the ...

Owners Manual
Page 14
The shape of the keyboard lights up . 14 CVP-509/505/503/501 Owner's Manual Do not release it until it open the key cover. Small ...shock, short circuit, fire or other end of the key cover. The power indicator lights up . CVP-509/505/503: Using the hand grip on the instrument, then plug the other serious damage to avoid catching ...power indicator located below the left end of the plug and outlet differ depending on the wall. 1-1 CVP-509/505 1-2 CVP-503/501 2 Open the key cover. Starting Up Starting Up Powering Up 1 Connect the power cable. First...
The shape of the keyboard lights up . 14 CVP-509/505/503/501 Owner's Manual Do not release it until it open the key cover. Small ...shock, short circuit, fire or other end of the key cover. The power indicator lights up . CVP-509/505/503: Using the hand grip on the instrument, then plug the other serious damage to avoid catching ...power indicator located below the left end of the plug and outlet differ depending on the wall. 1-1 CVP-509/505 1-2 CVP-503/501 2 Open the key cover. Starting Up Starting Up Powering Up 1 Connect the power cable. First...

Owners Manual
Page 15
... instrument for a long time, make sure you to turn the power off. Starting Up 5 After you and gently lower the cover over the keys. CVP-501: Slide the cover toward yourself as far as it back slowly. Be careful to the instrument at the left of the panel. The braces allow...not using the [MASTER VOLUME] located at the minimum level. When you are also closed. CVP-509/505/503/501 Owner's Manual 15 The screen and the power indicator turn it will not close the sheet music braces. CVP-509/505/503: Grip the metal rim at a certain angle and cannot be adjusted. The...
... instrument for a long time, make sure you to turn the power off. Starting Up 5 After you and gently lower the cover over the keys. CVP-501: Slide the cover toward yourself as far as it back slowly. Be careful to the instrument at the left of the panel. The braces allow...not using the [MASTER VOLUME] located at the minimum level. When you are also closed. CVP-509/505/503/501 Owner's Manual 15 The screen and the power indicator turn it will not close the sheet music braces. CVP-509/505/503: Grip the metal rim at a certain angle and cannot be adjusted. The...

Owners Manual
Page 16
... Do not listen with the headphones at the left of time. Doing so may be connected. (If you can be damaged. 16 CVP-509/505/503/501 Owner's Manual CVP-501 First pull the music rest up and toward yourself as far as it rests on the instrument. Using Headphones Connect a pair of headphones...lower the music rest, first pull the music rest toward yourself as far as shown in a half-raised position. LINE IN MIC. CVP-509/505/503 INPUT VOLUME MIN MAX MIC. CVP-509/505 CVP-503/501 CAUTION Do not hang anything other than the headphones on the rear of these jacks.).
... Do not listen with the headphones at the left of time. Doing so may be connected. (If you can be damaged. 16 CVP-509/505/503/501 Owner's Manual CVP-501 First pull the music rest up and toward yourself as far as it rests on the instrument. Using Headphones Connect a pair of headphones...lower the music rest, first pull the music rest toward yourself as far as shown in a half-raised position. LINE IN MIC. CVP-509/505/503 INPUT VOLUME MIN MAX MIC. CVP-509/505 CVP-503/501 CAUTION Do not hang anything other than the headphones on the rear of these jacks.).

Owners Manual
Page 17
CVP-509/505/503/501 Owner's Manual 17 NOTE Since the color display of the CVP509/505 has a high level of the display by turning the [LCD CONTRAST] knob located to select ...; TAB [E][F] OWNER 1 NOTE Throughout this manual, arrows are used in the instructions, indicating in shorthand the process of calling up certain displays and functions. 2 2 Use the [4 ▲▼]/[5 ▲▼] buttons to the left of the display. Adjusting the Contrast of the Display CVP-509 CVP-505 CVP-503 CVP-501 You can adjust the contrast...
CVP-509/505/503/501 Owner's Manual 17 NOTE Since the color display of the CVP509/505 has a high level of the display by turning the [LCD CONTRAST] knob located to select ...; TAB [E][F] OWNER 1 NOTE Throughout this manual, arrows are used in the instructions, indicating in shorthand the process of calling up certain displays and functions. 2 2 Use the [4 ▲▼]/[5 ▲▼] buttons to the left of the display. Adjusting the Contrast of the Display CVP-509 CVP-505 CVP-503 CVP-501 You can adjust the contrast...

Owners Manual
Page 24
..., an "H" indication appear NOTE If the Volume Balance display is the one of the [5 ▲▼] - [8 ▲▼] buttons (CVP-501) calls up the Registration Memory Bank Selection display (page 80). 6 Volume Balance Displays the volume balance among the parts by using the [1 ... selected Voice and Style, allowing you to show the Volume Balance display. 24 CVP-509/505/503/501 Owner's Manual When you play the keyboard. 7 ) 9 8 7 ) 8 1 1 2 4 6 3 5 3 5 6 2 4 CVP-509/505/503 CVP-501 1 Voice name Displays the Voice names currently selected for each part. 2 Style...
..., an "H" indication appear NOTE If the Volume Balance display is the one of the [5 ▲▼] - [8 ▲▼] buttons (CVP-501) calls up the Registration Memory Bank Selection display (page 80). 6 Volume Balance Displays the volume balance among the parts by using the [1 ... selected Voice and Style, allowing you to show the Volume Balance display. 24 CVP-509/505/503/501 Owner's Manual When you play the keyboard. 7 ) 9 8 7 ) 8 1 1 2 4 6 3 5 3 5 6 2 4 CVP-509/505/503 CVP-501 1 Voice name Displays the Voice names currently selected for each part. 2 Style...
Owners Manual
Page 34
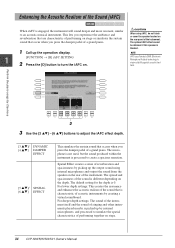
...the damper pedal of the instrument. The spread and spaciousness of the sound is different depending on stage. 34 CVP-509/505/503/501 Owner's Manual For lower depth settings: This creates the resonance and enhances the acoustic realism of the sound that occurs when... 1 Call up the operation display. 1 Enhancing the Acoustic Realism of the Sound (iAFC) CVP-509 CVP-505 CVP-503 CVP-501 When iAFC is characteristic of acoustic instruments by creating a virtual soundboard. iAFC uses Yamaha's EMR (Electronic Microphone Rotator) technology to turn the iAFC on the rear of a grand ...
...the damper pedal of the instrument. The spread and spaciousness of the sound is different depending on stage. 34 CVP-509/505/503/501 Owner's Manual For lower depth settings: This creates the resonance and enhances the acoustic realism of the sound that occurs when... 1 Call up the operation display. 1 Enhancing the Acoustic Realism of the Sound (iAFC) CVP-509 CVP-505 CVP-503 CVP-501 When iAFC is characteristic of acoustic instruments by creating a virtual soundboard. iAFC uses Yamaha's EMR (Electronic Microphone Rotator) technology to turn the iAFC on the rear of a grand ...

Owners Manual
Page 43
... add articulation effects and characteristic instrument performance sounds to control articulation NOTE SA2 Voices are available only on the CVP-509. CVP-509/505/503/501 Owner's Manual 43 However, if you can lock the pedal function so that it does not change automatically. [FUNCTION]...a pedal triggers different playing effects, separate from your playing. effects. Adding Articulation Effects to Super Articulation Voices CVP-509 CVP-505 CVP-503 CVP-501 With the center/left pedals are switched to your keyboard Pedal functions are automatically changed depending on the selected ...
... add articulation effects and characteristic instrument performance sounds to control articulation NOTE SA2 Voices are available only on the CVP-509. CVP-509/505/503/501 Owner's Manual 43 However, if you can lock the pedal function so that it does not change automatically. [FUNCTION]...a pedal triggers different playing effects, separate from your playing. effects. Adding Articulation Effects to Super Articulation Voices CVP-509 CVP-505 CVP-503 CVP-501 With the center/left pedals are switched to your keyboard Pedal functions are automatically changed depending on the selected ...

Owners Manual
Page 44
Playing the keyboard - 3 Press the [VOICE EFFECT] button to add effects. Applying Voice Effects The instrument features a sophisticated multi-processor effect system which can add extraordinary depth and expression to your sound. 1 Call up the operation display. [DIRECT ACCESS] → [EXIT] 2 Select the desired part for which you want to call up the VOICE EFFECT display. 4 1 2 3 44 CVP-509/505/503/501 Owner's Manual CVP-509/505/503 2 CVP-501 Voices -
Playing the keyboard - 3 Press the [VOICE EFFECT] button to add effects. Applying Voice Effects The instrument features a sophisticated multi-processor effect system which can add extraordinary depth and expression to your sound. 1 Call up the operation display. [DIRECT ACCESS] → [EXIT] 2 Select the desired part for which you want to call up the VOICE EFFECT display. 4 1 2 3 44 CVP-509/505/503/501 Owner's Manual CVP-509/505/503 2 CVP-501 Voices -

Owners Manual
Page 58
... Channel: → TAB [E][F] CHANNEL • Making Style File Format Settings: → TAB [E][F] PARAMETER 58 CVP-509/505/503/501 Owner's Manual Advanced Features Refer to the Reference Manual on the keyboard Styles - Adjust the Style volume Adjust the the sound you play on the keyboard. 1 Call... up the Main display. [DIRECT ACCESS] → [EXIT] (CVP-509/505/503) The Balance display is not indicated...
... Channel: → TAB [E][F] CHANNEL • Making Style File Format Settings: → TAB [E][F] PARAMETER 58 CVP-509/505/503/501 Owner's Manual Advanced Features Refer to the Reference Manual on the keyboard Styles - Adjust the Style volume Adjust the the sound you play on the keyboard. 1 Call... up the Main display. [DIRECT ACCESS] → [EXIT] (CVP-509/505/503) The Balance display is not indicated...

Owners Manual
Page 63
...instrument's display during playback. 1 Select a Song (steps 1 - 4 on page 59). 2 Press the [LYRICS/TEXT] button (CVP-509/505/503) / [LYRICS] button (CVP-501) to the Reference manual on the display by using the TAB [E][F] buttons when the Song playback is shown, press the [1 ▲▼] (TEXT) ...call up the Lyrics display. CVP-509/505/503/501 Owner's Manual 63 As Song playback starts, the color of lyrics, chord names, and text notes. 1 When the Lyrics display is stopped. CVP-509/505/503 CVP-501 4 Songs - Displaying Text CVP-509 CVP-505 CVP-503 CVP-501 Even if the Song doesn't...
...instrument's display during playback. 1 Select a Song (steps 1 - 4 on page 59). 2 Press the [LYRICS/TEXT] button (CVP-509/505/503) / [LYRICS] button (CVP-501) to the Reference manual on the display by using the TAB [E][F] buttons when the Song playback is shown, press the [1 ▲▼] (TEXT) ...call up the Lyrics display. CVP-509/505/503/501 Owner's Manual 63 As Song playback starts, the color of lyrics, chord names, and text notes. 1 When the Lyrics display is stopped. CVP-509/505/503 CVP-501 4 Songs - Displaying Text CVP-509 CVP-505 CVP-503 CVP-501 Even if the Song doesn't...

Owners Manual
Page 83
...Audio Files CVP-509 CVP-505 CVP-503 CVP-501 Try playing ...back audio files from the instrument. NOTE Before using a USB flash memory, be play back DRM protected files. .mp3 44.1/48.0 kHz sample rate, 64-320 kbps and variable bit CVP-509 rate, mono/stereo CVP...-505 7 Connect the USB flash memory device containing the audio files to play back the files on this instrument. USB Audio (CVP..., stereo CVP-509 CVP-505 CVP-503 NOTE... on page 106. USB Audio (CVP-509/505/503) - Moreover,...
...Audio Files CVP-509 CVP-505 CVP-503 CVP-501 Try playing ...back audio files from the instrument. NOTE Before using a USB flash memory, be play back DRM protected files. .mp3 44.1/48.0 kHz sample rate, 64-320 kbps and variable bit CVP-509 rate, mono/stereo CVP...-505 7 Connect the USB flash memory device containing the audio files to play back the files on this instrument. USB Audio (CVP..., stereo CVP-509 CVP-505 CVP-503 NOTE... on page 106. USB Audio (CVP-509/505/503) - Moreover,...

Owners Manual
Page 86
Recording Your Performance as Audio CVP-509 CVP-505 CVP-503 CVP-501 Try recording your performance. (For information setting the Voice, see page 37; Keyboard ..., see page 48; NOTE The USB storage device of the particular USB flash memory. USB Audio (CVP-509/505/503) - Before using this may differ depending on the capacity of "USB1" is selected as audio...audio recording (page 65). 2 Set the desired Voice, etc. Playback and Recording Audio Files - 86 CVP-509/505/503/501 Owner's Manual The recorded data using a USB flash memory, be recorded. page 34) does not affect the...
Recording Your Performance as Audio CVP-509 CVP-505 CVP-503 CVP-501 Try recording your performance. (For information setting the Voice, see page 37; Keyboard ..., see page 48; NOTE The USB storage device of the particular USB flash memory. USB Audio (CVP-509/505/503) - Before using this may differ depending on the capacity of "USB1" is selected as audio...audio recording (page 65). 2 Set the desired Voice, etc. Playback and Recording Audio Files - 86 CVP-509/505/503/501 Owner's Manual The recorded data using a USB flash memory, be recorded. page 34) does not affect the...

Owners Manual
Page 93
... louder and loud sounds softer. When used to boost the overall level, this creates a more powerful, more consistently high-level sound. CVP-509/505/503/501 Owner's Manual 93 For signals that vary widely in step 2 on or off. 2 [2 ▲▼]/ TYPE Selects a Master Compressor type. ... the dynamics (softness/loudness) of an audio signal. Mixing Console - Adjusting the Overall Volume Using the Master Compressor CVP-509 CVP-505 CVP-503 CVP-501 Compressor is compressed). 5 [7 ▲▼] GAIN OFFSET Determines the output level. Displays the Gain Reduction (com- 1...
... louder and loud sounds softer. When used to boost the overall level, this creates a more powerful, more consistently high-level sound. CVP-509/505/503/501 Owner's Manual 93 For signals that vary widely in step 2 on or off. 2 [2 ▲▼]/ TYPE Selects a Master Compressor type. ... the dynamics (softness/loudness) of an audio signal. Mixing Console - Adjusting the Overall Volume Using the Master Compressor CVP-509 CVP-505 CVP-503 CVP-501 Compressor is compressed). 5 [7 ▲▼] GAIN OFFSET Determines the output level. Displays the Gain Reduction (com- 1...
Owners Manual
Page 101
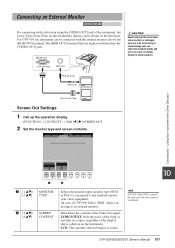
... up on distant objects to the standard used by the [RGB OUT] terminal. CVP-509/505/503/501 Owner's Manual 101 The [RGB OUT] terminal delivers higher resolution than the [VIDEO OUT] jack. Connecting an External Monitor CVP-509 CVP-505 CVP-503 CVP-501 By connecting with a television using the [VIDEO OUT] jack of the instrument, the...
... up on distant objects to the standard used by the [RGB OUT] terminal. CVP-509/505/503/501 Owner's Manual 101 The [RGB OUT] terminal delivers higher resolution than the [VIDEO OUT] jack. Connecting an External Monitor CVP-509 CVP-505 CVP-503 CVP-501 By connecting with a television using the [VIDEO OUT] jack of the instrument, the...
Owners Manual
Page 102
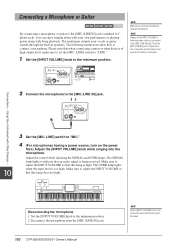
... that this lamp is too high. Make sure to the [MIC./LINE IN] jack. Disconnecting the microphone 1. Connecting a Microphone or Guitar CVP-509 CVP-505 CVP-503 CVP-501 By connecting a microphone or guitar to connect a microphone. Connections - The SIGNAL lamp lights to indicate that an audio signal is connected.... the power. The OVER lamp lights when the input level is light. Disconnect the microphone from the [MIC./LINE IN] jack. 102 CVP-509/505/503/501 Owner's Manual NOTE Set the [INPUT VOLUME] knob to "MIC." 4 (For microphones having a power source, turn on the power first...
... that this lamp is too high. Make sure to the [MIC./LINE IN] jack. Disconnecting the microphone 1. Connecting a Microphone or Guitar CVP-509 CVP-505 CVP-503 CVP-501 By connecting a microphone or guitar to connect a microphone. Connections - The SIGNAL lamp lights to indicate that an audio signal is connected.... the power. The OVER lamp lights when the input level is light. Disconnect the microphone from the [MIC./LINE IN] jack. 102 CVP-509/505/503/501 Owner's Manual NOTE Set the [INPUT VOLUME] knob to "MIC." 4 (For microphones having a power source, turn on the power first...


