Owner's Manual
Page 2
... in this manual is considered to be correct at an end, please observe all cautions indicated on the enclosure. CVP-305 CVP-303 Model CVP-301 Serial No. SPECIFICATIONS SUBJECT TO CHANGE: The information contained in its useful life is believed to be at the time of printing. SPECIAL MESSAGE SECTION PRODUCT SAFETY MARKINGS: Yamaha electronic...
... in this manual is considered to be correct at an end, please observe all cautions indicated on the enclosure. CVP-305 CVP-303 Model CVP-301 Serial No. SPECIFICATIONS SUBJECT TO CHANGE: The information contained in its useful life is believed to be at the time of printing. SPECIAL MESSAGE SECTION PRODUCT SAFETY MARKINGS: Yamaha electronic...
Owner's Manual
Page 3
...connector. A burning item may fall over. • Before moving the instrument, remove all connected cables. (1)B-7 1/2 CVP-305/303/301 Owner's Manual 3 Pulling by qualified Yamaha service personnel. Failure to assemble the instrument in the proper sequence might result in a position where anyone could walk...8226; Do not place the instrument in a safe place for the instrument. PRECAUTIONS PLEASE READ CAREFULLY BEFORE PROCEEDING * Please keep this manual in an unstable position where it might accidentally fall over and cause a fire. Doing so can damage it. • ...
...connector. A burning item may fall over. • Before moving the instrument, remove all connected cables. (1)B-7 1/2 CVP-305/303/301 Owner's Manual 3 Pulling by qualified Yamaha service personnel. Failure to assemble the instrument in the proper sequence might result in a position where anyone could walk...8226; Do not place the instrument in a safe place for the instrument. PRECAUTIONS PLEASE READ CAREFULLY BEFORE PROCEEDING * Please keep this manual in an unstable position where it might accidentally fall over and cause a fire. Doing so can damage it. • ...
Owner's Manual
Page 4
...the types listed below are lost due to malfunction or incorrect operation. If you turn off the power to extensive long-term use . 4 CVP-305/303/301 Owner's Manual (1)B-7 2/2 Saving data Saving and backing up your weight on, or place heavy objects on the instrument, and do not insert a &#...play carelessly with or stand on the buttons, switches or connectors. • Do not operate the instrument for damage caused by qualified Yamaha service personnel. • Do not place vinyl, plastic or rubber objects on the instrument, since this might result in accident or injury. •...
...the types listed below are lost due to malfunction or incorrect operation. If you turn off the power to extensive long-term use . 4 CVP-305/303/301 Owner's Manual (1)B-7 2/2 Saving data Saving and backing up your weight on, or place heavy objects on the instrument, and do not insert a &#...play carelessly with or stand on the buttons, switches or connectors. • Do not operate the instrument for damage caused by qualified Yamaha service personnel. • Do not place vinyl, plastic or rubber objects on the instrument, since this might result in accident or injury. •...

Owner's Manual
Page 5
... following instruments, shown in the displays of the commercially available software is used in English. • Copying of the CVP-305/303/301, are in this manual carefully so that you read this Yamaha Clavinova! Quick Guide (page 23 This section explains how to use the basic operations including display- Any violation of their...
... following instruments, shown in the displays of the commercially available software is used in English. • Copying of the CVP-305/303/301, are in this manual carefully so that you read this Yamaha Clavinova! Quick Guide (page 23 This section explains how to use the basic operations including display- Any violation of their...

Owner's Manual
Page 6
... horizontally. Do not subject the instrument to be included or optional, depending on its side. Accessories Guide to Yamaha Online Member Product User Registration "50 greats for the Piano" Music Book Owner's Manual Data List The following items may be tuned. When transporting the assembled Clavinova, make sure all screws are properly...
... horizontally. Do not subject the instrument to be included or optional, depending on its side. Accessories Guide to Yamaha Online Member Product User Registration "50 greats for the Piano" Music Book Owner's Manual Data List The following items may be tuned. When transporting the assembled Clavinova, make sure all screws are properly...

Owner's Manual
Page 7
... Main Display 59 File Selection Display Configuration and Basic Operation 60 File/Folder Operations in shorthand the process of this manual, arrows are used in the instructions, indicating in the File Selection Display ..62 Restoring the Factory-programmed Settings ......Adding Effects to select the Initial Touch parameter. [FUNCTION] → [D] CONTROLLER → TAB [®] KEYBOARD/PANEL → [A] 1 INITIAL TOUCH CVP-307 Owner's Manual 7 The example shorthand below describes a four step operation: 1) press the [FUNCTION] button, 2) press the [D] button to select the Controller page...
... Main Display 59 File Selection Display Configuration and Basic Operation 60 File/Folder Operations in shorthand the process of this manual, arrows are used in the instructions, indicating in the File Selection Display ..62 Restoring the Factory-programmed Settings ......Adding Effects to select the Initial Touch parameter. [FUNCTION] → [D] CONTROLLER → TAB [®] KEYBOARD/PANEL → [A] 1 INITIAL TOUCH CVP-307 Owner's Manual 7 The example shorthand below describes a four step operation: 1) press the [FUNCTION] button, 2) press the [D] button to select the Controller page...
Owner's Manual
Page 8
... Function Type 131 Recording Your Performance 133 Recording Methods 133 Editing a Recorded Song 148 Using a Microphone (CVP-305/303 157 Editing Vocal Harmony Parameters 157 Adjusting the Microphone and Harmony Sound 160 Talk Setting 164 Connecting...Instrument with Other Devices 180 Using Headphones ([PHONES] jacks 180 Connecting a Microphone or Guitar ([MIC./LINE IN] jack) (CVP-305/303 180 Connecting Audio & Video Devices 180 Using External Audio Devices for playback and Recording ([AUX OUT] Jacks, ... the Chord Type for Style Playback via MIDI Receive 196 8 CVP-307 Owner's Manual
... Function Type 131 Recording Your Performance 133 Recording Methods 133 Editing a Recorded Song 148 Using a Microphone (CVP-305/303 157 Editing Vocal Harmony Parameters 157 Adjusting the Microphone and Harmony Sound 160 Talk Setting 164 Connecting...Instrument with Other Devices 180 Using Headphones ([PHONES] jacks 180 Connecting a Microphone or Guitar ([MIC./LINE IN] jack) (CVP-305/303 180 Connecting Audio & Video Devices 180 Using External Audio Devices for playback and Recording ([AUX OUT] Jacks, ... the Chord Type for Style Playback via MIDI Receive 196 8 CVP-307 Owner's Manual

Owner's Manual
Page 9
Using Your Instrument with Other Devices Appendix Troubleshooting 197 CVP-305: Keyboard Stand Assembly 202 CVP-303: Keyboard Stand Assembly 204 CVP-301: Keyboard Stand Assembly 206 Installing the Floppy Disk Drive (Included/Optional 208 Specifications 209 Index 211 Introduction Quick Guide Basic Operation Reference Using, Creating and ... Recalling Custom Panel Setups Using, Creating and Editing Songs Using a Microphone Connecting the Clavinova Directly to the Internet Using Your Instrument with Other Devices Appendix CVP-307 Owner's Manual 9
Using Your Instrument with Other Devices Appendix Troubleshooting 197 CVP-305: Keyboard Stand Assembly 202 CVP-303: Keyboard Stand Assembly 204 CVP-301: Keyboard Stand Assembly 206 Installing the Floppy Disk Drive (Included/Optional 208 Specifications 209 Index 211 Introduction Quick Guide Basic Operation Reference Using, Creating and ... Recalling Custom Panel Setups Using, Creating and Editing Songs Using a Microphone Connecting the Clavinova Directly to the Internet Using Your Instrument with Other Devices Appendix CVP-307 Owner's Manual 9

Owner's Manual
Page 10
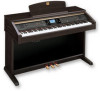
It's like Touch with Song playback. STYLE SELECT 10 CVP-305/303/301 Owner's Manual ORGAN FLUTES Perform Along with a Full Band SONG -Song Playback page 34 SELECT Play along with Graded Hammer (GH) and Graded Hammer 3 (GH3) Keyboard .... Now you not only various realistic piano Voices, but also features an exceptionally wide variety of the Clavinova CVP! mance with previously recorded Song data, and fill out your backing band! The CVP-305 features the enhanced, improved Graded Hammer 3 (GH3) technology, providing performance functions and expressive power found ...
It's like Touch with Song playback. STYLE SELECT 10 CVP-305/303/301 Owner's Manual ORGAN FLUTES Perform Along with a Full Band SONG -Song Playback page 34 SELECT Play along with Graded Hammer (GH) and Graded Hammer 3 (GH3) Keyboard .... Now you not only various realistic piano Voices, but also features an exceptionally wide variety of the Clavinova CVP! mance with previously recorded Song data, and fill out your backing band! The CVP-305 features the enhanced, improved Graded Hammer 3 (GH3) technology, providing performance functions and expressive power found ...

Owner's Manual
Page 11
... indicate the notes you should play, when you should play them, and how long you listen back to internal memory or a SmartMedia card. CVP-305/303/301 Owner's Manual 11 Introduction Practicing Displaying and Playing along with the Music Score page 56 While playing back a Song, you download Song data from special websites...
... indicate the notes you should play, when you should play them, and how long you listen back to internal memory or a SmartMedia card. CVP-305/303/301 Owner's Manual 11 Introduction Practicing Displaying and Playing along with the Music Score page 56 While playing back a Song, you download Song data from special websites...

Owner's Manual
Page 12
Introduction 1 [POWER] switch P. 14 2 SmartMedia slot P. 22 MIC. (CVP-305/303) 3 [MIC SETTING/VOCAL HARMONY] button P. 54 METRONOME 4 [ON/OFF] button P. 30 VOLUME 5 [MASTER VOLUME] dial P. 15 6 [FADE IN/OUT] button P. 46 TEMPO 7 [TAP] ...;] buttons P. 25 e TAB [√][®] buttons P. 26 f [EXIT] button P. 26 g [DEMO] button P. 23 h [MUSIC FINDER] button P. 50 i [DATA ENTRY] dial P. 61 j [ENTER] button P. 61 12 CVP-305/303/301 Owner's Manual Panel Controls The panel shown below is that of the...
Introduction 1 [POWER] switch P. 14 2 SmartMedia slot P. 22 MIC. (CVP-305/303) 3 [MIC SETTING/VOCAL HARMONY] button P. 54 METRONOME 4 [ON/OFF] button P. 30 VOLUME 5 [MASTER VOLUME] dial P. 15 6 [FADE IN/OUT] button P. 46 TEMPO 7 [TAP] ...;] buttons P. 25 e TAB [√][®] buttons P. 26 f [EXIT] button P. 26 g [DEMO] button P. 23 h [MUSIC FINDER] button P. 50 i [DATA ENTRY] dial P. 61 j [ENTER] button P. 61 12 CVP-305/303/301 Owner's Manual Panel Controls The panel shown below is that of the...

Owner's Manual
Page 13
... pedal P. 29 x Keyboard guide lamps P. 38 For information on the jacks and connectors located on the bottom left of the instrument, see page 180. CVP-305/303 CVP-301 Introduction VOICE k VOICE buttons P. 31 l [VOICE EFFECT] button P. 78 ONE TOUCH SETTING m [1]-[4] buttons P. 49 n [LEFT HOLD] button P. 48 PART o PART buttons P. 73 PIANO Setting...
... pedal P. 29 x Keyboard guide lamps P. 38 For information on the jacks and connectors located on the bottom left of the instrument, see page 180. CVP-305/303 CVP-301 Introduction VOICE k VOICE buttons P. 31 l [VOICE EFFECT] button P. 78 ONE TOUCH SETTING m [1]-[4] buttons P. 49 n [LEFT HOLD] button P. 48 PART o PART buttons P. 73 PIANO Setting...
Owner's Manual
Page 14
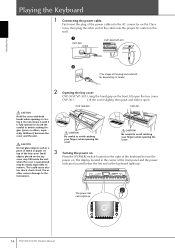
... of the keyboard lights up . 14 CVP-305/303/301 Owner's Manual Do not release it until it . tric shock, short circuit, fire or other end of the key cover. The power indicator lights up . Introduction Playing the Keyboard 1 Connecting the power cable. CVP-305 CVP-303/CVP-301 (The shape of the keyboard to avoid...
... of the keyboard lights up . 14 CVP-305/303/301 Owner's Manual Do not release it until it . tric shock, short circuit, fire or other end of the key cover. The power indicator lights up . Introduction Playing the Keyboard 1 Connecting the power cable. CVP-305 CVP-303/CVP-301 (The shape of the keyboard to avoid...

Owner's Manual
Page 15
CVP-305/303 CVP-301 CAUTION Be careful to turn the power off. Adjusting the volume While playing the keyboard, adjust the volume level by using the [MASTER VOLUME] located at the top of the panel. 5 Turning the power off . 6 Closing the key cover CVP-305/CVP-303: Grip the metal rim ... left of the panel, and close the key cover. CAUTION Be careful to produce sound. CVP-301: Slide the cover toward you and gently lower the cover over the keys. CVP-305/303/301 Owner's Manual 15 Introduction 4 Playing the keyboard Play the keyboard to avoid catching your fingers when ...
CVP-305/303 CVP-301 CAUTION Be careful to turn the power off. Adjusting the volume While playing the keyboard, adjust the volume level by using the [MASTER VOLUME] located at the top of the panel. 5 Turning the power off . 6 Closing the key cover CVP-305/CVP-303: Grip the metal rim ... left of the panel, and close the key cover. CAUTION Be careful to produce sound. CVP-301: Slide the cover toward you and gently lower the cover over the keys. CVP-305/303/301 Owner's Manual 15 Introduction 4 Playing the keyboard Play the keyboard to avoid catching your fingers when ...
Owner's Manual
Page 16
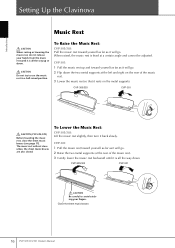
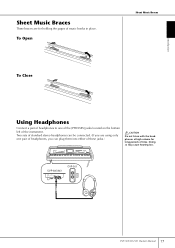
...up and toward yourself as far as it is all the way down . CVP-305/303 CVP-301 CAUTION Be careful to use the music rest in a half-raised position. Close the sheet music braces 16 CVP-305/303/301 Owner's Manual The music rest will go. CAUTION Do not try to avoid catching your ...hands from the music rest until it will go. 2 Raise the two metal supports (at a certain angle and cannot be adjusted. CVP-301: 1 Pull the music rest up ...
...up and toward yourself as far as it is all the way down . CVP-305/303 CVP-301 CAUTION Be careful to use the music rest in a half-raised position. Close the sheet music braces 16 CVP-305/303/301 Owner's Manual The music rest will go. CAUTION Do not try to avoid catching your ...hands from the music rest until it will go. 2 Raise the two metal supports (at a certain angle and cannot be adjusted. CVP-301: 1 Pull the music rest up ...
Owner's Manual
Page 17
... [PHONES] jacks located on the bottom left of the instrument. LINE IN MIC. Doing so may cause hearing loss. LINE PHONES MIN MAX CVP-301 CVP-305/303/301 Owner's Manual 17 CVP-305/303 INPUT VOLUME MIC. Two sets of standard stereo headphones can plug them into either of these jacks.) CAUTION Do not listen...
... [PHONES] jacks located on the bottom left of the instrument. LINE IN MIC. Doing so may cause hearing loss. LINE PHONES MIN MAX CVP-301 CVP-305/303/301 Owner's Manual 17 CVP-305/303 INPUT VOLUME MIC. Two sets of standard stereo headphones can plug them into either of these jacks.) CAUTION Do not listen...
Owner's Manual
Page 18
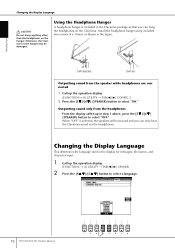
CVP-305/303 CVP-301 Outputting sound from the headphones From the display called up in the Clavinova package so that you can hang the headphones on the hanger. Outputting ... 1 Call up the operation display. [FUNCTION] → [I ] UTILITY → TAB[√][®] CONFIG 2 2 Press the [5†]/[6†] (SPEAKER) button to select a language. 18 CVP-305/303/301 Owner's Manual When "OFF" is included in step 1 above, press the [5†]/[6†] (SPEAKER) button to select "OFF." Otherwise, the Clavinova or the hanger may be...
CVP-305/303 CVP-301 Outputting sound from the headphones From the display called up in the Clavinova package so that you can hang the headphones on the hanger. Outputting ... 1 Call up the operation display. [FUNCTION] → [I ] UTILITY → TAB[√][®] CONFIG 2 2 Press the [5†]/[6†] (SPEAKER) button to select a language. 18 CVP-305/303/301 Owner's Manual When "OFF" is included in step 1 above, press the [5†]/[6†] (SPEAKER) button to select "OFF." Otherwise, the Clavinova or the hanger may be...

Owner's Manual
Page 19
CVP-305/303/301 Owner's Manual 19 Display Settings Adjusting the Contrast of the Display You can adjust the contrast of the display by turning the [LCD CONTRAST] knob located to adjust the brightness of the display. Display Settings Introduction Adjusting the Brightness of the Display (CVP305/303) Adjust the brightness of the display. 1 Call up the operation display. [FUNCTION] → [I] UTILITY → TAB[√][®] CONFIG 2 2 Press the [2π†] button to the left of the display.
CVP-305/303/301 Owner's Manual 19 Display Settings Adjusting the Contrast of the Display You can adjust the contrast of the display by turning the [LCD CONTRAST] knob located to adjust the brightness of the display. Display Settings Introduction Adjusting the Brightness of the Display (CVP305/303) Adjust the brightness of the display. 1 Call up the operation display. [FUNCTION] → [I] UTILITY → TAB[√][®] CONFIG 2 2 Press the [2π†] button to the left of the display.

Owner's Manual
Page 20
... the operation display. [FUNCTION] → [I] UTILITY → TAB[√][®] OWNER 2 Press the [I ] (OWNER NAME) button in the display in step 2 above. 20 CVP-305/303/301 Owner's Manual Displaying the version number To check the version number of this instrument, press and hold the [I ] (OWNER NAME) button and call up the Owner...
... the operation display. [FUNCTION] → [I] UTILITY → TAB[√][®] OWNER 2 Press the [I ] (OWNER NAME) button in the display in step 2 above. 20 CVP-305/303/301 Owner's Manual Displaying the version number To check the version number of this instrument, press and hold the [I ] (OWNER NAME) button and call up the Owner...

Owner's Manual
Page 21
... it all the way in. For details on a disk or bend or apply pressure to the "protect" position (tab open (protect position) CVP-305/303/301 Owner's Manual 21 When the floppy disk is set to the disk drive or floppy disks. A floppy disk left in any way.... Disk • After checking that the instrument is not accessing* the floppy disk (checking that can be removed because it is on your Yamaha dealer about once a month. Follow the important precautions below. Carefully insert the disk into place and the eject button pops out. Other objects may ...
... it all the way in. For details on a disk or bend or apply pressure to the "protect" position (tab open (protect position) CVP-305/303/301 Owner's Manual 21 When the floppy disk is set to the disk drive or floppy disks. A floppy disk left in any way.... Disk • After checking that the instrument is not accessing* the floppy disk (checking that can be removed because it is on your Yamaha dealer about once a month. Follow the important precautions below. Carefully insert the disk into place and the eject button pops out. Other objects may ...

