

Owner's Manual
Page 2
... that are therefore the owners responsibility. Purchase Date 92-469- ➀ (rear) 2 CP300 Owner's Manual REFER SERVICING TO QUALIFIED SERVICE PERSONNEL. IMPORTANT NOTICE: All Yamaha electronic products are tested and approved by an independent safety testing laboratory in the spaces provided below... having the servicer dispose of these graphics appears on this type of important operating and maintenance (servicing) instructions in its useful life is soldered in the safety instruction section. Please observe all batteries away from children. In keeping with arrowhead symbol,...
... that are therefore the owners responsibility. Purchase Date 92-469- ➀ (rear) 2 CP300 Owner's Manual REFER SERVICING TO QUALIFIED SERVICE PERSONNEL. IMPORTANT NOTICE: All Yamaha electronic products are tested and approved by an independent safety testing laboratory in the spaces provided below... having the servicer dispose of these graphics appears on this type of important operating and maintenance (servicing) instructions in its useful life is soldered in the safety instruction section. Please observe all batteries away from children. In keeping with arrowhead symbol,...

Owner's Manual
Page 3
...contact your dealer for a long period of these items are not limited to be assumed that are recommended. 92-469-2 PLEASE KEEP THIS MANUAL CP300 Owner's Manual 3 Some electronic products utilize external power supplies or adapters. If you should be followed. For longer extension cords, consult a ...any doubt exists about the supply voltage in the owners manual, on the name plate, or specifically recommended by Yamaha are well secured BEFORE using any connections, including connection to their operating temperature. Some of time at a high volume level or at a level that...
...contact your dealer for a long period of these items are not limited to be assumed that are recommended. 92-469-2 PLEASE KEEP THIS MANUAL CP300 Owner's Manual 3 Some electronic products utilize external power supplies or adapters. If you should be followed. For longer extension cords, consult a ...any doubt exists about the supply voltage in the owners manual, on the name plate, or specifically recommended by Yamaha are well secured BEFORE using any connections, including connection to their operating temperature. Some of time at a high volume level or at a level that...

Owner's Manual
Page 4
...not open • Do not open the instrument or attempt to an electrical outlet using is printed on it . Doing so can cause inadequate air circulation, and possibly result in the instrument overheating. 4 CP300 Owner's Manual (1)B-9 1/2 Otherwise, the instrument, TV, or radio may generate noise...easily accessible. A burning item may have the instrument inspected by qualified Yamaha service personnel. These precautions include, but are not limited to the internal components. • Do not use the voltage specified as in direct sunlight, near water or in a...
...not open • Do not open the instrument or attempt to an electrical outlet using is printed on it . Doing so can cause inadequate air circulation, and possibly result in the instrument overheating. 4 CP300 Owner's Manual (1)B-9 1/2 Otherwise, the instrument, TV, or radio may generate noise...easily accessible. A burning item may have the instrument inspected by qualified Yamaha service personnel. These precautions include, but are not limited to the internal components. • Do not use the voltage specified as in direct sunlight, near water or in a...

Owner's Manual
Page 5
... level. Handling caution • Do not insert a finger or hand in the ears, consult a physician. Then have the instrument inspected by improper use . (1)B-9 2/2 CP300 Owner's Manual 5 Saving data Saving and backing up your weight on, or place heavy objects on the instrument, and do not... use excessive force on or off the power for damage caused by qualified Yamaha service personnel. • Do not place vinyl, plastic or rubber objects on the panel or keyboard...
... level. Handling caution • Do not insert a finger or hand in the ears, consult a physician. Then have the instrument inspected by improper use . (1)B-9 2/2 CP300 Owner's Manual 5 Saving data Saving and backing up your weight on, or place heavy objects on the instrument, and do not... use excessive force on or off the power for damage caused by qualified Yamaha service personnel. • Do not place vinyl, plastic or rubber objects on the panel or keyboard...

Owner's Manual
Page 6
...recording. As a result, this device may appear somewhat different from those on your personal use them in detail. This product incorporates and bundles computer programs and contents in which Yamaha owns copyrights or with the device in advance. Basic Operation (page 20) This section... of editing functions-making it has license to use . If you play them to make detailed settings for the CP300's various functions. Introduction (page 6) Please read this manual carefully so that you for choosing the Yamaha Stage Piano CP300. Appendix (page 94) This section contains important...
...recording. As a result, this device may appear somewhat different from those on your personal use them in detail. This product incorporates and bundles computer programs and contents in which Yamaha owns copyrights or with the device in advance. Basic Operation (page 20) This section... of editing functions-making it has license to use . If you play them to make detailed settings for the CP300's various functions. Introduction (page 6) Please read this manual carefully so that you for choosing the Yamaha Stage Piano CP300. Appendix (page 94) This section contains important...

Owner's Manual
Page 7
... external tone generators. • Comprehensive selection of inputs/outputs and interfaces-including two separate stereo output pairs, stereo inputs, MIDI terminals, and a USB connector. Using AWM, the CP300 has 50 original Voices-including a variety of ultra-realistic piano and other effects that is virtually indistinguishable from an actual acoustic piano. • Sophisticated...
... external tone generators. • Comprehensive selection of inputs/outputs and interfaces-including two separate stereo output pairs, stereo inputs, MIDI terminals, and a USB connector. Using AWM, the CP300 has 50 original Voices-including a variety of ultra-realistic piano and other effects that is virtually indistinguishable from an actual acoustic piano. • Sophisticated...
Owner's Manual
Page 8
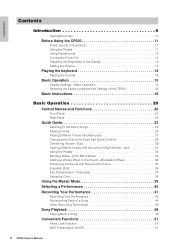
Introduction Contents Introduction 6 Application Index 10 Before Using the CP300 11 Power Supply Connections 11 Using the Pedals 11 Using Headphones 12 Turning the Power On 12 Adjusting the Brightness of the Display 13 Setting the Volume 13 Playing the keyboard 14 Playing... the Sounds 14 Basic Operation 15 Display Settings-Basic Operation 15 Restoring the Factory-programmed Settings of the CP300 16 ...
Introduction Contents Introduction 6 Application Index 10 Before Using the CP300 11 Power Supply Connections 11 Using the Pedals 11 Using Headphones 12 Turning the Power On 12 Adjusting the Brightness of the Display 13 Setting the Volume 13 Playing the keyboard 14 Playing... the Sounds 14 Basic Operation 15 Display Settings-Basic Operation 15 Restoring the Factory-programmed Settings of the CP300 16 ...
Owner's Manual
Page 9
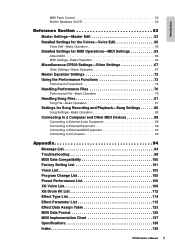
... Operation 56 Detailed Settings for MIDI Operations-MIDI Settings 63 About MIDI 63 MIDI Settings-Basic Operation 64 Miscellaneous CP300 Settings-Other Settings 67 Other Settings-Basic Operation 67 Master Equalizer Settings 72 Using the Performance Functions 73 Performance Parameters 74 Handling Performance Files 76 Performance File-Basic Operation 76 Handling Song... Effect Type List 114 Effect Parameter List 115 Effect Data Assign Table 123 MIDI Data Format 125 MIDI Implementation Chart 137 Specifications 138 Index 139 CP300 Owner's Manual 9
... Operation 56 Detailed Settings for MIDI Operations-MIDI Settings 63 About MIDI 63 MIDI Settings-Basic Operation 64 Miscellaneous CP300 Settings-Other Settings 67 Other Settings-Basic Operation 67 Master Equalizer Settings 72 Using the Performance Functions 73 Performance Parameters 74 Handling Performance Files 76 Performance File-Basic Operation 76 Handling Song... Effect Type List 114 Effect Parameter List 115 Effect Data Assign Table 123 MIDI Data Format 125 MIDI Implementation Chart 137 Specifications 138 Index 139 CP300 Owner's Manual 9

Owner's Manual
Page 10
...8226; Making detailed settings for Voices Detailed Settings for the Voices-Voice Edit" on page 56 • Making detailed settings for the entire CP300 "Miscellaneous CP300 Settings-Other Settings" on page 67 • Making settings for Master mode Master Settings-Master Edit" on page 53 • Making detailed ... Pedals" on page 33 • Using multiple MIDI tone generators Using the Master Mode" on page 39 Changing Voices • Viewing the list of Voices Voice List" on page 103 • Viewing the list of the CP300" on page 16 • About the display messages Message List" on page ...
...8226; Making detailed settings for Voices Detailed Settings for the Voices-Voice Edit" on page 56 • Making detailed settings for the entire CP300 "Miscellaneous CP300 Settings-Other Settings" on page 67 • Making settings for Master mode Master Settings-Master Edit" on page 53 • Making detailed ... Pedals" on page 33 • Using multiple MIDI tone generators Using the Master Mode" on page 39 Changing Voices • Viewing the list of Voices Voice List" on page 103 • Viewing the list of the CP300" on page 16 • About the display messages Message List" on page ...

Owner's Manual
Page 11
... SOSTENUTO SOFT 4 AUX MIDI IN OUT THRU USB OUTPUT R L OUTPUT R L/MONO INPUT R L/MONO ASSIGNABLE FOOT PEDAL 1 2 3 SUSTAIN SOSTENUTO SOFT 4 AUX FC3/FC4/FC5 FC7 CP300 Owner's Manual 11 POWER OFF!! Also an optional FC3/FC4/FC5 foot switch or FC7 foot controller can be connected to the [4 AUX] jack, and...[AC INLET] jack (page 22) on the instrument's rear panel. 3 Connect the other end of parameters on the rear panel is being used. Make sure your CP300 meets the voltage requirement for the country or region in which it is at the OFF position. Introduction Before...
... SOSTENUTO SOFT 4 AUX MIDI IN OUT THRU USB OUTPUT R L OUTPUT R L/MONO INPUT R L/MONO ASSIGNABLE FOOT PEDAL 1 2 3 SUSTAIN SOSTENUTO SOFT 4 AUX FC3/FC4/FC5 FC7 CP300 Owner's Manual 11 POWER OFF!! Also an optional FC3/FC4/FC5 foot switch or FC7 foot controller can be connected to the [4 AUX] jack, and...[AC INLET] jack (page 22) on the instrument's rear panel. 3 Connect the other end of parameters on the rear panel is being used. Make sure your CP300 meets the voltage requirement for the country or region in which it is at the OFF position. Introduction Before...

Owner's Manual
Page 12
... the built-in the center of time. Press the [POWER] switch to the CP300. POWER ON OFF MIN MAX MASTER VOLUME The display located in speakers sound normally when using a set of headphones, connect them to the minimum. A ****** PleaseWait YAMAHA ****** C B NO YES D A Grand Piano 1 C Press the [POWER] switch again to turn off the...
... the built-in the center of time. Press the [POWER] switch to the CP300. POWER ON OFF MIN MAX MASTER VOLUME The display located in speakers sound normally when using a set of headphones, connect them to the minimum. A ****** PleaseWait YAMAHA ****** C B NO YES D A Grand Piano 1 C Press the [POWER] switch again to turn off the...

Owner's Manual
Page 13
...playing, re-adjust the [MASTER VOLUME] dial to the right of the LCD. MIN MAX MASTER VOLUME The level increases. Introduction Before Using the CP300 Adjusting the Brightness of the Display You can adjust the contrast of the display by turning the [CONTRAST] knob located to the most ...[MASTER VOLUME] dial also controls the volume of the panel. A Grand Piano 1 C B NO YES D CONTRAST EXIT Setting the Volume To adjust the volume, use the [MASTER VOLUME] dial located at the left of the headphones. Terminology Master Volume: The volume level of the entire keyboard sound.
...playing, re-adjust the [MASTER VOLUME] dial to the right of the LCD. MIN MAX MASTER VOLUME The level increases. Introduction Before Using the CP300 Adjusting the Brightness of the Display You can adjust the contrast of the display by turning the [CONTRAST] knob located to the most ...[MASTER VOLUME] dial also controls the volume of the panel. A Grand Piano 1 C B NO YES D CONTRAST EXIT Setting the Volume To adjust the volume, use the [MASTER VOLUME] dial located at the left of the headphones. Terminology Master Volume: The volume level of the entire keyboard sound.

Owner's Manual
Page 15
... Strings C Choir E.Bass B NO YES D Sometimes, after you've changed the parameter values or settings, you 'll learn about the fundamental operations of the CP300-the use of this , simply press the [-] button and [+] button simultaneously. Display Settings-Basic Operation Each function may want to reset them to their default values by...
... Strings C Choir E.Bass B NO YES D Sometimes, after you've changed the parameter values or settings, you 'll learn about the fundamental operations of the CP300-the use of this , simply press the [-] button and [+] button simultaneously. Display Settings-Basic Operation Each function may want to reset them to their default values by...

Owner's Manual
Page 16
...B FactorySet Execute?--> NO YES MemoryFileExcluded C D 3 Use the D [-][+] buttons to "Factory Setting List" on the keyboard). Storage memory selections: Memory File Excluded Memory files are maintained. This lets you can restore the CP300's memory to access the Other Settings menu. Refer to...or "Memory File Included." There are two ways you restore the CP300's default Voices and Performances, as well as its System and other settings. OTHER SETTING 2 Press the [OTHER SETTING] button repeatedly or use the A [-][+] buttons to the factory default settings. A B ...
...B FactorySet Execute?--> NO YES MemoryFileExcluded C D 3 Use the D [-][+] buttons to "Factory Setting List" on the keyboard). Storage memory selections: Memory File Excluded Memory files are maintained. This lets you can restore the CP300's memory to access the Other Settings menu. Refer to...or "Memory File Included." There are two ways you restore the CP300's default Voices and Performances, as well as its System and other settings. OTHER SETTING 2 Press the [OTHER SETTING] button repeatedly or use the A [-][+] buttons to the factory default settings. A B ...

Owner's Manual
Page 18
... Turning the Power On First, turn the power on the Keyboard The CP300 allows you play a different Voice (or even two layered Voices!) with them, try branching out creatively and use the editing features to make your own original Voices. • Detailed Settings...) • Connecting to a Computer (page 92) MUSIC PRODUCTION SYNTHESIZER 18 CP300 Owner's Manual PIANO 1 E. ON OFF Selecting and Playing a Voice The CP300 features an exceptionally wide variety of the CP300 before playing. • Before Using the CP300 (pages 11 and 12) POWER ON! GRAND PIANO 1 GRAND PIANO 2 ...
... Turning the Power On First, turn the power on the Keyboard The CP300 allows you play a different Voice (or even two layered Voices!) with them, try branching out creatively and use the editing features to make your own original Voices. • Detailed Settings...) • Connecting to a Computer (page 92) MUSIC PRODUCTION SYNTHESIZER 18 CP300 Owner's Manual PIANO 1 E. ON OFF Selecting and Playing a Voice The CP300 features an exceptionally wide variety of the CP300 before playing. • Before Using the CP300 (pages 11 and 12) POWER ON! GRAND PIANO 1 GRAND PIANO 2 ...

Owner's Manual
Page 19
... you to store and recall the entire CP300 settings all together. Basic Instructions Introduction Recording Your Performance and Playing It Back Recording and playing back your custom Master settings, you can save them to a Performance as well. • Using the Master Mode (page 39) ZONE 1... • Master Settings-Master Edit (page 53) ZONE 2 ZONE 3 ZONE 4 MASTER MASTER EDIT CP300 Owner's Manual 19 This includes demonstration tunes and piano preset tunes. These ...
... you to store and recall the entire CP300 settings all together. Basic Instructions Introduction Recording Your Performance and Playing It Back Recording and playing back your custom Master settings, you can save them to a Performance as well. • Using the Master Mode (page 39) ZONE 1... • Master Settings-Master Edit (page 53) ZONE 2 ZONE 3 ZONE 4 MASTER MASTER EDIT CP300 Owner's Manual 19 This includes demonstration tunes and piano preset tunes. These ...

Owner's Manual
Page 22
...IN][OUT][THRU] connectors (page 90) For connecting external MIDI devices, allowing the use just the L/MONO jack. 7 INPUT [L/MONO][R] jacks (page 89) External audio signals can be input via the CP300's speakers. For stereo input from sixteen groups of detailed settings for connection to HIGH... (high band). Use only the AC power cord supplied with a single touch. ⁄ MASTER EQ EDIT [&#...
...IN][OUT][THRU] connectors (page 90) For connecting external MIDI devices, allowing the use just the L/MONO jack. 7 INPUT [L/MONO][R] jacks (page 89) External audio signals can be input via the CP300's speakers. For stereo input from sixteen groups of detailed settings for connection to HIGH... (high band). Use only the AC power cord supplied with a single touch. ⁄ MASTER EQ EDIT [&#...

Owner's Manual
Page 23
... these Demo Songs now and hear the wide-ranging capabilities of the CP300. Adjusting the Volume To adjust the volume level of the Demo Songs, use the [MASTER VOLUME] dial or [SONG VOLUME] slider. CP300 Owner's Manual 23 The Voice group button indicators will play back in... ZONE 4 MIN MAX MASTER VOLUME SONG VOLUME ZONE CONTROL n Make sure that effectively showcase each Voice group will flash in the section "Before Using the CP300" on page 11. If the [SONG VOLUME] slider is set appropriately. MASTER PERFORMANCE TRANSPOSE TRACK 1 2 3-16 SONG FILE MIDI OUT PANEL LOCK...
... these Demo Songs now and hear the wide-ranging capabilities of the CP300. Adjusting the Volume To adjust the volume level of the Demo Songs, use the [MASTER VOLUME] dial or [SONG VOLUME] slider. CP300 Owner's Manual 23 The Voice group button indicators will play back in... ZONE 4 MIN MAX MASTER VOLUME SONG VOLUME ZONE CONTROL n Make sure that effectively showcase each Voice group will flash in the section "Before Using the CP300" on page 11. If the [SONG VOLUME] slider is set appropriately. MASTER PERFORMANCE TRANSPOSE TRACK 1 2 3-16 SONG FILE MIDI OUT PANEL LOCK...

Owner's Manual
Page 24
PIANO 1 E. PIANO 2 E. PIANO 2 6 E. Showcases the Sustain Sampling feature, which reproduces the unique resonance of actual piano strings. 24 CP300 Owner's Manual Voice Name 1 GRAND PIANO 1 2 GRAND PIANO 2 3 MONO PIANO 4 E. Piano Demo Song Stereo sampling Mono sampling Dynamic sampling: mezzopiano Dynamic ...Basic Operation Quick Guide Listening to the Piano Demo Songs 1 Simultaneously press both the [MIDI SETTING] button and the [OTHER SETTING] button. 2 Use the A [-][+] buttons to the sound buttons as follows. VIBES 1 2 3 4 5 6 7 8 ORGAN 1 ORGAN 2 HARPSI.
PIANO 1 E. PIANO 2 E. PIANO 2 6 E. Showcases the Sustain Sampling feature, which reproduces the unique resonance of actual piano strings. 24 CP300 Owner's Manual Voice Name 1 GRAND PIANO 1 2 GRAND PIANO 2 3 MONO PIANO 4 E. Piano Demo Song Stereo sampling Mono sampling Dynamic sampling: mezzopiano Dynamic ...Basic Operation Quick Guide Listening to the Piano Demo Songs 1 Simultaneously press both the [MIDI SETTING] button and the [OTHER SETTING] button. 2 Use the A [-][+] buttons to the sound buttons as follows. VIBES 1 2 3 4 5 6 7 8 ORGAN 1 ORGAN 2 HARPSI.
Owner's Manual
Page 25
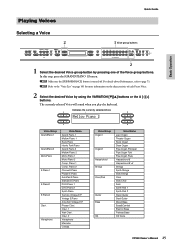
... Slow Strings Choir Slow Choir Scat Synth Pad 1 Synth Pad 2 Nylon Guitar Steel Guitar Wood Bass Bass&Cymbal Electric Bass Fretless Bass XG Voice CP300 Owner's Manual 25 PIANO 2 E. In this step, press the [GRAND PIANO 1] button. PIANO 1 E. n Make sure the [PERFORMANCE] ... 13 14 15 16 VOICE/PERFORMANCE REVERB CHORUS SPEAKER MIDI SETTING MASTER EQ EDIT CLICK OTHER SETTING DEMO 2 1 Select the desired Voice group button by using the VARIATION [▼][▲] buttons or the A [-][+] buttons. Vintage E.Piano Amp.Sim.Vintage E.P. VIBES VOICE EDIT SPLIT 1 2 3 4 5 6 7 8 ...
... Slow Strings Choir Slow Choir Scat Synth Pad 1 Synth Pad 2 Nylon Guitar Steel Guitar Wood Bass Bass&Cymbal Electric Bass Fretless Bass XG Voice CP300 Owner's Manual 25 PIANO 2 E. In this step, press the [GRAND PIANO 1] button. PIANO 1 E. n Make sure the [PERFORMANCE] ... 13 14 15 16 VOICE/PERFORMANCE REVERB CHORUS SPEAKER MIDI SETTING MASTER EQ EDIT CLICK OTHER SETTING DEMO 2 1 Select the desired Voice group button by using the VARIATION [▼][▲] buttons or the A [-][+] buttons. Vintage E.Piano Amp.Sim.Vintage E.P. VIBES VOICE EDIT SPLIT 1 2 3 4 5 6 7 8 ...


