

Owner's Manual
Page 2
...a function or effect works (when the unit is considered to be affected. ENVIRONMENTAL ISSUES: Yamaha strives to update existing units. When replacement becomes necessary, contact a qualified service...to perform the replacement. Dispose of used batteries promptly and as a permanent record of these parts for some areas, the servicer is soldered in the safety instruction section. Note: In some...of your dealer before requesting service. Purchase Date 92-469- ➀ (rear) 2 CP300 Owner's Manual The average life span of these graphics on this type of printing. NAME...
...a function or effect works (when the unit is considered to be affected. ENVIRONMENTAL ISSUES: Yamaha strives to update existing units. When replacement becomes necessary, contact a qualified service...to perform the replacement. Dispose of used batteries promptly and as a permanent record of these parts for some areas, the servicer is soldered in the safety instruction section. Note: In some...of your dealer before requesting service. Purchase Date 92-469- ➀ (rear) 2 CP300 Owner's Manual The average life span of these graphics on this type of printing. NAME...

Owner's Manual
Page 3
... from the outlet when electronic products are recommended. 92-469-2 PLEASE KEEP THIS MANUAL CP300 Owner's Manual 3 The product dose not operate, exhibits a marked change in the Special...that is a high probability of the product or as ; This product, either supplied as a part of lightning and/or electrical storm activity. 11. Read all safety markings and instructions that may...place it must use in the ears, you should be disconnected when there is recommended by Yamaha are ; Some electronic products utilize external power supplies or adapters. or b. a cart, rack...
... from the outlet when electronic products are recommended. 92-469-2 PLEASE KEEP THIS MANUAL CP300 Owner's Manual 3 The product dose not operate, exhibits a marked change in the Special...that is a high probability of the product or as ; This product, either supplied as a part of lightning and/or electrical storm activity. 11. Read all safety markings and instructions that may...place it must use in the ears, you should be disconnected when there is recommended by Yamaha are ; Some electronic products utilize external power supplies or adapters. or b. a cart, rack...

Owner's Manual
Page 4
... unit. Doing so can cause inadequate air circulation, and possibly result in the instrument overheating. 4 CP300 Owner's Manual (1)B-9 1/2 Otherwise, the instrument, TV, or radio may generate noise. • ... always hold the plug itself and not the cord. Pulling by qualified Yamaha service personnel. If it should appear to you are using a multiple-connector. If ... plug from the outlet when the instrument is easily accessible. The instrument contains no user-serviceable parts. These precautions include, but are not limited to, the following : Power supply/Power cord ...
... unit. Doing so can cause inadequate air circulation, and possibly result in the instrument overheating. 4 CP300 Owner's Manual (1)B-9 1/2 Otherwise, the instrument, TV, or radio may generate noise. • ... always hold the plug itself and not the cord. Pulling by qualified Yamaha service personnel. If it should appear to you are using a multiple-connector. If ... plug from the outlet when the instrument is easily accessible. The instrument contains no user-serviceable parts. These precautions include, but are not limited to, the following : Power supply/Power cord ...

Owner's Manual
Page 7
...from the keys. Introduction Supplied Accessories • Power cord • Foot pedal (FC3) • Owner's Manual Main Features The CP300 gives you the ultimate acoustic grand piano sound-utilizing three-stage dynamic sampling, providing the ability to change tone with the sustain pedal...sound when you lift your sound. • Comprehensive MIDI functions for creating complex multi-instrument arrangements and Songs-up to a maximum 16 parts. • Master mode, which allows you to independently control up to four external tone generators. • Comprehensive selection of inputs/outputs...
...from the keys. Introduction Supplied Accessories • Power cord • Foot pedal (FC3) • Owner's Manual Main Features The CP300 gives you the ultimate acoustic grand piano sound-utilizing three-stage dynamic sampling, providing the ability to change tone with the sustain pedal...sound when you lift your sound. • Comprehensive MIDI functions for creating complex multi-instrument arrangements and Songs-up to a maximum 16 parts. • Master mode, which allows you to independently control up to four external tone generators. • Comprehensive selection of inputs/outputs...
Owner's Manual
Page 8
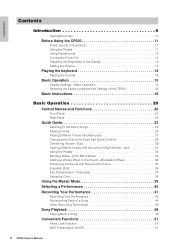
...Playing the keyboard 14 Playing the Sounds 14 Basic Operation 15 Display Settings-Basic Operation 15 Restoring the Factory-programmed Settings of the CP300 16 Basic Instructions 18 Basic Operation 20 Control Names and Functions 20 Front Panel 20 Rear Panel 22 Quick Guide 23 Listening to... 37 Using the Click 38 Using the Master Mode 39 Selecting a Performance 40 Recording Your Performance 41 Recording Your Performance 42 Re-recording Parts of a Song 44 Other Recording Techniques 46 Song Playback 49 Playing Back a Song 49 Convenient Functions 51 Panel Lock Function 51 MIDI ...
...Playing the keyboard 14 Playing the Sounds 14 Basic Operation 15 Display Settings-Basic Operation 15 Restoring the Factory-programmed Settings of the CP300 16 Basic Instructions 18 Basic Operation 20 Control Names and Functions 20 Front Panel 20 Rear Panel 22 Quick Guide 23 Listening to... 37 Using the Click 38 Using the Master Mode 39 Selecting a Performance 40 Recording Your Performance 41 Recording Your Performance 42 Re-recording Parts of a Song 44 Other Recording Techniques 46 Song Playback 49 Playing Back a Song 49 Convenient Functions 51 Panel Lock Function 51 MIDI ...

Owner's Manual
Page 19
...back your custom Master settings, you to store and recall the entire CP300 settings all together. and right-hand parts separately-and lets you to control up to four external tone generators (or four separate instrument parts on one . • Recording Your Performance (page 42) •...; Other Recording Techniques (page 46) • Handling Song Files (page 81) • Playing Back Songs (page 49) Terminology On the CP300, performance data is exceptionally easy. The...
...back your custom Master settings, you to store and recall the entire CP300 settings all together. and right-hand parts separately-and lets you to control up to four external tone generators (or four separate instrument parts on one . • Recording Your Performance (page 42) •...; Other Recording Techniques (page 46) • Handling Song Files (page 81) • Playing Back Songs (page 49) Terminology On the CP300, performance data is exceptionally easy. The...

Owner's Manual
Page 20
... the [ZONE CONTROL] sliders. 8 [MASTER] button (page 39) Turning on the [MASTER] button switches the CP300 to function as saving and deleting Performance data, and making other settings for each Layer parts (up to a pair of stereo headphones. 4 [POWER] switch (page 12) For turning the power on /...the Song playback. (page 47) 7 [ZONE CONTROL] sliders (pages 28, 39) These four sliders adjust the output level for Performance files. 20 CP300 Owner's Manual The power is turned on if the button is set this position: . The power is set to this way: . 5 [MASTER VOLUME]...
... the [ZONE CONTROL] sliders. 8 [MASTER] button (page 39) Turning on the [MASTER] button switches the CP300 to function as saving and deleting Performance data, and making other settings for each Layer parts (up to a pair of stereo headphones. 4 [POWER] switch (page 12) For turning the power on /...the Song playback. (page 47) 7 [ZONE CONTROL] sliders (pages 28, 39) These four sliders adjust the output level for Performance files. 20 CP300 Owner's Manual The power is turned on if the button is set this position: . The power is set to this way: . 5 [MASTER VOLUME]...
Owner's Manual
Page 27
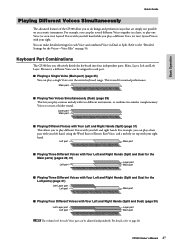
... your left hand, using the Wood Bass or Electric Bass Voice, and a melody on top with your right. Keyboard Part Combinations The CP300 lets you to create a thicker sound. Refer to page 28. For example, you play a different Voice (or two) layered Voices with Your... Left and Right Hands (Split and Dual) (page 30) Left Layer part Left part Layer part Main part n The volume level for the Voices-Voice Edit" on an acoustic instrument. CP300 Owner's Manual 27 Main part ■ Playing Two Voices Simultaneously (Dual) (page 29) This lets you can make detailed...
... your left hand, using the Wood Bass or Electric Bass Voice, and a melody on top with your right. Keyboard Part Combinations The CP300 lets you to create a thicker sound. Refer to page 28. For example, you play a different Voice (or two) layered Voices with Your... Left and Right Hands (Split and Dual) (page 30) Left Layer part Left part Layer part Main part n The volume level for the Voices-Voice Edit" on an acoustic instrument. CP300 Owner's Manual 27 Main part ■ Playing Two Voices Simultaneously (Dual) (page 29) This lets you can make detailed...

Owner's Manual
Page 28
...ZONE 3 ZONE 4 SONG VOLUME ZONE CONTROL ZONE 1: Main part ZONE 2: Left part ZONE 3: Layer part ZONE 4: Left Layer part n When you can adjust the volume by moving the [ZONE 1] slider. MASTER PERFORMANCE MASTER EDIT PERFORM.FILE 28 CP300 Owner's Manual Moving a slider up increases the volume while pulling... the slider down decreases it. Refer to the "Using the Master Mode" on page 39. Basic Operation Quick Guide Changing the Volume for Each Part (Zone Control) The convenient...
...ZONE 3 ZONE 4 SONG VOLUME ZONE CONTROL ZONE 1: Main part ZONE 2: Left part ZONE 3: Layer part ZONE 4: Left Layer part n When you can adjust the volume by moving the [ZONE 1] slider. MASTER PERFORMANCE MASTER EDIT PERFORM.FILE 28 CP300 Owner's Manual Moving a slider up increases the volume while pulling... the slider down decreases it. Refer to the "Using the Master Mode" on page 39. Basic Operation Quick Guide Changing the Volume for Each Part (Zone Control) The convenient...

Owner's Manual
Page 29
... selected Voice name will appear in the display. The [GRAND PIANO 1] button and [CHOIR/PAD] button light. Main part Layer part A B Dual GrandPiano1 Choir NO YES C D 2 Select the particular Voice for the Main parts C D Left part CP300 Owner's Manual 29 Select the "Honky Tonk Piano" Voice by using the A [-][+] buttons and select the "Scat" Voice...
... selected Voice name will appear in the display. The [GRAND PIANO 1] button and [CHOIR/PAD] button light. Main part Layer part A B Dual GrandPiano1 Choir NO YES C D 2 Select the particular Voice for the Main parts C D Left part CP300 Owner's Manual 29 Select the "Honky Tonk Piano" Voice by using the A [-][+] buttons and select the "Scat" Voice...
Owner's Manual
Page 30
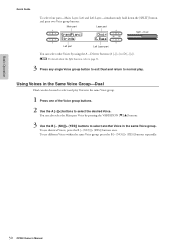
... buttons (A [-][+] to normal play Voices in the same Voice group. Using Voices in the Same Voice Group-Dual Dual can also select the Main part Voice by using the A - You can also be used to select the desired Voice. To use different Voices within the same Voice group, press... the B [- (NO)][+ (YES)] buttons repeatedly. 30 CP300 Owner's Manual Basic Operation Quick Guide To select four parts-Main, Layer, Left and Left Layer-simultaneously hold down the [SPLIT] button and press two Voice group buttons. To use...
... buttons (A [-][+] to normal play Voices in the same Voice group. Using Voices in the Same Voice Group-Dual Dual can also select the Main part Voice by using the A - You can also be used to select the desired Voice. To use different Voices within the same Voice group, press... the B [- (NO)][+ (YES)] buttons repeatedly. 30 CP300 Owner's Manual Basic Operation Quick Guide To select four parts-Main, Layer, Left and Left Layer-simultaneously hold down the [SPLIT] button and press two Voice group buttons. To use...

Owner's Manual
Page 31
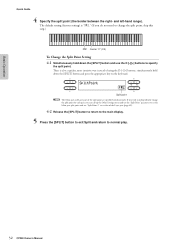
... EXIT GRAND PIANO 1 GRAND PIANO 2 MONO PIANO E. VIBES VOICE EDIT SPLIT 1 2 3 4 5 6 7 8 ORGAN 1 ORGAN 2 HARPSI. CP300 Owner's Manual 31 PIANO 1 E. PIANO 2 E. Main part A HonkyTonkPiano Scat B NO YES Split C D Left part To divide the keyboard into Main, Layer and Left parts, press two Voice group buttons at the same time (or press one Voice group button...
... EXIT GRAND PIANO 1 GRAND PIANO 2 MONO PIANO E. VIBES VOICE EDIT SPLIT 1 2 3 4 5 6 7 8 ORGAN 1 ORGAN 2 HARPSI. CP300 Owner's Manual 31 PIANO 1 E. PIANO 2 E. Main part A HonkyTonkPiano Scat B NO YES Split C D Left part To divide the keyboard into Main, Layer and Left parts, press two Voice group buttons at the same time (or press one Voice group button...
Owner's Manual
Page 32
... Layer part of the Layer part (page 69). 4-2 Release the [SPLIT] button to return to the main display. 5 Press the [SPLIT] button to exit Split and return to normal play. 32 CP300 Owner's Manual There is "F#2." (If you can call up the Other Settings menu and use the "Split Point" parameter to ...set the Main part split point and use the D [-][+] buttons to set that of the split point are...
... Layer part of the Layer part (page 69). 4-2 Release the [SPLIT] button to return to the main display. 5 Press the [SPLIT] button to exit Split and return to normal play. 32 CP300 Owner's Manual There is "F#2." (If you can call up the Other Settings menu and use the "Split Point" parameter to ...set the Main part split point and use the D [-][+] buttons to set that of the split point are...

Owner's Manual
Page 35
... Chorus The chorus effects use various types of modulation processing, including flanger and phaser, to three parts from Main, Layer, Left and Left Layer parts (page 27). The CP300 has three separate Insertion Effect blocks, letting you select a given Voice, the chorus setting is automatically turned ... the Voice Edit menu, and adjust the Insertion effect depth for the selected Voice via the "Reverb Send" parameter (page 58). CP300 Owner's Manual 35 Each part can select an Insertion type via the "Dry/Wet Balance" parameter (pages 59, 60). PIANO 3 CLAVI. Refer to the saved...
... Chorus The chorus effects use various types of modulation processing, including flanger and phaser, to three parts from Main, Layer, Left and Left Layer parts (page 27). The CP300 has three separate Insertion Effect blocks, letting you select a given Voice, the chorus setting is automatically turned ... the Voice Edit menu, and adjust the Insertion effect depth for the selected Voice via the "Reverb Send" parameter (page 58). CP300 Owner's Manual 35 Each part can select an Insertion type via the "Dry/Wet Balance" parameter (pages 59, 60). PIANO 3 CLAVI. Refer to the saved...
Owner's Manual
Page 36
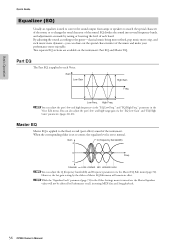
... slider is set to center, the equalizer level is turned on the instrument: Part EQ and Master EQ. Two separate EQ sections are made by Performance recall, incoming MIDI data and Song playback. 36 CP300 Owner's Manual High Freq. Master EQ Master EQ is applied to normal. parameter... the sound into several frequency bands, and adjustments are available on , the Master Equalizer values will remain in the Voice Edit menu. Part EQ The Part EQ is applied to the genre-classical music being more refined, pop music more crisp, and rock music more enjoyable. and...
... slider is set to center, the equalizer level is turned on the instrument: Part EQ and Master EQ. Two separate EQ sections are made by Performance recall, incoming MIDI data and Song playback. 36 CP300 Owner's Manual High Freq. Master EQ Master EQ is applied to normal. parameter... the sound into several frequency bands, and adjustments are available on , the Master Equalizer values will remain in the Voice Edit menu. Part EQ The Part EQ is applied to the genre-classical music being more refined, pop music more crisp, and rock music more enjoyable. and...

Owner's Manual
Page 39
Press the [MASTER] button to turn the power off . n If you to page 53. CP300 Owner's Manual 39 Each Zone can be turned off and on again while the Master mode is turned on , the function will be enabled ...MIDI CH1 ZONE 3 ZONE 1 External MIDI synthesizer/tone generator ZONE 1 ZONE 2 ZONE 3 ZONE 4 ZONE 1: Main part ZONE 2: Left part ZONE 3: Layer part ZONE 4: Left Layer part ZONE CONTROL Left Layer part (ZONE 4) Left part (ZONE 2) Internal tone generator Layer part (ZONE 3) Main part (ZONE 1) n While the Master mode is on , the "MIDI Out Channel" parameter in the Master...
Press the [MASTER] button to turn the power off . n If you to page 53. CP300 Owner's Manual 39 Each Zone can be turned off and on again while the Master mode is turned on , the function will be enabled ...MIDI CH1 ZONE 3 ZONE 1 External MIDI synthesizer/tone generator ZONE 1 ZONE 2 ZONE 3 ZONE 4 ZONE 1: Main part ZONE 2: Left part ZONE 3: Layer part ZONE 4: Left Layer part ZONE CONTROL Left Layer part (ZONE 4) Left part (ZONE 2) Internal tone generator Layer part (ZONE 3) Main part (ZONE 1) n While the Master mode is on , the "MIDI Out Channel" parameter in the Master...

Owner's Manual
Page 40
... Performance indicated in the Performance Play display are supplied with the CP300. Hold this down to view all Voices of the parts Hold this down the B [- (NO)] button and pressing the [PERFORMANCE] button. 40 CP300 Owner's Manual The Preset Performances consist of each Preset Performance.... SPEAKER MIDI SETTING MASTER EQ EDIT CLICK OTHER SETTING DEMO 3 1 Press the [PERFORMANCE] button to page 73. "A" and "B" features the Yamaha original Voices. The parameters shown in the display. "C" and "D" contains the default Performances (Grand Piano Voices). 4 Play the keyboard. 5...
... Performance indicated in the Performance Play display are supplied with the CP300. Hold this down to view all Voices of the parts Hold this down the B [- (NO)] button and pressing the [PERFORMANCE] button. 40 CP300 Owner's Manual The Preset Performances consist of each Preset Performance.... SPEAKER MIDI SETTING MASTER EQ EDIT CLICK OTHER SETTING DEMO 3 1 Press the [PERFORMANCE] button to page 73. "A" and "B" features the Yamaha original Voices. The parameters shown in the display. "C" and "D" contains the default Performances (Grand Piano Voices). 4 Play the keyboard. 5...
Owner's Manual
Page 41
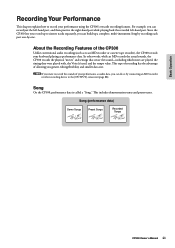
... chapter explains how to record your keyboard playing as performance data. Since the CP300 lets you record up to sixteen tracks separately, you can build up a complete, multi-instrument Song by recording each part one-by connecting an MD recorder or other words, while an MD records ...the actual sounds, the CP300 records the physical "moves" and settings that create the sound-including which notes are played,...
... chapter explains how to record your keyboard playing as performance data. Since the CP300 lets you record up to sixteen tracks separately, you can build up a complete, multi-instrument Song by recording each part one-by connecting an MD recorder or other words, while an MD records ...the actual sounds, the CP300 records the physical "moves" and settings that create the sound-including which notes are played,...

Owner's Manual
Page 44
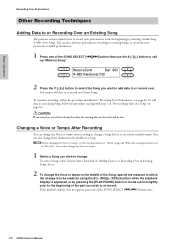
... Voices for recording, if necessary. Punch Out: Existing data following the point at which you stopped recording will be erased (when rerecording part of the Song). Ending methods: Replace: Existing data following the point at which you stopped recording will not be erased after re-recording... starts. Repeat Step 2 on page 42. 44 CP300 Owner's Manual Basic Operation Recording Your Performance Re-recording Parts of a Song This section explains how to record a specific section or part of a Song again. 1 Use the B [- (NO)][+ (YES)] buttons...
... Voices for recording, if necessary. Punch Out: Existing data following the point at which you stopped recording will be erased (when rerecording part of the Song). Ending methods: Replace: Existing data following the point at which you stopped recording will not be erased after re-recording... starts. Repeat Step 2 on page 42. 44 CP300 Owner's Manual Basic Operation Recording Your Performance Re-recording Parts of a Song This section explains how to record a specific section or part of a Song again. 1 Use the B [- (NO)][+ (YES)] buttons...
Owner's Manual
Page 46
...the track will be made by using the B [- (NO)][+ (YES)] buttons while the playback display is to change these elements in "Re-recording Parts of a Song. You can also add new performance recordings to existing Songs, or overwrite your performance from the beginning by pressing the [PLAY/PAUSE] ...button to locate a point slightly prior to the beginning of the SONG SELECT [N][O] buttons once. 46 CP300 Owner's Manual You cannot add data to re-record. You can also change . When the starting with Step 1 in the middle of a Song"...
...the track will be made by using the B [- (NO)][+ (YES)] buttons while the playback display is to change these elements in "Re-recording Parts of a Song. You can also add new performance recordings to existing Songs, or overwrite your performance from the beginning by pressing the [PLAY/PAUSE] ...button to locate a point slightly prior to the beginning of the SONG SELECT [N][O] buttons once. 46 CP300 Owner's Manual You cannot add data to re-record. You can also change . When the starting with Step 1 in the middle of a Song"...

