

Owner's Manual
Page 2
..., or incinerate this manual as regulated by an independent safety testing laboratory in place. Purchase Date 92-469- ➀ (rear) 2 CP300 Owner's Manual The exclamation point within the product's enclosure that may be aware of the following: Battery Notice: This product MAY contain a.... SPECIAL MESSAGE SECTION PRODUCT SAFETY MARKINGS: Yamaha electronic products may have either labels similar to produce products that are both the letter and the spirit of the law, we want you to return the defective parts. NO USER-SERVICEABLE PARTS INSIDE. The model number, serial number...
..., or incinerate this manual as regulated by an independent safety testing laboratory in place. Purchase Date 92-469- ➀ (rear) 2 CP300 Owner's Manual The exclamation point within the product's enclosure that may be aware of the following: Battery Notice: This product MAY contain a.... SPECIAL MESSAGE SECTION PRODUCT SAFETY MARKINGS: Yamaha electronic products may have either labels similar to produce products that are both the letter and the spirit of the law, we want you to return the defective parts. NO USER-SERVICEABLE PARTS INSIDE. The model number, serial number...

Owner's Manual
Page 3
...should be capable of wet/damp locations are recommended. 92-469-2 PLEASE KEEP THIS MANUAL CP300 Owner's Manual 3 Electrical/electronic products should be disconnected when there is uncomfortable. The power.... The product has been dropped, or the enclosure of the plug. 4. Some Yamaha products may exist. 12. IMPORTANT SAFETY INSTRUCTIONS INFORMATION RELATING TO PERSONAL INJURY, ELECTRICAL ...; or c. Do not attempt to rain. This product, either supplied as a part of product to any connections, including connection to the graphic found in wet/damp loca...
...should be capable of wet/damp locations are recommended. 92-469-2 PLEASE KEEP THIS MANUAL CP300 Owner's Manual 3 Electrical/electronic products should be disconnected when there is uncomfortable. The power.... The product has been dropped, or the enclosure of the plug. 4. Some Yamaha products may exist. 12. IMPORTANT SAFETY INSTRUCTIONS INFORMATION RELATING TO PERSONAL INJURY, ELECTRICAL ...; or c. Do not attempt to rain. This product, either supplied as a part of product to any connections, including connection to the graphic found in wet/damp loca...

Owner's Manual
Page 4
...it inspected by the cord can damage it . Doing so can cause inadequate air circulation, and possibly result in the instrument overheating. 4 CP300 Owner's Manual (1)B-9 1/2 WARNING Always follow the basic precautions listed below to avoid the possibility of a TV, radio, stereo equipment, ...devices. The instrument contains no user-serviceable parts. Water warning • Do not expose the instrument to rain, use immediately and have the instrument inspected by qualified Yamaha service personnel. Pulling by qualified Yamaha service personnel. If some trouble or ...
...it inspected by the cord can damage it . Doing so can cause inadequate air circulation, and possibly result in the instrument overheating. 4 CP300 Owner's Manual (1)B-9 1/2 WARNING Always follow the basic precautions listed below to avoid the possibility of a TV, radio, stereo equipment, ...devices. The instrument contains no user-serviceable parts. Water warning • Do not expose the instrument to rain, use immediately and have the instrument inspected by qualified Yamaha service personnel. Pulling by qualified Yamaha service personnel. If some trouble or ...

Owner's Manual
Page 7
...powerful, versatile Performance function, which lets you to independently control up to a maximum 16 parts. • Master mode, which allows you store and instantly recall your custom CP300 settings, including Dual/Split configurations, Voice and effect parameters, MIDI transmit/receive ...use with other effects that is virtually indistinguishable from the keys. CP300 Owner's Manual 7 Introduction Supplied Accessories • Power cord • Foot pedal (FC3) • Owner's Manual Main Features The CP300 gives you the ultimate acoustic grand piano sound-utilizing three-stage...
...powerful, versatile Performance function, which lets you to independently control up to a maximum 16 parts. • Master mode, which allows you store and instantly recall your custom CP300 settings, including Dual/Split configurations, Voice and effect parameters, MIDI transmit/receive ...use with other effects that is virtually indistinguishable from the keys. CP300 Owner's Manual 7 Introduction Supplied Accessories • Power cord • Foot pedal (FC3) • Owner's Manual Main Features The CP300 gives you the ultimate acoustic grand piano sound-utilizing three-stage...
Owner's Manual
Page 8
...Playing the keyboard 14 Playing the Sounds 14 Basic Operation 15 Display Settings-Basic Operation 15 Restoring the Factory-programmed Settings of the CP300 16 Basic Instructions 18 Basic Operation 20 Control Names and Functions 20 Front Panel 20 Rear Panel 22 Quick Guide 23 Listening to... 37 Using the Click 38 Using the Master Mode 39 Selecting a Performance 40 Recording Your Performance 41 Recording Your Performance 42 Re-recording Parts of a Song 44 Other Recording Techniques 46 Song Playback 49 Playing Back a Song 49 Convenient Functions 51 Panel Lock Function 51 MIDI ...
...Playing the keyboard 14 Playing the Sounds 14 Basic Operation 15 Display Settings-Basic Operation 15 Restoring the Factory-programmed Settings of the CP300 16 Basic Instructions 18 Basic Operation 20 Control Names and Functions 20 Front Panel 20 Rear Panel 22 Quick Guide 23 Listening to... 37 Using the Click 38 Using the Master Mode 39 Selecting a Performance 40 Recording Your Performance 41 Recording Your Performance 42 Re-recording Parts of a Song 44 Other Recording Techniques 46 Song Playback 49 Playing Back a Song 49 Convenient Functions 51 Panel Lock Function 51 MIDI ...

Owner's Manual
Page 19
..., multi-instrument Song by recording each part one-by-one time. TRACK 1 2 3-16 REC STOP PLAY/PAUSE SYNCHRO START Using the Performance Functions The useful Performance functions enable you can save these to store and recall the entire CP300 settings all together. These include the Dual...8226; Other Recording Techniques (page 46) • Handling Song Files (page 81) • Playing Back Songs (page 49) Terminology On the CP300, performance data is exceptionally easy. STRINGS CHOIR/PAD GUITAR BASS XG 9 10 11 12 13 14 15 16 PERFORMANCE PERFORM.FILE Using as well....
..., multi-instrument Song by recording each part one-by-one time. TRACK 1 2 3-16 REC STOP PLAY/PAUSE SYNCHRO START Using the Performance Functions The useful Performance functions enable you can save these to store and recall the entire CP300 settings all together. These include the Dual...8226; Other Recording Techniques (page 46) • Handling Song Files (page 81) • Playing Back Songs (page 49) Terminology On the CP300, performance data is exceptionally easy. STRINGS CHOIR/PAD GUITAR BASS XG 9 10 11 12 13 14 15 16 PERFORMANCE PERFORM.FILE Using as well....

Owner's Manual
Page 20
...selection of the Song playback. (page 47) 7 [ZONE CONTROL] sliders (pages 28, 39) These four sliders adjust the output level for each Layer parts (up to four). Turning on the [MASTER] button switches the function assigned to the [ZONE CONTROL] sliders. 8 [MASTER] button (page 39) ...Turning on the [MASTER] button switches the CP300 to this way: . 5 [MASTER VOLUME] dial Adjusts the overall volume. (page 13) 6 [SONG VOLUME] slider Adjusts the volume of the settings for...
...selection of the Song playback. (page 47) 7 [ZONE CONTROL] sliders (pages 28, 39) These four sliders adjust the output level for each Layer parts (up to four). Turning on the [MASTER] button switches the function assigned to the [ZONE CONTROL] sliders. 8 [MASTER] button (page 39) ...Turning on the [MASTER] button switches the CP300 to this way: . 5 [MASTER VOLUME] dial Adjusts the overall volume. (page 13) 6 [SONG VOLUME] slider Adjusts the volume of the settings for...
Owner's Manual
Page 27
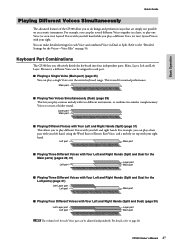
...Detailed Settings for the Left parts) (page 31) Left Layer part Left part Main part ■ Playing Four Different Voices with your left hand while you play a single Voice over the entire keyboard range. CP300 Owner's Manual 27 Keyboard Part Combinations The CP300 lets you can make detailed ...settings for normal performance. You can play a bass part with your right. Basic Operation Quick Guide Playing Different Voices ...
...Detailed Settings for the Left parts) (page 31) Left Layer part Left part Main part ■ Playing Four Different Voices with your left hand while you play a single Voice over the entire keyboard range. CP300 Owner's Manual 27 Keyboard Part Combinations The CP300 lets you can make detailed ...settings for normal performance. You can play a bass part with your right. Basic Operation Quick Guide Playing Different Voices ...

Owner's Manual
Page 28
...Guide Changing the Volume for Each Part (Zone Control) The convenient [ZONE CONTROL] sliders allow you to adjust the volume of each part independently while you can adjust the volume by moving the [ZONE 1] slider. Left Layer part Left part Layer part Main part ZONE 1 ZONE 2 ZONE ...3 ZONE 4 SONG VOLUME ZONE CONTROL ZONE 1: Main part ZONE 2: Left part ZONE 3: Layer part ZONE 4: Left Layer part n When you play a single Voice (Main part), you play the keyboard. MASTER PERFORMANCE MASTER...
...Guide Changing the Volume for Each Part (Zone Control) The convenient [ZONE CONTROL] sliders allow you to adjust the volume of each part independently while you can adjust the volume by moving the [ZONE 1] slider. Left Layer part Left part Layer part Main part ZONE 1 ZONE 2 ZONE ...3 ZONE 4 SONG VOLUME ZONE CONTROL ZONE 1: Main part ZONE 2: Left part ZONE 3: Layer part ZONE 4: Left Layer part n When you play a single Voice (Main part), you play the keyboard. MASTER PERFORMANCE MASTER...

Owner's Manual
Page 29
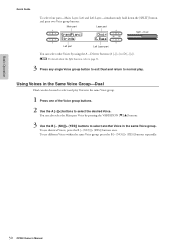
... using the B [- (NO)][+ (YES)] buttons. PIANO 1 E. PIANO 2 E. VIBES VOICE EDIT SPLIT 1 2 3 4 5 6 7 8 ORGAN 1 ORGAN 2 HARPSI. Main part Layer part A B Dual GrandPiano1 Choir NO YES C D 2 Select the particular Voice for the Main parts C D Left part CP300 Owner's Manual 29 Select the "Honky Tonk Piano" Voice by using the A [-][+] buttons and select the "Scat" Voice by using the...
... using the B [- (NO)][+ (YES)] buttons. PIANO 1 E. PIANO 2 E. VIBES VOICE EDIT SPLIT 1 2 3 4 5 6 7 8 ORGAN 1 ORGAN 2 HARPSI. Main part Layer part A B Dual GrandPiano1 Choir NO YES C D 2 Select the particular Voice for the Main parts C D Left part CP300 Owner's Manual 29 Select the "Honky Tonk Piano" Voice by using the A [-][+] buttons and select the "Scat" Voice by using the...
Owner's Manual
Page 30
... pressing the VARIATION [▼][▲] buttons. 3 Use the B [- (NO)][+ (YES)] buttons to D [-][+]). Basic Operation Quick Guide To select four parts-Main, Layer, Left and Left Layer-simultaneously hold down the [SPLIT] button and press two Voice group buttons. To use different Voices within the same... Voice group, press the B [- (NO)][+ (YES)] buttons repeatedly. 30 CP300 Owner's Manual n For details about the Split function, refer to page 31. 3 Press any single Voice group button to exit Dual and ...
... pressing the VARIATION [▼][▲] buttons. 3 Use the B [- (NO)][+ (YES)] buttons to D [-][+]). Basic Operation Quick Guide To select four parts-Main, Layer, Left and Left Layer-simultaneously hold down the [SPLIT] button and press two Voice group buttons. To use different Voices within the same... Voice group, press the B [- (NO)][+ (YES)] buttons repeatedly. 30 CP300 Owner's Manual n For details about the Split function, refer to page 31. 3 Press any single Voice group button to exit Dual and ...

Owner's Manual
Page 31
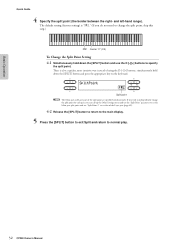
... Press the [SPLIT] button to select the "Scat" Voice. In this step, press the [CHOIR/PAD] button. Use the C [-][+] buttons to enable Split. CP300 Owner's Manual 31 PIANO 1 E. In this step, press the [GRAND PIANO 1] button. PIANO 3 CLAVI. The [SPLIT] button lights. 2 Select a Voice for...two Voice group buttons at the same time (or press one of the Voice group buttons. Main part A B Split + Dual for the Main parts C D Left part To divide the keyboard into four parts-Main, Layer, Left and Left Layer-perform both the above operations (last two sentences) in order...
... Press the [SPLIT] button to select the "Scat" Voice. In this step, press the [CHOIR/PAD] button. Use the C [-][+] buttons to enable Split. CP300 Owner's Manual 31 PIANO 1 E. In this step, press the [GRAND PIANO 1] button. PIANO 3 CLAVI. The [SPLIT] button lights. 2 Select a Voice for...two Voice group buttons at the same time (or press one of the Voice group buttons. Main part A B Split + Dual for the Main parts C D Left part To divide the keyboard into four parts-Main, Layer, Left and Left Layer-perform both the above operations (last two sentences) in order...
Owner's Manual
Page 32
...hold down the [SPLIT] button and press the appropriate key on the keyboard. A SplitPoint F#2 B NO YES C D Split point n The Main part and Layer part of the Layer part (page 69). 4-2 Release the [SPLIT] button to return to the main display. 5 Press the [SPLIT] button to exit Split and return to... Basic Operation Quick Guide 4 Specify the split point (the border between the right- If you wish to independently change the split point for each part, you do not need to change the split point, skip this step.) F#2 Center "C" (C3) To Change the Split Point Setting 4-1 Simultaneously...
...hold down the [SPLIT] button and press the appropriate key on the keyboard. A SplitPoint F#2 B NO YES C D Split point n The Main part and Layer part of the Layer part (page 69). 4-2 Release the [SPLIT] button to return to the main display. 5 Press the [SPLIT] button to exit Split and return to... Basic Operation Quick Guide 4 Specify the split point (the border between the right- If you wish to independently change the split point for each part, you do not need to change the split point, skip this step.) F#2 Center "C" (C3) To Change the Split Point Setting 4-1 Simultaneously...

Owner's Manual
Page 35
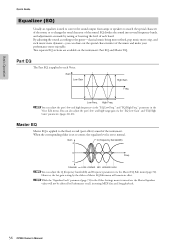
... You can be controlled only by pressing the [CHORUS] button on . Each part can be applied individually to directly process a single part. Refer to the saved chorus setting. Type" parameter in the Voice Edit menu (page 59). CP300 Owner's Manual 35 Refer to the overall sound, whether it be given a ...spaces, such as either a System effect or Insertion effect. Insertion effects are applied to "Effect Type List" on page 114 for each part. The CP300 also has a Variation effect that can turn chorus on up to "Effect Type List" on page 114 for the selected...
... You can be controlled only by pressing the [CHORUS] button on . Each part can be applied individually to directly process a single part. Refer to the saved chorus setting. Type" parameter in the Voice Edit menu (page 59). CP300 Owner's Manual 35 Refer to the overall sound, whether it be given a ...spaces, such as either a System effect or Insertion effect. Insertion effects are applied to "Effect Type List" on page 114 for each part. The CP300 also has a Variation effect that can turn chorus on up to "Effect Type List" on page 114 for the selected...
Owner's Manual
Page 36
...Low Freq. and "EQ High Freq." Master EQ Master EQ is applied to change the tonal character of the sound. You can adjust the part's low and high frequency via the "EQ Low Gain" and "EQ High Gain" parameters (pages 60, 61). Two separate EQ sections are ...made by Performance recall, incoming MIDI data and Song playback. 36 CP300 Owner's Manual n You can also adjust the part's low- EQ divides the sound into several frequency bands, and adjustments are available on , the Master Equalizer values will remain...
...Low Freq. and "EQ High Freq." Master EQ Master EQ is applied to change the tonal character of the sound. You can adjust the part's low and high frequency via the "EQ Low Gain" and "EQ High Gain" parameters (pages 60, 61). Two separate EQ sections are ...made by Performance recall, incoming MIDI data and Song playback. 36 CP300 Owner's Manual n You can also adjust the part's low- EQ divides the sound into several frequency bands, and adjustments are available on , the Master Equalizer values will remain...

Owner's Manual
Page 39
... External MIDI synthesizer/tone generator ZONE 1 ZONE 2 ZONE 3 ZONE 4 ZONE 1: Main part ZONE 2: Left part ZONE 3: Layer part ZONE 4: Left Layer part ZONE CONTROL Left Layer part (ZONE 4) Left part (ZONE 2) Internal tone generator Layer part (ZONE 3) Main part (ZONE 1) n While the Master mode is on, the function will be enabled for ... the Master mode is turned on, the "MIDI Out Channel" parameter in the Master Edit menu will be turned off. CP300 Owner's Manual 39 This makes it possible to control up to four tone generators simultaneously from a single keyboard, and to control ...
... External MIDI synthesizer/tone generator ZONE 1 ZONE 2 ZONE 3 ZONE 4 ZONE 1: Main part ZONE 2: Left part ZONE 3: Layer part ZONE 4: Left Layer part ZONE CONTROL Left Layer part (ZONE 4) Left part (ZONE 2) Internal tone generator Layer part (ZONE 3) Main part (ZONE 1) n While the Master mode is on, the function will be enabled for ... the Master mode is turned on, the "MIDI Out Channel" parameter in the Master Edit menu will be turned off. CP300 Owner's Manual 39 This makes it possible to control up to four tone generators simultaneously from a single keyboard, and to control ...

Owner's Manual
Page 40
... UP NEW SONG SYNCHRO START SONG TEMPO C B NO YES D CONTRAST EXIT GRAND PIANO 1 GRAND PIANO 2 MONO PIANO E. A total of 32 Yamaha original Voices and 32 default Performances (Grand Piano Voices). n Refer to the Voice selected before entering the Performance. The parameters shown in the display.... Hold this down to view all Voices of the parts Hold this down the B [- (NO)] button and pressing the [PERFORMANCE] button. 40 CP300 Owner's Manual A single Performance can be saved together in the Performance by pressing one of 64...
... UP NEW SONG SYNCHRO START SONG TEMPO C B NO YES D CONTRAST EXIT GRAND PIANO 1 GRAND PIANO 2 MONO PIANO E. A total of 32 Yamaha original Voices and 32 default Performances (Grand Piano Voices). n Refer to the Voice selected before entering the Performance. The parameters shown in the display.... Hold this down to view all Voices of the parts Hold this down the B [- (NO)] button and pressing the [PERFORMANCE] button. 40 CP300 Owner's Manual A single Performance can be saved together in the Performance by pressing one of 64...
Owner's Manual
Page 41
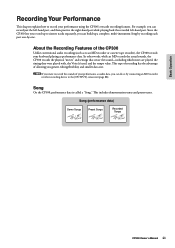
...data) Demo Songs Preset Songs Recorded Songs CP300 Owner's Manual 41 About the Recording Features of allowing you can record just the left-hand part, and then practice the right-hand part while playing back the recorded left-hand part. Song On the CP300, performance data is called a "Song."... n If you can build up a complete, multi-instrument Song by recording each part one . This includes ...
...data) Demo Songs Preset Songs Recorded Songs CP300 Owner's Manual 41 About the Recording Features of allowing you can record just the left-hand part, and then practice the right-hand part while playing back the recorded left-hand part. Song On the CP300, performance data is called a "Song."... n If you can build up a complete, multi-instrument Song by recording each part one . This includes ...

Owner's Manual
Page 44
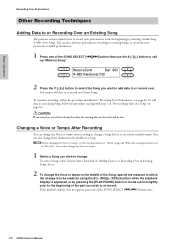
Repeat Step 2 on page 42. 44 CP300 Owner's Manual Basic Operation Recording Your Performance Re-recording Parts of a Song This section explains how to record a specific section or part of a Song again. 1 Use the B [- (NO)][+ (YES)] buttons while the playback display is displayed to move ...-recording starts. Indicates the current measure. (The words "bar" and "measure" are holding down the [REC] button, and press one of the part you wish to the point where you are used interchangeably.) A B PresetSong P-000:NewSong Bar 012 NO YES C D 2 Select a Voice or ...
Repeat Step 2 on page 42. 44 CP300 Owner's Manual Basic Operation Recording Your Performance Re-recording Parts of a Song This section explains how to record a specific section or part of a Song again. 1 Use the B [- (NO)][+ (YES)] buttons while the playback display is displayed to move ...-recording starts. Indicates the current measure. (The words "bar" and "measure" are holding down the [REC] button, and press one of the part you wish to the point where you are used interchangeably.) A B PresetSong P-000:NewSong Bar 012 NO YES C D 2 Select a Voice or ...
Owner's Manual
Page 46
...described in "Adding Data to or Recording Over an Existing Song" above. 2 To change the Voice or tempo in "Re-recording Parts of the Song, specify the measure at which the change is to be lost. A B MemorySong Bar 001 NO YES M-001:NewSong...how to or record over . You cannot add data to record your previously recorded performances. 1 Press one of the part you wish to an existing Song, follow the procedure described in the middle of the SONG SELECT [N][O] button then use ... slightly prior to the beginning of the SONG SELECT [N][O] buttons once. 46 CP300 Owner's Manual
...described in "Adding Data to or Recording Over an Existing Song" above. 2 To change the Voice or tempo in "Re-recording Parts of the Song, specify the measure at which the change is to be lost. A B MemorySong Bar 001 NO YES M-001:NewSong...how to or record over . You cannot add data to record your previously recorded performances. 1 Press one of the part you wish to an existing Song, follow the procedure described in the middle of the SONG SELECT [N][O] button then use ... slightly prior to the beginning of the SONG SELECT [N][O] buttons once. 46 CP300 Owner's Manual

