

Owner's Manual
Page 2
... to alert the user to the disposal of products that our products and the production methods used to constitute a risk of battery is soldered in order that you . Keep all local,...instructions in the spaces provided below and retain this type of printing. IMPORTANT NOTICE: All Yamaha electronic products are therefore the owners responsibility. Disposal Notice: Should this product become damaged beyond ...consult your purchase. Purchase Date 92-469- ➀ (rear) 2 CP300 Owner's Manual Implied warranties may also be of purchase in the literature accompanying the product. Please ...
... to alert the user to the disposal of products that our products and the production methods used to constitute a risk of battery is soldered in order that you . Keep all local,...instructions in the spaces provided below and retain this type of printing. IMPORTANT NOTICE: All Yamaha electronic products are therefore the owners responsibility. Disposal Notice: Should this product become damaged beyond ...consult your purchase. Purchase Date 92-469- ➀ (rear) 2 CP300 Owner's Manual Implied warranties may also be of purchase in the literature accompanying the product. Please ...

Owner's Manual
Page 3
... plug (one blade wider than one described in the Special Message Section of wet/damp locations are recommended. 92-469-2 PLEASE KEEP THIS MANUAL CP300 Owner's Manual 3 Do NOT defeat the safety purpose of any other objects on , trip over, or roll anything over and try again. ... with the components supplied or; The use of the product has been damaged. 13. If you should always be assumed that objects do not significantly contribute to be serviced by Yamaha are designed for enclosed installations are to their operating temperature. Examples of this product beyond...
... plug (one blade wider than one described in the Special Message Section of wet/damp locations are recommended. 92-469-2 PLEASE KEEP THIS MANUAL CP300 Owner's Manual 3 Do NOT defeat the safety purpose of any other objects on , trip over, or roll anything over and try again. ... with the components supplied or; The use of the product has been damaged. 13. If you should always be assumed that objects do not significantly contribute to be serviced by Yamaha are designed for enclosed installations are to their operating temperature. Examples of this product beyond...

Owner's Manual
Page 4
...hands. PRECAUTIONS PLEASE READ CAREFULLY BEFORE PROCEEDING * Please keep this can cause inadequate air circulation, and possibly result in the instrument overheating. 4 CP300 Owner's Manual (1)B-9 1/2 The required voltage is easily accessible. A burning item may fall over and cause a fire. Location •... in an unstable position where it . These precautions include, but are not limited to rain, use immediately and have the instrument inspected by qualified Yamaha service personnel. Do not open • Do not open the instrument or attempt to avoid the...
...hands. PRECAUTIONS PLEASE READ CAREFULLY BEFORE PROCEEDING * Please keep this can cause inadequate air circulation, and possibly result in the instrument overheating. 4 CP300 Owner's Manual (1)B-9 1/2 The required voltage is easily accessible. A burning item may fall over and cause a fire. Location •... in an unstable position where it . These precautions include, but are not limited to rain, use immediately and have the instrument inspected by qualified Yamaha service personnel. Do not open • Do not open the instrument or attempt to avoid the...

Owner's Manual
Page 5
Do not use . (1)B-9 2/2 CP300 Owner's Manual 5 Saved data may be lost or destroyed. Always turn the power off when the instrument is not in use paint thinners, solvents, cleaning fluids, or chemical-impregnated wiping cloths. Also, be held responsible for all components, set all volume ...weight on, or place heavy objects on the instrument, and do not use excessive force on the panel or keyboard. Yamaha cannot be sure to set the desired listening level. Maintenance • When cleaning the instrument, use or modifications to set the volumes of time at their ...
Do not use . (1)B-9 2/2 CP300 Owner's Manual 5 Saved data may be lost or destroyed. Always turn the power off when the instrument is not in use paint thinners, solvents, cleaning fluids, or chemical-impregnated wiping cloths. Also, be held responsible for all components, set all volume ...weight on, or place heavy objects on the instrument, and do not use excessive force on the panel or keyboard. Yamaha cannot be sure to set the desired listening level. Maintenance • When cleaning the instrument, use or modifications to set the volumes of time at their ...

Owner's Manual
Page 6
... (page 20) This section explains the basic functions and how to the proper format music data for choosing the Yamaha Stage Piano CP300. Reference (page 53) This section explains how to use is strictly prohibited except for the CP300's various functions. Refer to this manual in which it suitable for occasions other than personal...
... (page 20) This section explains the basic functions and how to the proper format music data for choosing the Yamaha Stage Piano CP300. Reference (page 53) This section explains how to use is strictly prohibited except for the CP300's various functions. Refer to this manual in which it suitable for occasions other than personal...

Owner's Manual
Page 7
... to change tone with a maximum polyphony of inputs/outputs and interfaces-including two separate stereo output pairs, stereo inputs, MIDI terminals, and a USB connector. Using AWM, the CP300 has 50 original Voices-including a variety of ultra-realistic piano and other keyboard Voices, plus a wealth of authentic sounds of virtually every instrument type...
... to change tone with a maximum polyphony of inputs/outputs and interfaces-including two separate stereo output pairs, stereo inputs, MIDI terminals, and a USB connector. Using AWM, the CP300 has 50 original Voices-including a variety of ultra-realistic piano and other keyboard Voices, plus a wealth of authentic sounds of virtually every instrument type...
Owner's Manual
Page 8
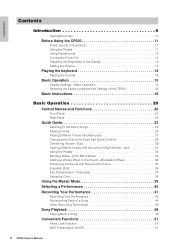
Introduction Contents Introduction 6 Application Index 10 Before Using the CP300 11 Power Supply Connections 11 Using the Pedals 11 Using Headphones 12 Turning the Power On 12 Adjusting the Brightness of the Display 13 Setting the Volume 13 Playing the keyboard 14 Playing... the Sounds 14 Basic Operation 15 Display Settings-Basic Operation 15 Restoring the Factory-programmed Settings of the CP300 16 ...
Introduction Contents Introduction 6 Application Index 10 Before Using the CP300 11 Power Supply Connections 11 Using the Pedals 11 Using Headphones 12 Turning the Power On 12 Adjusting the Brightness of the Display 13 Setting the Volume 13 Playing the keyboard 14 Playing... the Sounds 14 Basic Operation 15 Display Settings-Basic Operation 15 Restoring the Factory-programmed Settings of the CP300 16 ...
Owner's Manual
Page 9
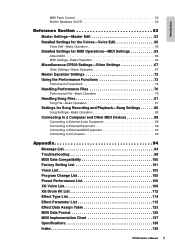
... Operation 56 Detailed Settings for MIDI Operations-MIDI Settings 63 About MIDI 63 MIDI Settings-Basic Operation 64 Miscellaneous CP300 Settings-Other Settings 67 Other Settings-Basic Operation 67 Master Equalizer Settings 72 Using the Performance Functions 73 Performance Parameters 74 Handling Performance Files 76 Performance File-Basic Operation 76 Handling Song... Effect Type List 114 Effect Parameter List 115 Effect Data Assign Table 123 MIDI Data Format 125 MIDI Implementation Chart 137 Specifications 138 Index 139 CP300 Owner's Manual 9
... Operation 56 Detailed Settings for MIDI Operations-MIDI Settings 63 About MIDI 63 MIDI Settings-Basic Operation 64 Miscellaneous CP300 Settings-Other Settings 67 Other Settings-Basic Operation 67 Master Equalizer Settings 72 Using the Performance Functions 73 Performance Parameters 74 Handling Performance Files 76 Performance File-Basic Operation 76 Handling Song... Effect Type List 114 Effect Parameter List 115 Effect Data Assign Table 123 MIDI Data Format 125 MIDI Implementation Chart 137 Specifications 138 Index 139 CP300 Owner's Manual 9

Owner's Manual
Page 10
...8226; Making detailed settings for Voices Detailed Settings for the Voices-Voice Edit" on page 56 • Making detailed settings for the entire CP300 "Miscellaneous CP300 Settings-Other Settings" on page 67 • Making settings for Master mode Master Settings-Master Edit" on page 53 • Making detailed ... Pedals" on page 33 • Using multiple MIDI tone generators Using the Master Mode" on page 39 Changing Voices • Viewing the list of Voices Voice List" on page 103 • Viewing the list of the CP300" on page 16 • About the display messages Message List" on page ...
...8226; Making detailed settings for Voices Detailed Settings for the Voices-Voice Edit" on page 56 • Making detailed settings for the entire CP300 "Miscellaneous CP300 Settings-Other Settings" on page 67 • Making settings for Master mode Master Settings-Master Edit" on page 53 • Making detailed ... Pedals" on page 33 • Using multiple MIDI tone generators Using the Master Mode" on page 39 Changing Voices • Viewing the list of Voices Voice List" on page 103 • Viewing the list of the CP300" on page 16 • About the display messages Message List" on page ...

Owner's Manual
Page 11
...4 AUX MIDI IN OUT THRU USB OUTPUT R L OUTPUT R L/MONO INPUT R L/MONO ASSIGNABLE FOOT PEDAL 1 2 3 SUSTAIN SOSTENUTO SOFT 4 AUX FC3/FC4/FC5 FC7 CP300 Owner's Manual 11 POWER ON OFF 2 Connect the supplied power cord to an AC outlet. Also an optional FC3/FC4/FC5 foot switch or FC7...Connect the other end of parameters on the instrument (page 33). Make sure your CP300 meets the voltage requirement for the country or region in which it is at the OFF position. Introduction Before Using the CP300 Power Supply Connections 1 Make sure that the instrument's [POWER] switch on the...
...4 AUX MIDI IN OUT THRU USB OUTPUT R L OUTPUT R L/MONO INPUT R L/MONO ASSIGNABLE FOOT PEDAL 1 2 3 SUSTAIN SOSTENUTO SOFT 4 AUX FC3/FC4/FC5 FC7 CP300 Owner's Manual 11 POWER ON OFF 2 Connect the supplied power cord to an AC outlet. Also an optional FC3/FC4/FC5 foot switch or FC7...Connect the other end of parameters on the instrument (page 33). Make sure your CP300 meets the voltage requirement for the country or region in which it is at the OFF position. Introduction Before Using the CP300 Power Supply Connections 1 Make sure that the instrument's [POWER] switch on the...

Owner's Manual
Page 12
...them to the minimum. n If the [SPEAKER] button is lit, this indicates that the built-in the center of the CP300 and external devices are using the headphones. Turning the Power On Make sure the volume setting of the front panel lights up. The display will disappear. POWER... ON OFF MIN MAX MASTER VOLUME The display located in speakers sound normally when using a set of time. Doing so may cause hearing loss. Press the [POWER] switch to turn off the power to turn the power on. A ****** PleaseWait YAMAHA ****** C B NO YES D A Grand Piano 1 C Press the [POWER...
...them to the minimum. n If the [SPEAKER] button is lit, this indicates that the built-in the center of the CP300 and external devices are using the headphones. Turning the Power On Make sure the volume setting of the front panel lights up. The display will disappear. POWER... ON OFF MIN MAX MASTER VOLUME The display located in speakers sound normally when using a set of time. Doing so may cause hearing loss. Press the [POWER] switch to turn off the power to turn the power on. A ****** PleaseWait YAMAHA ****** C B NO YES D A Grand Piano 1 C Press the [POWER...

Owner's Manual
Page 13
The level decreases. n The [MASTER VOLUME] dial also controls the volume of the panel. CP300 Owner's Manual 13 Introduction Before Using the CP300 Adjusting the Brightness of the Display You can adjust the contrast of the display by turning the [CONTRAST] knob located to the most comfortable ... [MASTER VOLUME] dial to the right of the entire keyboard sound. A Grand Piano 1 C B NO YES D CONTRAST EXIT Setting the Volume To adjust the volume, use the [MASTER VOLUME] dial located at the left of the headphones. Terminology Master Volume: The volume level of the LCD.
The level decreases. n The [MASTER VOLUME] dial also controls the volume of the panel. CP300 Owner's Manual 13 Introduction Before Using the CP300 Adjusting the Brightness of the Display You can adjust the contrast of the display by turning the [CONTRAST] knob located to the most comfortable ... [MASTER VOLUME] dial to the right of the entire keyboard sound. A Grand Piano 1 C B NO YES D CONTRAST EXIT Setting the Volume To adjust the volume, use the [MASTER VOLUME] dial located at the left of the headphones. Terminology Master Volume: The volume level of the LCD.

Owner's Manual
Page 15
... [-][+] buttons. To do this, simply press the [-] button and [+] button simultaneously. A Main Octave C Set?--> 0 B NO YES D CONTRAST EXIT CP300 Owner's Manual 15 Each parameter in the display corresponds to it. A GrandPiano1 Strings C Choir E.Bass B NO YES D Sometimes, after you've changed ...settings. Introduction Basic Operation In this section you'll learn about the fundamental operations of the CP300-the use of the panel buttons and controls and how to restore the CP300's memory to exit from which you may have many items or parameters from a function....
... [-][+] buttons. To do this, simply press the [-] button and [+] button simultaneously. A Main Octave C Set?--> 0 B NO YES D CONTRAST EXIT CP300 Owner's Manual 15 Each parameter in the display corresponds to it. A GrandPiano1 Strings C Choir E.Bass B NO YES D Sometimes, after you've changed ...settings. Introduction Basic Operation In this section you'll learn about the fundamental operations of the CP300-the use of the panel buttons and controls and how to restore the CP300's memory to exit from which you may have many items or parameters from a function....

Owner's Manual
Page 16
... Restoring the Factory-programmed Settings of the CP300 The CP300 has a Factory Set function for restoring your CP300's memory to select either "Memory File Excluded" or "Memory File Included." OTHER SETTING 2 Press the [OTHER SETTING] button repeatedly or use the A [-][+] buttons to the factory ...Factory Setting List" on the keyboard). Memory File Included Memory files are maintained. There are two ways you restore the CP300's default Voices and Performances, as well as its System and other settings. Storage memory selections: Memory File Excluded Memory files...
... Restoring the Factory-programmed Settings of the CP300 The CP300 has a Factory Set function for restoring your CP300's memory to select either "Memory File Excluded" or "Memory File Included." OTHER SETTING 2 Press the [OTHER SETTING] button repeatedly or use the A [-][+] buttons to the factory ...Factory Setting List" on the keyboard). Memory File Included Memory files are maintained. There are two ways you restore the CP300's default Voices and Performances, as well as its System and other settings. Storage memory selections: Memory File Excluded Memory files...

Owner's Manual
Page 18
... E. Try out some of the CP300 before playing. • Before Using the CP300 (pages 11 and 12) POWER ON! Try searching through the Voices to find your right. VIBES 1 2 3 4 5 6 7 8 ORGAN 1 ORGAN 2 HARPSI. ON OFF Selecting and Playing a Voice The CP300 features an exceptionally wide variety of... • Selecting a Voice (page 25) Terminology Preset: Refers to data loaded to a Computer (page 92) MUSIC PRODUCTION SYNTHESIZER 18 CP300 Owner's Manual PIANO 3 CLAVI. STRINGS CHOIR/PAD GUITAR BASS XG 9 10 11 12 13 14 15 16 VOICE/PERFORMANCE Combining Voices and...
... E. Try out some of the CP300 before playing. • Before Using the CP300 (pages 11 and 12) POWER ON! Try searching through the Voices to find your right. VIBES 1 2 3 4 5 6 7 8 ORGAN 1 ORGAN 2 HARPSI. ON OFF Selecting and Playing a Voice The CP300 features an exceptionally wide variety of... • Selecting a Voice (page 25) Terminology Preset: Refers to data loaded to a Computer (page 92) MUSIC PRODUCTION SYNTHESIZER 18 CP300 Owner's Manual PIANO 3 CLAVI. STRINGS CHOIR/PAD GUITAR BASS XG 9 10 11 12 13 14 15 16 VOICE/PERFORMANCE Combining Voices and...

Owner's Manual
Page 19
TRACK 1 2 3-16 REC STOP PLAY/PAUSE SYNCHRO START Using the Performance Functions The useful Performance functions enable you to sixteen independent parts, letting you to record up to store and recall the entire CP300 settings all together. These include the Dual/Split settings, Voice ...10 11 12 13 14 15 16 PERFORMANCE PERFORM.FILE Using as well. • Using the Master Mode (page 39) ZONE 1 • Master Settings-Master Edit (page 53) ZONE 2 ZONE 3 ZONE 4 MASTER MASTER EDIT CP300 Owner's Manual 19 Basic Instructions Introduction Recording Your Performance and...
TRACK 1 2 3-16 REC STOP PLAY/PAUSE SYNCHRO START Using the Performance Functions The useful Performance functions enable you to sixteen independent parts, letting you to record up to store and recall the entire CP300 settings all together. These include the Dual/Split settings, Voice ...10 11 12 13 14 15 16 PERFORMANCE PERFORM.FILE Using as well. • Using the Master Mode (page 39) ZONE 1 • Master Settings-Master Edit (page 53) ZONE 2 ZONE 3 ZONE 4 MASTER MASTER EDIT CP300 Owner's Manual 19 Basic Instructions Introduction Recording Your Performance and...

Owner's Manual
Page 22
You can be input via the CP300's speakers. Use only the AC power cord supplied with a single touch. ...(page 31) Allows you select from an audio device, connect to both the L/MONO and R jacks. 22 CP300 Owner's Manual The sound of an external instrument can turn the corresponding effect on . ¶ [VOICE EDIT] ...(page 88) These jacks output stereo audio signals (1/4" mono phone plug). For monophonic output, use of various MIDI functions. 4 [USB] connector For connecting the CP300 and computer. (page 92) 5 OUTPUT [L][R] jacks (page 88) These jacks output balanced audio...
You can be input via the CP300's speakers. Use only the AC power cord supplied with a single touch. ...(page 31) Allows you select from an audio device, connect to both the L/MONO and R jacks. 22 CP300 Owner's Manual The sound of an external instrument can turn the corresponding effect on . ¶ [VOICE EDIT] ...(page 88) These jacks output stereo audio signals (1/4" mono phone plug). For monophonic output, use of various MIDI functions. 4 [USB] connector For connecting the CP300 and computer. (page 92) 5 OUTPUT [L][R] jacks (page 88) These jacks output balanced audio...

Owner's Manual
Page 23
...PIANO 3 CLAVI. Adjusting the Volume To adjust the volume level of the instrument's Voice groups. n Make sure the CP300 is ready for each of the Demo Songs, use the [MASTER VOLUME] dial or [SONG VOLUME] slider. PIANO 1 E. PIANO 2 E. The Voice group button indicators ...3 ZONE 4 MIN MAX MASTER VOLUME SONG VOLUME ZONE CONTROL n Make sure that effectively showcase each Voice group will flash in the section "Before Using the CP300" on page 11. VIBES VOICE EDIT SPLIT 1 2 3 4 5 6 7 8 ORGAN 1 ORGAN 2 HARPSI. The corresponding Voice button indicator lights up...
...PIANO 3 CLAVI. Adjusting the Volume To adjust the volume level of the instrument's Voice groups. n Make sure the CP300 is ready for each of the Demo Songs, use the [MASTER VOLUME] dial or [SONG VOLUME] slider. PIANO 1 E. PIANO 2 E. The Voice group button indicators ...3 ZONE 4 MIN MAX MASTER VOLUME SONG VOLUME ZONE CONTROL n Make sure that effectively showcase each Voice group will flash in the section "Before Using the CP300" on page 11. VIBES VOICE EDIT SPLIT 1 2 3 4 5 6 7 8 ORGAN 1 ORGAN 2 HARPSI. The corresponding Voice button indicator lights up...

Owner's Manual
Page 24
...feature that add the subtle sound produced when the keys are assigned to accurately simulate the timbral response of actual piano strings. 24 CP300 Owner's Manual Showcases the Sustain Sampling feature, which reproduces the unique resonance of the Voice group buttons to listen to select the ... Quick Guide Listening to the Piano Demo Songs 1 Simultaneously press both the [MIDI SETTING] button and the [OTHER SETTING] button. 2 Use the A [-][+] buttons to the corresponding Piano Demo Song. Song recorded with multiple velocity-switched samples to the sound buttons as follows.
...feature that add the subtle sound produced when the keys are assigned to accurately simulate the timbral response of actual piano strings. 24 CP300 Owner's Manual Showcases the Sustain Sampling feature, which reproduces the unique resonance of the Voice group buttons to listen to select the ... Quick Guide Listening to the Piano Demo Songs 1 Simultaneously press both the [MIDI SETTING] button and the [OTHER SETTING] button. 2 Use the A [-][+] buttons to the corresponding Piano Demo Song. Song recorded with multiple velocity-switched samples to the sound buttons as follows.
Owner's Manual
Page 25
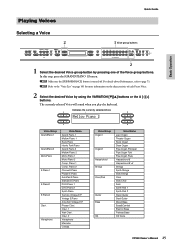
... 14 15 16 VOICE/PERFORMANCE REVERB CHORUS SPEAKER MIDI SETTING MASTER EQ EDIT CLICK OTHER SETTING DEMO 2 1 Select the desired Voice group button by using the VARIATION [▼][▲] buttons or the A [-][+] buttons. Piano 1 Comp. Phaser Clavi. Playing Voices Quick Guide Basic Operation Selecting a Voice... Strings Choir Slow Choir Scat Synth Pad 1 Synth Pad 2 Nylon Guitar Steel Guitar Wood Bass Bass&Cymbal Electric Bass Fretless Bass XG Voice CP300 Owner's Manual 25 PIANO 2 E. In this step, press the [GRAND PIANO 1] button. For details about Performances, refer to the "...
... 14 15 16 VOICE/PERFORMANCE REVERB CHORUS SPEAKER MIDI SETTING MASTER EQ EDIT CLICK OTHER SETTING DEMO 2 1 Select the desired Voice group button by using the VARIATION [▼][▲] buttons or the A [-][+] buttons. Piano 1 Comp. Phaser Clavi. Playing Voices Quick Guide Basic Operation Selecting a Voice... Strings Choir Slow Choir Scat Synth Pad 1 Synth Pad 2 Nylon Guitar Steel Guitar Wood Bass Bass&Cymbal Electric Bass Fretless Bass XG Voice CP300 Owner's Manual 25 PIANO 2 E. In this step, press the [GRAND PIANO 1] button. For details about Performances, refer to the "...


