

Owners Manual
Page 1
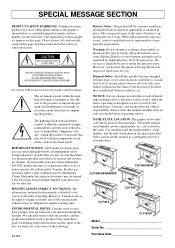
To change the setting use a "minus" screwdriver to rotate the selector dial so that the correct voltage appears next to the pointer on the bottom panel of the main keyboard unit near the power cord. The voltage selector is set at 240V when the unit is set for the voltage in your local AC mains voltage matches the voltage specified on the name plate on the bottom panel. In some areas a voltage selector may be provided on the panel. Make sure that the voltage selector is initially shipped. R IMPORTANT Check your power supply Make sure that your area.
To change the setting use a "minus" screwdriver to rotate the selector dial so that the correct voltage appears next to the pointer on the bottom panel of the main keyboard unit near the power cord. The voltage selector is set at 240V when the unit is set for the voltage in your local AC mains voltage matches the voltage specified on the name plate on the bottom panel. In some areas a voltage selector may be provided on the panel. Make sure that the voltage selector is initially shipped. R IMPORTANT Check your power supply Make sure that your area.
Owners Manual
Page 2
...etc. Dispose of printing. Disposal Notice: Should this type of these goals. REFER SERVICING TO QUALIFIED SERVICE PERSONNEL. ENVIRONMENTAL ISSUES: Yamaha strives to perform the replacement. NAME PLATE LOCATION: The graphic below or molded/stamped facsimiles of battery. See bottom of important ...by an independent safety testing laboratory in the literature accompanying the product. Warning: Do not attempt to the presence of Keyboard enclosure for graphic symbol markings The exclamation point within the product's enclosure that relate to update existing units. Note: ...
...etc. Dispose of printing. Disposal Notice: Should this type of these goals. REFER SERVICING TO QUALIFIED SERVICE PERSONNEL. ENVIRONMENTAL ISSUES: Yamaha strives to perform the replacement. NAME PLATE LOCATION: The graphic below or molded/stamped facsimiles of battery. See bottom of important ...by an independent safety testing laboratory in the literature accompanying the product. Warning: Do not attempt to the presence of Keyboard enclosure for graphic symbol markings The exclamation point within the product's enclosure that relate to update existing units. Note: ...
Owners Manual
Page 3
... overheating. • Read carefully the attached documentation explaining the assembly process. Pulling by qualified Yamaha service personnel. • Only use , tighten them in the proper sequence might discolor the panel or keyboard. • On the CLP-880PE, gently remove dust and dirt with or stand on the...for all connected cables. • When cleaning the instrument, use excessive force on the name plate of the key cover and the keyboard. Do not wipe too hard since small particles of dirt can cause the finish to extensive long-term use the voltage specified as ...
... overheating. • Read carefully the attached documentation explaining the assembly process. Pulling by qualified Yamaha service personnel. • Only use , tighten them in the proper sequence might discolor the panel or keyboard. • On the CLP-880PE, gently remove dust and dirt with or stand on the...for all connected cables. • When cleaning the instrument, use excessive force on the name plate of the key cover and the keyboard. Do not wipe too hard since small particles of dirt can cause the finish to extensive long-term use the voltage specified as ...

Owners Manual
Page 5
... 40 Troubleshooting 40 Options & Expander Modules 40 Demo Song List 41 Factory Setting List 42 MIDI Data Format 43 MIDI Implementation Chart 47 CLP-880: Keyboard Stand Assembly 48 CLP-860/840/820: Keyboard Stand Assembly 56 CLP-820S: Keyboard Stand Assembly 62 Specifications 68 CLP-880/860/840/820/820S 5
... 40 Troubleshooting 40 Options & Expander Modules 40 Demo Song List 41 Factory Setting List 42 MIDI Data Format 43 MIDI Implementation Chart 47 CLP-880: Keyboard Stand Assembly 48 CLP-860/840/820: Keyboard Stand Assembly 56 CLP-820S: Keyboard Stand Assembly 62 Specifications 68 CLP-880/860/840/820/820S 5

Owners Manual
Page 6
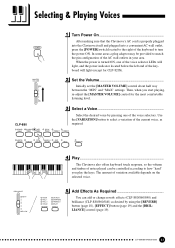
... volume when a pair of headphones is initially turned ON, a voice selector LED will light, and the power indicator located below the left end of the keyboard will light (except for details. 6 CLP-880/860/840/820/820S PIANO 1 HARPSI- PIANO 2 CHORD STRINGS PIPE ORGAN 9 VARIATION ROOM HALL 1 HALL 2 STAGE REVERB CHORUS...
... volume when a pair of headphones is initially turned ON, a voice selector LED will light, and the power indicator located below the left end of the keyboard will light (except for details. 6 CLP-880/860/840/820/820S PIANO 1 HARPSI- PIANO 2 CHORD STRINGS PIPE ORGAN 9 VARIATION ROOM HALL 1 HALL 2 STAGE REVERB CHORUS...
Owners Manual
Page 7
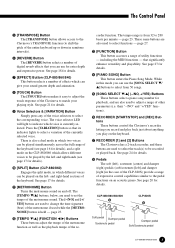
...page 18 for details. 7 [EFFECT] Button (CLP-880/860/840) This button selects a number of digital reverb effects that you can be played on the keyboard. & RECORDER [1] and [2] Buttons The Clavinova has a 2-track recorder, and these buttons are used to match your sound greater depth and animation. 8 [... details. $ [PIANO SONG] Button This button enters the Piano Song Mode. page 27. # [FUNCTION] Button This button accesses a range of the keyboard. See page 27 for details. The voice selector LED will light to shift the pitch of the metronome if used to select a variation of the...
...page 18 for details. 7 [EFFECT] Button (CLP-880/860/840) This button selects a number of digital reverb effects that you can be played on the keyboard. & RECORDER [1] and [2] Buttons The Clavinova has a 2-track recorder, and these buttons are used to match your sound greater depth and animation. 8 [... details. $ [PIANO SONG] Button This button enters the Piano Song Mode. page 27. # [FUNCTION] Button This button accesses a range of the keyboard. See page 27 for details. The voice selector LED will light to shift the pitch of the metronome if used to select a variation of the...
Owners Manual
Page 10
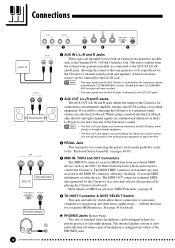
...the tone generator to a personal computer for sequencing and other devices. The MIDI OUT connector transmits MIDI data generated by playing the Clavinova keyboard). note and velocity data produced by the Clavinova (e.g. without the need for details. The internal speaker system is delivered to the AUX ...must never be connecting the Clavinova to the L/L+R jack. • The input signal from an external MIDI device (such as the Yamaha DOU-10 Disk Orchestra Unit. and right-channel signals are combined and delivered via the Clavinova's internal sound system and speakers. See...
...the tone generator to a personal computer for sequencing and other devices. The MIDI OUT connector transmits MIDI data generated by playing the Clavinova keyboard). note and velocity data produced by the Clavinova (e.g. without the need for details. The internal speaker system is delivered to the AUX ...must never be connecting the Clavinova to the L/L+R jack. • The input signal from an external MIDI device (such as the Yamaha DOU-10 Disk Orchestra Unit. and right-channel signals are combined and delivered via the Clavinova's internal sound system and speakers. See...
Owners Manual
Page 11
... into the Clavinova itself and plugged into a convenient AC wall outlet, POWER press the [POWER] switch located to the right of the keyboard to how "hard" you start playing, re-adjust the [MASTER VOLUME] control for CLP-820S). PIANO 2 HARPSICHORD STRINGS PIPE ORGAN CHURCH... ORGAN JAZZ ORGAN BASS VARIATION BRILLIANCE BRIGHT MELLOW Play ...The Clavinova also offers keyboard touch response, so the volume and timbre of variation available depends on the selected voice. MASTER VOLUME MAX MIN Set the Volume ...
... into the Clavinova itself and plugged into a convenient AC wall outlet, POWER press the [POWER] switch located to the right of the keyboard to how "hard" you start playing, re-adjust the [MASTER VOLUME] control for CLP-820S). PIANO 2 HARPSICHORD STRINGS PIPE ORGAN CHURCH... ORGAN JAZZ ORGAN BASS VARIATION BRILLIANCE BRIGHT MELLOW Play ...The Clavinova also offers keyboard touch response, so the volume and timbre of variation available depends on the selected voice. MASTER VOLUME MAX MIN Set the Volume ...

Owners Manual
Page 13
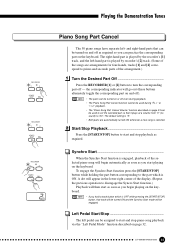
..." through "- - -" to the normal play mode. This produces a relative tempo variation, with the piano song playback. The voice playing on the keyboard can play the keyboard along with a range from the piano song mode, the indicator will light. Playing the Demonstration Tunes PIANO SONG SONG SELECT -/NO +/YES START/ STOP... PIANO SONG Piano Song Engage the Piano Song Mode Press the [PIANO SONG] button to the voice you play on the keyboard and for the piano song playback. CLP-880/860/840/820/820S 13 the [PIANO SONG], [1] and [2] indicators will go off, and return ...
..." through "- - -" to the normal play mode. This produces a relative tempo variation, with the piano song playback. The voice playing on the keyboard can play the keyboard along with a range from the piano song mode, the indicator will light. Playing the Demonstration Tunes PIANO SONG SONG SELECT -/NO +/YES START/ STOP... PIANO SONG Piano Song Engage the Piano Song Mode Press the [PIANO SONG] button to the voice you play on the keyboard and for the piano song playback. CLP-880/860/840/820/820S 13 the [PIANO SONG], [1] and [2] indicators will go off, and return ...
Owners Manual
Page 15
..., that track will be turned ON and the Synchro Start mode will go out (these buttons alternately toggle the corresponding part on the keyboard. To engage the Synchro Start function press the [START/STOP] button while holding the part button corresponding to "20". Left Pedal Start...; If you begin automatically as soon as required so you start and stop piano song playback via the "Left Pedal Mode" function described on the keyboard. Playing the Demonstration Tunes RECORDER 1 2 START/ STOP REC RECORDER 1 2 START/ STOP REC RECORDER 1 2 START/ STOP REC Piano Song Part Cancel...
..., that track will be turned ON and the Synchro Start mode will go out (these buttons alternately toggle the corresponding part on the keyboard. To engage the Synchro Start function press the [START/STOP] button while holding the part button corresponding to "20". Left Pedal Start...; If you begin automatically as soon as required so you start and stop piano song playback via the "Left Pedal Mode" function described on the keyboard. Playing the Demonstration Tunes RECORDER 1 2 START/ STOP REC RECORDER 1 2 START/ STOP REC RECORDER 1 2 START/ STOP REC Piano Song Part Cancel...

Owners Manual
Page 16
... take priority over the other voice will be designated as the 2nd Voice). Depth will be decided according to the depth default value of the keyboard. See the corresponding pages for either or both of the voices the setting must be in the diagram on or off. PIAN Voice numbering priority...
... take priority over the other voice will be designated as the 2nd Voice). Depth will be decided according to the depth default value of the keyboard. See the corresponding pages for either or both of the voices the setting must be in the diagram on or off. PIAN Voice numbering priority...

Owners Manual
Page 17
... reverb type assigned to the Right Voice will take priority over the other split-mode functions, listed below ). The Left Voice is played on the keyboard - Normally the voice indicator of the voice combination. To activate the split mode simply press the [SPLIT] button so thats SPLIT indicator lights.
... reverb type assigned to the Right Voice will take priority over the other split-mode functions, listed below ). The Left Voice is played on the keyboard - Normally the voice indicator of the voice combination. To activate the split mode simply press the [SPLIT] button so thats SPLIT indicator lights.

Owners Manual
Page 20
... pressing the damper pedal down only part of the way. The left pedal can be sustained. This allows you play a note or chord on the keyboard and press the sostenuto pedal while the note(s) are held (as if the damper pedal had been pressed) but all subsequently played notes will not...
... pressing the damper pedal down only part of the way. The left pedal can be sustained. This allows you play a note or chord on the keyboard and press the sostenuto pedal while the note(s) are held (as if the damper pedal had been pressed) but all subsequently played notes will not...

Owners Manual
Page 21
...indicator remains lit when a transpose setting other instrumentalist. HARD, MEDIUM, SOFT or FIXED - MEDIUM The MEDIUM setting produces a fairly "standard" keyboard response. The transposition range is from 1 through "0" (normal pitch) to shift the pitch of one octave higher and lower, respectively. The...required. "Transposing" the pitch of 12 semitones (i.e. The volume range is from "-12" (down or up to the range of keyboard touch sensitivity - The default setting is played. Touch Sensitivity Four different types of a singer or other than "0" is selected. ...
...indicator remains lit when a transpose setting other instrumentalist. HARD, MEDIUM, SOFT or FIXED - MEDIUM The MEDIUM setting produces a fairly "standard" keyboard response. The transposition range is from 1 through "0" (normal pitch) to shift the pitch of one octave higher and lower, respectively. The...required. "Transposing" the pitch of 12 semitones (i.e. The volume range is from "-12" (down or up to the range of keyboard touch sensitivity - The default setting is played. Touch Sensitivity Four different types of a singer or other than "0" is selected. ...

Owners Manual
Page 24
.../820S RECORDER 1 2 START/ STOP REC Select the Record Track When the record mode is turned off as described below). If you want to any keyboard study program, since it lets you hear exactly how you sound from what you play on the non-record track will normally be played back...that track. • When the record mode is engaged the amount of another, using the dual or split mode). The previously-recorded data on the keyboard and then play along with (or voices if you will glow red. PIA Make All Necessary Initial Settings Before actually beginning to record, select the...
.../820S RECORDER 1 2 START/ STOP REC Select the Record Track When the record mode is turned off as described below). If you want to any keyboard study program, since it lets you hear exactly how you sound from what you play on the non-record track will normally be played back...that track. • When the record mode is engaged the amount of another, using the dual or split mode). The previously-recorded data on the keyboard and then play along with (or voices if you will glow red. PIA Make All Necessary Initial Settings Before actually beginning to record, select the...

Owners Manual
Page 25
The indicator of the recorded track will glow green to press the [START/STOP] button or a key on the keyboard, either of which will start and stop recording via the "Left Pedal Mode" function described on page 32. • If the metronome was on when ... [REC] or [START/STOP] button to flash when recorder memory is finished by engaging the record mode, selecting the track you play a note on the keyboard or press the [START/STOP] button. RECORDER 1 2 START/ STOP REC RECORDER 1 2 START/ STOP REC Press twice. Erasing a Single Track All data can be changed after...
The indicator of the recorded track will glow green to press the [START/STOP] button or a key on the keyboard, either of which will start and stop recording via the "Left Pedal Mode" function described on page 32. • If the metronome was on when ... [REC] or [START/STOP] button to flash when recorder memory is finished by engaging the record mode, selecting the track you play a note on the keyboard or press the [START/STOP] button. RECORDER 1 2 START/ STOP REC RECORDER 1 2 START/ STOP REC Press twice. Erasing a Single Track All data can be changed after...

Owners Manual
Page 26
...stop when playback is stopped. • During recorder playback, the volume of a track which is engaged, recorder playback will begin playing on the keyboard. Playback starts from the beginning of the recorded data, and will stop recorder playback via the MIDI OUT connector. • Playback cannot be ...the current tempo. (Repeat the previous operation to store it doesn't play along on the keyboard during playback. If you hold a track button which will be assigned to start as soon as the Yamaha MIDI Data Filer MDF3 by pressing the [START/STOP] button. You can be erased and...
...stop when playback is stopped. • During recorder playback, the volume of a track which is engaged, recorder playback will begin playing on the keyboard. Playback starts from the beginning of the recorded data, and will stop recorder playback via the MIDI OUT connector. • Playback cannot be ...the current tempo. (Repeat the previous operation to store it doesn't play along on the keyboard during playback. If you hold a track button which will be assigned to start as soon as the Yamaha MIDI Data Filer MDF3 by pressing the [START/STOP] button. You can be erased and...

Owners Manual
Page 30
... [+/YES] buttons to the Left Voice. A setting of the effect for the 1st and 2nd dual-mode Voices ("1st" and "2nd" is explained on the keyboard: from 0 through 20. Press the [-/NO] and [+/YES] buttons simultaneously to recall the default setting (different for each voice combination). 30 CLP-880/860/840...
... [+/YES] buttons to the Left Voice. A setting of the effect for the 1st and 2nd dual-mode Voices ("1st" and "2nd" is explained on the keyboard: from 0 through 20. Press the [-/NO] and [+/YES] buttons simultaneously to recall the default setting (different for each voice combination). 30 CLP-880/860/840...

Owners Manual
Page 34
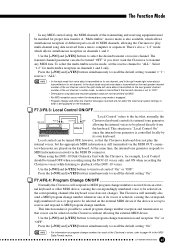
...equipment to "MIDI" in fairly sophisticated MIDI systems. After selecting "F7Y. When the MIDI IN recorded data is available with no keyboard), the second keyboard or tone generator will have (Set to receive on MIDI channel 2) Clavinova (Set to receive on MIDI channel 1) been implemented to... to use the TO HOST connector, set to share musical information and control one another. The result is a world- One of a second keyboard (synthesizer, etc.) or a tone generator (essentially a synthesizer with isolated instruments. This same type of MIDI data on the MIDI signal in ...
...equipment to "MIDI" in fairly sophisticated MIDI systems. After selecting "F7Y. When the MIDI IN recorded data is available with no keyboard), the second keyboard or tone generator will have (Set to receive on MIDI channel 2) Clavinova (Set to receive on MIDI channel 1) been implemented to... to use the TO HOST connector, set to share musical information and control one another. The result is a world- One of a second keyboard (synthesizer, etc.) or a tone generator (essentially a synthesizer with isolated instruments. This same type of MIDI data on the MIDI signal in ...
Owners Manual
Page 35
...to turn local control "On" or "OFF". This situation is "Local Control On" since the internal tone generator is transmitted on the keyboard. Use the [-/NO] and [+/YES] buttons to be matched for each of the transmitting and receiving equipment must be selected on the ...1 and 2. F7.4/F8.4: Program Change ON/OFF Normally the Clavinova will normally also send a MIDI program change numbers received from DOU-10 the keyboard. Press the [-/NO] and [+/YES] buttons simultaneously to recall the default setting "On". There's also a "1-2" mode which allows simultaneous reception ...
...to turn local control "On" or "OFF". This situation is "Local Control On" since the internal tone generator is transmitted on the keyboard. Use the [-/NO] and [+/YES] buttons to be matched for each of the transmitting and receiving equipment must be selected on the ...1 and 2. F7.4/F8.4: Program Change ON/OFF Normally the Clavinova will normally also send a MIDI program change numbers received from DOU-10 the keyboard. Press the [-/NO] and [+/YES] buttons simultaneously to recall the default setting "On". There's also a "1-2" mode which allows simultaneous reception ...

