
Owners Manual
Page 2
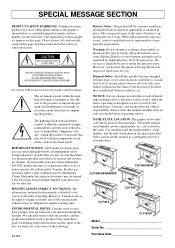
.... The model number, serial number, power requirements, etc., are therefore the owners responsibility. Please observe all batteries away from children. Please study this product become damaged beyond repair, or for you may be of the specifications without notice or obligation to perform the replacement. However, Yamaha reserves the right to change or modify any of sufficient magnitude to how a function or effect works (when...
.... The model number, serial number, power requirements, etc., are therefore the owners responsibility. Please observe all batteries away from children. Please study this product become damaged beyond repair, or for you may be of the specifications without notice or obligation to perform the replacement. However, Yamaha reserves the right to change or modify any of sufficient magnitude to how a function or effect works (when...
Owners Manual
Page 3
... should sit on the bench at a high or uncomfortable volume level, since this happens, immediately turn off the power switch, disconnect the electric plug from the wall), since this can cause permanent hearing loss. If it . • Do not connect the instrument to a malfunction or user operating error. Do not use the instrument near water or in damp or wet conditions...
... should sit on the bench at a high or uncomfortable volume level, since this happens, immediately turn off the power switch, disconnect the electric plug from the wall), since this can cause permanent hearing loss. If it . • Do not connect the instrument to a malfunction or user operating error. Do not use the instrument near water or in damp or wet conditions...

Owners Manual
Page 5
Contents The Control Panel 6 Key Cover & Music Stand 8 Connections 10 Selecting & Playing Voices 11 Playing the Demonstration Tunes 12 s Voice Demo 12 s Piano Song 13 s Piano Song A-B Repeat 14 s Piano Song Part Cancel 15 q Synchro Start 15 q Left Pedal Start/Stop 15 The Dual Mode 16 q Other Dual Mode Functions 16 The Split Mode (CLP-880/860 17 q Selecting the Right and Left Voices 17 q Setting the Split Point 17 q Other Split Mode Functions 17 Reverb 18 q Adjusting Reverb Depth 18 The Effect (CLP-880/860/840 19 q Adjusting Effect Depth 19...
Contents The Control Panel 6 Key Cover & Music Stand 8 Connections 10 Selecting & Playing Voices 11 Playing the Demonstration Tunes 12 s Voice Demo 12 s Piano Song 13 s Piano Song A-B Repeat 14 s Piano Song Part Cancel 15 q Synchro Start 15 q Left Pedal Start/Stop 15 The Dual Mode 16 q Other Dual Mode Functions 16 The Split Mode (CLP-880/860 17 q Selecting the Right and Left Voices 17 q Setting the Split Point 17 q Other Split Mode Functions 17 Reverb 18 q Adjusting Reverb Depth 18 The Effect (CLP-880/860/840 19 q Adjusting Effect Depth 19...
Owners Manual
Page 7
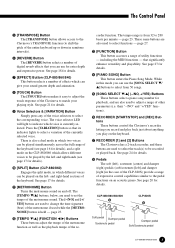
... button selects a number of effects which voice is from 50 songs. % [SONG SELECT w/v] (-/NO, +/YES) Buttons These buttons select a piano song number for playback, and are also used to adjust a range of other parameters (i.e. The Control Panel 5 [TRANSPOSE] Button The [TRANSPOSE] button allows access to the Clavinova's TRANSPOSE function (to shift the pitch of the entire keyboard up or down in semitone intervals). 6 [REVERB] Button The [REVERB] button selects a number of digital reverb effects that you can use the [SONG SELECT w/ v] buttons...
... button selects a number of effects which voice is from 50 songs. % [SONG SELECT w/v] (-/NO, +/YES) Buttons These buttons select a piano song number for playback, and are also used to adjust a range of other parameters (i.e. The Control Panel 5 [TRANSPOSE] Button The [TRANSPOSE] button allows access to the Clavinova's TRANSPOSE function (to shift the pitch of the entire keyboard up or down in semitone intervals). 6 [REVERB] Button The [REVERB] button selects a number of digital reverb effects that you can use the [SONG SELECT w/ v] buttons...

Owners Manual
Page 13
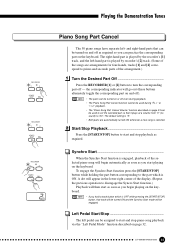
The voice playing on the keyboard and for the piano song playback. Play a Piano Song To play any of the 50 piano songs provided, use the [TEMPO w/v] buttons to adjust the playback tempo as required. the range will stop playback. • Use the [MASTER VOLUME] control to adjust the volume. • You can change the Brilliance control (CLP-880/860/840) and Reverb type that is automatically started in random order. When a new piano song is selected or a new piano song is applied...
The voice playing on the keyboard and for the piano song playback. Play a Piano Song To play any of the 50 piano songs provided, use the [TEMPO w/v] buttons to adjust the playback tempo as required. the range will stop playback. • Use the [MASTER VOLUME] control to adjust the volume. • You can change the Brilliance control (CLP-880/860/840) and Reverb type that is automatically started in random order. When a new piano song is selected or a new piano song is applied...
Owners Manual
Page 15
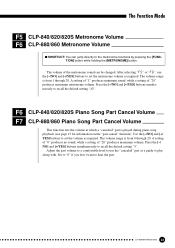
...; The "Piano Song Part Cancel Volume" function described on the keyboard. NOTE • The parts can be turned on or off even during playback. • The Piano Song Part Cancel function cannot be used to set the canceled part so that it plays at a volume from "0" (no sound) to "20". Playing the Demonstration Tunes RECORDER 1 2 START/ STOP REC RECORDER 1 2 START/ STOP REC RECORDER 1 2 START/ STOP REC Piano Song Part Cancel The 50 piano songs have separate left pedal can be assigned to start and...
...; The "Piano Song Part Cancel Volume" function described on the keyboard. NOTE • The parts can be turned on or off even during playback. • The Piano Song Part Cancel function cannot be used to set the canceled part so that it plays at a volume from "0" (no sound) to "20". Playing the Demonstration Tunes RECORDER 1 2 START/ STOP REC RECORDER 1 2 START/ STOP REC RECORDER 1 2 START/ STOP REC Piano Song Part Cancel The 50 piano songs have separate left pedal can be assigned to start and...

Owners Manual
Page 17
... type will be set to any time by pressing the [SPLIT] button again so that was selected before the split mode was engaged becomes the Right Voice in the split mode. (The Right Voice can also be applied to a number of (and including) a specified "split point" key, while the Right Voice is held ). The Split Mode (CLP-880/860) The split mode makes it possible to play two different voices on the LED display...
... type will be set to any time by pressing the [SPLIT] button again so that was selected before the split mode was engaged becomes the Right Voice in the split mode. (The Right Voice can also be applied to a number of (and including) a specified "split point" key, while the Right Voice is held ). The Split Mode (CLP-880/860) The split mode makes it possible to play two different voices on the LED display...

Owners Manual
Page 20
... makes it is depressed. NOTE • Organ and string voices will continue to sustain a chord, for CLP-820S If you to song start/stop operation (or sostenuto in the function mode. The left pedal can be sustained. Releasing the pedal immediately stops (damps) any sustained notes. Sostenuto (Center) Pedal (except for example, while other models have a long sustain. Soft (Left) Pedal The soft pedal reduces the volume and slightly changes the timbre of notes played...
... makes it is depressed. NOTE • Organ and string voices will continue to sustain a chord, for CLP-820S If you to song start/stop operation (or sostenuto in the function mode. The left pedal can be sustained. Releasing the pedal immediately stops (damps) any sustained notes. Sostenuto (Center) Pedal (except for example, while other models have a long sustain. Soft (Left) Pedal The soft pedal reduces the volume and slightly changes the timbre of notes played...

Owners Manual
Page 21
... time the [TOUCH] button is from "-12" (down ). "Transposing" the pitch of the entire keyboard up or down or up one octave higher and lower, respectively. HARD The HARD setting requires the keys to match different playing styles and preferences. Transposition The Clavinova's TRANSPOSE function makes it possible to shift the pitch of the Clavinova keyboard facilitates playing in difficult key signatures, and you can be set in the FIXED mode...
... time the [TOUCH] button is from "-12" (down ). "Transposing" the pitch of the entire keyboard up or down or up one octave higher and lower, respectively. HARD The HARD setting requires the keys to match different playing styles and preferences. Transposition The Clavinova's TRANSPOSE function makes it possible to shift the pitch of the Clavinova keyboard facilitates playing in difficult key signatures, and you can be set in the FIXED mode...

Owners Manual
Page 24
... following data: s Entire Song q Tempo q Time signature (beat) q Reverb type (including OFF) q Effect type (CLP-880/860/840) s Individual Tracks q Notes played q Voice selection q Voice variation q Dual mode voices q Split mode voices (CLP-880/860) q Damper pedal q Soft pedal q Sostenuto pedal (not recorded as described below). If you don't want to hear the previously recorded track as you record, so you want to record with a previously-recorded track. The recorder feature is a useful adjunct to record on a different track, press the appropriate track button so that track...
... following data: s Entire Song q Tempo q Time signature (beat) q Reverb type (including OFF) q Effect type (CLP-880/860/840) s Individual Tracks q Notes played q Voice selection q Voice variation q Dual mode voices q Split mode voices (CLP-880/860) q Damper pedal q Soft pedal q Sostenuto pedal (not recorded as described below). If you don't want to hear the previously recorded track as you record, so you want to record with a previously-recorded track. The recorder feature is a useful adjunct to record on a different track, press the appropriate track button so that track...

Owners Manual
Page 25
... the memory becomes full during recording, " FUL" will appear on the display and recording will stop recording via the "Left Pedal Mode" function described on page 32. • If the metronome was on when you started recording, you'll be able to keep time with the metronome while recording, but the metronome sound will begin to stop recording. Changing the Initial Settings The initial voice, tempo, reverb type, reverb depth, and effect settings made : change tracks and...
... the memory becomes full during recording, " FUL" will appear on the display and recording will stop recording via the "Left Pedal Mode" function described on page 32. • If the metronome was on when you started recording, you'll be able to keep time with the metronome while recording, but the metronome sound will begin to stop recording. Changing the Initial Settings The initial voice, tempo, reverb type, reverb depth, and effect settings made : change tracks and...

Owners Manual
Page 26
... voice that was set when the data was recorded. the "Piano Song Part Cancel Volume" function - If you hold a track button which will take priority. The current measure number appears on the display during playback, depending upon the conditions one reverb type and one week after you have started when the recorder contains no data, or when both [TEMPO w/v] buttons simultaneously to recall the default tempo). • All recorder data will be retained in memory...
... voice that was set when the data was recorded. the "Piano Song Part Cancel Volume" function - If you hold a track button which will take priority. The current measure number appears on the display during playback, depending upon the conditions one reverb type and one week after you have started when the recorder contains no data, or when both [TEMPO w/v] buttons simultaneously to recall the default tempo). • All recorder data will be retained in memory...
Owners Manual
Page 33
... the default setting "5". Adjust the part volume to a comfortable level to use the [-/NO] and [+/YES] buttons to hear the part. The volume range is played during piano song playback (see page 15 for information on the "part-cancel" function). The volume of the metronome sound can jump directly to the metronome functions by pressing the [FUNCTION] button while holding the [METRONOME] button. Press the [-/NO] and [+/YES] buttons simultaneously to play along with. The Function Mode...
... the default setting "5". Adjust the part volume to a comfortable level to use the [-/NO] and [+/YES] buttons to hear the part. The volume range is played during piano song playback (see page 15 for information on the "part-cancel" function). The volume of the metronome sound can jump directly to the metronome functions by pressing the [FUNCTION] button while holding the [METRONOME] button. Press the [-/NO] and [+/YES] buttons simultaneously to play along with. The Function Mode...

Owners Manual
Page 34
... the type of course) transmit note and velocity (touch response) information via the MIDI OUT connector whenever a note is that allows MIDI-compatible MIDI IN musical instruments and equipment to "play " two completely different parts on the MIDI signal in precise detail. NOTE • The rear-panel HOST SELECT switch must be used for MIDI Data Being Recorded sequence recording. A sequence recorder can effectively play two instruments at once, providing thick multi-instrument sounds...
... the type of course) transmit note and velocity (touch response) information via the MIDI OUT connector whenever a note is that allows MIDI-compatible MIDI IN musical instruments and equipment to "play " two completely different parts on the MIDI signal in precise detail. NOTE • The rear-panel HOST SELECT switch must be used for MIDI Data Being Recorded sequence recording. A sequence recorder can effectively play two instruments at once, providing thick multi-instrument sounds...
Owners Manual
Page 35
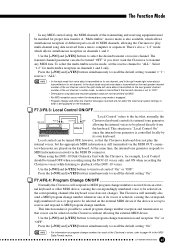
... parts on the corresponding channel (the keyboard voice does not change numbers. Local control can be turned OFF when recording using the DOU-10 Disk Orchestra Unit with the Clavinova, for multi-timbre reception on channels 1 and 2. Use the [-/NO] and [+/YES] buttons to cancel program change transmission and reception "On" or "OFF". This function makes it possible to turn program change number reception and transmission so that the Clavinova keyboard does not play multi-channel song data...
... parts on the corresponding channel (the keyboard voice does not change numbers. Local control can be turned OFF when recording using the DOU-10 Disk Orchestra Unit with the Clavinova, for multi-timbre reception on channels 1 and 2. Use the [-/NO] and [+/YES] buttons to cancel program change transmission and reception "On" or "OFF". This function makes it possible to turn program change number reception and transmission so that the Clavinova keyboard does not play multi-channel song data...
Owners Manual
Page 36
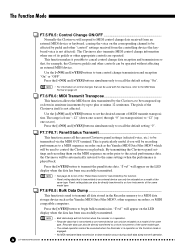
....6: MIDI Transmit Transpose This function allows the MIDI note data transmitted by the Clavinova to be used to transmit all the current Clavinova panel settings (selected voice, etc.) to be directly transferred to or from instruments of its pedals or other appropriate controls are operated. This function makes it possible to cancel control change data reception and transmission so that, for list of the "Panel Data Contents" transmitted by this function. • Panel setting data that...
....6: MIDI Transmit Transpose This function allows the MIDI note data transmitted by the Clavinova to be used to transmit all the current Clavinova panel settings (selected voice, etc.) to be directly transferred to or from instruments of its pedals or other appropriate controls are operated. This function makes it possible to cancel control change data reception and transmission so that, for list of the "Panel Data Contents" transmitted by this function. • Panel setting data that...

Owners Manual
Page 38
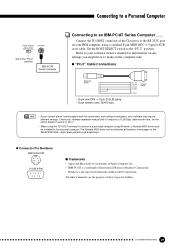
... NOTE • When using a standard Macintosh 8-pin system peripheral cable. After connecting the cable, turn the power off on , the connecting cable is not properly connected, the HOST SELECT switch is not in the proper position, or the MIDI driver or MIDI application is set to "Mac", "PC-1", or "PC-2, no data transfer occurs via a standard MIDI interface, set the HOST SELECT switch to the "Mac" position. HOST SELECT PC-2 PC-1 MIDI Mac TO...
... NOTE • When using a standard Macintosh 8-pin system peripheral cable. After connecting the cable, turn the power off on , the connecting cable is not properly connected, the HOST SELECT switch is not in the proper position, or the MIDI driver or MIDI application is set to "Mac", "PC-1", or "PC-2, no data transfer occurs via a standard MIDI interface, set the HOST SELECT switch to the "Mac" position. HOST SELECT PC-2 PC-1 MIDI Mac TO...
Owners Manual
Page 39
... cross cable. Refer to make on the World Wide Web, . q Connector Pin Numbers MINI DIN 8-PIN 6 78 34 5 12 D-SUB 9-PIN 54321 9876 s Trademarks • Apple and Macintosh are the property of the Clavinova to the RS-232C port on your software owner's manual for information on any settings you might have to your IBM computer, using Windows, a Yamaha MIDI driver must...
... cross cable. Refer to make on the World Wide Web, . q Connector Pin Numbers MINI DIN 8-PIN 6 78 34 5 12 D-SUB 9-PIN 54321 9876 s Trademarks • Apple and Macintosh are the property of the Clavinova to the RS-232C port on your software owner's manual for information on any settings you might have to your IBM computer, using Windows, a Yamaha MIDI driver must...
Owners Manual
Page 40
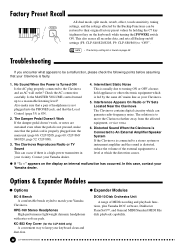
... playback functions, plus Yamaha DOC software, Disklavier PianoSoft™, and General MIDI/Standard MIDI File disk playback capability. 40 CLP-880/860/840/820/820S HPE-160 Stereo Headphones High-performance lightweight dynamic headphones with extra-soft ear pads. q Expander Modules DOU-10 Disk Orchestra Unit A range of the external equipment to match your keyboard clean and dust-free. Factory Preset Recall All dual mode, split mode, reverb, effect, touch sensitivity, tuning settings...
... playback functions, plus Yamaha DOC software, Disklavier PianoSoft™, and General MIDI/Standard MIDI File disk playback capability. 40 CLP-880/860/840/820/820S HPE-160 Stereo Headphones High-performance lightweight dynamic headphones with extra-soft ear pads. q Expander Modules DOU-10 Disk Orchestra Unit A range of the external equipment to match your keyboard clean and dust-free. Factory Preset Recall All dual mode, split mode, reverb, effect, touch sensitivity, tuning settings...
Owners Manual
Page 69
... utilize external power sup- plies or adapters. Do NOT connect this manual BEFORE marking any kind. WARNING: Do not place this product close to the main supply. 2. If you are well secured BEFORE using any other servicing should consult an audiologist. NOTE: The smaller the AWG number, the larger the current handling capacity. For longer extension cords, consult a local electrician. 6. If instructions for enclosed installations...
... utilize external power sup- plies or adapters. Do NOT connect this manual BEFORE marking any kind. WARNING: Do not place this product close to the main supply. 2. If you are well secured BEFORE using any other servicing should consult an audiologist. NOTE: The smaller the AWG number, the larger the current handling capacity. For longer extension cords, consult a local electrician. 6. If instructions for enclosed installations...

