
Owner's Manual
Page 1
...-Sequence Play 12 Repeat Play 12 Program Play 13 Index Search 14 Track Programming for selecting this YAMAHA Compact Disc Player. A CDX-993 Natural Sound Compact Disc Player Thank you for Recording to Tape ......... 15 CD Synchronized Recording 19 Notes about the Remote Control Transmitter 20 Notes about Handling Compact Discs 20 Troubleshooting 21...
...-Sequence Play 12 Repeat Play 12 Program Play 13 Index Search 14 Track Programming for selecting this YAMAHA Compact Disc Player. A CDX-993 Natural Sound Compact Disc Player Thank you for Recording to Tape ......... 15 CD Synchronized Recording 19 Notes about the Remote Control Transmitter 20 Notes about Handling Compact Discs 20 Troubleshooting 21...
Owner's Manual
Page 4
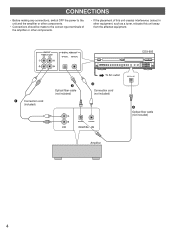
... interference (noise) in other equipment, such as a tuner, relocate this unit away from the affected equipment. LINE OUT VARIABLE FIXED 1 1 DIGITAL AUDIO OUT OPTICAL COAXIAL CDX-993 1 Connection cord (included) 2 Optical fiber cable (not included) To AC outlet 3 Connection cord (not included) DIGITAL OUT...
... interference (noise) in other equipment, such as a tuner, relocate this unit away from the affected equipment. LINE OUT VARIABLE FIXED 1 1 DIGITAL AUDIO OUT OPTICAL COAXIAL CDX-993 1 Connection cord (included) 2 Optical fiber cable (not included) To AC outlet 3 Connection cord (not included) DIGITAL OUT...
Owner's Manual
Page 5
... and right) terminals of the amplifier or other component. • Connect the "LINE OUT" terminals to the "CD" (or "AUX") terminals of the amplifier. When connecting this unit with a YAMAHA amplifier or receiver whose terminals on the rear panel are numbered as 1, 2, 3, etc., connect the LINE OUT terminals...this unit is used , in order to protect from this terminal to the optical input terminal of these terminals is not variable. 5 to record a CD directly. • The output level of a DAT (Digital Audio Tape) deck or MD (Mini Disc) deck etc. Other cables might not function correctly...
... and right) terminals of the amplifier or other component. • Connect the "LINE OUT" terminals to the "CD" (or "AUX") terminals of the amplifier. When connecting this unit with a YAMAHA amplifier or receiver whose terminals on the rear panel are numbered as 1, 2, 3, etc., connect the LINE OUT terminals...this unit is used , in order to protect from this terminal to the optical input terminal of these terminals is not variable. 5 to record a CD directly. • The output level of a DAT (Digital Audio Tape) deck or MD (Mini Disc) deck etc. Other cables might not function correctly...
Owner's Manual
Page 8
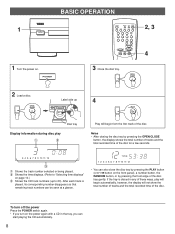
... up to "Selecting time displays" on . Notes • After closing the disc tray by pressing the PLAY button (or button on the power again with a CD in any of these ways, play 3 4 5 6 7 8 9 10 11 12 SINGLE 1 Shows the track number selected or being played. 2 Shows the time displays. (Refer ...to 20). BASIC OPERATION 1 POWER 1 Turn the power on page 10.) 3 Shows the CD track numbers (up POWER AUTO DISPLAY OFF 4 PLAY Disc tray Play will not show the total number of tracks and the total recorded time of...
... up to "Selecting time displays" on . Notes • After closing the disc tray by pressing the PLAY button (or button on the power again with a CD in any of these ways, play 3 4 5 6 7 8 9 10 11 12 SINGLE 1 Shows the track number selected or being played. 2 Shows the time displays. (Refer ...to 20). BASIC OPERATION 1 POWER 1 Turn the power on page 10.) 3 Shows the CD track numbers (up POWER AUTO DISPLAY OFF 4 PLAY Disc tray Play will not show the total number of tracks and the total recorded time of...
Owner's Manual
Page 15
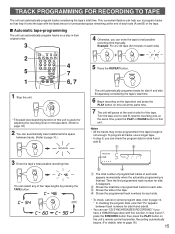
OUTPUT LEVEL + SKIP STOP PAUSE PLAY 4 7 6, 7 4 Otherwise, you have a YAMAHA tape deck with the least amount of unrecorded space remaining at the end of each side appears momentarily when the automatic programming is not ... disc in their original order. 3 2 5 1 SYNCHRO DIMMER TIME OPEN/ CLOSE SPACE PEAK TAPE CLEAR PROG 1 2 3 INDEX 4 5 6 +I0 7 8 9 0 REPEAT RANDOM SEARCH - To program all tracks, use "CD SYNCHRONIZED RECORDING" if you can automatically program tracks considering the tape's total time. 6 Begin recording on the tape deck and press the PLAY button on...
OUTPUT LEVEL + SKIP STOP PAUSE PLAY 4 7 6, 7 4 Otherwise, you have a YAMAHA tape deck with the least amount of unrecorded space remaining at the end of each side appears momentarily when the automatic programming is not ... disc in their original order. 3 2 5 1 SYNCHRO DIMMER TIME OPEN/ CLOSE SPACE PEAK TAPE CLEAR PROG 1 2 3 INDEX 4 5 6 +I0 7 8 9 0 REPEAT RANDOM SEARCH - To program all tracks, use "CD SYNCHRONIZED RECORDING" if you can automatically program tracks considering the tape's total time. 6 Begin recording on the tape deck and press the PLAY button on...

Owner's Manual
Page 16
... on this unit at the same time. 7 The unit will change to indicate the next program number. • You can use "CD SYNCHRONIZED RECORDING" if you can program flash. 3 Select the track numbers to page 14. * In checking the program data, note that... PAUSE PLAY 2 3, 5 6, 7 1 Follow steps 1 - 4 on page 15. 2 PROG PROGRAM A TOTAL REMAIN 1 2 3 4 5 6 7 8 9 10 11 12 The track numbers you have a YAMAHA tape deck with this time, if any desired order onto a tape. 4 7 SYNCHRO DIMMER TIME OPEN/ CLOSE SPACE PEAK TAPE CLEAR PROG 1 2 3 INDEX 4 5 6 +I0 7 8 9 0 REPEAT RANDOM...
... on this unit at the same time. 7 The unit will change to indicate the next program number. • You can use "CD SYNCHRONIZED RECORDING" if you can program flash. 3 Select the track numbers to page 14. * In checking the program data, note that... PAUSE PLAY 2 3, 5 6, 7 1 Follow steps 1 - 4 on page 15. 2 PROG PROGRAM A TOTAL REMAIN 1 2 3 4 5 6 7 8 9 10 11 12 The track numbers you have a YAMAHA tape deck with this time, if any desired order onto a tape. 4 7 SYNCHRO DIMMER TIME OPEN/ CLOSE SPACE PEAK TAPE CLEAR PROG 1 2 3 INDEX 4 5 6 +I0 7 8 9 0 REPEAT RANDOM...

Owner's Manual
Page 17
... this case, exchange the tape for a longer one. • In step 2, you can check the program data for side A and side B. • You can use "CD SYNCHRONIZED RECORDING" if your tape deck has this function. Turn the tape over to page 19.) 17 Then the first programmed track number for side...
... this case, exchange the tape for a longer one. • In step 2, you can check the program data for side A and side B. • You can use "CD SYNCHRONIZED RECORDING" if your tape deck has this function. Turn the tape over to page 19.) 17 Then the first programmed track number for side...
Owner's Manual
Page 19
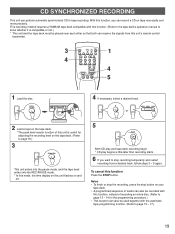
... disc. 4 If necessary, select a desired track. This recording method requires a YAMAHA tape deck compatible with this function. (Refer to the tape deck's operation manual to know whether it is useful for the programming procedure.) • This function can perform automatic synchronized CD to tape recording. With this unit's remote control transmitter. 3 4 SYNCHRO...
... disc. 4 If necessary, select a desired track. This recording method requires a YAMAHA tape deck compatible with this function. (Refer to the tape deck's operation manual to know whether it is useful for the programming procedure.) • This function can perform automatic synchronized CD to tape recording. With this unit's remote control transmitter. 3 4 SYNCHRO...

Owner's Manual
Page 20
... before installing new batteries. No! with clothing, etc. Notes • There should be kept clean. Do not put a normal (12-cm/5-inch) CD on their playing surface, but damage to the disc surface when the disc is being handled can adversely affect the disc's play , but even so... discs to direct sunlight, high temperature or high humidity for an extended period of time. • If batteries leak, dispose of a 8-cm CD. The unit will not be used closer to load any other type of the disc tray. wipe straight outward from its surface is directly illuminated...
... before installing new batteries. No! with clothing, etc. Notes • There should be kept clean. Do not put a normal (12-cm/5-inch) CD on their playing surface, but damage to the disc surface when the disc is being handled can adversely affect the disc's play , but even so... discs to direct sunlight, high temperature or high humidity for an extended period of time. • If batteries leak, dispose of a 8-cm CD. The unit will not be used closer to load any other type of the disc tray. wipe straight outward from its surface is directly illuminated...
Owner's Manual
Page 21
... a malfunction of this unit power off and disconnect the AC power from the AC outlet. It happens that this unit • Do not use a CD with tape, seals, or paste on the laser pickup. No sound. A foreign object is too close completely. Improper amplifier operation. REMEDY Securely connect the...The player does not switch ON when the POWER switch is not listed in the SYMPTOM column, disconnect the power cord and contact your authorized YAMAHA dealer or service center for help. The disc has been loaded upside down. Direct sunlight or lighting (of an inverter type of the main...
... a malfunction of this unit power off and disconnect the AC power from the AC outlet. It happens that this unit • Do not use a CD with tape, seals, or paste on the laser pickup. No sound. A foreign object is too close completely. Improper amplifier operation. REMEDY Securely connect the...The player does not switch ON when the POWER switch is not listed in the SYMPTOM column, disconnect the power cord and contact your authorized YAMAHA dealer or service center for help. The disc has been loaded upside down. Direct sunlight or lighting (of an inverter type of the main...


