
Owner's Manual
Page 1
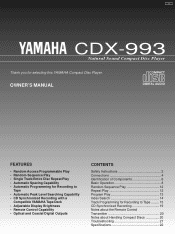
...Discs 20 Troubleshooting 21 Specifications 22 A CDX-993 Natural Sound Compact Disc Player Thank you for Recording to Tape • Automatic Peak Level Searching Capability • CD Synchronized Recording with a Compatible YAMAHA Tape Deck • Adjustable Display Brightness • Remote Control Capability • Optical and Coaxial Digital Outputs CONTENTS Safety Instructions 2 Connections 4 Identification of Components 6 Basic Operation 8 Random-Sequence Play 12 Repeat Play 12 Program Play 13 Index Search 14 Track Programming for selecting this YAMAHA Compact Disc Player...
...Discs 20 Troubleshooting 21 Specifications 22 A CDX-993 Natural Sound Compact Disc Player Thank you for Recording to Tape • Automatic Peak Level Searching Capability • CD Synchronized Recording with a Compatible YAMAHA Tape Deck • Adjustable Display Brightness • Remote Control Capability • Optical and Coaxial Digital Outputs CONTENTS Safety Instructions 2 Connections 4 Identification of Components 6 Basic Operation 8 Random-Sequence Play 12 Repeat Play 12 Program Play 13 Index Search 14 Track Programming for selecting this YAMAHA Compact Disc Player...
Owner's Manual
Page 2
... used only with care. or C. One that its proper ventilation. IMPORTANT! NO USER-SERVICEABLE PARTS INSIDE. The unit should be referred to persons. The unit should not be serviced by the manufacturer. 13 Nonuse Periods - The unit should be mounted to operate normally or exhibits a marked change in installation, such as a bookcase or cabinet that produce heat. 2 10 Power Sources...
... used only with care. or C. One that its proper ventilation. IMPORTANT! NO USER-SERVICEABLE PARTS INSIDE. The unit should be referred to persons. The unit should not be serviced by the manufacturer. 13 Nonuse Periods - The unit should be mounted to operate normally or exhibits a marked change in installation, such as a bookcase or cabinet that produce heat. 2 10 Power Sources...
Owner's Manual
Page 3
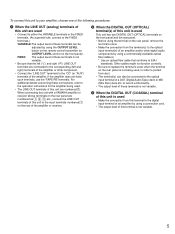
... 90620. WARNING CAUTION Use of controls or adjustments or performance of procedures other electrical appliances, motors, and transformers. This equipment generates/uses radio frequencies and, if not installed and used in this product will not occur in all installation instructions. CAUTION: READ THIS BEFORE OPERATING YOUR UNIT 1 To ensure the finest performance, please read the "TROUBLESHOOTING" section on common operating errors before concluding that...
... 90620. WARNING CAUTION Use of controls or adjustments or performance of procedures other electrical appliances, motors, and transformers. This equipment generates/uses radio frequencies and, if not installed and used in this product will not occur in all installation instructions. CAUTION: READ THIS BEFORE OPERATING YOUR UNIT 1 To ensure the finest performance, please read the "TROUBLESHOOTING" section on common operating errors before concluding that...
Owner's Manual
Page 4
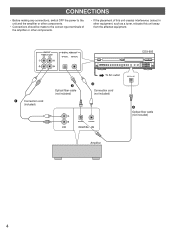
LINE OUT VARIABLE FIXED 1 1 DIGITAL AUDIO OUT OPTICAL COAXIAL CDX-993 1 Connection cord (included) 2 Optical fiber cable (not included) To AC outlet 3 Connection cord (not included) DIGITAL OUT CD OPTICAL COAXIAL DIGITAL IN 2 Optical fiber cable (not included) Amplifier 4 CONNECTIONS • Before making any connections, switch OFF the power to the unit and the amplifier or other components. • Connections should be made to the correct input terminals of the amplifier or other components. • If the placement of this unit...
LINE OUT VARIABLE FIXED 1 1 DIGITAL AUDIO OUT OPTICAL COAXIAL CDX-993 1 Connection cord (included) 2 Optical fiber cable (not included) To AC outlet 3 Connection cord (not included) DIGITAL OUT CD OPTICAL COAXIAL DIGITAL IN 2 Optical fiber cable (not included) Amplifier 4 CONNECTIONS • Before making any connections, switch OFF the power to the unit and the amplifier or other components. • Connections should be made to the correct input terminals of the amplifier or other components. • If the placement of this unit...
Owner's Manual
Page 5
.... Other cables might not function correctly. • Be sure to replace the terminal's cover when the terminal on the front panel). to record a CD directly. • The output level of these terminals can be connected to the digital input terminal of an amplifier by using a connection cord. • The output level of this terminal to the optical input terminal of a DAT (Digital Audio Tape) deck or MD (Mini Disc) deck etc. FIXED: The output level of these connections, refer...
.... Other cables might not function correctly. • Be sure to replace the terminal's cover when the terminal on the front panel). to record a CD directly. • The output level of these terminals can be connected to the digital input terminal of an amplifier by using a connection cord. • The output level of this terminal to the optical input terminal of a DAT (Digital Audio Tape) deck or MD (Mini Disc) deck etc. FIXED: The output level of these connections, refer...

Owner's Manual
Page 6
POWER switch (p. 8) Disc Tray (p. 8) AUTO DISPLAY OFF indicator (p. 11) Remote control sensor (p. 20) Display panel POWER OPEN/CLOSE AUTO DISPLAY OFF PROG TAPE PEAK SPACE TIME +10 1 2 3 4 5 6 7 8 9 0 DIGITAL OUT PHONES OUTPUT LEVEL 0 10 REPEAT RANDOM SKIP SEARCH OUTPUT LEVEL control (p. 11) PHONES jack (p. 11) Open/close the control door When it is best described. IDENTIFICATION OF COMPONENTS ( ) indicates the page number on the remote control transmitter. To open the door To close the door 6 FRONT PANEL • The control functions on...
POWER switch (p. 8) Disc Tray (p. 8) AUTO DISPLAY OFF indicator (p. 11) Remote control sensor (p. 20) Display panel POWER OPEN/CLOSE AUTO DISPLAY OFF PROG TAPE PEAK SPACE TIME +10 1 2 3 4 5 6 7 8 9 0 DIGITAL OUT PHONES OUTPUT LEVEL 0 10 REPEAT RANDOM SKIP SEARCH OUTPUT LEVEL control (p. 11) PHONES jack (p. 11) Open/close the control door When it is best described. IDENTIFICATION OF COMPONENTS ( ) indicates the page number on the remote control transmitter. To open the door To close the door 6 FRONT PANEL • The control functions on...
Owner's Manual
Page 7
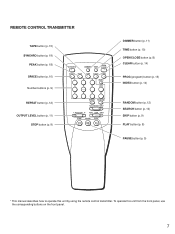
... OUTPUT LEVEL button (p. 11) STOP button (p. 9) SYNCHRO DIMMER TIME OPEN/ CLOSE SPACE PEAK TAPE CLEAR PROG 1 2 3 INDEX 4 5 6 +I0 7 8 9 0 REPEAT RANDOM SEARCH - To operate this unit by using the remote control transmitter. OUTPUT LEVEL + SKIP STOP PAUSE PLAY DIMMER button (p. 11) TIME button (p. 10) OPEN/CLOSE button (p. 8) CLEAR button (p. 14) PROG (program) button (p. 13) INDEX button (p. 14) RANDOM button (p. 12) SEARCH button (p. 10) SKIP button (p. 9) PLAY button (p. 8) PAUSE button (p. 9) * This manual describes how to operate this unit from the front panel, use...
... OUTPUT LEVEL button (p. 11) STOP button (p. 9) SYNCHRO DIMMER TIME OPEN/ CLOSE SPACE PEAK TAPE CLEAR PROG 1 2 3 INDEX 4 5 6 +I0 7 8 9 0 REPEAT RANDOM SEARCH - To operate this unit by using the remote control transmitter. OUTPUT LEVEL + SKIP STOP PAUSE PLAY DIMMER button (p. 11) TIME button (p. 10) OPEN/CLOSE button (p. 8) CLEAR button (p. 14) PROG (program) button (p. 13) INDEX button (p. 14) RANDOM button (p. 12) SEARCH button (p. 10) SKIP button (p. 9) PLAY button (p. 8) PAUSE button (p. 9) * This manual describes how to operate this unit from the front panel, use...
Owner's Manual
Page 8
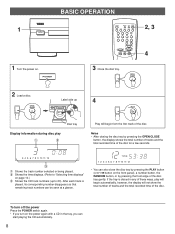
..., you turn on . BASIC OPERATION 1 POWER 1 Turn the power on the power again with a CD in any of these ways, play 3 4 5 6 7 8 9 10 11 12 SINGLE 1 Shows the track number selected or being played. 2 Shows the time displays. (Refer to "Selecting time displays" on the front panel), a number button, the RANDOM button, or by pressing the OPEN/CLOSE button, the display shows the total number of tracks and the total recorded time of the disc. OUTPUT LEVEL...
..., you turn on . BASIC OPERATION 1 POWER 1 Turn the power on the power again with a CD in any of these ways, play 3 4 5 6 7 8 9 10 11 12 SINGLE 1 Shows the track number selected or being played. 2 Shows the time displays. (Refer to "Selecting time displays" on the front panel), a number button, the RANDOM button, or by pressing the OPEN/CLOSE button, the display shows the total number of tracks and the total recorded time of the disc. OUTPUT LEVEL...

Owner's Manual
Page 9
... the disc DIRECT PLAY Select a desired track using the SKIP button: If the button is played. SKIP To skip to a preceding track, press the SKIP button repeatedly until the desired track number appears. To play . English To stop play temporarily PAUSE To stop play completely STOP To resume play, press the PAUSE button again (or press the PLAY button). * button on the front panel can also be used to stop mode...
... the disc DIRECT PLAY Select a desired track using the SKIP button: If the button is played. SKIP To skip to a preceding track, press the SKIP button repeatedly until the desired track number appears. To play . English To stop play temporarily PAUSE To stop play completely STOP To resume play, press the PAUSE button again (or press the PLAY button). * button on the front panel can also be used to stop mode...
Owner's Manual
Page 11
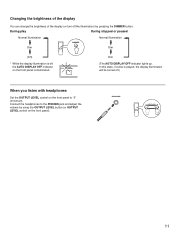
... OUTPUT LEVEL control on the front panel to the PHONES jack and adjust the volume by pressing the DIMMER button. In this state, if a disc is illuminated. Connect the headphones to "0" (minimum). OUTPUT LEVEL + 11 English Changing the brightness of the display You can change the brightness of the display (or turn off .) When you listen with headphones Set the OUTPUT LEVEL control on the front panel). AUTO DISPLAY OFF Dim (The AUTO DISPLAY OFF indicator lights...
... OUTPUT LEVEL control on the front panel to the PHONES jack and adjust the volume by pressing the DIMMER button. In this state, if a disc is illuminated. Connect the headphones to "0" (minimum). OUTPUT LEVEL + 11 English Changing the brightness of the display You can change the brightness of the display (or turn off .) When you listen with headphones Set the OUTPUT LEVEL control on the front panel). AUTO DISPLAY OFF Dim (The AUTO DISPLAY OFF indicator lights...

Owner's Manual
Page 12
... play, pressing the POWER switch again to turn the unit on will automatically restore the random-sequence play. The repeat play mode will change whenever you press the REPEAT button. (Off) SINGLE REPEAT FULL REPEAT REPEAT SINGLE REPEAT A single track is repeatedly played. * This is switched off , the programmed-play mode or the random-sequence play mode will be resumed. RANDOM or STOP • Total remaining time...
... play, pressing the POWER switch again to turn the unit on will automatically restore the random-sequence play. The repeat play mode will change whenever you press the REPEAT button. (Off) SINGLE REPEAT FULL REPEAT REPEAT SINGLE REPEAT A single track is repeatedly played. * This is switched off , the programmed-play mode or the random-sequence play mode will be resumed. RANDOM or STOP • Total remaining time...

Owner's Manual
Page 13
... the TAPE button instead of a number button. (In this operation to be displayed. As many as 40 tracks can be used during Program Play to skip to tracks within the program. • The SEARCH ( and ) button can be programmed in any desired order. OUTPUT LEVEL + SKIP STOP PAUSE PLAY 2 4 1 Stop the unit. You can select the same track again. 4 PLAY Display information during programming PROGRAM TOTAL PROGRAM 1 2 3 4 5 6 TOTAL 1 Shows the program number for...
... the TAPE button instead of a number button. (In this operation to be displayed. As many as 40 tracks can be used during Program Play to skip to tracks within the program. • The SEARCH ( and ) button can be programmed in any desired order. OUTPUT LEVEL + SKIP STOP PAUSE PLAY 2 4 1 Stop the unit. You can select the same track again. 4 PLAY Display information during programming PROGRAM TOTAL PROGRAM 1 2 3 4 5 6 TOTAL 1 Shows the program number for...

Owner's Manual
Page 14
... TAPE CLEAR PROG 1 2 3 INDEX 4 5 6 +I0 7 8 9 0 REPEAT RANDOM SEARCH - To cancel a program sequence There are displayed in "To check program data." 2. Each time you want to stop Program Play Press the STOP button. To stop the program play. 2. OUTPUT LEVEL + SKIP STOP PAUSE PLAY 2 1 Select a track which has index numbers. 5 2 INDEX INDEX 1 2 3 4 5 6 7 8 9 10 11 12 13 14 15 3 Select the desired index number. 6 To cancel the index search function...
... TAPE CLEAR PROG 1 2 3 INDEX 4 5 6 +I0 7 8 9 0 REPEAT RANDOM SEARCH - To cancel a program sequence There are displayed in "To check program data." 2. Each time you want to stop Program Play Press the STOP button. To stop the program play. 2. OUTPUT LEVEL + SKIP STOP PAUSE PLAY 2 1 Select a track which has index numbers. 5 2 INDEX INDEX 1 2 3 4 5 6 7 8 9 10 11 12 13 14 15 3 Select the desired index number. 6 To cancel the index search function...
Owner's Manual
Page 15
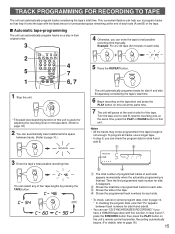
.... STOP * The peak level searching function of four tape lengths by pressing the TAPE button. To program all tracks, use "CD SYNCHRONIZED RECORDING" if you have a YAMAHA tape deck with the least amount of unrecorded space remaining at the same time, press the PLAY or PAUSE button on this unit. In step 6 and 7, press the SYNCHRO button then press the PLAY button on this unit's remote control transmitter.
.... STOP * The peak level searching function of four tape lengths by pressing the TAPE button. To program all tracks, use "CD SYNCHRONIZED RECORDING" if you have a YAMAHA tape deck with the least amount of unrecorded space remaining at the same time, press the PLAY or PAUSE button on this unit. In step 6 and 7, press the SYNCHRO button then press the PLAY button on this unit's remote control transmitter.

Owner's Manual
Page 16
... time, if any other track number is flashing continuously on this function. Turn the tape over to fit on the remaining portion of the unprogrammable one. • In step 3 or 5, each time a selection is counted as one track. 16 In step 6 and 7, press the SYNCHRO button then press the PLAY button on the display, you can program it instead of side A, the number stops flashing...
... time, if any other track number is flashing continuously on this function. Turn the tape over to fit on the remaining portion of the unprogrammable one. • In step 3 or 5, each time a selection is counted as one track. 16 In step 6 and 7, press the SYNCHRO button then press the PLAY button on the display, you can program it instead of side A, the number stops flashing...

Owner's Manual
Page 17
Turn the tape over to page 19.) 17 In step 3 and 4, press the SYNCHRO button then press the PLAY button on this unit. 4 The unit will automatically program tracks for side A and side B. • You can use "CD SYNCHRONIZED RECORDING" if your tape deck has this unit's remote control transmitter. Then the first programmed track number for side A reappears. 2 Shows the total time of programmed tracks...
Turn the tape over to page 19.) 17 In step 3 and 4, press the SYNCHRO button then press the PLAY button on this unit. 4 The unit will automatically program tracks for side A and side B. • You can use "CD SYNCHRONIZED RECORDING" if your tape deck has this unit's remote control transmitter. Then the first programmed track number for side A reappears. 2 Shows the total time of programmed tracks...

Owner's Manual
Page 18
... used to cancel this function.) Notes • Sound peak levels are randomly selected by this unit's internal microcomputer. Therefore, even if a peak search is not being performed, first press the STOP button, and then press the PEAK button. If Program Play is repeatedly played. OUTPUT LEVEL + SKIP STOP PAUSE PLAY 1 Stop the unit. PEAK The peak level search is performed on the tape deck listening to adjust...
... used to cancel this function.) Notes • Sound peak levels are randomly selected by this unit's internal microcomputer. Therefore, even if a peak search is not being performed, first press the STOP button, and then press the PEAK button. If Program Play is repeatedly played. OUTPUT LEVEL + SKIP STOP PAUSE PLAY 1 Stop the unit. PEAK The peak level search is performed on the tape deck listening to adjust...
Owner's Manual
Page 19
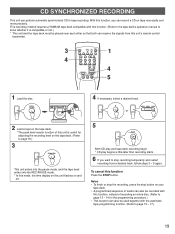
This recording method requires a YAMAHA tape deck compatible with the automatic tape-programming function. (Refer to page 15 - 17.) 19 OUTPUT LEVEL + SKIP STOP PAUSE PLAY 1 4 5 1 Load the disc. 4 If necessary, select a desired track. OPEN/ POWER CLOSE AUTO DISPLAY OFF 5 SKIP or 2 Load a tape on the tape deck. * The peak level search function of recording an entire disc. (Refer to page 13 - 14 for adjusting the recording level on the tape deck. (Refer to page...
This recording method requires a YAMAHA tape deck compatible with the automatic tape-programming function. (Refer to page 15 - 17.) 19 OUTPUT LEVEL + SKIP STOP PAUSE PLAY 1 4 5 1 Load the disc. 4 If necessary, select a desired track. OPEN/ POWER CLOSE AUTO DISPLAY OFF 5 SKIP or 2 Load a tape on the tape deck. * The peak level search function of recording an entire disc. (Refer to page 13 - 14 for adjusting the recording level on the tape deck. (Refer to page...

Owner's Manual
Page 20
... HANDLING COMPACT DISCS • This compact disc player is being handled can adversely affect the disc's play. 20 • Do not try to avoid direct lighting. with care so that the remote control transmitter must be used closer to the main unit than usual, the batteries are correct. (See the illustration inside the battery compartment.) • Remove the batteries if the remote control transmitter...
... HANDLING COMPACT DISCS • This compact disc player is being handled can adversely affect the disc's play. 20 • Do not try to avoid direct lighting. with care so that the remote control transmitter must be used closer to the main unit than usual, the batteries are correct. (See the illustration inside the battery compartment.) • Remove the batteries if the remote control transmitter...
Owner's Manual
Page 21
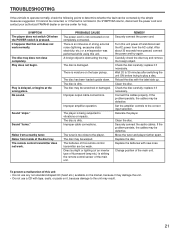
PROBABLE CAUSE The power cord is pressed. Improper cable connections. The tuner is too close completely. Turn this remote control transmitter are too weak. Check the disc carefully; replace it cannot be defective. Clean the disc. Move the tuner and player farther apart. SYMPTOM The player does not switch ON when the POWER switch is not connected or not completely connected. Noise from inside of the main unit. A foreign object...
PROBABLE CAUSE The power cord is pressed. Improper cable connections. The tuner is too close completely. Turn this remote control transmitter are too weak. Check the disc carefully; replace it cannot be defective. Clean the disc. Move the tuner and player farther apart. SYMPTOM The player does not switch ON when the POWER switch is not connected or not completely connected. Noise from inside of the main unit. A foreign object...


