

Owner's Manual
Page 2
...The STANDBY/ON switch does not disconnect the complete apparatus from the objective lens surface on the Optical Pickup Block. AVVERTENZA L'apparecchio rimane sotto tensione anche quando viene spento tramite l'interruttore STANDBY/ON. MODEL IMPORTANT: The wire in the mains lead are not suitable for strå... pin plug fitted. Proceed as follows: the wire which is coloured BLUE must be connected to the terminal which is coloured BROWN must be destroyed, as a plug with bared flexible cord is marked with the letter L or coloured RED. Alleen voor klanten in deze compact-disc speler ...
...The STANDBY/ON switch does not disconnect the complete apparatus from the objective lens surface on the Optical Pickup Block. AVVERTENZA L'apparecchio rimane sotto tensione anche quando viene spento tramite l'interruttore STANDBY/ON. MODEL IMPORTANT: The wire in the mains lead are not suitable for strå... pin plug fitted. Proceed as follows: the wire which is coloured BLUE must be connected to the terminal which is coloured BROWN must be destroyed, as a plug with bared flexible cord is marked with the letter L or coloured RED. Alleen voor klanten in deze compact-disc speler ...
Owner's Manual
Page 3
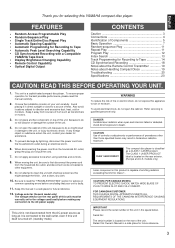
... to clean the unit with a Compatible YAMAHA Tape Deck • Display Brightness Changing Capability • Remote Control Capability • Optical Digital Output CONTENTS Caution 3 Connections 4 Identification of this unit, because to the AC power supply. Voltage selector (General model only) The voltage selector (on the rear of procedures other equipment. 9. Use a clean, dry cloth. 10. CAUTION Use of controls or adjustments or performance of the unit. FOR CANADIAN...
... to clean the unit with a Compatible YAMAHA Tape Deck • Display Brightness Changing Capability • Remote Control Capability • Optical Digital Output CONTENTS Caution 3 Connections 4 Identification of this unit, because to the AC power supply. Voltage selector (General model only) The voltage selector (on the rear of procedures other equipment. 9. Use a clean, dry cloth. 10. CAUTION Use of controls or adjustments or performance of the unit. FOR CANADIAN...

Owner's Manual
Page 4
... record CD onto tape or MD directly. to your amplifier. When the LINE OUT (analog) terminals of this unit are used . • The LINE OUT terminals of this unit are numbered 1. model Connection cord (included) 1 Amplifier or receiver CD To AC outlet 2 LINE OUT 1 DIGITAL OUT OPTICAL U.S.A. For additional details concerning these connections, refer to the operation instructions for the amplifier being used ( 2 ) • Before using this terminal, remove...
... record CD onto tape or MD directly. to your amplifier. When the LINE OUT (analog) terminals of this unit are used . • The LINE OUT terminals of this unit are numbered 1. model Connection cord (included) 1 Amplifier or receiver CD To AC outlet 2 LINE OUT 1 DIGITAL OUT OPTICAL U.S.A. For additional details concerning these connections, refer to the operation instructions for the amplifier being used ( 2 ) • Before using this terminal, remove...

Owner's Manual
Page 5
...the SKIP button and the SEARCH button on the remote control transmitter. * The PLAY/PAUSE button on the main unit has both the functions of the PLAY button and the PAUSE button on which the control part is best described. Disc tray (p. 7) Display panel NATURAL SOUND COMPACT DISC PLAYER CDX-9 STANDBY/ON STOP PLAY/ PAUSE Remote control sensor (p. 19) STANDBY/ON switch (p. 7) OPEN/CLOSE button (p. 7) SKIP/SEARCH buttons (p. 8, 9) STOP button (p. 8) PLAY/PAUSE button (p. 7, 8) 5 English IDENTIFICATION OF COMPONENTS * ( ) indicates the page number on the remote control transmitter...
...the SKIP button and the SEARCH button on the remote control transmitter. * The PLAY/PAUSE button on the main unit has both the functions of the PLAY button and the PAUSE button on which the control part is best described. Disc tray (p. 7) Display panel NATURAL SOUND COMPACT DISC PLAYER CDX-9 STANDBY/ON STOP PLAY/ PAUSE Remote control sensor (p. 19) STANDBY/ON switch (p. 7) OPEN/CLOSE button (p. 7) SKIP/SEARCH buttons (p. 8, 9) STOP button (p. 8) PLAY/PAUSE button (p. 7, 8) 5 English IDENTIFICATION OF COMPONENTS * ( ) indicates the page number on the remote control transmitter...
Owner's Manual
Page 6
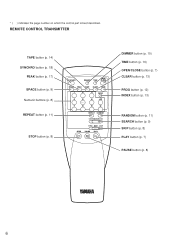
REMOTE CONTROL TRANSMITTER TAPE button (p. 14) SYNCHRO button (p. 18) PEAK button (p. 17) SPACE button (p. 9) Numeric buttons (p. 8) REPEAT button (p. 11) STOP button (p. 8) SYNCHRO DIMMER TIME OPEN/ CLOSE SPACE PEAK TAPE CLEAR PROG 1 2 3 INDEX 4 5 6 +I0 7 8 9 0 REPEAT RANDOM SEARCH SKIP STOP PAUSE PLAY DIMMER button (p. 10) TIME button (p. 10) OPEN/CLOSE button (p. 7) CLEAR button (p. 13) PROG button (p. 12) INDEX button (p. 13) RANDOM button (p. 11) SEARCH button (p. 9) SKIP button (p. 8) PLAY button (p. 7) PAUSE button (p. 8) 6 * ( ) indicates the page number on which...
REMOTE CONTROL TRANSMITTER TAPE button (p. 14) SYNCHRO button (p. 18) PEAK button (p. 17) SPACE button (p. 9) Numeric buttons (p. 8) REPEAT button (p. 11) STOP button (p. 8) SYNCHRO DIMMER TIME OPEN/ CLOSE SPACE PEAK TAPE CLEAR PROG 1 2 3 INDEX 4 5 6 +I0 7 8 9 0 REPEAT RANDOM SEARCH SKIP STOP PAUSE PLAY DIMMER button (p. 10) TIME button (p. 10) OPEN/CLOSE button (p. 7) CLEAR button (p. 13) PROG button (p. 12) INDEX button (p. 13) RANDOM button (p. 11) SEARCH button (p. 9) SKIP button (p. 8) PLAY button (p. 7) PAUSE button (p. 8) 6 * ( ) indicates the page number on which...
Owner's Manual
Page 7
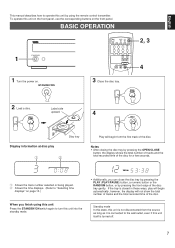
... recorded time of the disc for a few seconds. 1 Shows the track number selected or being played. 2 Shows the time displays. (Refer to "Selecting time displays" on page 10.) TOTAL • Additionally, you finish using the remote control transmitter. English This manual describes how to operate this unit by pressing the front edge of the disc tray gently. OPEN/ CLOSE 2 Load a disc. BASIC OPERATION 1 STANDBY/ON 1 Turn the power on the front panel.
... recorded time of the disc for a few seconds. 1 Shows the track number selected or being played. 2 Shows the time displays. (Refer to "Selecting time displays" on page 10.) TOTAL • Additionally, you finish using the remote control transmitter. English This manual describes how to operate this unit by pressing the front edge of the disc tray gently. OPEN/ CLOSE 2 Load a disc. BASIC OPERATION 1 STANDBY/ON 1 Turn the power on the front panel.

Owner's Manual
Page 8
... PLAY button). * The PLAY/PAUSE button on the front panel: Be careful not to press and hold a button, otherwise the selected track is played forward (or backward) rapidly. Caution When the disc tray is continuously changed to higher numbers (or lower numbers). When using the SKIP button on the disc will be played. NATURAL SOUND COMPACT DISC PLAYER STANDBY/ON Gear wheel 8 To play a desired track on the disc DIRECT PLAY Select a desired track using the numeric button. 5 SKIP PLAY...
... PLAY button). * The PLAY/PAUSE button on the front panel: Be careful not to press and hold a button, otherwise the selected track is played forward (or backward) rapidly. Caution When the disc tray is continuously changed to higher numbers (or lower numbers). When using the SKIP button on the disc will be played. NATURAL SOUND COMPACT DISC PLAYER STANDBY/ON Gear wheel 8 To play a desired track on the disc DIRECT PLAY Select a desired track using the numeric button. 5 SKIP PLAY...

Owner's Manual
Page 9
... record a disc onto tape with an insufficient time space between tracks. To reverse rapidly SEARCH (Press and hold .) • The sound can be prevented by pressing the auto-SPACE button to the beginning of the 4 second non-recorded intervals placed between tracks, the tape deck will not be able to perform blank search operations on the front panel: Be careful...
... record a disc onto tape with an insufficient time space between tracks. To reverse rapidly SEARCH (Press and hold .) • The sound can be prevented by pressing the auto-SPACE button to the beginning of the 4 second non-recorded intervals placed between tracks, the tape deck will not be able to perform blank search operations on the front panel: Be careful...

Owner's Manual
Page 10
... disc TIME TOTAL REMAIN Ž Total disc play time TOTAL Note The remaining time will not be displayed if the track number is 25 or higher. Normal illumination DIMMER Slightly dim Dim 10 Changing brightness of the display If desired, you can select any of the four time displays by pressing the TIME display mode-select button. Œ Elapsed time of the track now playing Remaining time of the display...
... disc TIME TOTAL REMAIN Ž Total disc play time TOTAL Note The remaining time will not be displayed if the track number is 25 or higher. Normal illumination DIMMER Slightly dim Dim 10 Changing brightness of the display If desired, you can select any of the four time displays by pressing the TIME display mode-select button. Œ Elapsed time of the track now playing Remaining time of the display...

Owner's Manual
Page 11
... is switched off, the programmedplay mode or the random-sequence play will be displayed during random-sequence play mode, all programmed tracks are repeatedly played in a random sequence selected by pressing the REPEAT button. The repeat play mode will change whenever you press the REPEAT button. (OFF) SINGLE REPEAT FULL REPEAT REPEAT SINGLE REPEAT A single track is repeatedly played. * This is also available in the programmed-play mode...
... is switched off, the programmedplay mode or the random-sequence play will be displayed during random-sequence play mode, all programmed tracks are repeatedly played in a random sequence selected by pressing the REPEAT button. The repeat play mode will change whenever you press the REPEAT button. (OFF) SINGLE REPEAT FULL REPEAT REPEAT SINGLE REPEAT A single track is repeatedly played. * This is also available in the programmed-play mode...

Owner's Manual
Page 12
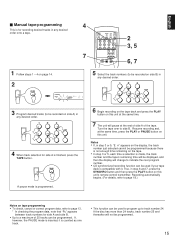
... the display, press the TIME display mode-select button. • If, during programming, the TIME display mode-select button is programmed, the total time will disappear from the display. To return to the previous display, press the TIME display mode-select button once again. • The SKIP ( and ) button can be used during playing, but only within the range of the programmed tracks. • The SEARCH ( and ) button can be used during programming PROGRAM TOTAL PROGRAM 1 2 3 TOTAL 1 Shows the program number for a compact disc with...
... the display, press the TIME display mode-select button. • If, during programming, the TIME display mode-select button is programmed, the total time will disappear from the display. To return to the previous display, press the TIME display mode-select button once again. • The SKIP ( and ) button can be used during playing, but only within the range of the programmed tracks. • The SEARCH ( and ) button can be used during programming PROGRAM TOTAL PROGRAM 1 2 3 TOTAL 1 Shows the program number for a compact disc with...

Owner's Manual
Page 13
... no encoded index points, play Press the STOP button. After the correction has been completed, once again press the PROG button or the PLAY button. Notes • Not all discs have index numbers. English To stop program play will be displayed. The index system is a method for sub-dividing tracks into the standby mode. Press a numeric button to select a track to replace the one after another...
... no encoded index points, play Press the STOP button. After the correction has been completed, once again press the PROG button or the PLAY button. Notes • Not all discs have index numbers. English To stop program play will be displayed. The index system is a method for sub-dividing tracks into the standby mode. Press a numeric button to select a track to replace the one after another...
Owner's Manual
Page 14
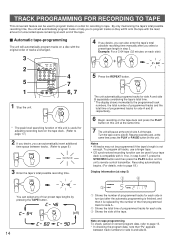
... the TAPE button. STOP 4 If you desire, you select a preset tape length in turn just after you can select any of the tape. REPEAT The unit automatically programs tracks for side A and side B separately considering the tape's total time. * The display shows momentarily the programmed track numbers, the total number of programmed tracks and the total time of programmed tracks for side A and B respectively. * The peak level searching function of...
... the TAPE button. STOP 4 If you desire, you select a preset tape length in turn just after you can select any of the tape. REPEAT The unit automatically programs tracks for side A and side B separately considering the tape's total time. * The display shows momentarily the programmed track numbers, the total number of programmed tracks and the total time of programmed tracks for side A and B respectively. * The peak level searching function of...
Owner's Manual
Page 15
... number just selected cannot be programmed. 15 Resume recording and, at the end of side A of 25 tracks can be used to program up to track number 24. If, however, the PAUSE mode is made, the track number and the tape's remaining time will be displayed, and then the display will not be programmed because there is not enough time remaining on this unit's remote control...
... number just selected cannot be programmed. 15 Resume recording and, at the end of side A of 25 tracks can be used to program up to track number 24. If, however, the PAUSE mode is made, the track number and the tape's remaining time will be displayed, and then the display will not be programmed because there is not enough time remaining on this unit's remote control...

Owner's Manual
Page 16
... the PLAY button on this unit's remote control transmitter. Resume recording and, at step 2) 3 PROGRAM A 1 2 TOTAL 1 Shows the number of programmed tracks for each side in turn just after the automatic programming is finished, and then it is replaced by the number of the first programmed track for side A. 2 Shows the total time of programmed tracks for side A and B respectively. 3 Begin recording on the tape deck...
... the PLAY button on this unit's remote control transmitter. Resume recording and, at step 2) 3 PROGRAM A 1 2 TOTAL 1 Shows the number of programmed tracks for each side in turn just after the automatic programming is finished, and then it is replaced by the number of the first programmed track for side A. 2 Shows the total time of programmed tracks for side A and B respectively. 3 Begin recording on the tape deck...
Owner's Manual
Page 17
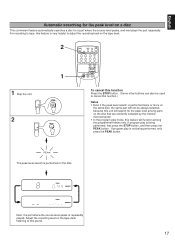
... disc. If program play is being performed, only press the PEAK button. If program play is performed twice or more on the same disc, the same part will not be always selected, because this unit will search for a part where the source level peaks, and next plays the part repeatedly. For recording to tape, this feature is very helpful to adjust the recording level on the tape deck. 2 1 SYNCHRO DIMMER TIME...
... disc. If program play is being performed, only press the PEAK button. If program play is performed twice or more on the same disc, the same part will not be always selected, because this unit will search for a part where the source level peaks, and next plays the part repeatedly. For recording to tape, this feature is very helpful to adjust the recording level on the tape deck. 2 1 SYNCHRO DIMMER TIME...
Owner's Manual
Page 18
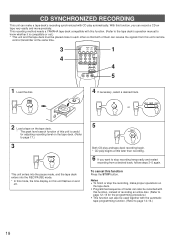
... record a CD on the tape deck. * The peak level search function of this unit is compatible or not.) * This unit and the tape deck must be used together with the automatic tape-programming function. (Refer to page 14-16.) 18 To cancel this function Press the STOP button. This recording method needs a YAMAHA tape deck compatible with this function. (Refer to the tape deck's operation manual to know whether it...
... record a CD on the tape deck. * The peak level search function of this unit is compatible or not.) * This unit and the tape deck must be used together with the automatic tape-programming function. (Refer to page 14-16.) 18 To cancel this function Press the STOP button. This recording method needs a YAMAHA tape deck compatible with this function. (Refer to the tape deck's operation manual to know whether it...
Owner's Manual
Page 19
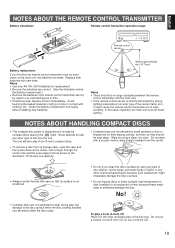
... for a long period of time, because these might cause the remote control transmitter not to wear during play, but even so they should be used closer to avoid direct lighting. wipe straight outward from its surface is not scratched. • Compact discs are not subjected to work correctly. Replace both batteries with care so that the remote control transmitter must be no large...
... for a long period of time, because these might cause the remote control transmitter not to wear during play, but even so they should be used closer to avoid direct lighting. wipe straight outward from its surface is not scratched. • Compact discs are not subjected to work correctly. Replace both batteries with care so that the remote control transmitter must be no large...

Owner's Manual
Page 20
... operate normally, check the following points to the correct input selection. If it cannot be corrected by the simple measures suggested. SYMPTOM The player does not switch ON when the STANDBY/ON switch is not listed in the SYMPTOM column, disconnect the power cord and contact your authorized YAMAHA dealer or service center for help. It happens that all specifications are too weak. The disc...
... operate normally, check the following points to the correct input selection. If it cannot be corrected by the simple measures suggested. SYMPTOM The player does not switch ON when the STANDBY/ON switch is not listed in the SYMPTOM column, disconnect the power cord and contact your authorized YAMAHA dealer or service center for help. It happens that all specifications are too weak. The disc...


