
Owner's Manual
Page 1
... USER-SERVICEABLE PARTS INSIDE, REFER SERVICING TO QUALIFIED SERVICE PERSONNEL. • Explanation of Graphical Symbols The lightning flash with a Compatible YAMAHA Tape Disk Display Brightness Changing Capability Remote Control Capability Thank you to Tape 15 CD Synchronized Recording ...... 19 Notes about the Remote Control Transmitter 20 Notes about Handling Compact Discs 20 Troubleshooting 21 Specifications 21 IMPORTANT! CDX-880/580/480 Natural Sound Compact Disc Player Random Access Programmable Play Random-Sequence Play Single Track/Entire Disc Repeat Play Automatic...
... USER-SERVICEABLE PARTS INSIDE, REFER SERVICING TO QUALIFIED SERVICE PERSONNEL. • Explanation of Graphical Symbols The lightning flash with a Compatible YAMAHA Tape Disk Display Brightness Changing Capability Remote Control Capability Thank you to Tape 15 CD Synchronized Recording ...... 19 Notes about the Remote Control Transmitter 20 Notes about Handling Compact Discs 20 Troubleshooting 21 Specifications 21 IMPORTANT! CDX-880/580/480 Natural Sound Compact Disc Player Random Access Programmable Play Random-Sequence Play Single Track/Entire Disc Repeat Play Automatic...
Owner's Manual
Page 2
... connected to a power supply only of this Owner's Manual in a wet basement, or near water - All operating and other servicing should not be situated away from the unit. 12 Cleaning - for US customers only) YAMAHA and the Electronic Industries Association's Consumer Electronics Group want you to the presence of Graphical Symbols The lightning flash with care. The power-supply cord...
... connected to a power supply only of this Owner's Manual in a wet basement, or near water - All operating and other servicing should not be situated away from the unit. 12 Cleaning - for US customers only) YAMAHA and the Electronic Industries Association's Consumer Electronics Group want you to the presence of Graphical Symbols The lightning flash with care. The power-supply cord...
Owner's Manual
Page 3
... the surface of optical instrument with chemical solvents; Compliance with other electronic devices. Utilize power outlets that is 300 ohm ribbon lead, change the lead-in FCC Regulations, Part 15 for US customers only) 1. Use a clean, dry cloth. 7 Be sure to use force on switches, knobs or cords. WARNING CAUTION Use of controls or adjustments or performance of product. Avoid direct exposure to...
... the surface of optical instrument with chemical solvents; Compliance with other electronic devices. Utilize power outlets that is 300 ohm ribbon lead, change the lead-in FCC Regulations, Part 15 for US customers only) 1. Use a clean, dry cloth. 7 Be sure to use force on switches, knobs or cords. WARNING CAUTION Use of controls or adjustments or performance of product. Avoid direct exposure to...
Owner's Manual
Page 4
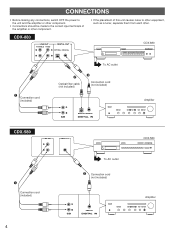
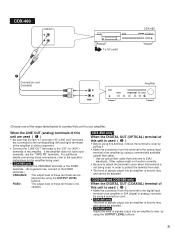
... connections, switch OFF the power to the unit and the amplifier or other component. • Connections should be made to the correct input terminals of the amplifier or other component. • If the placement of this unit causes noise to other equipment, such as a tuner, separate them from each other. CDX-880 LINE OUT VARIABLE FIXED DIGITAL OUT OPTICAL COAXIAL CDX-880 – Connection cord (included) To AC outlet — Optical...
... connections, switch OFF the power to the unit and the amplifier or other component. • Connections should be made to the correct input terminals of the amplifier or other component. • If the placement of this unit causes noise to other equipment, such as a tuner, separate them from each other. CDX-880 LINE OUT VARIABLE FIXED DIGITAL OUT OPTICAL COAXIAL CDX-880 – Connection cord (included) To AC outlet — Optical...
Owner's Manual
Page 5
... terminal's cover by using a connection cord. • CDX-880 only The level of the ways listed below to connect this terminal to the digital input terminal of an amplifier or D/A (digital-to-analog) converter by pulling it. • Make the connection from dust. • The level of signals output into an amplifier is fixed to the "CD" (or "AUX") terminals of these terminals can be adjusted by using the OUTPUT LEVEL buttons. When the...
... terminal's cover by using a connection cord. • CDX-880 only The level of the ways listed below to connect this terminal to the digital input terminal of an amplifier or D/A (digital-to-analog) converter by pulling it. • Make the connection from dust. • The level of signals output into an amplifier is fixed to the "CD" (or "AUX") terminals of these terminals can be adjusted by using the OUTPUT LEVEL buttons. When the...
Owner's Manual
Page 6
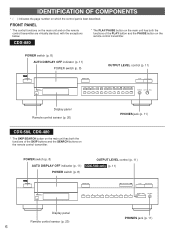
... 9 0 OUTPUT LEVEL DOWN UP PHONES Display panel Remote control sensor (p. 20) 6 PHONES jack (p. 11) CDX-880 POWER switch (p. 8) AUTO DISPLAY OFF indicator (p. 11) POWER switch (p. 8) OUTPUT LEVEL control (p. 11) POWER AUTO DISPLAY OFF OPEN/CLOSE STOP PLAY/PAUSE PROG TAPE PEAK SPACE INDEX REPEAT RANDOM SKIP +10 1 2 3 4 5 6 7 8 SEARCH 9 0 TIME PHONES OUTPUT LEVEL Display panel Remote control sensor (p. 20) CDX-580, CDX-480 * The SKIP/SEARCH button on the main unit has both the functions of the SKIP buttons and the SEARCH buttons on which the control part is best...
... 9 0 OUTPUT LEVEL DOWN UP PHONES Display panel Remote control sensor (p. 20) 6 PHONES jack (p. 11) CDX-880 POWER switch (p. 8) AUTO DISPLAY OFF indicator (p. 11) POWER switch (p. 8) OUTPUT LEVEL control (p. 11) POWER AUTO DISPLAY OFF OPEN/CLOSE STOP PLAY/PAUSE PROG TAPE PEAK SPACE INDEX REPEAT RANDOM SKIP +10 1 2 3 4 5 6 7 8 SEARCH 9 0 TIME PHONES OUTPUT LEVEL Display panel Remote control sensor (p. 20) CDX-580, CDX-480 * The SKIP/SEARCH button on the main unit has both the functions of the SKIP buttons and the SEARCH buttons on which the control part is best...
Owner's Manual
Page 8
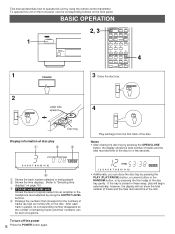
...; Ž SINGLE 3 4 5 6 7 8 9 10 11 12 Œ Shows the track number selected or being played. Shows the time displays. (Refer to "Selecting time displays" on page 10.) Ž CDX-580 and CDX-480 only Shows the level of signals output into an amplifier or the headphone level adjusted by pressing the front edge of the disc for a few seconds. TOTAL 1 2 3 4 5 6 7 8 9 10 11 12 • Additionally, you...
...; Ž SINGLE 3 4 5 6 7 8 9 10 11 12 Œ Shows the track number selected or being played. Shows the time displays. (Refer to "Selecting time displays" on page 10.) Ž CDX-580 and CDX-480 only Shows the level of signals output into an amplifier or the headphone level adjusted by pressing the front edge of the disc for a few seconds. TOTAL 1 2 3 4 5 6 7 8 9 10 11 12 • Additionally, you...
Owner's Manual
Page 9
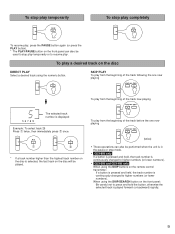
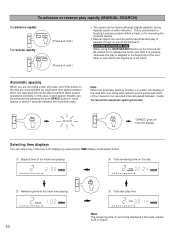
... panel: Be careful not to press and hold the button, otherwise the selected track is continuously changed to higher numbers (or lower numbers). • CDX-580 and CDX-480 only When using the SKIP/SEARCH button on the remote control transmitter: If a button is pressed and held, the track number is played forward (or backward) rapidly. 9 To stop play temporarily PAUSE To stop mode. • CDX-880 only If a button...
... panel: Be careful not to press and hold the button, otherwise the selected track is continuously changed to higher numbers (or lower numbers). • CDX-580 and CDX-480 only When using the SKIP/SEARCH button on the remote control transmitter: If a button is pressed and held, the track number is played forward (or backward) rapidly. 9 To stop play temporarily PAUSE To stop mode. • CDX-880 only If a button...
Owner's Manual
Page 10
... 11 12 TIME Remaining time of about 4 seconds between tracks. Selecting time displays You can also be performed while disc play is convenient for locating a precise position within a track, or for reviewing the contents quickly. • Manual search can select any of the four time displays by pressing the auto-SPACE button to insert spaces of the track now playing Ž Total disc play is skipped...
... 11 12 TIME Remaining time of about 4 seconds between tracks. Selecting time displays You can also be performed while disc play is convenient for locating a precise position within a track, or for reviewing the contents quickly. • Manual search can select any of the four time displays by pressing the auto-SPACE button to insert spaces of the track now playing Ž Total disc play is skipped...
Owner's Manual
Page 11
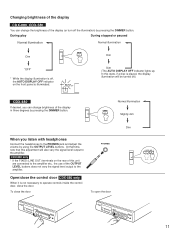
.... AUTO DISPLAY OFF Dim (The AUTO DISPLAY OFF indicator lights up. CDX-880 only * If the FIXED (LINE OUT) terminals on the front panel is played, the display illumination will also vary the signal level output to the amplifier. Open/close the door PHONES To open the door Dim - In this adjustment will be turned off the illumination) by using the OUTPUT LEVEL buttons. At that time, note that this state, if a disc...
.... AUTO DISPLAY OFF Dim (The AUTO DISPLAY OFF indicator lights up. CDX-880 only * If the FIXED (LINE OUT) terminals on the front panel is played, the display illumination will also vary the signal level output to the amplifier. Open/close the door PHONES To open the door Dim - In this adjustment will be turned off the illumination) by using the OUTPUT LEVEL buttons. At that time, note that this state, if a disc...

Owner's Manual
Page 12
...-sequence play mode is functioning, when the POWER is switched on again, the unit will begin the random-sequence play automatically. (This feature is available for timer play.) • If the SKIP button is pressed during random-sequence play, the next randomly programmed track will not be displayed during programmed play. • If the POWER is mixing up tracks. • Total remaining time on a disc in...
...-sequence play mode is functioning, when the POWER is switched on again, the unit will begin the random-sequence play automatically. (This feature is available for timer play.) • If the SKIP button is pressed during random-sequence play, the next randomly programmed track will not be displayed during programmed play. • If the POWER is mixing up tracks. • Total remaining time on a disc in...

Owner's Manual
Page 13
... range of the programmed tracks. • The SEARCH ( and ) button can be used during playing to search through all tracks, including unprogrammed tracks. • The PAUSE mode can also be programmed (one time only), if so desired, by pressing the TAPE button instead of a numeric button. (In this operation to program more , track number 25 or higher is programmed, the total time will not be displayed. STOP 3 Select...
... range of the programmed tracks. • The SEARCH ( and ) button can be used during playing to search through all tracks, including unprogrammed tracks. • The PAUSE mode can also be programmed (one time only), if so desired, by pressing the TAPE button instead of a numeric button. (In this operation to program more , track number 25 or higher is programmed, the total time will not be displayed. STOP 3 Select...

Owner's Manual
Page 14
... INDEX number display is stopped. • Open the disc tray. • Switch off the power. Each time the SKIP button is a method for sub-dividing tracks into smaller divisions (such as described below. • Press the STOP button or the CLEAR button while the unit is illuminated. 14 Press the PROG button. 3. To check programmed data 1. INDEX SEARCH If the disc includes index numbers, play...
... INDEX number display is stopped. • Open the disc tray. • Switch off the power. Each time the SKIP button is a method for sub-dividing tracks into smaller divisions (such as described below. • Press the STOP button or the CLEAR button while the unit is illuminated. 14 Press the PROG button. 3. To check programmed data 1. INDEX SEARCH If the disc includes index numbers, play...
Owner's Manual
Page 15
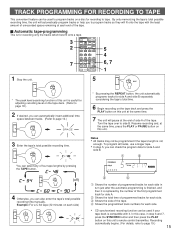
... the SYNCHRO button and then press the PLAY button on this unit is useful for recording to tape. TAPE (off) 4 Otherwise, you can automatically insert additional time space between tracks. (Refer to program tracks on a disc for adjusting recording level on this case, in turn just after the automatic programming is finished, and then it . OUTPUT LEVEL + SYNCHRO 5 4 6, 7 1 1 Stop the unit. Turn the tape over to page...
... the SYNCHRO button and then press the PLAY button on this unit is useful for recording to tape. TAPE (off) 4 Otherwise, you can automatically insert additional time space between tracks. (Refer to program tracks on a disc for adjusting recording level on this case, in turn just after the automatic programming is finished, and then it . OUTPUT LEVEL + SYNCHRO 5 4 6, 7 1 1 Stop the unit. Turn the tape over to page...
Owner's Manual
Page 16
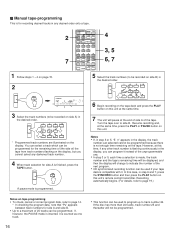
... the TAPE button. Ⅲ Manual tape-programming This is for recording desired tracks in step 6 and 7, press the SYNCHRO button and then press the PLAY button on this unit's remote control transmitter. You can select a track which can be programmed for the remaining time of (the side of 25 tracks can be displayed, and then the display will not be programmed. If, however, the PAUSE mode is programmed...
... the TAPE button. Ⅲ Manual tape-programming This is for recording desired tracks in step 6 and 7, press the SYNCHRO button and then press the PLAY button on this unit's remote control transmitter. You can select a track which can be programmed for the remaining time of (the side of 25 tracks can be displayed, and then the display will not be programmed. If, however, the PAUSE mode is programmed...

Owner's Manual
Page 17
... automatic programming is finished, and then it is replaced by the number of the first programmed track for side A. Shows the total time of programmed tracks for each side. Ž Shows the side of the tape. Shows the programmed track numbers for each side in step 3 and 4, press the SYNCHRO button and then press the PLAY button on this unit's remote control...
... automatic programming is finished, and then it is replaced by the number of the first programmed track for side A. Shows the total time of programmed tracks for each side. Ž Shows the side of the tape. Shows the programmed track numbers for each side in step 3 and 4, press the SYNCHRO button and then press the PLAY button on this unit's remote control...

Owner's Manual
Page 18
Adjust the recording level on the tape deck listening to this feature is very helpful to adjust the recording level on the tape deck. OUTPUT LEVEL + SYNCHRO 2 1 1 Stop the unit. OPEN/CLOSE DIMMER TIME PROG TAPE CLEAR PEAK SPACE S/F RANDOM REPEAT 1 2 3 +10 4 5 6 7 8 9 0 SKIP PAUSE PLAY SEARCH INDEX STOP - If program play mode, this feature will search for the part on a disc where the source level peaks, and next plays the part repeatedly. For recording...
Adjust the recording level on the tape deck listening to this feature is very helpful to adjust the recording level on the tape deck. OUTPUT LEVEL + SYNCHRO 2 1 1 Stop the unit. OPEN/CLOSE DIMMER TIME PROG TAPE CLEAR PEAK SPACE S/F RANDOM REPEAT 1 2 3 +10 4 5 6 7 8 9 0 SKIP PAUSE PLAY SEARCH INDEX STOP - If program play mode, this feature will search for the part on a disc where the source level peaks, and next plays the part repeatedly. For recording...
Owner's Manual
Page 19
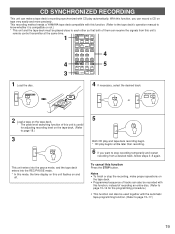
This recording method needs a YAMAHA tape deck compatible with this function. (Refer to the tape deck's operation manual to know whether it is useful for the programming procedure.) • This function can also be placed close to each other so that both of this function Press the STOP button. OUTPUT LEVEL + SYNCHRO 1 Load the disc. 4 If necessary, select the desired track. Notes • To finish or stop recording...
This recording method needs a YAMAHA tape deck compatible with this function. (Refer to the tape deck's operation manual to know whether it is useful for the programming procedure.) • This function can also be placed close to each other so that both of this function Press the STOP button. OUTPUT LEVEL + SYNCHRO 1 Load the disc. 4 If necessary, select the desired track. Notes • To finish or stop recording...

Owner's Manual
Page 20
... the remote control transmitter will not be used closer to the disc surface when the disc is directly illuminated by strong lighting (especially an inverter type of fluorescent lamp etc.), it might cause the remote control transmitter not to load any other type of disc into the unit. with clothing, etc. NOTES ABOUT THE REMOTE CONTROL TRANSMITTER Battery installation 1 Remote control transmitter operation range 3 Remote control sensor 2 Battery replacement If...
... the remote control transmitter will not be used closer to the disc surface when the disc is directly illuminated by strong lighting (especially an inverter type of fluorescent lamp etc.), it might cause the remote control transmitter not to load any other type of disc into the unit. with clothing, etc. NOTES ABOUT THE REMOTE CONTROL TRANSMITTER Battery installation 1 Remote control transmitter operation range 3 Remote control sensor 2 Battery replacement If...
Owner's Manual
Page 21
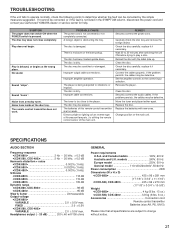
... amplifier controls to play a disc. Replace the batteries with the label side up. If the problem persists, the cables may be defective. SPECIFICATIONS AUDIO SECTION Frequency response SYMPTOM The player does not switch ON when the POWER switch is obstructing the tray. The disc is dirty. The disc is damaged. Move the tuner and player farther apart. If the problem persists, the cables may be defective. REMEDY Securely connect the power cord. The remote control...
... amplifier controls to play a disc. Replace the batteries with the label side up. If the problem persists, the cables may be defective. SPECIFICATIONS AUDIO SECTION Frequency response SYMPTOM The player does not switch ON when the POWER switch is obstructing the tray. The disc is dirty. The disc is damaged. Move the tuner and player farther apart. If the problem persists, the cables may be defective. REMEDY Securely connect the power cord. The remote control...


