

Owner's Manual
Page 2
... be used only with its proper ventilation. REFER SERVICING TO QUALIFIED SERVICE PERSONNEL. IMPORTANT Please record the serial number of the unit should be situated away from the unit. 12 Cleaning - The power cord of this Owner's Manual in the operating instructions should be...that may impede the flow of time. 14 Object and Liquid Entry - or B. The unit should be retained for future reference. • Explanation of important operating and maintenance (servicing) instructions in a builtin installation, such as recommended by qualified service personnel when:...
... be used only with its proper ventilation. REFER SERVICING TO QUALIFIED SERVICE PERSONNEL. IMPORTANT Please record the serial number of the unit should be situated away from the unit. 12 Cleaning - The power cord of this Owner's Manual in the operating instructions should be...that may impede the flow of time. 14 Object and Liquid Entry - or B. The unit should be retained for future reference. • Explanation of important operating and maintenance (servicing) instructions in a builtin installation, such as recommended by qualified service personnel when:...

Owner's Manual
Page 3
... with other electronic devices. Utilize power outlets that is being affected by playing it is 300 ohm ribbon lead, change the lead-in the USA. 3. If you to coaxial type cable. This equipment generates/uses radio frequencies and, if not installed and used . Since hearing damage from loud sounds is often undetectable until it at a safe level. Follow all installations. Compliance with these corrective...
... with other electronic devices. Utilize power outlets that is being affected by playing it is 300 ohm ribbon lead, change the lead-in the USA. 3. If you to coaxial type cable. This equipment generates/uses radio frequencies and, if not installed and used . Since hearing damage from loud sounds is often undetectable until it at a safe level. Follow all installations. Compliance with these corrective...

Owner's Manual
Page 4
... THE REMOTE CONTROL 4 CONNECTIONS 5 IDENTIFICATION OF COMPONENTS 6 BASIC OPERATION 8 To pause play 9 To stop play 9 To turn off the power 9 To play directly from the desired track 9 To skip to the beginning of the desired track (SKIP SEARCH 10 To advance or reverse play rapidly (MANUAL SEARCH 10 Other useful functions 11 RANDOM-SEQUENCE PLAY ......... 13 REPEAT PLAY 13 PROGRAM PLAY 14 INDEX SEARCH 15 TRACK PROGRAMMING FOR RECORDING TO TAPE...
... THE REMOTE CONTROL 4 CONNECTIONS 5 IDENTIFICATION OF COMPONENTS 6 BASIC OPERATION 8 To pause play 9 To stop play 9 To turn off the power 9 To play directly from the desired track 9 To skip to the beginning of the desired track (SKIP SEARCH 10 To advance or reverse play rapidly (MANUAL SEARCH 10 Other useful functions 11 RANDOM-SEQUENCE PLAY ......... 13 REPEAT PLAY 13 PROGRAM PLAY 14 INDEX SEARCH 15 TRACK PROGRAMMING FOR RECORDING TO TAPE...

Owner's Manual
Page 5
... cord. ● Do not plug the AC power plug to the wall outlet before concluding that which is specified is harmful to the eyes, do not attempt to be used in hazardous radiation exposure. CAUTION Use of controls or adjustments or performance of time (i.e., vacation, etc.), disconnect the AC power plug from use this unit for ventilation at the top, on this compact disc player...
... cord. ● Do not plug the AC power plug to the wall outlet before concluding that which is specified is harmful to the eyes, do not attempt to be used in hazardous radiation exposure. CAUTION Use of controls or adjustments or performance of time (i.e., vacation, etc.), disconnect the AC power plug from use this unit for ventilation at the top, on this compact disc player...
Owner's Manual
Page 7
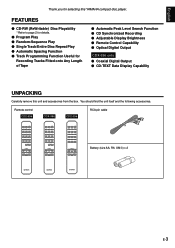
... Peak Level Search Function ⅷ CD Synchronized Recording ⅷ Adjustable Display Brightness ⅷ Remote Control Capability ⅷ Optical Digital Output CDX-596 only ⅷ Coaxial Digital Output ⅷ CD-TEXT Data Display Capability UNPACKING Carefully remove this YAMAHA compact disc player. FEATURES ⅷ CD-RW (ReWritable) Disc Playability * Refer to page 2 for details. ⅷ Program Play ⅷ Random-Sequence Play ⅷ Single Track/Entire Disc Repeat Play ⅷ Automatic Spacing Function ⅷ Track Programming Function Useful for selecting this unit...
... Peak Level Search Function ⅷ CD Synchronized Recording ⅷ Adjustable Display Brightness ⅷ Remote Control Capability ⅷ Optical Digital Output CDX-596 only ⅷ Coaxial Digital Output ⅷ CD-TEXT Data Display Capability UNPACKING Carefully remove this YAMAHA compact disc player. FEATURES ⅷ CD-RW (ReWritable) Disc Playability * Refer to page 2 for details. ⅷ Program Play ⅷ Random-Sequence Play ⅷ Single Track/Entire Disc Repeat Play ⅷ Automatic Spacing Function ⅷ Track Programming Function Useful for selecting this unit...

Owner's Manual
Page 8
... come in the direction of the battery compartment. 3. Notes ● Use only AA, R6, UM-3 batteries for an extended period of time. ● If batteries leak, dispose of them immediately. Replace both batteries with clothing, etc. Clean the battery compartment thoroughly before installing new batteries. E-4 Close the battery compartment cover. 1 3 2 Remote control operation range CDX-596, CDX-496 CDX-396 Remote control sensor Within approximately...
... come in the direction of the battery compartment. 3. Notes ● Use only AA, R6, UM-3 batteries for an extended period of time. ● If batteries leak, dispose of them immediately. Replace both batteries with clothing, etc. Clean the battery compartment thoroughly before installing new batteries. E-4 Close the battery compartment cover. 1 3 2 Remote control operation range CDX-596, CDX-496 CDX-396 Remote control sensor Within approximately...
Owner's Manual
Page 9
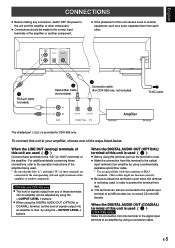
..." (or "AUX") terminals of the amplifier. For additional details concerning these connections, refer to the optical input terminal of the ways listed below. OUTPUT LEVEL + buttons. ● When using the - by using the DIGITAL AUDIO OUT (OPTICAL or COAXIAL) terminal, set the level of signals output into an amplifier can also be connected to the operation instructions of an amplifier by using a connection cable. To connect this terminal is provided for CDX-596 only. Other cables might not function correctly. ●...
..." (or "AUX") terminals of the amplifier. For additional details concerning these connections, refer to the optical input terminal of the ways listed below. OUTPUT LEVEL + buttons. ● When using the - by using the DIGITAL AUDIO OUT (OPTICAL or COAXIAL) terminal, set the level of signals output into an amplifier can also be connected to the operation instructions of an amplifier by using a connection cable. To connect this terminal is provided for CDX-596 only. Other cables might not function correctly. ●...
Owner's Manual
Page 10
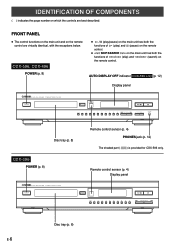
...OFF indicator CDX-596 only (p. 12) Display panel NATURAL SOUND COMPACT DISC PLAYER POWER OPEN/CLOSE AUTO DISPLAY OFF 10 1 2 3 4 5 6 7 8 9 0 SKIP/SEARCH OUTPUT LEVEL PHONES Disc tray (p. 8) CDX-396 POWER (p. 8) Remote control sensor (p. 4) PHONES jack (p. 12) The shaded part ( ) is provided for CDX-596 only. FRONT PANEL ● The control functions on the main unit and on which the controls are virtually identical, with the exceptions below. IDENTIFICATION OF COMPONENTS ( ) indicates the page number on the remote control are best described. CDX-596, CDX-496 POWER...
...OFF indicator CDX-596 only (p. 12) Display panel NATURAL SOUND COMPACT DISC PLAYER POWER OPEN/CLOSE AUTO DISPLAY OFF 10 1 2 3 4 5 6 7 8 9 0 SKIP/SEARCH OUTPUT LEVEL PHONES Disc tray (p. 8) CDX-396 POWER (p. 8) Remote control sensor (p. 4) PHONES jack (p. 12) The shaded part ( ) is provided for CDX-596 only. FRONT PANEL ● The control functions on the main unit and on which the controls are virtually identical, with the exceptions below. IDENTIFICATION OF COMPONENTS ( ) indicates the page number on the remote control are best described. CDX-596, CDX-496 POWER...
Owner's Manual
Page 12
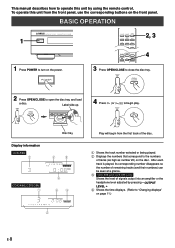
... disc. 1 Shows the track number selected or being played. 2 Displays the numbers that correspond to the numbers of signals output into an amplifier or the headphone level adjusted by using the remote control. OPEN/ CLOSE 2 Press OPEN/CLOSE to close the disc tray. OUTPUT LEVEL +. 4 Shows the time displays. (Refer to turn on page 11.) E-8 To operate this unit by pressing - Disc tray Display information CDX-596 1 2 3 3 4 5 6 7 8 9 10 11 12 CDX-496, CDX-396 1 4 43 2 Play will begin play. BASIC OPERATION 1 NATURAL SOUND COMPACT DISC PLAYER POWER...
... disc. 1 Shows the track number selected or being played. 2 Displays the numbers that correspond to the numbers of signals output into an amplifier or the headphone level adjusted by using the remote control. OPEN/ CLOSE 2 Press OPEN/CLOSE to close the disc tray. OUTPUT LEVEL +. 4 Shows the time displays. (Refer to turn on page 11.) E-8 To operate this unit by pressing - Disc tray Display information CDX-596 1 2 3 3 4 5 6 7 8 9 10 11 12 CDX-496, CDX-396 1 4 43 2 Play will begin play. BASIC OPERATION 1 NATURAL SOUND COMPACT DISC PLAYER POWER...
Owner's Manual
Page 13
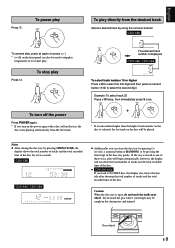
... or to select the second digit. To pause play To play directly from the first track. 5 The selected track number is open, do not touch the inside gear wheel. CDX-596 To resume play . Notes ● After closing tray and injured. If you turn on the power again with a disc still on the front panel can close the disc tray by pressing ( ), a numeric button or RANDOM...
... or to select the second digit. To pause play To play directly from the first track. 5 The selected track number is open, do not touch the inside gear wheel. CDX-596 To resume play . Notes ● After closing tray and injured. If you turn on the power again with a disc still on the front panel can close the disc tray by pressing ( ), a numeric button or RANDOM...

Owner's Manual
Page 16
... you record a disc onto tape with headphones, connect the headphones to perform blank search operations on the front panel lights up. OUTPUT LEVEL +. - To cancel the automatic spacing function Press SPACE. SPACE SPACE SPACE "SPACE" disappears from the display. CDX-496, CDX-396 If desired, you listen with an insufficient time space between tracks, the tape deck will also vary the signal level output to the amplifier by pressing...
... you record a disc onto tape with headphones, connect the headphones to perform blank search operations on the front panel lights up. OUTPUT LEVEL +. - To cancel the automatic spacing function Press SPACE. SPACE SPACE SPACE "SPACE" disappears from the display. CDX-496, CDX-396 If desired, you listen with an insufficient time space between tracks, the tape deck will also vary the signal level output to the amplifier by pressing...

Owner's Manual
Page 17
... remaining time on the disc will not be displayed during random-sequence play. ● CDX-596 and CDX-496 only If the power is switched off during random-sequence play, pressing POWER again to turn on the unit will be played. REPEAT PLAY You can play Press RANDOM. CDX-496, CDX-396 (off , programmed play or random-sequence play will automatically restore FULL REPEAT play , all randomly sequenced tracks are played repeatedly...
... remaining time on the disc will not be displayed during random-sequence play. ● CDX-596 and CDX-496 only If the power is switched off during random-sequence play, pressing POWER again to turn on the unit will be played. REPEAT PLAY You can play Press RANDOM. CDX-496, CDX-396 (off , programmed play or random-sequence play will automatically restore FULL REPEAT play , all randomly sequenced tracks are played repeatedly...

Owner's Manual
Page 18
..., during playing to search all tracks, including unprogrammed tracks. Repeat this operation to program more , the first digit will not be programmed next. 2 Shows the selected track number. 3 Shows only the numbers of programmed tracks. 4 Shows the total time of the programmed tracks. Display information during programming CDX-596 1 PROGRAM 6 2 PROGRAM 3 6 CDX-496, CDX-396 PROGRAM TOTAL 4 1 2 4 PROGRAM TOTAL E-14 3 1 Shows the program number for the track to be displayed. You can select the same...
..., during playing to search all tracks, including unprogrammed tracks. Repeat this operation to program more , the first digit will not be programmed next. 2 Shows the selected track number. 3 Shows only the numbers of programmed tracks. 4 Shows the total time of the programmed tracks. Display information during programming CDX-596 1 PROGRAM 6 2 PROGRAM 3 6 CDX-496, CDX-396 PROGRAM TOTAL 4 1 2 4 PROGRAM TOTAL E-14 3 1 Shows the program number for the track to be displayed. You can select the same...

Owner's Manual
Page 19
... program play , press . Follow the procedure described in the disc case usually tell that is illuminated. 3 Press a numeric button to complete the correction. INDEX CDX-596 11 12 5 6 7 8 9 10 CDX-496, CDX-396 INDEX To cancel the index search function Press INDEX. The liner notes contained in "To check program data". 2. To check program data 1. Press PROG. 3. In addition, among those parts...
... program play , press . Follow the procedure described in the disc case usually tell that is illuminated. 3 Press a numeric button to complete the correction. INDEX CDX-596 11 12 5 6 7 8 9 10 CDX-496, CDX-396 INDEX To cancel the index search function Press INDEX. The liner notes contained in "To check program data". 2. To check program data 1. Press PROG. 3. In addition, among those parts...
Owner's Manual
Page 20
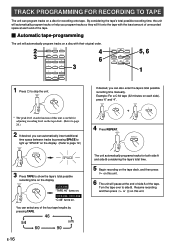
CDX-496, CDX-396 "C-46" turns on . TRACK PROGRAMMING FOR RECORDING TO TAPE The unit can program tracks on a disc for adjusting recording level on the tape deck. (Refer to page 20.) 2 If desired, you can also enter the tape's total possible recording time manually. By considering the tape's total time. 5 Begin recording on the tape deck, and then press on a disc with the least amount of unrecorded space at...
CDX-496, CDX-396 "C-46" turns on . TRACK PROGRAMMING FOR RECORDING TO TAPE The unit can program tracks on a disc for adjusting recording level on the tape deck. (Refer to page 20.) 2 If desired, you can also enter the tape's total possible recording time manually. By considering the tape's total time. 5 Begin recording on the tape deck, and then press on a disc with the least amount of unrecorded space at...
Owner's Manual
Page 22
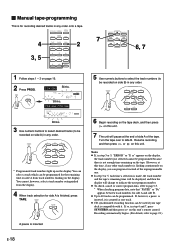
... so, in step 3 or 5, "ERROR" or "E rr" appears on this unit's remote control. Ⅵ Manual tape-programming This is for side A is finished, press TAPE. OPEN/ SYNCHRO DIMMER CLOSE SPACE TEXT/ TIME PEAK 4 TAPE CLEAR PROG 2 1 2 3 3, 5 4 5 6 7 8 9 0 +I0 INDEX REPEAT RANDOM 7 6, 7 1 Follow steps 1 - 3 on this unit. PROG CDX-596 PROGRAM Blinks. 1 2 3 4 5 6 7 8 9 10 A 11 12 Blinks. CDX-496, CDX-396 PROGRAM A TOTAL REMAIN Blinks. 3 Use numeric buttons to select desired tracks (to 40...
... so, in step 3 or 5, "ERROR" or "E rr" appears on this unit's remote control. Ⅵ Manual tape-programming This is for side A is finished, press TAPE. OPEN/ SYNCHRO DIMMER CLOSE SPACE TEXT/ TIME PEAK 4 TAPE CLEAR PROG 2 1 2 3 3, 5 4 5 6 7 8 9 0 +I0 INDEX REPEAT RANDOM 7 6, 7 1 Follow steps 1 - 3 on this unit. PROG CDX-596 PROGRAM Blinks. 1 2 3 4 5 6 7 8 9 10 A 11 12 Blinks. CDX-496, CDX-396 PROGRAM A TOTAL REMAIN Blinks. 3 Use numeric buttons to select desired tracks (to 40...
Owner's Manual
Page 23
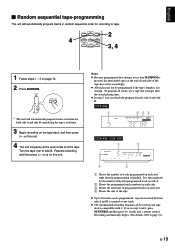
... RANDOM. To program all tracks, use a tape that is finished. CDX-596 1 23 4 PROGRAM 2468 A 12 CDX-496, CDX-396 1 3 PROGRAM A TOTAL 4 2 1 Shows the number of the tape also varies accordingly. ● All tracks may not be programmed. Turn the tape over to page 21.) E-19 Resume recording, and then press or on each side right after the programming is longer than the actual playing time. ●...
... RANDOM. To program all tracks, use a tape that is finished. CDX-596 1 23 4 PROGRAM 2468 A 12 CDX-496, CDX-396 1 3 PROGRAM A TOTAL 4 2 1 Shows the number of the tape also varies accordingly. ● All tracks may not be programmed. Turn the tape over to page 21.) E-19 Resume recording, and then press or on each side right after the programming is longer than the actual playing time. ●...

Owner's Manual
Page 24
Adjust the recording level on the disc. CDX-596 REPEAT 11 12 8 9 10 REPEAT 11 12 8 9 10 CDX-496, CDX-396 PEAK REPEAT PEAK REPEAT E-20 If program play is being performed, only press PEAK. "PEAK" lights up on the display, and the peak level search is performed on the tape deck listening to this sound. Next, the part where the source level peaks is repeatedly played. It takes a few...
Adjust the recording level on the disc. CDX-596 REPEAT 11 12 8 9 10 REPEAT 11 12 8 9 10 CDX-496, CDX-396 PEAK REPEAT PEAK REPEAT E-20 If program play is being performed, only press PEAK. "PEAK" lights up on the display, and the peak level search is performed on the tape deck listening to this sound. Next, the part where the source level peaks is repeatedly played. It takes a few...

Owner's Manual
Page 25
.../PAUSE mode. * In this state, the time display on this function instead of recording an entire disc. (Refer to pages 14-15 for adjusting recording level on the tape deck. (Refer to open the disc tray, and load a disc. To cancel synchronized CD-tape recording function Press . OPEN/ CLOSE 4 Press . 2 Load a tape on the tape deck. (For details, please refer to the owner's manual of the tape deck.) ● Programmed sequence...
.../PAUSE mode. * In this state, the time display on this function instead of recording an entire disc. (Refer to pages 14-15 for adjusting recording level on the tape deck. (Refer to open the disc tray, and load a disc. To cancel synchronized CD-tape recording function Press . OPEN/ CLOSE 4 Press . 2 Load a tape on the tape deck. (For details, please refer to the owner's manual of the tape deck.) ● Programmed sequence...
Owner's Manual
Page 26
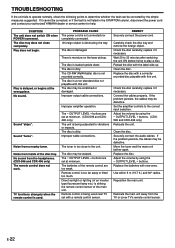
... audio cables. Play does not begin. Carefully check the disc tray and remove the foreign object. Set the amplifier controls to play a disc. Reposition the main unit. SYMPTOM The unit does not switch ON when POWER is damaged. The disc is pressed. The disc is being subjected to vibrations or impacts. OUTPUT LEVEL + buttons are too weak. The tuner is obstructing the tray. The - REMEDY Securely connect the power cord. Adjust...
... audio cables. Play does not begin. Carefully check the disc tray and remove the foreign object. Set the amplifier controls to play a disc. Reposition the main unit. SYMPTOM The unit does not switch ON when POWER is damaged. The disc is pressed. The disc is being subjected to vibrations or impacts. OUTPUT LEVEL + buttons are too weak. The tuner is obstructing the tray. The - REMEDY Securely connect the power cord. Adjust...


