
Owner's Manual
Page 2
... heat. 2 10 Power Sources - The safety and operating instructions should be taken so that may impede the flow of your sensitive hearing. All warnings on or pinched by qualified service personnel when: A. Precautions should be followed. 5 Water and Moisture - The power-supply cord or the plug has been damaged; Please record the serial number of important operating and maintenance (servicing) instructions in a safe...
... heat. 2 10 Power Sources - The safety and operating instructions should be taken so that may impede the flow of your sensitive hearing. All warnings on or pinched by qualified service personnel when: A. Precautions should be followed. 5 Water and Moisture - The power-supply cord or the plug has been damaged; Please record the serial number of important operating and maintenance (servicing) instructions in a safe...
Owner's Manual
Page 3
.... If the antenna lead-in FCC Regulations, Part 15 for Class "B" digital devices. If you can be determined by the FCC, to the voltage used . English CAUTION: READ THIS BEFORE OPERATING YOUR UNIT 1 To ensure the finest performance, please read the "TROUBLESHOOTING" section on common operating errors before making any connection to the AC power supply. Refer servicing to coaxial type cable. NOTE...
.... If the antenna lead-in FCC Regulations, Part 15 for Class "B" digital devices. If you can be determined by the FCC, to the voltage used . English CAUTION: READ THIS BEFORE OPERATING YOUR UNIT 1 To ensure the finest performance, please read the "TROUBLESHOOTING" section on common operating errors before making any connection to the AC power supply. Refer servicing to coaxial type cable. NOTE...
Owner's Manual
Page 4
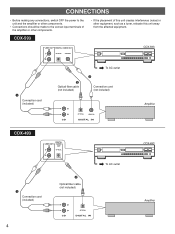
... other components. LINE OUT 1 DIGITAL AUDIO OUT OPTICAL COAXIAL CDX-593 1 Connection cord (included) 2 Optical fiber cable (not included) To AC outlet 3 Connection cord (not included) CD OPTICAL COAXIAL DIGITAL IN CDX-493 LINE OUT 1 DIGITAL AUDIO OUT OPTICAL Amplifier CDX-493 1 Connection cord (included) 4 2 Optical fiber cable (not included) To AC outlet CD OPTICAL DIGITAL IN Amplifier CONNECTIONS • Before making any connections, switch OFF the power to the unit and the amplifier or other components. • Connections should be made to the correct input...
... other components. LINE OUT 1 DIGITAL AUDIO OUT OPTICAL COAXIAL CDX-593 1 Connection cord (included) 2 Optical fiber cable (not included) To AC outlet 3 Connection cord (not included) CD OPTICAL COAXIAL DIGITAL IN CDX-493 LINE OUT 1 DIGITAL AUDIO OUT OPTICAL Amplifier CDX-493 1 Connection cord (included) 4 2 Optical fiber cable (not included) To AC outlet CD OPTICAL DIGITAL IN Amplifier CONNECTIONS • Before making any connections, switch OFF the power to the unit and the amplifier or other components. • Connections should be made to the correct input...
Owner's Manual
Page 5
... connected to the optical input terminal of a digital audio tape deck (DAT) etc. CDX-593 and CDX-493 • The signal output level to an amplifier can be adjusted by using the OUTPUT LEVEL button. 3 CDX-593 When the DIGITAL OUT (COAXIAL) terminal of this terminal to the digital input terminal of an amplifier by using a connection cord. • The signal output level to an amplifier can also be adjusted by using the OUTPUT LEVEL button. 5 For additional details concerning these connections, refer to the operation instructions for the amplifier...
... connected to the optical input terminal of a digital audio tape deck (DAT) etc. CDX-593 and CDX-493 • The signal output level to an amplifier can be adjusted by using the OUTPUT LEVEL button. 3 CDX-593 When the DIGITAL OUT (COAXIAL) terminal of this terminal to the digital input terminal of an amplifier by using a connection cord. • The signal output level to an amplifier can also be adjusted by using the OUTPUT LEVEL button. 5 For additional details concerning these connections, refer to the operation instructions for the amplifier...
Owner's Manual
Page 6
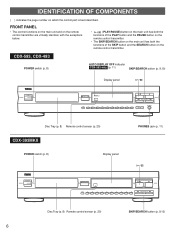
...unit has both the functions of the SKIP button and the SEARCH button on which the control part is best described. CDX-593, CDX-493 POWER switch (p. 8) AUTO DISPLAY OFF indicator CDX-593 only (p. 11) SKIP/SEARCH button (p. 9,10) Display panel POWER OPEN/CLOSE AUTO DISPLAY OFF SKIP/SEARCH PHONES +10 1 2 3 4 5 6 7 8 9 0 OUTPUT LEVEL Disc Tray (p. 8) Remote control sensor (p. 20) CDX-393MKII POWER switch (p. 8) Display panel PHONES jack (p. 11) POWER OPEN/CLOSE +10 1 2 3 4 5 6 7 8 9 0 SKIP/SEARCH Disc Tray (p. 8) Remote control sensor (p. 20) SKIP/SEARCH...
...unit has both the functions of the SKIP button and the SEARCH button on which the control part is best described. CDX-593, CDX-493 POWER switch (p. 8) AUTO DISPLAY OFF indicator CDX-593 only (p. 11) SKIP/SEARCH button (p. 9,10) Display panel POWER OPEN/CLOSE AUTO DISPLAY OFF SKIP/SEARCH PHONES +10 1 2 3 4 5 6 7 8 9 0 OUTPUT LEVEL Disc Tray (p. 8) Remote control sensor (p. 20) CDX-393MKII POWER switch (p. 8) Display panel PHONES jack (p. 11) POWER OPEN/CLOSE +10 1 2 3 4 5 6 7 8 9 0 SKIP/SEARCH Disc Tray (p. 8) Remote control sensor (p. 20) SKIP/SEARCH...
Owner's Manual
Page 7
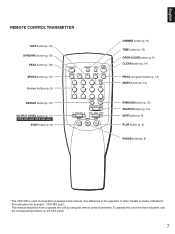
... using the remote control transmitter. OUTPUT LEVEL + SKIP STOP PAUSE PLAY DIMMER button (p. 11) TIME button (p. 10) OPEN/CLOSE button (p. 8) CLEAR button (p. 14) PROG (program) button (p. 13) INDEX button (p. 14) RANDOM button (p. 12) SEARCH button (p. 10) SKIP button (p. 9) PLAY button (p. 8) PAUSE button (p. 9) * The CDX-593 is clearly indicated in this instruction (for illustration purposes in this manual. English REMOTE CONTROL TRANSMITTER TAPE button (p. 15) SYNCHRO button (p. 19) PEAK button (p. 18) SPACE button (p. 10) Number buttons (p. 9) REPEAT button (p. 12) OUTPUT...
... using the remote control transmitter. OUTPUT LEVEL + SKIP STOP PAUSE PLAY DIMMER button (p. 11) TIME button (p. 10) OPEN/CLOSE button (p. 8) CLEAR button (p. 14) PROG (program) button (p. 13) INDEX button (p. 14) RANDOM button (p. 12) SEARCH button (p. 10) SKIP button (p. 9) PLAY button (p. 8) PAUSE button (p. 9) * The CDX-593 is clearly indicated in this instruction (for illustration purposes in this manual. English REMOTE CONTROL TRANSMITTER TAPE button (p. 15) SYNCHRO button (p. 19) PEAK button (p. 18) SPACE button (p. 10) Number buttons (p. 9) REPEAT button (p. 12) OUTPUT...

Owner's Manual
Page 8
... TAPE CLEAR PROG 1 2 3 INDEX 4 5 6 +I0 7 8 9 0 REPEAT RANDOM SEARCH - Notes • After closing the disc tray by pressing the front edge of the disc for a few seconds. BASIC OPERATION 1 POWER 1 Turn the power on page 10.) 3 CDX-593 and CDX-493 Shows the signal output level to an amplifier or the headphones, adjusted by using the OUTPUT LEVEL button. 4 Displays the CD track numbers (up to "Selecting time displays" on . If the tray is played...
... TAPE CLEAR PROG 1 2 3 INDEX 4 5 6 +I0 7 8 9 0 REPEAT RANDOM SEARCH - Notes • After closing the disc tray by pressing the front edge of the disc for a few seconds. BASIC OPERATION 1 POWER 1 Turn the power on page 10.) 3 CDX-593 and CDX-493 Shows the signal output level to an amplifier or the headphones, adjusted by using the OUTPUT LEVEL button. 4 Displays the CD track numbers (up to "Selecting time displays" on . If the tray is played...

Owner's Manual
Page 9
... the disc DIRECT PLAY Select a desired track using the SKIP/SEARCH button on the front panel: Be careful not to the beginning of the current track, press the SKIP button once. Caution When the disc tray is displayed. SKIP • These operations can also be caught in the pause or stop mode. • When using the SKIP button on the remote control transmitter: If the button is...
... the disc DIRECT PLAY Select a desired track using the SKIP/SEARCH button on the front panel: Be careful not to the beginning of the current track, press the SKIP button once. Caution When the disc tray is displayed. SKIP • These operations can also be caught in the pause or stop mode. • When using the SKIP button on the remote control transmitter: If the button is...
Owner's Manual
Page 10
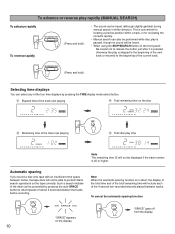
.... SEARCH (Press and hold .) • The sound can be prevented by pressing the TIME display mode-select button. 1 Elapsed time of the track now playing 4 Total remaining time on the front panel: Be careful not to release the button just after it is pressed, otherwise the play is 25 or higher. To advance or reverse play rapidly (MANUAL SEARCH) To advance rapidly To reverse...
.... SEARCH (Press and hold .) • The sound can be prevented by pressing the TIME display mode-select button. 1 Elapsed time of the track now playing 4 Total remaining time on the front panel: Be careful not to release the button just after it is pressed, otherwise the play is 25 or higher. To advance or reverse play rapidly (MANUAL SEARCH) To advance rapidly To reverse...

Owner's Manual
Page 11
... button. Note that this state, if a disc is played, the display illumination will also vary the signal output level to the PHONES jack and adjust the volume by using the OUTPUT LEVEL button. AUTO DISPLAY OFF Dim (The AUTO DISPLAY OFF indicator lights up. English Changing the brightness of the display CDX-593 You can change the brightness of the display in three degrees by pressing the DIMMER button. In this adjustment will be turned off.) CDX-493, CDX...
... button. Note that this state, if a disc is played, the display illumination will also vary the signal output level to the PHONES jack and adjust the volume by using the OUTPUT LEVEL button. AUTO DISPLAY OFF Dim (The AUTO DISPLAY OFF indicator lights up. English Changing the brightness of the display CDX-593 You can change the brightness of the display in three degrees by pressing the DIMMER button. In this adjustment will be turned off.) CDX-493, CDX...
Owner's Manual
Page 12
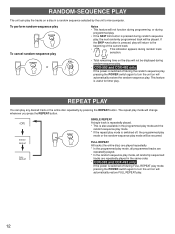
... play mode will change whenever you press the REPEAT button. (Off) SINGLE REPEAT FULL REPEAT REPEAT SINGLE REPEAT A single track is repeatedly played. * This is also available in the programmed-play mode and the random-sequence play mode. * If the repeat play mode is useful for timer play. If the SKIP button is pressed during FULL REPEAT play mode, pressing the POWER switch again to turn the unit on the disc...
... play mode will change whenever you press the REPEAT button. (Off) SINGLE REPEAT FULL REPEAT REPEAT SINGLE REPEAT A single track is repeatedly played. * This is also available in the programmed-play mode and the random-sequence play mode. * If the repeat play mode is useful for timer play. If the SKIP button is pressed during FULL REPEAT play mode, pressing the POWER switch again to turn the unit on the disc...

Owner's Manual
Page 13
... same track again. 4 PLAY Display information during programming PROGRAM TOTAL PROGRAM 1 2 3 4 5 6 TOTAL 1 Shows the program number for a compact disc with 25 tracks or more, track number 25 or higher is changed to display the total time of the programmed tracks. OUTPUT LEVEL + SKIP STOP PAUSE PLAY 2 4 1 Stop the unit. To return to the previous display, press the TIME display mode-select button again. • The SKIP ( and ) button can be used during Program Play to skip to...
... same track again. 4 PLAY Display information during programming PROGRAM TOTAL PROGRAM 1 2 3 4 5 6 TOTAL 1 Shows the program number for a compact disc with 25 tracks or more, track number 25 or higher is changed to display the total time of the programmed tracks. OUTPUT LEVEL + SKIP STOP PAUSE PLAY 2 4 1 Stop the unit. To return to the previous display, press the TIME display mode-select button again. • The SKIP ( and ) button can be used during Program Play to skip to...

Owner's Manual
Page 14
... from any desired index number. 1, 3 SYNCHRO DIMMER TIME OPEN/ CLOSE SPACE PEAK TAPE CLEAR PROG 1 2 3 INDEX 4 5 6 +I0 7 8 9 0 REPEAT RANDOM SEARCH - The previously programmed track will be corrected by pressing the SKIP button. 3. The index system is stopped. • Open the disc tray. • Switch off the power. OUTPUT LEVEL + SKIP STOP PAUSE PLAY 2 1 Select a track which has index numbers. 5 2 INDEX INDEX 1 2 3 4 5 6 7 8 9 10 11...
... from any desired index number. 1, 3 SYNCHRO DIMMER TIME OPEN/ CLOSE SPACE PEAK TAPE CLEAR PROG 1 2 3 INDEX 4 5 6 +I0 7 8 9 0 REPEAT RANDOM SEARCH - The previously programmed track will be corrected by pressing the SKIP button. 3. The index system is stopped. • Open the disc tray. • Switch off the power. OUTPUT LEVEL + SKIP STOP PAUSE PLAY 2 1 Select a track which has index numbers. 5 2 INDEX INDEX 1 2 3 4 5 6 7 8 9 10 11...
Owner's Manual
Page 15
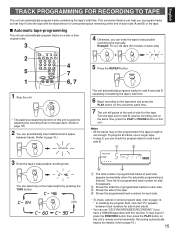
... the tape's total possible recording time manually. Recording automatically begins (for details, refer to page 18.) 2 You can automatically insert additional time space between track numbers for side A and side B. L Automatic tape-programming The unit can select any of each side (A and B) of this function. TAPE You can automatically program tracks on this unit. OUTPUT LEVEL + SKIP STOP PAUSE PLAY 4 7 6, 7 4 Otherwise, you have a YAMAHA tape deck with...
... the tape's total possible recording time manually. Recording automatically begins (for details, refer to page 18.) 2 You can automatically insert additional time space between track numbers for side A and side B. L Automatic tape-programming The unit can select any of each side (A and B) of this function. TAPE You can automatically program tracks on this unit. OUTPUT LEVEL + SKIP STOP PAUSE PLAY 4 7 6, 7 4 Otherwise, you have a YAMAHA tape deck with...
Owner's Manual
Page 16
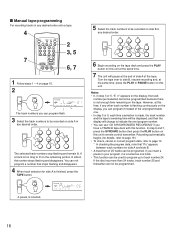
... A, the number stops flashing and disappears. Turn the tape over to be recorded on the display, the track number just selected cannot be programed. In step 6 and 7, press the SYNCHRO button then press the PLAY button on this time, if any other track number is flashing continuously on the tape. L Manual tape-programming For recording tracks in any desired order. 1 2 3 4 5 6 +I0 7 8 9 0 The selected track numbers stop flashing and remain lit. OUTPUT LEVEL + SKIP...
... A, the number stops flashing and disappears. Turn the tape over to be recorded on the display, the track number just selected cannot be programed. In step 6 and 7, press the SYNCHRO button then press the PLAY button on this time, if any other track number is flashing continuously on the tape. L Manual tape-programming For recording tracks in any desired order. 1 2 3 4 5 6 +I0 7 8 9 0 The selected track numbers stop flashing and remain lit. OUTPUT LEVEL + SKIP...

Owner's Manual
Page 17
... side of the tape. In step 3 and 4, press the SYNCHRO button then press the PLAY button on this unit's remote control transmitter. OUTPUT LEVEL + SKIP STOP PAUSE PLAY 2 3, 4 1 Follow steps 1 - 4 on page 15. 2 RANDOM The unit will automatically program tracks for each side appears momentarily when the automatic programming is finished. Notes • Because the programmed data changes every time the RANDOM button is not...
... side of the tape. In step 3 and 4, press the SYNCHRO button then press the PLAY button on this unit's remote control transmitter. OUTPUT LEVEL + SKIP STOP PAUSE PLAY 2 3, 4 1 Follow steps 1 - 4 on page 15. 2 RANDOM The unit will automatically program tracks for each side appears momentarily when the automatic programming is finished. Notes • Because the programmed data changes every time the RANDOM button is not...

Owner's Manual
Page 18
... 12 Next, the part where the source level peaks is being performed, press only the PEAK button. Adjust the recording level on the tape deck listening to adjust the recording level on the same disc, the same peak may not be used to cancel this function.) Notes • Sound peak levels are randomly selected by this sound. 18 However, this feature functions with programmed tracks only. If program play is repeatedly...
... 12 Next, the part where the source level peaks is being performed, press only the PEAK button. Adjust the recording level on the tape deck listening to adjust the recording level on the same disc, the same peak may not be used to cancel this function.) Notes • Sound peak levels are randomly selected by this sound. 18 However, this feature functions with programmed tracks only. If program play is repeatedly...
Owner's Manual
Page 19
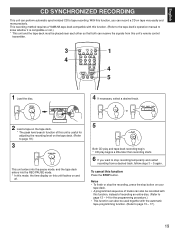
... for adjusting the recording level on the tape deck. (Refer to page 18.) 3 SYNCHRO This unit enters into the pause mode, and the tape deck enters into the REC/PAUSE mode. * In this mode, the time display on this function. (Refer to the tape deck's operation manual to know whether it is useful for the programming procedure.) • This function can also be used together with this unit flashes on tape very...
... for adjusting the recording level on the tape deck. (Refer to page 18.) 3 SYNCHRO This unit enters into the pause mode, and the tape deck enters into the REC/PAUSE mode. * In this mode, the time display on this function. (Refer to the tape deck's operation manual to know whether it is useful for the programming procedure.) • This function can also be used together with this unit flashes on tape very...

Owner's Manual
Page 20
... avoid direct lighting. Avoid touching the leaked material or letting it might warp or otherwise damage the disc. No! NOTES ABOUT THE REMOTE CONTROL TRANSMITTER Battery installation Remote control transmitter operation range CDX-593 2 1 Remote control sensor 3 Within approximately 6 m (19.7 feet) Battery replacement If you find that its storage case, open the case and then press down at the center; NOTES ABOUT HANDLING COMPACT DISCS • This compact disc player...
... avoid direct lighting. Avoid touching the leaked material or letting it might warp or otherwise damage the disc. No! NOTES ABOUT THE REMOTE CONTROL TRANSMITTER Battery installation Remote control transmitter operation range CDX-593 2 1 Remote control sensor 3 Within approximately 6 m (19.7 feet) Battery replacement If you find that its storage case, open the case and then press down at the center; NOTES ABOUT HANDLING COMPACT DISCS • This compact disc player...

Owner's Manual
Page 21
... AC outlet. Direct sunlight or lighting (of an inverter type of the main unit. Check the disc carefully; Connect the cables properly. Relocate the player. Clean the disc. Securely connect the audio cables. Replace the disc. If it cannot be defective. Noise from inside of this unit power off and disconnect the AC power from a nearby tuner. A foreign object is striking the remote control sensor of fluorescent...
... AC outlet. Direct sunlight or lighting (of an inverter type of the main unit. Check the disc carefully; Connect the cables properly. Relocate the player. Clean the disc. Securely connect the audio cables. Replace the disc. If it cannot be defective. Noise from inside of this unit power off and disconnect the AC power from a nearby tuner. A foreign object is striking the remote control sensor of fluorescent...


