
Owner's Manual
Page 2
...time. 14 Object and Liquid Entry - or C. Precautions should not be situated away from the outlet when left unused for US customers only) YAMAHA and the Electronic Industries Association's Consumer Electronics Group want you to overturn. 7 Wall or Ceiling Mounting - and, most out of Graphical Symbols... from heat sources such as marked on a bed, sofa, rug, or similar surface, that the grounding or polarization is too late, YAMAHA and the Electronic Industries Association's Consumer Electronics Group recommend you to a power supply only of the unit. The power cord of the unit...
...time. 14 Object and Liquid Entry - or C. Precautions should not be situated away from the outlet when left unused for US customers only) YAMAHA and the Electronic Industries Association's Consumer Electronics Group want you to overturn. 7 Wall or Ceiling Mounting - and, most out of Graphical Symbols... from heat sources such as marked on a bed, sofa, rug, or similar surface, that the grounding or polarization is too late, YAMAHA and the Electronic Industries Association's Consumer Electronics Group recommend you to a power supply only of the unit. The power cord of the unit...
Owner's Manual
Page 3
... 6 Do not attempt to qualified personel only. If you can be used. this manual, meets FCC requirements. To prevent damage by Yamaha Corporation of America or its subsidiaries. 3 Follow all installations. Utilize power outlets that is faulty. 8. The above statements apply ONLY to ...does not guarantee that interference will increase eye hazard. In the case of interference, which can not locate the appropriate retailer, please contact Yamaha Electronics Corp., U.S.A. 6660 Orangethorpe Ave, Buena Park, CA 90620. Use a clean, dry cloth. 7 Be sure to read this ...
... 6 Do not attempt to qualified personel only. If you can be used. this manual, meets FCC requirements. To prevent damage by Yamaha Corporation of America or its subsidiaries. 3 Follow all installations. Utilize power outlets that is faulty. 8. The above statements apply ONLY to ...does not guarantee that interference will increase eye hazard. In the case of interference, which can not locate the appropriate retailer, please contact Yamaha Electronics Corp., U.S.A. 6660 Orangethorpe Ave, Buena Park, CA 90620. Use a clean, dry cloth. 7 Be sure to read this ...
Owner's Manual
Page 4
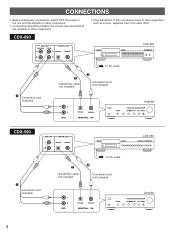
...; Connection cord (included) — Optical fiber cable (not included) To AC outlet ˜ Connection cord (not included) CD OPTICAL COAXIAL DIGITAL IN CDX-590 LINE OUT DIGITAL OUT OPTICAL COAXIAL Amplifier CDX-590 – Connection cord (included) — Optical fiber cable (not included) To AC outlet ˜ Connection cord (not included) CD OPTICAL COAXIAL...
...; Connection cord (included) — Optical fiber cable (not included) To AC outlet ˜ Connection cord (not included) CD OPTICAL COAXIAL DIGITAL IN CDX-590 LINE OUT DIGITAL OUT OPTICAL COAXIAL Amplifier CDX-590 – Connection cord (included) — Optical fiber cable (not included) To AC outlet ˜ Connection cord (not included) CD OPTICAL COAXIAL...
Owner's Manual
Page 5
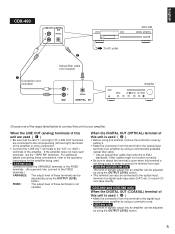
...the amplifier. When the LINE OUT (analog) terminals of this unit are used , in order to protect the terminal from dust. • CDX-590 and CDX-490 only The level of signals output into an amplifier can be adjusted by using a commercially available optical fiber cable. * Use an optical fiber... the digital input terminal of an amplifier by using a connection cord. • CDX-590 only The level of signals output into an amplifier can also be adjusted by using the OUTPUT LEVEL button. CDX-890 and CDX-590 only When the DIGITAL OUT (COAXIAL) terminal of this unit is not variable. ...
...the amplifier. When the LINE OUT (analog) terminals of this unit are used , in order to protect the terminal from dust. • CDX-590 and CDX-490 only The level of signals output into an amplifier can be adjusted by using a commercially available optical fiber cable. * Use an optical fiber... the digital input terminal of an amplifier by using a connection cord. • CDX-590 only The level of signals output into an amplifier can also be adjusted by using the OUTPUT LEVEL button. CDX-890 and CDX-590 only When the DIGITAL OUT (COAXIAL) terminal of this unit is not variable. ...
Owner's Manual
Page 6
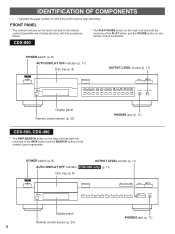
...INDEX REPEAT RANDOM SKIP +10 1 2 3 4 5 6 7 8 SEARCH 9 0 TIME PHONES OUTPUT LEVEL Display panel Remote control sensor (p. 20) CDX-590, CDX-490 * The SKIP/SEARCH button on the main unit has both the functions of the SKIP button and the SEARCH button on the remote control... PLAY button and the PAUSE button on the remote control transmitter. PHONES jack (p. 11) POWER switch (p. 8) OUTPUT LEVEL control (p. 11) AUTO DISPLAY OFF indicator CDX-590 only (p. 11) Disc tray (p. 8) POWER OPEN/CLOSE SKIP/SEARCH STOP PLAY/ PAUSE AUTO DISPLAY OFF +10 1 2 3 4 5 6 7 8 9 ...
...INDEX REPEAT RANDOM SKIP +10 1 2 3 4 5 6 7 8 SEARCH 9 0 TIME PHONES OUTPUT LEVEL Display panel Remote control sensor (p. 20) CDX-590, CDX-490 * The SKIP/SEARCH button on the main unit has both the functions of the SKIP button and the SEARCH button on the remote control... PLAY button and the PAUSE button on the remote control transmitter. PHONES jack (p. 11) POWER switch (p. 8) OUTPUT LEVEL control (p. 11) AUTO DISPLAY OFF indicator CDX-590 only (p. 11) Disc tray (p. 8) POWER OPEN/CLOSE SKIP/SEARCH STOP PLAY/ PAUSE AUTO DISPLAY OFF +10 1 2 3 4 5 6 7 8 9 ...

Owner's Manual
Page 7
OUTPUT LEVEL + SKIP STOP PAUSE PLAY DIMMER button (p. 11) TIME button (p. 10) OPEN/CLOSE button (p. 8) CLEAR button (p. 14) PROG button (p. 13) INDEX button (p. 14) RANDOM button (p. 12) SEARCH button (p. 10) SKIP button (p. 9) PLAY button (p. 8) PAUSE button (p. 9) 7 REMOTE CONTROL TRANSMITTER TAPE button (p. 15) SYNCHRO button (p. 19) PEAK button (p. 18) SPACE button (p. 10) Numeric buttons (p. 9) REPEAT button (p. 12) OUTPUT LEVEL button (p. 11) STOP button (p. 9) SYNCHRO DIMMER TIME OPEN/ CLOSE SPACE PEAK TAPE CLEAR PROG 1 2 3 INDEX 4 5 6 +I0 7 8 9 0 REPEAT RANDOM ...
OUTPUT LEVEL + SKIP STOP PAUSE PLAY DIMMER button (p. 11) TIME button (p. 10) OPEN/CLOSE button (p. 8) CLEAR button (p. 14) PROG button (p. 13) INDEX button (p. 14) RANDOM button (p. 12) SEARCH button (p. 10) SKIP button (p. 9) PLAY button (p. 8) PAUSE button (p. 9) 7 REMOTE CONTROL TRANSMITTER TAPE button (p. 15) SYNCHRO button (p. 19) PEAK button (p. 18) SPACE button (p. 10) Numeric buttons (p. 9) REPEAT button (p. 12) OUTPUT LEVEL button (p. 11) STOP button (p. 9) SYNCHRO DIMMER TIME OPEN/ CLOSE SPACE PEAK TAPE CLEAR PROG 1 2 3 INDEX 4 5 6 +I0 7 8 9 0 REPEAT RANDOM ...
Owner's Manual
Page 8
.... To operate this unit by using the OUTPUT LEVEL button. Displays the numbers that correspond to "Selecting time displays" on page 10.) Ž CDX-590 and CDX-490 only Shows the level of tracks (as high as number 20) on the disc. POWER SYNCHRO DIMMER TIME OPEN/ CLOSE SPACE PEAK TAPE CLEAR...
.... To operate this unit by using the OUTPUT LEVEL button. Displays the numbers that correspond to "Selecting time displays" on page 10.) Ž CDX-590 and CDX-490 only Shows the level of tracks (as high as number 20) on the disc. POWER SYNCHRO DIMMER TIME OPEN/ CLOSE SPACE PEAK TAPE CLEAR...
Owner's Manual
Page 9
... only If the button is pressed and held , the track number is continuously changed to higher numbers (or lower numbers). • CDX-590 and CDX-490 only When using the SKIP/SEARCH button on the front panel: Be careful not to press and hold the button, otherwise the selected track ...
... only If the button is pressed and held , the track number is continuously changed to higher numbers (or lower numbers). • CDX-590 and CDX-490 only When using the SKIP/SEARCH button on the front panel: Be careful not to press and hold the button, otherwise the selected track ...
Owner's Manual
Page 10
...: Be careful not to release the button just after it is pressed, otherwise the play is paused, though no sound will be heard. • CDX-590 and CDX-490 only When using the SKIP/SEARCH button on the tape correctly. Note When the automatic spacing function is 25 or higher. To advance or...
...: Be careful not to release the button just after it is pressed, otherwise the play is paused, though no sound will be heard. • CDX-590 and CDX-490 only When using the SKIP/SEARCH button on the tape correctly. Note When the automatic spacing function is 25 or higher. To advance or...
Owner's Manual
Page 11
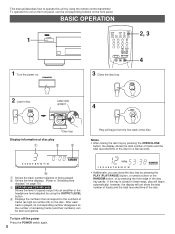
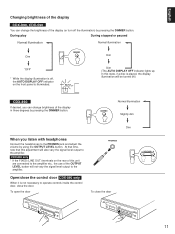
English Changing brightness of the display CDX-890, CDX-590 You can change the brightness of the display in three degrees ... will not vary the signal level output to operate controls inside the control door, close the door - CDX-890 only * If the FIXED (LINE OUT) terminals on the front panel is not necessary to the... or paused Normal illumination Normal illumination Dim DIMMER Dim "OFF" * While the display illumination is off .) CDX-490 If desired, you listen with headphones Connect the headphones to the amplifier. DIMMER Normal illumination Slightly dim Dim...
English Changing brightness of the display CDX-890, CDX-590 You can change the brightness of the display in three degrees ... will not vary the signal level output to operate controls inside the control door, close the door - CDX-890 only * If the FIXED (LINE OUT) terminals on the front panel is not necessary to the... or paused Normal illumination Normal illumination Dim DIMMER Dim "OFF" * While the display illumination is off .) CDX-490 If desired, you listen with headphones Connect the headphones to the amplifier. DIMMER Normal illumination Slightly dim Dim...

Owner's Manual
Page 12
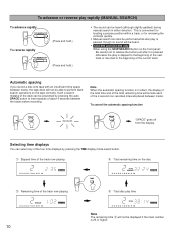
To perform random-sequence play RANDOM Notes • This feature will change whenever you press the REPEAT button. (OFF) SINGLE REPEAT FULL REPEAT REPEAT SINGLE REPEAT A single track is repeatedly played. * This is pressed during random-sequence play. To cancel random-sequence play RANDOM or STOP • Total remaining time on a disc in a random sequence selected by pressing the REPEAT button. The repeat play , the next randomly programmed track will be played. FULL REPEAT All tracks (the entire disc) are played repeatedly. * In the programmed-play mode, all programmed ...
To perform random-sequence play RANDOM Notes • This feature will change whenever you press the REPEAT button. (OFF) SINGLE REPEAT FULL REPEAT REPEAT SINGLE REPEAT A single track is repeatedly played. * This is pressed during random-sequence play. To cancel random-sequence play RANDOM or STOP • Total remaining time on a disc in a random sequence selected by pressing the REPEAT button. The repeat play , the next randomly programmed track will be played. FULL REPEAT All tracks (the entire disc) are played repeatedly. * In the programmed-play mode, all programmed ...

Owner's Manual
Page 13
You can select the same track again. 4 PLAY Display information during programming PROGRAM TOTAL PROGRAM 1 2 3 4 5 6 TOTAL Œ Ž Œ Shows the program number for a compact disc with 25 tracks or more , the highest position of a figure will disappear from the display. 13 Notes • In step 2, if "P-01" does not appear in the display, press the TIME display mode-select button. • If, during programming, the TIME display mode-select button is programmed, the total time will not be used during playing, but only within the range of the ...
You can select the same track again. 4 PLAY Display information during programming PROGRAM TOTAL PROGRAM 1 2 3 4 5 6 TOTAL Œ Ž Œ Shows the program number for a compact disc with 25 tracks or more , the highest position of a figure will disappear from the display. 13 Notes • In step 2, if "P-01" does not appear in the display, press the TIME display mode-select button. • If, during programming, the TIME display mode-select button is programmed, the total time will not be used during playing, but only within the range of the ...

Owner's Manual
Page 14
The first programmed track number will be designated only while the INDEX number display is illuminated. 14 Play will begin from the memory and the new one will be checked one displayed. To check program data 1. Each time the SKIP button is higher than any desired index number. 1, 3 SYNCHRO DIMMER TIME OPEN/ CLOSE SPACE PEAK TAPE CLEAR PROG 1 2 3 INDEX 4 5 6 +I0 7 8 9 0 REPEAT RANDOM SEARCH - Notes • Not all discs have index numbers. To cancel a program sequence There are included. • If an index number is selected that is pressed, the ...
The first programmed track number will be designated only while the INDEX number display is illuminated. 14 Play will begin from the memory and the new one will be checked one displayed. To check program data 1. Each time the SKIP button is higher than any desired index number. 1, 3 SYNCHRO DIMMER TIME OPEN/ CLOSE SPACE PEAK TAPE CLEAR PROG 1 2 3 INDEX 4 5 6 +I0 7 8 9 0 REPEAT RANDOM SEARCH - Notes • Not all discs have index numbers. To cancel a program sequence There are included. • If an index number is selected that is pressed, the ...
Owner's Manual
Page 15
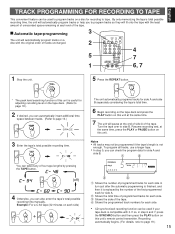
OUTPUT LEVEL + SKIP STOP PAUSE PLAY 4 7 6, 7 1 Stop the unit. REPEAT * The peak level searching function of this unit is useful for side A and side B separately considering the tape's total time. 6 Begin recording on the tape deck and press the PLAY button on this unit at the same time. 7 The unit will pause at the end of side A of the tape. Example: For a C-64 tape (32 minutes on each side) 6 4 + The unit automatically programs tracks for adjusting recording level on the tape deck. (Refer to page 18.) 2 If desired, you to program tracks so they will fit onto the tape with...
OUTPUT LEVEL + SKIP STOP PAUSE PLAY 4 7 6, 7 1 Stop the unit. REPEAT * The peak level searching function of this unit is useful for side A and side B separately considering the tape's total time. 6 Begin recording on the tape deck and press the PLAY button on this unit at the same time. 7 The unit will pause at the end of side A of the tape. Example: For a C-64 tape (32 minutes on each side) 6 4 + The unit automatically programs tracks for adjusting recording level on the tape deck. (Refer to page 18.) 2 If desired, you to program tracks so they will fit onto the tape with...
Owner's Manual
Page 16
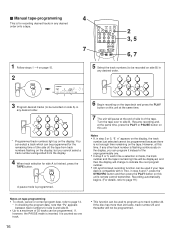
TAPE A pause mode is programmed. 6 Begin recording on the tape deck and press the PLAY button on this unit at the same time. 7 The unit will pause at the same time, press the PLAY or PAUSE button on this unit. OUTPUT LEVEL + SKIP STOP PAUSE PLAY 2 3, 5 6, 7 1 Follow steps 1 - 4 on page 15. 2 PROG PROGRAM A TOTAL REMAIN 1 2 3 4 5 6 7 8 9 10 11 12 5 Select the track numbers (to be recorded on side B) in any desired order. 1 2 3 4 5 6 +I0 7 8 9 0 3 Program desired tracks (to be recorded on the tape. Turn the tape over to side B. Resume recording and, at the...
TAPE A pause mode is programmed. 6 Begin recording on the tape deck and press the PLAY button on this unit at the same time. 7 The unit will pause at the same time, press the PLAY or PAUSE button on this unit. OUTPUT LEVEL + SKIP STOP PAUSE PLAY 2 3, 5 6, 7 1 Follow steps 1 - 4 on page 15. 2 PROG PROGRAM A TOTAL REMAIN 1 2 3 4 5 6 7 8 9 10 11 12 5 Select the track numbers (to be recorded on side B) in any desired order. 1 2 3 4 5 6 +I0 7 8 9 0 3 Program desired tracks (to be recorded on the tape. Turn the tape over to side B. Resume recording and, at the...

Owner's Manual
Page 17
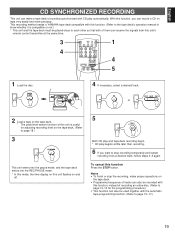
Turn the tape over to page 19.) 17 If so, in step 3 and 4, press the SYNCHRO button and then press the PLAY button on this unit at the same time. 4 The unit will pause at the end of side A of the tape. Shows the programmed track numbers for each side. • CD synchronized recording function can check the program data for side A and side B. Œ PROGRAM A TOTAL 1 2 3 4 5 6 7 8 9 10 11 12 13 14 15 16 17 18 19 20 Ž Œ Shows the number of programmed tracks for each side in random sequential order for each side. Ž Shows the side of the ...
Turn the tape over to page 19.) 17 If so, in step 3 and 4, press the SYNCHRO button and then press the PLAY button on this unit at the same time. 4 The unit will pause at the end of side A of the tape. Shows the programmed track numbers for each side. • CD synchronized recording function can check the program data for side A and side B. Œ PROGRAM A TOTAL 1 2 3 4 5 6 7 8 9 10 11 12 13 14 15 16 17 18 19 20 Ž Œ Shows the number of programmed tracks for each side in random sequential order for each side. Ž Shows the side of the ...

Owner's Manual
Page 18
If program play is being performed, only press the PEAK button. Adjust the recording level on the tape deck listening to cancel this function.) Notes • Even if the peak level search is repeatedly played. STOP 2 PEAK To cancel this function Press the STOP button. (Some other buttons can also be always selected, because this unit will search for a part where the source level peaks, and next plays the part repeatedly. For recording to tape, this feature is very helpful to adjust the recording level on the disc. 1 2 3 4 5 6 7 8 9 10 11 12 PEAK REPEAT 1 2 3 4 5 6 7 8 9 10 ...
If program play is being performed, only press the PEAK button. Adjust the recording level on the tape deck listening to cancel this function.) Notes • Even if the peak level search is repeatedly played. STOP 2 PEAK To cancel this function Press the STOP button. (Some other buttons can also be always selected, because this unit will search for a part where the source level peaks, and next plays the part repeatedly. For recording to tape, this feature is very helpful to adjust the recording level on the disc. 1 2 3 4 5 6 7 8 9 10 11 12 PEAK REPEAT 1 2 3 4 5 6 7 8 9 10 ...
Owner's Manual
Page 19
..., instead of them can record a CD on and off. 5 PLAY Both CD play and tape deck recording begin. * CD play automatically. This recording method needs a YAMAHA tape deck compatible with this function. (Refer to the tape deck's operation manual to know whether it is useful for the programming procedure.) • This...
..., instead of them can record a CD on and off. 5 PLAY Both CD play and tape deck recording begin. * CD play automatically. This recording method needs a YAMAHA tape deck compatible with this function. (Refer to the tape deck's operation manual to know whether it is useful for the programming procedure.) • This...

Owner's Manual
Page 20
Clean the battery compartment thoroughly before installing new batteries. with a finger through the center hole and the outer edges held as shown in the illustration, lift the disc out carefully. • Compact discs are not affected by strong lighting (especially an inverter type of time, because these might cause the remote control transmitter not to avoid direct lighting. Do not wipe with new ones. Notes • Use only AA, R6, UM-3 batteries for replacement. • Be sure the polarities are correct. (See the illustration inside the battery compartment.) • Remove the ...
Clean the battery compartment thoroughly before installing new batteries. with a finger through the center hole and the outer edges held as shown in the illustration, lift the disc out carefully. • Compact discs are not affected by strong lighting (especially an inverter type of time, because these might cause the remote control transmitter not to avoid direct lighting. Do not wipe with new ones. Notes • Use only AA, R6, UM-3 batteries for replacement. • Be sure the polarities are correct. (See the illustration inside the battery compartment.) • Remove the ...
Owner's Manual
Page 21
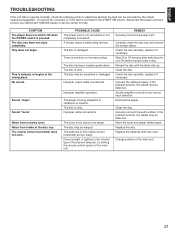
... of the main unit. 21 PROBABLE CAUSE The power cord is not listed in the SYMPTOM column, disconnect the power cord and contact your authorized YAMAHA dealer or service center for help. The disc has been loaded upside down. Improper amplifier operation. Direct sunlight or lighting (of an inverter type of...
... of the main unit. 21 PROBABLE CAUSE The power cord is not listed in the SYMPTOM column, disconnect the power cord and contact your authorized YAMAHA dealer or service center for help. The disc has been loaded upside down. Improper amplifier operation. Direct sunlight or lighting (of an inverter type of...
