
Owner's Manual
Page 2
... triangle is intended to alert you to operate normally or exhibits a marked change in the operating instructions should be adhered to cords at a safe level. Model: Serial No.: The serial number is not defeated. The unit should be walked on the rear of Graphical Symbols The lightning flash with its proper ventilation. SAFETY INSTRUCTIONS CAUTION RISK OF ELECTRIC SHOCK DO NOT...
... triangle is intended to alert you to operate normally or exhibits a marked change in the operating instructions should be adhered to cords at a safe level. Model: Serial No.: The serial number is not defeated. The unit should be walked on the rear of Graphical Symbols The lightning flash with its proper ventilation. SAFETY INSTRUCTIONS CAUTION RISK OF ELECTRIC SHOCK DO NOT...
Owner's Manual
Page 3
... by turning the unit "OFF" and "ON", please try to eliminate the problem by Yamaha may cause interference harmful to the operation of assurance that are on different branch (circuit breaker or fuse) circuits or install AC line filter/s. Use a clean, dry cloth. 7 Be sure to read this compact disc player is 300 ohm ribbon lead, change the lead-in this manual carefully...
... by turning the unit "OFF" and "ON", please try to eliminate the problem by Yamaha may cause interference harmful to the operation of assurance that are on different branch (circuit breaker or fuse) circuits or install AC line filter/s. Use a clean, dry cloth. 7 Be sure to read this compact disc player is 300 ohm ribbon lead, change the lead-in this manual carefully...
Owner's Manual
Page 4
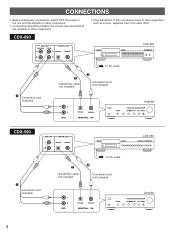
... connections, switch OFF the power to the unit and the amplifier or other component. • Connections should be made to the correct input terminals of the amplifier or other component. • If the placement of this unit causes noise to other equipment, such as a tuner, separate them from each other. CDX-890 LINE OUT VARIABLE FIXED DIGITAL OUT OPTICAL COAXIAL CDX-890 – Connection cord (included) — Optical fiber cable...
... connections, switch OFF the power to the unit and the amplifier or other component. • Connections should be made to the correct input terminals of the amplifier or other component. • If the placement of this unit causes noise to other equipment, such as a tuner, separate them from each other. CDX-890 LINE OUT VARIABLE FIXED DIGITAL OUT OPTICAL COAXIAL CDX-890 – Connection cord (included) — Optical fiber cable...
Owner's Manual
Page 5
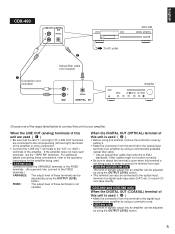
... OUTPUT LEVEL button. 5 If the amplifier does not have such terminals, use the "TAPE PB" terminals. Other cables might not function correctly. • Be sure to attach the terminal's cover when this terminal to the digital input terminal of an amplifier by using a connection cord. • CDX-590 only The level of signals output into an amplifier can be adjusted by using the OUTPUT LEVEL button. • This terminal can be connected to the optical input terminal of a digital audio tape deck...
... OUTPUT LEVEL button. 5 If the amplifier does not have such terminals, use the "TAPE PB" terminals. Other cables might not function correctly. • Be sure to attach the terminal's cover when this terminal to the digital input terminal of an amplifier by using a connection cord. • CDX-590 only The level of signals output into an amplifier can be adjusted by using the OUTPUT LEVEL button. • This terminal can be connected to the optical input terminal of a digital audio tape deck...
Owner's Manual
Page 6
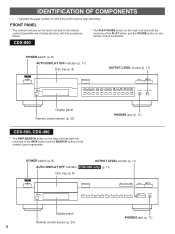
...POWER switch (p. 8) AUTO DISPLAY OFF indicator (p. 11) Disc tray (p. 8) OUTPUT LEVEL control (p. 11) POWER OPEN/CLOSE STOP PLAY/ PAUSE AUTO DISPLAY OFF PROG TAPE PEAK SPACE INDEX REPEAT RANDOM SKIP +10 1 2 3 4 5 6 7 8 SEARCH 9 0 TIME PHONES OUTPUT LEVEL Display panel Remote control sensor (p. 20) CDX-590, CDX-490 * The SKIP/SEARCH button on the main unit has both the functions of the SKIP button and the SEARCH button on which the control part is best described. PHONES jack (p. 11) POWER switch (p. 8) OUTPUT LEVEL control (p. 11) AUTO DISPLAY OFF indicator CDX-590...
...POWER switch (p. 8) AUTO DISPLAY OFF indicator (p. 11) Disc tray (p. 8) OUTPUT LEVEL control (p. 11) POWER OPEN/CLOSE STOP PLAY/ PAUSE AUTO DISPLAY OFF PROG TAPE PEAK SPACE INDEX REPEAT RANDOM SKIP +10 1 2 3 4 5 6 7 8 SEARCH 9 0 TIME PHONES OUTPUT LEVEL Display panel Remote control sensor (p. 20) CDX-590, CDX-490 * The SKIP/SEARCH button on the main unit has both the functions of the SKIP button and the SEARCH button on which the control part is best described. PHONES jack (p. 11) POWER switch (p. 8) OUTPUT LEVEL control (p. 11) AUTO DISPLAY OFF indicator CDX-590...

Owner's Manual
Page 7
...button (p. 18) SPACE button (p. 10) Numeric buttons (p. 9) REPEAT button (p. 12) OUTPUT LEVEL button (p. 11) STOP button (p. 9) SYNCHRO DIMMER TIME OPEN/ CLOSE SPACE PEAK TAPE CLEAR PROG 1 2 3 INDEX 4 5 6 +I0 7 8 9 0 REPEAT RANDOM SEARCH - OUTPUT LEVEL + SKIP STOP PAUSE PLAY DIMMER button (p. 11) TIME button (p. 10) OPEN/CLOSE button (p. 8) CLEAR button (p. 14) PROG button (p. 13) INDEX button (p. 14) RANDOM button (p. 12) SEARCH button (p. 10) SKIP button (p. 9) PLAY button (p. 8) PAUSE button (p. 9) 7 English * ( ) indicates the page number on which the control part...
...button (p. 18) SPACE button (p. 10) Numeric buttons (p. 9) REPEAT button (p. 12) OUTPUT LEVEL button (p. 11) STOP button (p. 9) SYNCHRO DIMMER TIME OPEN/ CLOSE SPACE PEAK TAPE CLEAR PROG 1 2 3 INDEX 4 5 6 +I0 7 8 9 0 REPEAT RANDOM SEARCH - OUTPUT LEVEL + SKIP STOP PAUSE PLAY DIMMER button (p. 11) TIME button (p. 10) OPEN/CLOSE button (p. 8) CLEAR button (p. 14) PROG button (p. 13) INDEX button (p. 14) RANDOM button (p. 12) SEARCH button (p. 10) SKIP button (p. 9) PLAY button (p. 8) PAUSE button (p. 9) 7 English * ( ) indicates the page number on which the control part...
Owner's Manual
Page 8
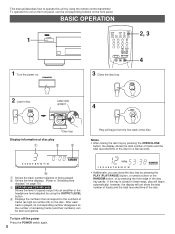
... OUTPUT LEVEL button. Displays the numbers that correspond to the numbers of tracks (as high as number 20) on page 10.) Ž CDX-590 and CDX-490 only Shows the level of signals output into an amplifier or the headphone level adjusted by pressing the OPEN/CLOSE button, the display shows the total number of tracks and the total recorded time of the disc. To turn off the power Press the POWER switch again. 8 Play...
... OUTPUT LEVEL button. Displays the numbers that correspond to the numbers of tracks (as high as number 20) on page 10.) Ž CDX-590 and CDX-490 only Shows the level of signals output into an amplifier or the headphone level adjusted by pressing the OPEN/CLOSE button, the display shows the total number of tracks and the total recorded time of the disc. To turn off the power Press the POWER switch again. 8 Play...
Owner's Manual
Page 9
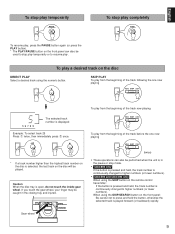
...; These operations can also be used to stop mode. • CDX-890 only If the button is pressed and held, the track number is continuously changed to higher numbers (or lower numbers). • CDX-590 and CDX-490 only When using the numeric button. 5 SKIP PLAY To play from the beginning of the track following the one now playing SKIP 12345678 9 The selected track number is displayed Example: To select track...
...; These operations can also be used to stop mode. • CDX-890 only If the button is pressed and held, the track number is continuously changed to higher numbers (or lower numbers). • CDX-590 and CDX-490 only When using the numeric button. 5 SKIP PLAY To play from the beginning of the track following the one now playing SKIP 12345678 9 The selected track number is displayed Example: To select track...
Owner's Manual
Page 10
... disc play is paused, though no sound will be heard. • CDX-590 and CDX-490 only When using the SKIP/SEARCH button on the front panel: Be careful not to release the button just after it is pressed, otherwise the play time REMAIN 2 3 4 5 6 7 8 9 10 11 12 10 TOTAL 2 3 4 5 6 7 8 9 10 11 12 Note The remaining time will not be displayed if the track number...
... disc play is paused, though no sound will be heard. • CDX-590 and CDX-490 only When using the SKIP/SEARCH button on the front panel: Be careful not to release the button just after it is pressed, otherwise the play time REMAIN 2 3 4 5 6 7 8 9 10 11 12 10 TOTAL 2 3 4 5 6 7 8 9 10 11 12 Note The remaining time will not be displayed if the track number...
Owner's Manual
Page 11
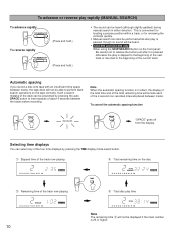
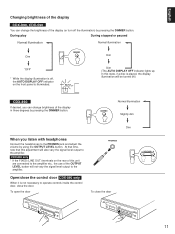
... vary the signal level output to the amplifier. English Changing brightness of the display CDX-890, CDX-590 You can change the brightness of the display (or turn off , the AUTO DISPLAY OFF indicator on the rear of this unit are connected to the amplifier etc., the use of the display in three degrees by pressing the DIMMER button. CDX-890 only * If the FIXED (LINE OUT) terminals on the front panel is...
... vary the signal level output to the amplifier. English Changing brightness of the display CDX-890, CDX-590 You can change the brightness of the display (or turn off , the AUTO DISPLAY OFF indicator on the rear of this unit are connected to the amplifier etc., the use of the display in three degrees by pressing the DIMMER button. CDX-890 only * If the FIXED (LINE OUT) terminals on the front panel is...

Owner's Manual
Page 13
... ) button can be used during playing, but only within the range of the programmed tracks. • The SEARCH ( and ) button can also be changed to display the total time of a figure will disappear from the display. 13 Notes • In step 2, if "P-01" does not appear in the display, press the TIME display mode-select button. • If, during playing to be programmed next. Shows the selected track number...
... ) button can be used during playing, but only within the range of the programmed tracks. • The SEARCH ( and ) button can also be changed to display the total time of a figure will disappear from the display. 13 Notes • In step 2, if "P-01" does not appear in the display, press the TIME display mode-select button. • If, during playing to be programmed next. Shows the selected track number...

Owner's Manual
Page 14
... DIMMER TIME OPEN/ CLOSE SPACE PEAK TAPE CLEAR PROG 1 2 3 INDEX 4 5 6 +I0 7 8 9 0 REPEAT RANDOM SEARCH - Play will begin from any index number on that is illuminated. 14 If during program play will be programmed. 4. The display of the program. Press a numeric button to select a track to the actual designated index point. • If the disc has no encoded index points, play , press the STOP button. 2. OUTPUT LEVEL...
... DIMMER TIME OPEN/ CLOSE SPACE PEAK TAPE CLEAR PROG 1 2 3 INDEX 4 5 6 +I0 7 8 9 0 REPEAT RANDOM SEARCH - Play will begin from any index number on that is illuminated. 14 If during program play will be programmed. 4. The display of the program. Press a numeric button to select a track to the actual designated index point. • If the disc has no encoded index points, play , press the STOP button. 2. OUTPUT LEVEL...
Owner's Manual
Page 15
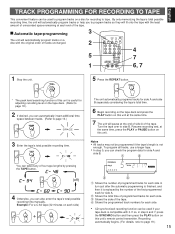
... considering the tape's total time. 6 Begin recording on the tape deck and press the PLAY button on a disc with it is not enough. Recording automatically begins. (For details, refer to side B. To program all tracks, use a longer tape. • In step 5, you can automatically insert additional time space between tracks. (Refer to tape. OUTPUT LEVEL + SKIP STOP PAUSE PLAY 4 7 6, 7 1 Stop the unit. Turn the tape over to...
... considering the tape's total time. 6 Begin recording on the tape deck and press the PLAY button on a disc with it is not enough. Recording automatically begins. (For details, refer to side B. To program all tracks, use a longer tape. • In step 5, you can automatically insert additional time space between tracks. (Refer to tape. OUTPUT LEVEL + SKIP STOP PAUSE PLAY 4 7 6, 7 1 Stop the unit. Turn the tape over to...
Owner's Manual
Page 16
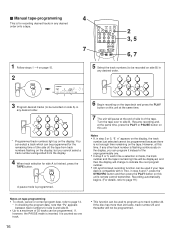
... track numbers flashing on the display, but you can be used to program up on the display. Turn the tape over to be programmed. If, however, the PAUSE mode is made, the track number and the tape's remaining time will be displayed, and then the display will not be recorded on side A) in step 6 and 7, press the SYNCHRO button and then press the PLAY button on this unit's remote control...
... track numbers flashing on the display, but you can be used to program up on the display. Turn the tape over to be programmed. If, however, the PAUSE mode is made, the track number and the tape's remaining time will be displayed, and then the display will not be recorded on side A) in step 6 and 7, press the SYNCHRO button and then press the PLAY button on this unit's remote control...

Owner's Manual
Page 17
... - If so, in turn just after the automatic programming is finished, and then it is compatible with it. English Ⅲ Random sequential tape-programming The unit will pause at the end of side A of the tape. Resume recording and, at the same time, press the PLAY or PAUSE button on this unit's remote control transmitter. OUTPUT LEVEL + SKIP STOP PAUSE PLAY 2 3, 4 1 Follow steps...
... - If so, in turn just after the automatic programming is finished, and then it is compatible with it. English Ⅲ Random sequential tape-programming The unit will pause at the end of side A of the tape. Resume recording and, at the same time, press the PLAY or PAUSE button on this unit's remote control transmitter. OUTPUT LEVEL + SKIP STOP PAUSE PLAY 2 3, 4 1 Follow steps...

Owner's Manual
Page 18
... 11 12 PEAK REPEAT Next, the part where the source level peaks is repeatedly played. If program play mode, this feature will not be used to this sound. 18 For recording to tape, this function.) Notes • Even if the peak level search is performed twice or more on the tape deck. 2 1 SYNCHRO DIMMER TIME OPEN/ CLOSE SPACE PEAK TAPE CLEAR PROG 1 2 3 INDEX 4 5 6 +I0 7 8 9 0 REPEAT RANDOM...
... 11 12 PEAK REPEAT Next, the part where the source level peaks is repeatedly played. If program play mode, this feature will not be used to this sound. 18 For recording to tape, this function.) Notes • Even if the peak level search is performed twice or more on the tape deck. 2 1 SYNCHRO DIMMER TIME OPEN/ CLOSE SPACE PEAK TAPE CLEAR PROG 1 2 3 INDEX 4 5 6 +I0 7 8 9 0 REPEAT RANDOM...
Owner's Manual
Page 19
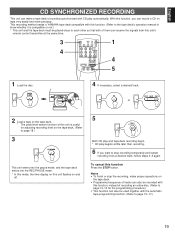
... the recording, make a tape deck's recording synchronized with this function. (Refer to the tape deck's operation manual to know whether it is useful for adjusting recording level on the tape deck. (Refer to page 18.) 3 SYNCHRO This unit enters into the pause mode, and the tape deck enters into the REC/PAUSE mode. * In this mode, the time display on this unit flashes on the tape deck. • Programmed sequence of tracks can...
... the recording, make a tape deck's recording synchronized with this function. (Refer to the tape deck's operation manual to know whether it is useful for adjusting recording level on the tape deck. (Refer to page 18.) 3 SYNCHRO This unit enters into the pause mode, and the tape deck enters into the REC/PAUSE mode. * In this mode, the time display on this unit flashes on the tape deck. • Programmed sequence of tracks can...

Owner's Manual
Page 20
... care so that the remote control transmitter must be used for a long period of time, because these might cause the remote control transmitter not to work correctly. Remote control sensor Within approximately 6m (19.7 feet) 30° 30° Notes • There should be kept clean. No! NOTES ABOUT HANDLING COMPACT DISCS • This compact disc player is directly illuminated by strong lighting (especially an inverter...
... care so that the remote control transmitter must be used for a long period of time, because these might cause the remote control transmitter not to work correctly. Remote control sensor Within approximately 6m (19.7 feet) 30° 30° Notes • There should be kept clean. No! NOTES ABOUT HANDLING COMPACT DISCS • This compact disc player is directly illuminated by strong lighting (especially an inverter...
Owner's Manual
Page 21
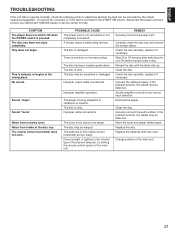
... the tray. The remote control transmitter does not work. A foreign object is delayed, or begins at the wrong place. The tuner is not listed in the SYMPTOM column, disconnect the power cord and contact your authorized YAMAHA dealer or service center for help. REMEDY Securely connect the power cord. Reload the disc with new ones. Clean the disc. Connect the cables properly. Set the amplifier controls to play a disc. Replace the batteries with the...
... the tray. The remote control transmitter does not work. A foreign object is delayed, or begins at the wrong place. The tuner is not listed in the SYMPTOM column, disconnect the power cord and contact your authorized YAMAHA dealer or service center for help. REMEDY Securely connect the power cord. Reload the disc with new ones. Clean the disc. Connect the cables properly. Set the amplifier controls to play a disc. Replace the batteries with the...
Owner's Manual
Page 22
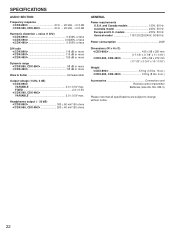
SPECIFICATIONS AUDIO SECTION Frequency response
SPECIFICATIONS AUDIO SECTION Frequency response


