
Owner's Manual
Page 4
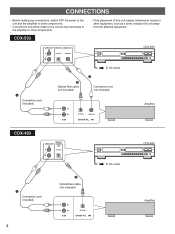
CDX-593 • If the placement of the amplifier or other equipment, such as a tuner, relocate this unit away from the affected equipment. CONNECTIONS • Before ... interference (noise) in other components. LINE OUT 1 DIGITAL AUDIO OUT OPTICAL COAXIAL CDX-593 1 Connection cord (included) 2 Optical fiber cable (not included) To AC outlet 3 Connection cord (not included) CD OPTICAL COAXIAL DIGITAL IN CDX-493 LINE OUT 1 DIGITAL AUDIO OUT OPTICAL Amplifier CDX-493 1 Connection cord (included) 4 2 Optical fiber cable (not included) To AC outlet...
CDX-593 • If the placement of the amplifier or other equipment, such as a tuner, relocate this unit away from the affected equipment. CONNECTIONS • Before ... interference (noise) in other components. LINE OUT 1 DIGITAL AUDIO OUT OPTICAL COAXIAL CDX-593 1 Connection cord (included) 2 Optical fiber cable (not included) To AC outlet 3 Connection cord (not included) CD OPTICAL COAXIAL DIGITAL IN CDX-493 LINE OUT 1 DIGITAL AUDIO OUT OPTICAL Amplifier CDX-493 1 Connection cord (included) 4 2 Optical fiber cable (not included) To AC outlet...

Owner's Manual
Page 5
...etc. When connecting this unit with a YAMAHA amplifier or receiver whose terminals on the rear panel are numbered as 1, 2, 3, etc., connect the LINE OUT terminals of this unit to the input terminals numbered 1 on the rear of the amplifier or receiver. 2 CDX-593 and CDX-493 only When the DIGITAL OUT (OPTICAL)...by using the OUTPUT LEVEL button. 5 If the amplifier does not have such terminals, use the "TAPE PB" terminals. to record CD onto a tape directly. 3 CDX-593 only When the DIGITAL OUT (COAXIAL) terminal of this unit is used • Make the connection from this terminal to the ...
...etc. When connecting this unit with a YAMAHA amplifier or receiver whose terminals on the rear panel are numbered as 1, 2, 3, etc., connect the LINE OUT terminals of this unit to the input terminals numbered 1 on the rear of the amplifier or receiver. 2 CDX-593 and CDX-493 only When the DIGITAL OUT (OPTICAL)...by using the OUTPUT LEVEL button. 5 If the amplifier does not have such terminals, use the "TAPE PB" terminals. to record CD onto a tape directly. 3 CDX-593 only When the DIGITAL OUT (COAXIAL) terminal of this unit is used • Make the connection from this terminal to the ...

Owner's Manual
Page 8
...tray by pressing the PLAY button (or button on page 10.) 3 CDX-593 and CDX-493 Shows the signal output level to an amplifier or the headphones, adjusted by using the OUTPUT LEVEL button. 4 Displays the CD track numbers (up 4 OPEN/ CLOSE PLAY Disc tray Display information ... PEAK TAPE CLEAR PROG 1 2 3 INDEX 4 5 6 +I0 7 8 9 0 REPEAT RANDOM SEARCH - BASIC OPERATION 1 POWER 1 Turn the power on the power again with a CD in any of these ways, play 3 4 5 6 7 8 9 10 11 12 SINGLE 1 Shows the track number selected or being played. 2 Shows the time displays. (Refer to...
...tray by pressing the PLAY button (or button on page 10.) 3 CDX-593 and CDX-493 Shows the signal output level to an amplifier or the headphones, adjusted by using the OUTPUT LEVEL button. 4 Displays the CD track numbers (up 4 OPEN/ CLOSE PLAY Disc tray Display information ... PEAK TAPE CLEAR PROG 1 2 3 INDEX 4 5 6 +I0 7 8 9 0 REPEAT RANDOM SEARCH - BASIC OPERATION 1 POWER 1 Turn the power on the power again with a CD in any of these ways, play 3 4 5 6 7 8 9 10 11 12 SINGLE 1 Shows the track number selected or being played. 2 Shows the time displays. (Refer to...
Owner's Manual
Page 15
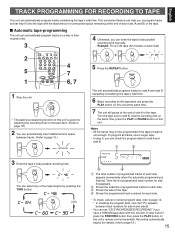
...+ SKIP STOP PAUSE PLAY 4 7 6, 7 4 Otherwise, you can use a longer tape. • In step 5, you can help you have a YAMAHA tape deck with the least amount of unrecorded space remaining at the end of each side. • To check, cancel or correct program data, refer... 5 1 SYNCHRO DIMMER TIME OPEN/ CLOSE SPACE PEAK TAPE CLEAR PROG 1 2 3 INDEX 4 5 6 +I0 7 8 9 0 REPEAT RANDOM SEARCH - To program all tracks, use "CD SYNCHRONIZED RECORDING" if you to page 19.) 15 This convenient feature can check the program data for side A and side B. • You can enter the...
...+ SKIP STOP PAUSE PLAY 4 7 6, 7 4 Otherwise, you can use a longer tape. • In step 5, you can help you have a YAMAHA tape deck with the least amount of unrecorded space remaining at the end of each side. • To check, cancel or correct program data, refer... 5 1 SYNCHRO DIMMER TIME OPEN/ CLOSE SPACE PEAK TAPE CLEAR PROG 1 2 3 INDEX 4 5 6 +I0 7 8 9 0 REPEAT RANDOM SEARCH - To program all tracks, use "CD SYNCHRONIZED RECORDING" if you to page 19.) 15 This convenient feature can check the program data for side A and side B. • You can enter the...
Owner's Manual
Page 16
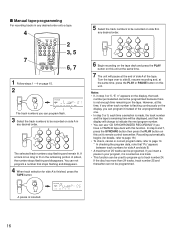
... lit. OUTPUT LEVEL + SKIP STOP PAUSE PLAY 2 3, 5 6, 7 1 Follow steps 1 - 4 on page 15. 2 PROG PROGRAM A TOTAL REMAIN 1 2 3 4 5 6 7 8 9 10 11 12 The track numbers you can use "CD SYNCHRONIZED RECORDING" if you have a YAMAHA tape deck with this time, if any other track number is flashing continuously on this unit's remote control transmitter.
... lit. OUTPUT LEVEL + SKIP STOP PAUSE PLAY 2 3, 5 6, 7 1 Follow steps 1 - 4 on page 15. 2 PROG PROGRAM A TOTAL REMAIN 1 2 3 4 5 6 7 8 9 10 11 12 The track numbers you can use "CD SYNCHRONIZED RECORDING" if you have a YAMAHA tape deck with this time, if any other track number is flashing continuously on this unit's remote control transmitter.

Owner's Manual
Page 17
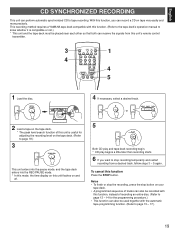
... and at the same time, press the PLAY button on this unit's remote control transmitter. English L Automatic Random Program tape recording The unit can use "CD SYNCHRONIZED RECORDING" if your tape deck has this function. Turn the tape over to tape. 4 SYNCHRO DIMMER TIME OPEN/ CLOSE SPACE PEAK TAPE CLEAR PROG...
... and at the same time, press the PLAY button on this unit's remote control transmitter. English L Automatic Random Program tape recording The unit can use "CD SYNCHRONIZED RECORDING" if your tape deck has this function. Turn the tape over to tape. 4 SYNCHRO DIMMER TIME OPEN/ CLOSE SPACE PEAK TAPE CLEAR PROG...
Owner's Manual
Page 19
...near each other so that both can receive the signals from a desired track, follow steps 3 - 5 again. This recording method requires a YAMAHA tape deck compatible with this unit is compatible or not.) * This unit and the tape deck must be used together with the automatic tape-...mode, the time display on this unit flashes on and off. 5 PLAY Both CD play and tape deck recording begin. * CD play begins a little later than recording starts. 6 If you can perform automatic synchronized CD to stop recording temporarily and restart recording from this function Press the STOP button....
...near each other so that both can receive the signals from a desired track, follow steps 3 - 5 again. This recording method requires a YAMAHA tape deck compatible with this unit is compatible or not.) * This unit and the tape deck must be used together with the automatic tape-...mode, the time display on this unit flashes on and off. 5 PLAY Both CD play and tape deck recording begin. * CD play begins a little later than recording starts. 6 If you can perform automatic synchronized CD to stop recording temporarily and restart recording from this function Press the STOP button....
Owner's Manual
Page 20
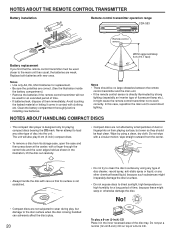
... its surface is not scratched. • Compact discs are not subjected to work correctly. Do not put a normal (12-cm/5-inch) CD on their playing surface, but damage to the main unit than usual, the batteries are not affected by using a clean, dry cloth. ...disc's surface. • Do not expose discs to avoid direct lighting. NOTES ABOUT THE REMOTE CONTROL TRANSMITTER Battery installation Remote control transmitter operation range CDX-593 2 1 Remote control sensor 3 Within approximately 6 m (19.7 feet) Battery replacement If you find that its storage case, open the case...
... its surface is not scratched. • Compact discs are not subjected to work correctly. Do not put a normal (12-cm/5-inch) CD on their playing surface, but damage to the main unit than usual, the batteries are not affected by using a clean, dry cloth. ...disc's surface. • Do not expose discs to avoid direct lighting. NOTES ABOUT THE REMOTE CONTROL TRANSMITTER Battery installation Remote control transmitter operation range CDX-593 2 1 Remote control sensor 3 Within approximately 6 m (19.7 feet) Battery replacement If you find that its storage case, open the case...


