
Owner's Manual
Page 2
... without affecting your equipment by qualified service personnel when: A. The safety and operating instructions should be used only with care. All other instructions should be adhered to qualified service personnel. 17 Power Lines - An outdoor antenna should be serviced by playing it is located on the unit. 11 Power-Cord Protection - Model: Serial No.: The serial number is too late, YAMAHA and the Electronic Industries Association...
... without affecting your equipment by qualified service personnel when: A. The safety and operating instructions should be used only with care. All other instructions should be adhered to qualified service personnel. 17 Power Lines - An outdoor antenna should be serviced by playing it is located on the unit. 11 Power-Cord Protection - Model: Serial No.: The serial number is too late, YAMAHA and the Electronic Industries Association...
Owner's Manual
Page 3
... approved by Yamaha may void your authority, granted by lightning, disconnect the power cord from the AC outlet during an electrical storm. 10 When disconnecting the power cord from the AC outlet, grasp the plug; IMPORTANT: When connecting this product to use only high quality shielded cables. This equipment generates/uses radio frequencies and, if not installed and used . WARNING CAUTION Use of controls or adjustments or...
... approved by Yamaha may void your authority, granted by lightning, disconnect the power cord from the AC outlet during an electrical storm. 10 When disconnecting the power cord from the AC outlet, grasp the plug; IMPORTANT: When connecting this product to use only high quality shielded cables. This equipment generates/uses radio frequencies and, if not installed and used . WARNING CAUTION Use of controls or adjustments or...
Owner's Manual
Page 4
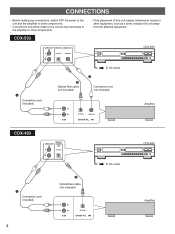
... 1 DIGITAL AUDIO OUT OPTICAL Amplifier CDX-493 1 Connection cord (included) 4 2 Optical fiber cable (not included) To AC outlet CD OPTICAL DIGITAL IN Amplifier CDX-593 • If the placement of the amplifier or other equipment, such as a tuner, relocate this unit away from the affected equipment. CONNECTIONS • Before making any connections, switch OFF the power to the unit and the amplifier or other components. • Connections should be made to the correct input...
... 1 DIGITAL AUDIO OUT OPTICAL Amplifier CDX-493 1 Connection cord (included) 4 2 Optical fiber cable (not included) To AC outlet CD OPTICAL DIGITAL IN Amplifier CDX-593 • If the placement of the amplifier or other equipment, such as a tuner, relocate this unit away from the affected equipment. CONNECTIONS • Before making any connections, switch OFF the power to the unit and the amplifier or other components. • Connections should be made to the correct input...

Owner's Manual
Page 5
... signal output level to an amplifier can be adjusted by using the OUTPUT LEVEL button. • This terminal can be connected to the optical input terminal of a digital audio tape deck (DAT) etc. When connecting this unit with a YAMAHA amplifier or receiver whose terminals on the rear panel are numbered as 1, 2, 3, etc., connect the LINE OUT terminals of this unit to the input terminals numbered 1 on the rear of the amplifier or receiver. 2 CDX-593 and CDX-493 only When the DIGITAL OUT (OPTICAL...
... signal output level to an amplifier can be adjusted by using the OUTPUT LEVEL button. • This terminal can be connected to the optical input terminal of a digital audio tape deck (DAT) etc. When connecting this unit with a YAMAHA amplifier or receiver whose terminals on the rear panel are numbered as 1, 2, 3, etc., connect the LINE OUT terminals of this unit to the input terminals numbered 1 on the rear of the amplifier or receiver. 2 CDX-593 and CDX-493 only When the DIGITAL OUT (OPTICAL...
Owner's Manual
Page 6
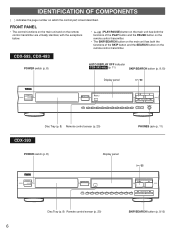
CDX-593, CDX-493 POWER switch (p. 8) AUTO DISPLAY OFF indicator CDX-593 only (p. 11) SKIP/SEARCH button (p. 9,10) Display panel POWER OPEN/CLOSE AUTO DISPLAY OFF SKIP/SEARCH PHONES +10 1 2 3 4 5 6 7 8 9 0 OUTPUT LEVEL Disc Tray (p. 8) Remote control sensor (p. 20) CDX-393 POWER switch (p. 8) Display panel PHONES jack (p. 11) POWER OPEN/CLOSE +10 1 2 3 4 5 6 7 8 9 0 SKIP/SEARCH Disc Tray (p. 8) Remote control sensor (p. 20) SKIP/SEARCH button (p. 9,10) 6 FRONT PANEL • The control functions on the main unit and on the remote control transmitter...
CDX-593, CDX-493 POWER switch (p. 8) AUTO DISPLAY OFF indicator CDX-593 only (p. 11) SKIP/SEARCH button (p. 9,10) Display panel POWER OPEN/CLOSE AUTO DISPLAY OFF SKIP/SEARCH PHONES +10 1 2 3 4 5 6 7 8 9 0 OUTPUT LEVEL Disc Tray (p. 8) Remote control sensor (p. 20) CDX-393 POWER switch (p. 8) Display panel PHONES jack (p. 11) POWER OPEN/CLOSE +10 1 2 3 4 5 6 7 8 9 0 SKIP/SEARCH Disc Tray (p. 8) Remote control sensor (p. 20) SKIP/SEARCH button (p. 9,10) 6 FRONT PANEL • The control functions on the main unit and on the remote control transmitter...
Owner's Manual
Page 7
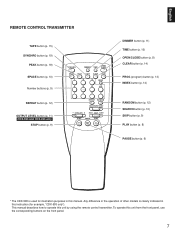
... TAPE CLEAR PROG 1 2 3 INDEX 4 5 6 +I0 7 8 9 0 REPEAT RANDOM SEARCH - OUTPUT LEVEL + SKIP STOP PAUSE PLAY DIMMER button (p. 11) TIME button (p. 10) OPEN/CLOSE button (p. 8) CLEAR button (p. 14) PROG (program) button (p. 13) INDEX button (p. 14) RANDOM button (p. 12) SEARCH button (p. 10) SKIP button (p. 9) PLAY button (p. 8) PAUSE button (p. 9) * The CDX-593 is clearly indicated in this instruction (for example, "CDX-593 only"). Any difference in the operation of other models is used for illustration purposes in this manual...
... TAPE CLEAR PROG 1 2 3 INDEX 4 5 6 +I0 7 8 9 0 REPEAT RANDOM SEARCH - OUTPUT LEVEL + SKIP STOP PAUSE PLAY DIMMER button (p. 11) TIME button (p. 10) OPEN/CLOSE button (p. 8) CLEAR button (p. 14) PROG (program) button (p. 13) INDEX button (p. 14) RANDOM button (p. 12) SEARCH button (p. 10) SKIP button (p. 9) PLAY button (p. 8) PAUSE button (p. 9) * The CDX-593 is clearly indicated in this instruction (for example, "CDX-593 only"). Any difference in the operation of other models is used for illustration purposes in this manual...

Owner's Manual
Page 8
... of the disc tray gently. BASIC OPERATION 1 POWER 1 Turn the power on page 10.) 3 CDX-593 and CDX-493 Shows the signal output level to 20). OUTPUT LEVEL + SKIP STOP PAUSE PLAY 2, 3 4 3 Close the disc tray. OPEN/ CLOSE 2 Load a disc. Label side up to an amplifier or the headphones, adjusted by pressing the OPEN/CLOSE button, the display shows the total number of tracks and the total recorded time of the disc. After...
... of the disc tray gently. BASIC OPERATION 1 POWER 1 Turn the power on page 10.) 3 CDX-593 and CDX-493 Shows the signal output level to 20). OUTPUT LEVEL + SKIP STOP PAUSE PLAY 2, 3 4 3 Close the disc tray. OPEN/ CLOSE 2 Load a disc. Label side up to an amplifier or the headphones, adjusted by pressing the OPEN/CLOSE button, the display shows the total number of tracks and the total recorded time of the disc. After...

Owner's Manual
Page 9
... stop mode. • When using the SKIP button on the disc, the final track is played. If you enter a number that is higher than the last track number on the remote control transmitter: If the button is pressed and held, the track number continuously changes to higher numbers (or lower numbers). • When using the number buttons. 5 SKIP PLAY To skip to press and hold the button, otherwise the selected...
... stop mode. • When using the SKIP button on the disc, the final track is played. If you enter a number that is higher than the last track number on the remote control transmitter: If the button is pressed and held, the track number continuously changes to higher numbers (or lower numbers). • When using the number buttons. 5 SKIP PLAY To skip to press and hold the button, otherwise the selected...

Owner's Manual
Page 10
... and hold .) Selecting time displays You can also be performed while disc play is paused, though no sound will not be displayed if the track number is 25 or higher. This is convenient for locating a precise position within a track, or for reviewing the contents quickly. • Manual search can select any of the four time displays by pressing the auto-SPACE button to insert spaces...
... and hold .) Selecting time displays You can also be performed while disc play is paused, though no sound will not be displayed if the track number is 25 or higher. This is convenient for locating a precise position within a track, or for reviewing the contents quickly. • Manual search can select any of the four time displays by pressing the auto-SPACE button to insert spaces...
Owner's Manual
Page 11
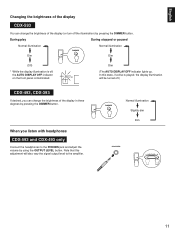
... using the OUTPUT LEVEL button. In this adjustment will be turned off.) CDX-493, CDX-393 If desired, you listen with headphones CDX-593 and CDX-493 only Connect the headphones to the amplifier. Note that this state, if a disc is illuminated. English Changing the brightness of the display CDX-593 You can change the brightness of the display in three degrees by pressing the DIMMER button. AUTO DISPLAY OFF Dim (The AUTO DISPLAY OFF...
... using the OUTPUT LEVEL button. In this adjustment will be turned off.) CDX-493, CDX-393 If desired, you listen with headphones CDX-593 and CDX-493 only Connect the headphones to the amplifier. Note that this state, if a disc is illuminated. English Changing the brightness of the display CDX-593 You can change the brightness of the display in three degrees by pressing the DIMMER button. AUTO DISPLAY OFF Dim (The AUTO DISPLAY OFF...
Owner's Manual
Page 12
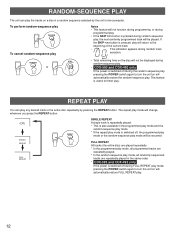
... programmed-play mode and the random-sequence play mode. * If the repeat play mode is switched off during random-sequence play. • CDX-593 and CDX-493 only If the power is switched off during FULL REPEAT play mode, pressing the POWER switch again to turn the unit on a disc in the same order. * CDX-593 and CDX-493 only If the power is switched off , the programmed-play mode or the random-sequence play . If the SKIP button is useful...
... programmed-play mode and the random-sequence play mode. * If the repeat play mode is switched off during random-sequence play. • CDX-593 and CDX-493 only If the power is switched off during FULL REPEAT play mode, pressing the POWER switch again to turn the unit on a disc in the same order. * CDX-593 and CDX-493 only If the power is switched off , the programmed-play mode or the random-sequence play . If the SKIP button is useful...

Owner's Manual
Page 13
... any desired order. OUTPUT LEVEL + SKIP STOP PAUSE PLAY 2 4 1 Stop the unit. To return to the previous display, press the TIME display mode-select button again. • The SKIP ( and ) button can be used during Program Play to skip to tracks within the Program. • The SEARCH ( and ) button can be used during programming, the TIME display mode-select button is pressed, the program number display is programmed, the total time will not be displayed. Notes • In...
... any desired order. OUTPUT LEVEL + SKIP STOP PAUSE PLAY 2 4 1 Stop the unit. To return to the previous display, press the TIME display mode-select button again. • The SKIP ( and ) button can be used during Program Play to skip to tracks within the Program. • The SEARCH ( and ) button can be used during programming, the TIME display mode-select button is pressed, the program number display is programmed, the total time will not be displayed. Notes • In...

Owner's Manual
Page 14
... desired index number. 1, 3 SYNCHRO DIMMER TIME OPEN/ CLOSE SPACE PEAK TAPE CLEAR PROG 1 2 3 INDEX 4 5 6 +I0 7 8 9 0 REPEAT RANDOM SEARCH - When you press this button, the track number and the program number is stopped. • Open the disc tray. • Switch off the power. To stop the program play will be cleared from the memory and the new one displayed. The first programmed track number will begin...
... desired index number. 1, 3 SYNCHRO DIMMER TIME OPEN/ CLOSE SPACE PEAK TAPE CLEAR PROG 1 2 3 INDEX 4 5 6 +I0 7 8 9 0 REPEAT RANDOM SEARCH - When you press this button, the track number and the program number is stopped. • Open the disc tray. • Switch off the power. To stop the program play will be cleared from the memory and the new one displayed. The first programmed track number will begin...
Owner's Manual
Page 15
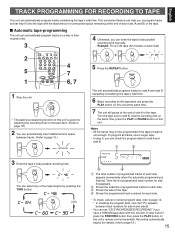
... the TAPE button. REPEAT 1 Stop the unit. STOP * The peak level searching function of this unit is useful for adjusting the recording level on each side appears momentarily when the automatic programming is not enough. English TRACK PROGRAMMING FOR RECORDING TO TAPE The unit can automatically insert additional time space between track numbers for side A and side B. • You can help you have a YAMAHA tape deck...
... the TAPE button. REPEAT 1 Stop the unit. STOP * The peak level searching function of this unit is useful for adjusting the recording level on each side appears momentarily when the automatic programming is not enough. English TRACK PROGRAMMING FOR RECORDING TO TAPE The unit can automatically insert additional time space between track numbers for side A and side B. • You can help you have a YAMAHA tape deck...
Owner's Manual
Page 16
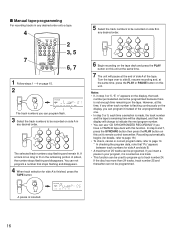
... 5, each time a selection is inserted. 5 Select the track numbers to be programmed. 16 Turn the tape over to fit on the tape. If a track is not enough time remaining on the remaining portion of 25 tracks can not be recorded on side A in any other track number is flashing continuously on the display, you have a YAMAHA tape deck with this unit's remote control transmitter. OUTPUT LEVEL + SKIP STOP PAUSE PLAY...
... 5, each time a selection is inserted. 5 Select the track numbers to be programmed. 16 Turn the tape over to fit on the tape. If a track is not enough time remaining on the remaining portion of 25 tracks can not be recorded on side A in any other track number is flashing continuously on the display, you have a YAMAHA tape deck with this unit's remote control transmitter. OUTPUT LEVEL + SKIP STOP PAUSE PLAY...

Owner's Manual
Page 17
... the programmed data changes every time the RANDOM button is pressed, the amount of the tape. OUTPUT LEVEL + SKIP STOP PAUSE PLAY 2 3, 4 1 Follow steps 1 - 4 on this unit. Resume recording and, at the end of the tape. 4 Shows the programmed track numbers for each side appears momentarily when the automatic programming is not enough, not all tracks can be programmed. English L Automatic Random Program tape recording...
... the programmed data changes every time the RANDOM button is pressed, the amount of the tape. OUTPUT LEVEL + SKIP STOP PAUSE PLAY 2 3, 4 1 Follow steps 1 - 4 on this unit. Resume recording and, at the end of the tape. 4 Shows the programmed track numbers for each side appears momentarily when the automatic programming is not enough, not all tracks can be programmed. English L Automatic Random Program tape recording...

Owner's Manual
Page 18
... function Press the STOP button. (Some other buttons can also be selected each time. OUTPUT LEVEL + SKIP STOP PAUSE PLAY 1 Stop the unit. If program play is performed twice or more on the same disc, the same peak may not be used to this sound. 18 Adjust the recording level on the tape deck listening to cancel this function.) Notes • Sound peak levels are randomly selected by this feature functions with programmed...
... function Press the STOP button. (Some other buttons can also be selected each time. OUTPUT LEVEL + SKIP STOP PAUSE PLAY 1 Stop the unit. If program play is performed twice or more on the same disc, the same peak may not be used to this sound. 18 Adjust the recording level on the tape deck listening to cancel this function.) Notes • Sound peak levels are randomly selected by this feature functions with programmed...
Owner's Manual
Page 19
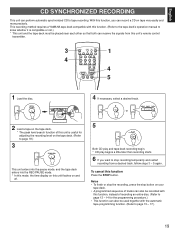
... function. (Refer to the tape deck's operation manual to know whether it is useful for the programming procedure.) • This function can perform automatic synchronized CD to tape recording. To cancel this unit's remote control transmitter. 3 4 SYNCHRO DIMMER TIME OPEN/ CLOSE SPACE PEAK TAPE CLEAR PROG 1 2 3 INDEX 4 5 6 +I0 7 8 9 0 REPEAT RANDOM SEARCH - This recording method requires a YAMAHA tape deck compatible with this function, you want to stop button on tape...
... function. (Refer to the tape deck's operation manual to know whether it is useful for the programming procedure.) • This function can perform automatic synchronized CD to tape recording. To cancel this unit's remote control transmitter. 3 4 SYNCHRO DIMMER TIME OPEN/ CLOSE SPACE PEAK TAPE CLEAR PROG 1 2 3 INDEX 4 5 6 +I0 7 8 9 0 REPEAT RANDOM SEARCH - This recording method requires a YAMAHA tape deck compatible with this function, you want to stop button on tape...
Owner's Manual
Page 20
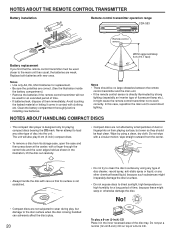
... the disc's play. 20 • Do not try to clean the disc's surface by using any type of disc cleaner, record spray, anti-static spray or liquid, or any other chemical-based liquid, because such substances might irreparably damage the disc's surface. • Do not expose discs to avoid direct lighting. NOTES ABOUT THE REMOTE CONTROL TRANSMITTER Battery installation Remote control transmitter operation range CDX-593 2 1 Remote control sensor...
... the disc's play. 20 • Do not try to clean the disc's surface by using any type of disc cleaner, record spray, anti-static spray or liquid, or any other chemical-based liquid, because such substances might irreparably damage the disc's surface. • Do not expose discs to avoid direct lighting. NOTES ABOUT THE REMOTE CONTROL TRANSMITTER Battery installation Remote control transmitter operation range CDX-593 2 1 Remote control sensor...
Owner's Manual
Page 21
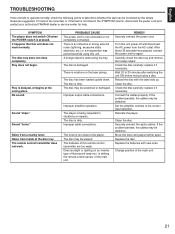
... after switching the unit ON before trying to the correct input selection. Check the disc carefully; Clean the disc. Replace the disc. It happens that this unit. No sound. There is an influence of this unit power off and disconnect the AC power from the AC outlet. Improper cable connections. Turn this remote control transmitter are too weak. replace it if necessary. If the problem persists, the cables...
... after switching the unit ON before trying to the correct input selection. Check the disc carefully; Clean the disc. Replace the disc. It happens that this unit. No sound. There is an influence of this unit power off and disconnect the AC power from the AC outlet. Improper cable connections. Turn this remote control transmitter are too weak. replace it if necessary. If the problem persists, the cables...


