
Owner's Manual
Page 2
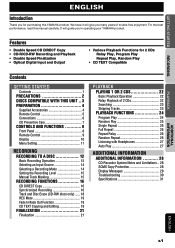
.... We hope it will guide you in operating your YAMAHA product. Features • Double Speed CD DIRECT Copy • CD-R/CD-RW Recording and Playback • Double Speed Finalization • Optical ...• CD TEXT Compatible Contents GETTING STARTED Contents 1 PRECAUTIONS 2 DISCS COMPATIBLE WITH THIS UNIT .. 3 PREPARATION 4 Supplied Accessories 4 Remote Control 5 Connections 6 CD Preventive Care 7 CONTROLS AND FUNCTIONS 8 Front Panel 8 Remote Control 9 Display 10 Menu Setting 11 RECORDING RECORDING TO A DISC 12 Basic Recording Operation 12 Selecting an Input Source 14...
.... We hope it will guide you in operating your YAMAHA product. Features • Double Speed CD DIRECT Copy • CD-R/CD-RW Recording and Playback • Double Speed Finalization • Optical ...• CD TEXT Compatible Contents GETTING STARTED Contents 1 PRECAUTIONS 2 DISCS COMPATIBLE WITH THIS UNIT .. 3 PREPARATION 4 Supplied Accessories 4 Remote Control 5 Connections 6 CD Preventive Care 7 CONTROLS AND FUNCTIONS 8 Front Panel 8 Remote Control 9 Display 10 Menu Setting 11 RECORDING RECORDING TO A DISC 12 Basic Recording Operation 12 Selecting an Input Source 14...

Owner's Manual
Page 5
... the electromagnetic interference. E-4 PREPARATION Supplied Accessories After unpacking, make sure the following items are included in order to the headphones cable in your package. • Remote Control • Batteries (size AA, UM-3, R6) (2) COPY A OPEN/CLOSE B FADE IN/OUT TRACK NO.
... the electromagnetic interference. E-4 PREPARATION Supplied Accessories After unpacking, make sure the following items are included in order to the headphones cable in your package. • Remote Control • Batteries (size AA, UM-3, R6) (2) COPY A OPEN/CLOSE B FADE IN/OUT TRACK NO.
Owner's Manual
Page 6
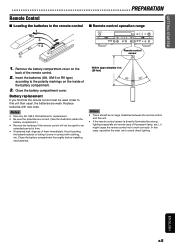
...) according to the polarity markings on the back of the battery compartment. 3. Replace batteries with clothing, etc. GETTING STARTED RECORDING PREPARATION Remote Control I Remote control operation range NATURAL SOUND CD RECORDER CDR-D651 POWER A DISC DISPLAY A TEXT/TIME DISPLAY B PHONES LEVEL MIN MAX COPY REC MODE TRACK NO. Close the battery compartment cover. INPUT...
...) according to the polarity markings on the back of the battery compartment. 3. Replace batteries with clothing, etc. GETTING STARTED RECORDING PREPARATION Remote Control I Remote control operation range NATURAL SOUND CD RECORDER CDR-D651 POWER A DISC DISPLAY A TEXT/TIME DISPLAY B PHONES LEVEL MIN MAX COPY REC MODE TRACK NO. Close the battery compartment cover. INPUT...

Owner's Manual
Page 10
w (Play) z B (Disc tray B P.24 x a (Stop) ADDITIONAL INFORMATION ENGLISH E-9 GETTING STARTED RECORDING PLAYBACK CONTROL AND FUNCTIONS Remote Control COPY 1 A OPEN/CLOSE B 2 FADE IN/OUT TRACK NO. WRITE P.15 p ERASE P.18 a FINALIZE P.21 s INPUT P.13,14 d DIMMER P.10 f P.11,16 g SET P.20 h PROG P....
w (Play) z B (Disc tray B P.24 x a (Stop) ADDITIONAL INFORMATION ENGLISH E-9 GETTING STARTED RECORDING PLAYBACK CONTROL AND FUNCTIONS Remote Control COPY 1 A OPEN/CLOSE B 2 FADE IN/OUT TRACK NO. WRITE P.15 p ERASE P.18 a FINALIZE P.21 s INPUT P.13,14 d DIMMER P.10 f P.11,16 g SET P.20 h PROG P....
Owner's Manual
Page 11
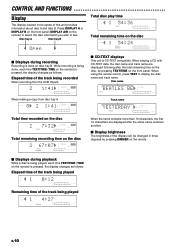
... -I 0 OVER Remaining time of this unit provides information about disc A and disc B. I Displays during recording Recording is done on the remote) is pressed, the display changes as follows: Elapsed time of the display can be changed in the center of the track being played 1...Total time recorded on the disc 2 7:32 CD-R REC 44.I TOTAL L dB -60 -30 -I0 R -6 -4 -2 -I 0 OVER Total remaining recording time on the remote. I Display brightness The brightness of the track being recorded When recording from the LINE IN jack 2 1:41 CD-R REC 44.I L dB -60 -30 -I0 R -6 ...
... -I 0 OVER Remaining time of this unit provides information about disc A and disc B. I Displays during recording Recording is done on the remote) is pressed, the display changes as follows: Elapsed time of the display can be changed in the center of the track being played 1...Total time recorded on the disc 2 7:32 CD-R REC 44.I TOTAL L dB -60 -30 -I0 R -6 -4 -2 -I 0 OVER Total remaining recording time on the remote. I Display brightness The brightness of the track being recorded When recording from the LINE IN jack 2 1:41 CD-R REC 44.I L dB -60 -30 -I0 R -6 ...
Owner's Manual
Page 12
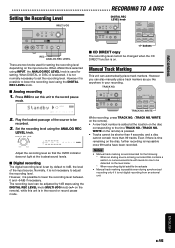
... Play CD L dB -60 -30 -I0 R -6 -4 -2 -I 0 OVER * To select an automatic start or manual start of playback when the power is turned on the remote) to display the items in and fade-out time respectively for recording. See page 19 for details. on . ⇒ Auto ON ↔ Auto OFF Copy...CD L dB -60 -30 -I0 R -6 -4 -2 -I 0 OVER * To select analog recording when digital recording is not possible for SCMS using the MULTI JOG knob on the remote). 1. The options (shown underlined below) blink and alternate as the knob is in the stop mode, press and rotate the MULTI JOG knob (MENU and...
... Play CD L dB -60 -30 -I0 R -6 -4 -2 -I 0 OVER * To select an automatic start or manual start of playback when the power is turned on the remote) to display the items in and fade-out time respectively for recording. See page 19 for details. on . ⇒ Auto ON ↔ Auto OFF Copy...CD L dB -60 -30 -I0 R -6 -4 -2 -I 0 OVER * To select analog recording when digital recording is not possible for SCMS using the MULTI JOG knob on the remote). 1. The options (shown underlined below) blink and alternate as the knob is in the stop mode, press and rotate the MULTI JOG knob (MENU and...
Owner's Manual
Page 13
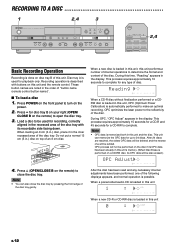
... 1 NATURAL SOUND CD RECORDER CDR-D651 POWER A DISC 2,4 3 DISPLAY A TEXT/TIME DISPLAY B PHONES LEVEL MIN MAX COPY REC MODE TRACK NO. Recording operation is memorized both in the order of an 8 cm disc. 4. Press POWER on the front panel to turn on the remote) to determine the format and...CD-R disc without finalization performed or a CDRW disc is loaded in this unit, OPC (Optimum Power Calibration) is loaded in this unit and the remote control. Press v for playback only. During OPC, "OPC Adjust" appears in the inner recessed area of the disc tray gently. This process ...
... 1 NATURAL SOUND CD RECORDER CDR-D651 POWER A DISC 2,4 3 DISPLAY A TEXT/TIME DISPLAY B PHONES LEVEL MIN MAX COPY REC MODE TRACK NO. Recording operation is memorized both in the order of an 8 cm disc. 4. Press POWER on the front panel to turn on the remote) to determine the format and...CD-R disc without finalization performed or a CDRW disc is loaded in this unit, OPC (Optimum Power Calibration) is loaded in this unit and the remote control. Press v for playback only. During OPC, "OPC Adjust" appears in the inner recessed area of the disc tray gently. This process ...
Owner's Manual
Page 14
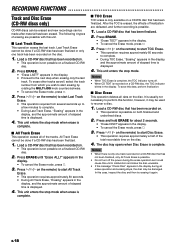
...the power is written to be adjusted when making a CD DIRECT copy. 4. ADDITIONAL INFORMATION ENGLISH E-13 Press REC. Press w/d (d on the remote) again to pause recording temporarily. "Wait" lights in the display. 7. This unit enters the record pause mode. See page 21 for details... when making digital and analog recordings. GETTING STARTED RECORDING PLAYBACK RECORDING TO A DISC 12 10,11 9 2 COPY NATURAL SOUND CD RECORDER CDR-D651 POWER A DISC DISPLAY A TEXT/TIME DISPLAY B PHONES LEVEL MIN MAX COPY REC MODE TRACK NO. However the recording level cannot be ...
...the power is written to be adjusted when making a CD DIRECT copy. 4. ADDITIONAL INFORMATION ENGLISH E-13 Press REC. Press w/d (d on the remote) again to pause recording temporarily. "Wait" lights in the display. 7. This unit enters the record pause mode. See page 21 for details... when making digital and analog recordings. GETTING STARTED RECORDING PLAYBACK RECORDING TO A DISC 12 10,11 9 2 COPY NATURAL SOUND CD RECORDER CDR-D651 POWER A DISC DISPLAY A TEXT/TIME DISPLAY B PHONES LEVEL MIN MAX COPY REC MODE TRACK NO. However the recording level cannot be ...
Owner's Manual
Page 16
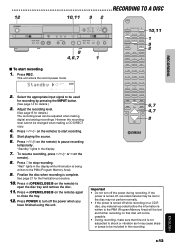
... necessary. Manual Track Marking This unit can be detected on the input source. TRACK NO. Even if there is time remaining on the remote), while this unit to be shorter than 4 seconds, and a disc cannot contain more than 99 tracks. When ANALOG is selected using ...-I0 R -6 -4 -2 -I 0 OVER 2. DIGITAL REC LEVEL knob COPY REC MODE TRACK NO. WRITE While recording, press TRACK NO. (TRACK NO. WRITE on the remote). • A new track number is not necessary to lower the recording level using INPUT, the ANALOG REC LEVEL knob is used for setting. Notes •...
... necessary. Manual Track Marking This unit can be detected on the input source. TRACK NO. Even if there is time remaining on the remote), while this unit to be shorter than 4 seconds, and a disc cannot contain more than 99 tracks. When ANALOG is selected using ...-I0 R -6 -4 -2 -I 0 OVER 2. DIGITAL REC LEVEL knob COPY REC MODE TRACK NO. WRITE While recording, press TRACK NO. (TRACK NO. WRITE on the remote). • A new track number is not necessary to lower the recording level using INPUT, the ANALOG REC LEVEL knob is used for setting. Notes •...
Owner's Manual
Page 17
... I 0 OVER 3. Load a source CD on the disc to record another disc. Select the desired copy speed by using both disc trays. on the remote) again. However, finalization is being written to the record pause mode. 3. See page 28 for Serial Copy Management System (SCMS) standards. • If...source. • This unit automatically starts recording. • When playback of the current track is longer than the total play time on the remote) to another track. 9. RECORDING FUNCTIONS CD DIRECT Copy This unit has a CD DIRECT copy function using INPUT on disc tray B. After the...
... I 0 OVER 3. Load a source CD on the disc to record another disc. Select the desired copy speed by using both disc trays. on the remote) again. However, finalization is being written to the record pause mode. 3. See page 28 for Serial Copy Management System (SCMS) standards. • If...source. • This unit automatically starts recording. • When playback of the current track is longer than the total play time on the remote) to another track. 9. RECORDING FUNCTIONS CD DIRECT Copy This unit has a CD DIRECT copy function using INPUT on disc tray B. After the...
Owner's Manual
Page 19
...8226; During Last Track Erase, "Erasing" appears in the display, and the approximate amount of elapsed time is displayed. 4. Press w/d (w on the remote) to start TOC Erase. • This operation requires approximately 80 seconds to start erasing by rotating the MULTI JOG knob counterclockwise. • To cancel ...be damaged. To erase other tracks as it may be done if a CD-RW disc has been finalized or only one track recorded on the remote) to start All Track Erase. • This operation requires approximately 80 seconds. • During All Track Erase, "Erasing" appears in the ...
...8226; During Last Track Erase, "Erasing" appears in the display, and the approximate amount of elapsed time is displayed. 4. Press w/d (w on the remote) to start TOC Erase. • This operation requires approximately 80 seconds to start erasing by rotating the MULTI JOG knob counterclockwise. • To cancel ...be damaged. To erase other tracks as it may be done if a CD-RW disc has been finalized or only one track recorded on the remote) to start All Track Erase. • This operation requires approximately 80 seconds. • During All Track Erase, "Erasing" appears in the ...
Owner's Manual
Page 20
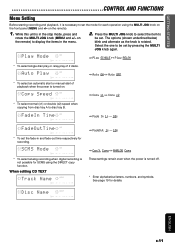
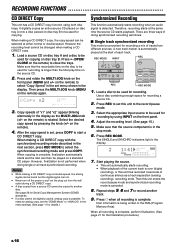
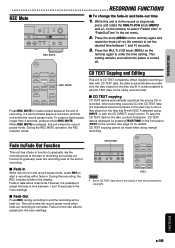
...recording. ADDITIONAL INFORMATION ENGLISH E-19 Fade-in the display. When digitally recording a disc with a fade-in function to edit CD TEXT data on the remote). While this unit is recorded, when recording a source CD with CD TEXT data (23 characters maximum) placed on the disc tray A onto a ... cannot be made when doing manual recording. A OPEN/CLOSE B FADE IN/OUT TRACK NO. To save the CD TEXT data on the remote) to gradually lower the recording level at the end of recording. This unit enters the record pause mode when fade-out recording is automatically...
...recording. ADDITIONAL INFORMATION ENGLISH E-19 Fade-in the display. When digitally recording a disc with a fade-in function to edit CD TEXT data on the remote). While this unit is recorded, when recording a source CD with CD TEXT data (23 characters maximum) placed on the disc tray A onto a ... cannot be made when doing manual recording. A OPEN/CLOSE B FADE IN/OUT TRACK NO. To save the CD TEXT data on the remote) to gradually lower the recording level at the end of recording. This unit enters the record pause mode when fade-out recording is automatically...
Owner's Manual
Page 21
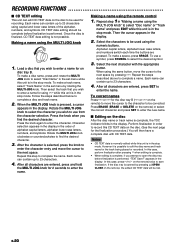
... knob. When using the MULTI JOG knob 1. Repeat the steps described above to enter the new name. Press ERASE (ERASE or DELETE on the remote) or select the correct character and press SET to complete a name. In this unit is complete, the TOC indicator blinks in the display. E-...enter the name. After all characters are entered, press SET to select "Disc Name" in the set menu by pressing v (OPEN/ CLOSE on the remote), the edited CD TEXT data will then have a complete disc with the appropriate button. Perform finalization in order to the next space. RECORDING FUNCTIONS I ...
... knob. When using the MULTI JOG knob 1. Repeat the steps described above to enter the new name. Press ERASE (ERASE or DELETE on the remote) or select the correct character and press SET to complete a name. In this unit is complete, the TOC indicator blinks in the display. E-...enter the name. After all characters are entered, press SET to select "Disc Name" in the set menu by pressing v (OPEN/ CLOSE on the remote), the edited CD TEXT data will then have a complete disc with the appropriate button. Perform finalization in order to the next space. RECORDING FUNCTIONS I ...
Owner's Manual
Page 22
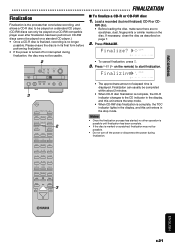
... not turn off or interrupted during finalization. Please ensure the disc is in the stop mode. If necessary, clean the disc as described on the remote) to the CD indicator in the display, and this unit enters the stop mode. • When CD-RW disc finalization is complete, the TOC indicator...
... not turn off or interrupted during finalization. Please ensure the disc is in the stop mode. If necessary, clean the disc as described on the remote) to the CD indicator in the display, and this unit enters the stop mode. • When CD-RW disc finalization is complete, the TOC indicator...
Owner's Manual
Page 23
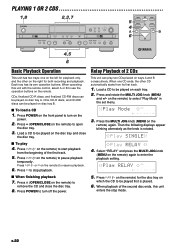
... can be played first is rotated. Press the MULTI JOG knob (MENU on the remote) to start playback from its own operation buttons. Play R E L A Y CD L dB -60 -30 -I0 R -6 -4 -2 -I 0 OVER 3. PLAYBACK PLAYING 1 OR 2 CDS 1,8 NATURAL SOUND CD RECORDER CDR-D651 POWER A DISC 2,3,7 DISPLAY A TEXT/TIME DISPLAY B PHONES LEVEL MIN MAX COPY REC MODE...
... can be played first is rotated. Press the MULTI JOG knob (MENU on the remote) to start playback from its own operation buttons. Play R E L A Y CD L dB -60 -30 -I0 R -6 -4 -2 -I 0 OVER 3. PLAYBACK PLAYING 1 OR 2 CDS 1,8 NATURAL SOUND CD RECORDER CDR-D651 POWER A DISC 2,3,7 DISPLAY A TEXT/TIME DISPLAY B PHONES LEVEL MIN MAX COPY REC MODE...
Owner's Manual
Page 24
... press 5 once. The total number of tracks and total recorded time on the remote) during playback. • No sound can be heard when searching is performed during playback. GETTING STARTED RECORDING PLAYBACK PLAYING 1 OR 2 CDS NATURAL SOUND CD RECORDER CDR-D651 POWER A DISC DISPLAY A TEXT/TIME DISPLAY B PHONES LEVEL MIN MAX COPY REC...
... press 5 once. The total number of tracks and total recorded time on the remote) during playback. • No sound can be heard when searching is performed during playback. GETTING STARTED RECORDING PLAYBACK PLAYING 1 OR 2 CDS NATURAL SOUND CD RECORDER CDR-D651 POWER A DISC DISPLAY A TEXT/TIME DISPLAY B PHONES LEVEL MIN MAX COPY REC...
Owner's Manual
Page 25
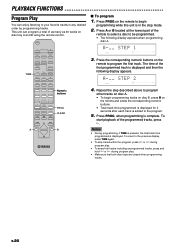
... Press PROG, when programming is displayed. A-__ STEP 1 PROG L dB -60 -30 -I0 R -6 -4 -2 -I To program 1. Press PROG on the remote to the previous display, press TIME again. • To skip tracks within the program, press t or y during program play. • To search all tracks ... disc A. • To begin programming while this unit is added to program the first track. Press the corresponding numeric buttons on the remote to the program. 5. This unit can enjoy listening to be programmed. • The following display appears. PLAYBACK FUNCTIONS Program Play You ...
... Press PROG, when programming is displayed. A-__ STEP 1 PROG L dB -60 -30 -I0 R -6 -4 -2 -I To program 1. Press PROG on the remote to the previous display, press TIME again. • To skip tracks within the program, press t or y during program play. • To search all tracks ... disc A. • To begin programming while this unit is added to program the first track. Press the corresponding numeric buttons on the remote to the program. 5. This unit can enjoy listening to be programmed. • The following display appears. PLAYBACK FUNCTIONS Program Play You ...
Owner's Manual
Page 26
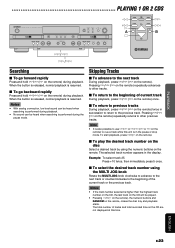
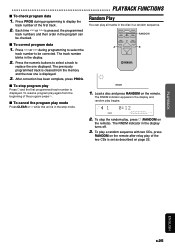
...the programmed track numbers and their order in the stop mode. Press t or y during programming to replace the one is set as described on the remote. I To cancel the program play all tracks in the disc in the display. 2. RNDM 1. Load a disc and press RANDOM on page 22. ...R -6 -4 -2 -I To check program data 1. To resume program play of the program press w. To play a random sequence with two CDs, press RANDOM on the remote after relay play again from the memory and the new one displayed. The previously programmed track is cleared from the beginning of the two CDs...
...the programmed track numbers and their order in the stop mode. Press t or y during programming to replace the one is set as described on the remote. I To cancel the program play all tracks in the disc in the display. 2. RNDM 1. Load a disc and press RANDOM on page 22. ...R -6 -4 -2 -I To check program data 1. To resume program play of the program press w. To play a random sequence with two CDs, press RANDOM on the remote after relay play again from the memory and the new one displayed. The previously programmed track is cleared from the beginning of the two CDs...
Owner's Manual
Page 27
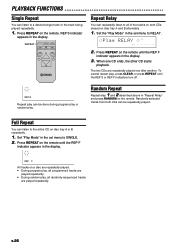
... during program play or random play. REP F All tracks on the remote. Randomly selected tracks from both CDs placed on the remote until the REP F indicator appears in the set menu to the entire CD on the remote. E-26 Press REPEAT on a disc are repeatedly played. • During... the display. To cancel repeat play, press CLEAR, or press REPEAT until the REP F indicator appears in the display. Press REPEAT on the remote until the REP S or REP F indicators turn off. PLAYBACK FUNCTIONS Single Repeat You can be repeatedly played. REP S Repeat play can listen ...
... during program play or random play. REP F All tracks on the remote. Randomly selected tracks from both CDs placed on the remote until the REP F indicator appears in the set menu to the entire CD on the remote. E-26 Press REPEAT on a disc are repeatedly played. • During... the display. To cancel repeat play, press CLEAR, or press REPEAT until the REP F indicator appears in the display. Press REPEAT on the remote until the REP S or REP F indicators turn off. PLAYBACK FUNCTIONS Single Repeat You can be repeatedly played. REP S Repeat play can listen ...
Owner's Manual
Page 28
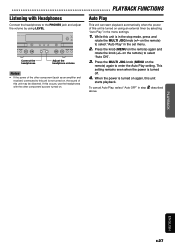
...PLAYBACK ADDITIONAL INFORMATION ENGLISH E-27 While this unit is in step 2 described above. This setting remains even when the power is turned on the remote) to enter the Auto Play setting. When the power is turned off. 4. If this unit starts playback. on again, this occurs, use ...select "Auto OFF" in the stop mode, press and rotate the MULTI JOG knob (+/- Press the knob (MENU on . on using LEVEL. ORDER CDR-D651 DISPLAY A TEXT/TIME DISPLAY B PHONES LEVEL MIN MAX COPY REC MOD FINALIZE Connect the headphones Adjust the headphone volume Notes • If the power...
...PLAYBACK ADDITIONAL INFORMATION ENGLISH E-27 While this unit is in step 2 described above. This setting remains even when the power is turned on the remote) to enter the Auto Play setting. When the power is turned off. 4. If this unit starts playback. on again, this occurs, use ...select "Auto OFF" in the stop mode, press and rotate the MULTI JOG knob (+/- Press the knob (MENU on . on using LEVEL. ORDER CDR-D651 DISPLAY A TEXT/TIME DISPLAY B PHONES LEVEL MIN MAX COPY REC MOD FINALIZE Connect the headphones Adjust the headphone volume Notes • If the power...