
Owner's Manual
Page 2
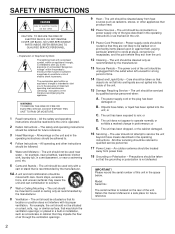
... may impede the flow of the type described in the space below. The power cord of the unit should be taken so that may block the ventilation openings; Care should be of sufficient magnitude to operate normally or exhibits a marked change in the operating instructions. or B. The unit does not appear to constitute a risk of this Owner's Manual in installation...
... may impede the flow of the type described in the space below. The power cord of the unit should be taken so that may block the ventilation openings; Care should be of sufficient magnitude to operate normally or exhibits a marked change in the operating instructions. or B. The unit does not appear to constitute a risk of this Owner's Manual in installation...
Owner's Manual
Page 3
.... WARNING CAUTION Use of controls or adjustments or performance of the unit. 9 To prevent damage by lightning, disconnect the power cord from the objective lens surface on switches, knobs or cords. To prevent fire or electrical shock, do not pull the cord. 11 When moving this might damage the finish. Then gently disconnect the power plug and the cords connecting to rain...
.... WARNING CAUTION Use of controls or adjustments or performance of the unit. 9 To prevent damage by lightning, disconnect the power cord from the objective lens surface on switches, knobs or cords. To prevent fire or electrical shock, do not pull the cord. 11 When moving this might damage the finish. Then gently disconnect the power plug and the cords connecting to rain...
Owner's Manual
Page 4
... FCC authorization to use only high quality shielded cables. Cable/s supplied with a Compatible YAMAHA Tape Deck CDC-765 and CDC-665 only q Automatic Programming for Class "B" digital devices. Disc Changing Capability while Playing Another q Random Access Programmable Play q Random-Sequence Play q Single Track/Entire Disc/All Disc Repeat Play q Adjustable Display Brightness q Remote Control Capability q Disc Scanning Capability Useful for Disc Searching or Disc Checking q CD Synchronized Recording with this product MUST be determined by turning the unit...
... FCC authorization to use only high quality shielded cables. Cable/s supplied with a Compatible YAMAHA Tape Deck CDC-765 and CDC-665 only q Automatic Programming for Class "B" digital devices. Disc Changing Capability while Playing Another q Random Access Programmable Play q Random-Sequence Play q Single Track/Entire Disc/All Disc Repeat Play q Adjustable Display Brightness q Remote Control Capability q Disc Scanning Capability Useful for Disc Searching or Disc Checking q CD Synchronized Recording with this product MUST be determined by turning the unit...
Owner's Manual
Page 5
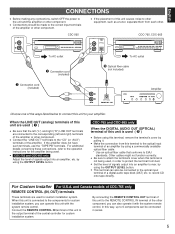
... custom installation system. by using the OUTPUT LEVEL button. q Be sure to attach the terminal's cover when this unit causes noise to other component. English CONNECTIONS q Before making any connections, switch OFF the power to the unit and the amplifier or other component. LINE OUT CDC-565 LINE OUT DIGITAL AUDIO OUT OPTICAL CDC-765, CDC-665 To AC outlet – Connection cord (included) – Connection cord (included) To AC outlet — Optical fiber cable...
... custom installation system. by using the OUTPUT LEVEL button. q Be sure to attach the terminal's cover when this unit causes noise to other component. English CONNECTIONS q Before making any connections, switch OFF the power to the unit and the amplifier or other component. LINE OUT CDC-565 LINE OUT DIGITAL AUDIO OUT OPTICAL CDC-765, CDC-665 To AC outlet – Connection cord (included) – Connection cord (included) To AC outlet — Optical fiber cable...
Owner's Manual
Page 6
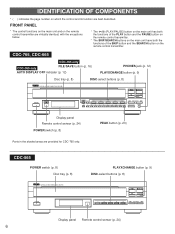
..., CDC-665 CDC-765 only CDC-765 only FILE/SAVE button (p. 16) AUTO DISPLAY OFF indicater (p. 12) PHONES jack (p. 12) PLAYXCHANGE button (p. 9) Disc tray (p. 8) DISC-select buttons (p. 8) NATURAL SOUND COMPACT DISC PLAYER POWER AUTO DISPLAY OFF / OPEN/CLOSE PLAYXCHANGE FILE/ SAVE PROG 1 +10 1 2 3 DISC 2 3 4 4 5 6 7 8 5 SKIP/SEARCH PHONES 9 0 OUTPUT LEVEL PEAK - + Display panel Remote control sensor (p. 24) POWER switch (p. 8) PEAK button (p. 23) Parts in the shaded areas are best described. CDC-565 POWER switch (p. 8) Disc tray (p. 8) NATURAL SOUND...
..., CDC-665 CDC-765 only CDC-765 only FILE/SAVE button (p. 16) AUTO DISPLAY OFF indicater (p. 12) PHONES jack (p. 12) PLAYXCHANGE button (p. 9) Disc tray (p. 8) DISC-select buttons (p. 8) NATURAL SOUND COMPACT DISC PLAYER POWER AUTO DISPLAY OFF / OPEN/CLOSE PLAYXCHANGE FILE/ SAVE PROG 1 +10 1 2 3 DISC 2 3 4 4 5 6 7 8 5 SKIP/SEARCH PHONES 9 0 OUTPUT LEVEL PEAK - + Display panel Remote control sensor (p. 24) POWER switch (p. 8) PEAK button (p. 23) Parts in the shaded areas are best described. CDC-565 POWER switch (p. 8) Disc tray (p. 8) NATURAL SOUND...
Owner's Manual
Page 7
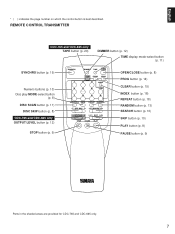
REMOTE CONTROL TRANSMITTER CDC-765 and CDC-665 only TAPE button (p. 20) DIMMER button (p. 12) TIME display mode-select button (p. 11) SYNCHRO button (p. 19) Numeric buttons (p. 10) Disc play MODE-select button (p. 8) DISC SCAN button (p. 11) DISC SKIP button (p. 8) CDC-765 and CDC-665 only OUTPUT LEVEL button (p. 12) STOP button (p. 9) SYNCHRO 1 4 DIMMER TIME OPEN/ CLOSE TAPE CLEAR PROG 2 3 INDEX 5 6 +10 7 8 9 0 DISC SCAN MODE REPEAT RANDOM DISC SKIP SEARCH - OUTPUT LEVEL + SKIP STOP PAUSE PLAY OPEN/CLOSE button (p. 8) PROG button (p. 14) CLEAR button (p. 15) INDEX ...
REMOTE CONTROL TRANSMITTER CDC-765 and CDC-665 only TAPE button (p. 20) DIMMER button (p. 12) TIME display mode-select button (p. 11) SYNCHRO button (p. 19) Numeric buttons (p. 10) Disc play MODE-select button (p. 8) DISC SCAN button (p. 11) DISC SKIP button (p. 8) CDC-765 and CDC-665 only OUTPUT LEVEL button (p. 12) STOP button (p. 9) SYNCHRO 1 4 DIMMER TIME OPEN/ CLOSE TAPE CLEAR PROG 2 3 INDEX 5 6 +10 7 8 9 0 DISC SCAN MODE REPEAT RANDOM DISC SKIP SEARCH - OUTPUT LEVEL + SKIP STOP PAUSE PLAY OPEN/CLOSE button (p. 8) PROG button (p. 14) CLEAR button (p. 15) INDEX ...
Owner's Manual
Page 8
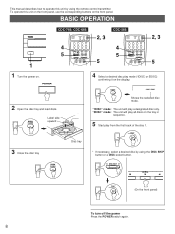
... the disc 1. OUTPUT LEVEL + SKIP STOP PAUSE PLAY 2, 3 5 CDC-565 4 5 SYNCHRO 1 4 DIMMER TIME OPEN/ CLOSE CLEAR PROG 2 3 INDEX 5 6 +I0 7 8 9 0 DISC SCAN MODE REPEAT RANDOM DISC SKIP SEARCH SKIP STOP PAUSE PLAY 2, 3 5 1 Turn the power on the display. POWER 4 Select a desired disc play a designated disc only. This manual describes how to operate this unit on the front panel, use the corresponding buttons on the front panel. OPEN/ CLOSE DISC SKIP DISC 2 3 4 PLAY (On the front panel) To turn off the power...
... the disc 1. OUTPUT LEVEL + SKIP STOP PAUSE PLAY 2, 3 5 CDC-565 4 5 SYNCHRO 1 4 DIMMER TIME OPEN/ CLOSE CLEAR PROG 2 3 INDEX 5 6 +I0 7 8 9 0 DISC SCAN MODE REPEAT RANDOM DISC SKIP SEARCH SKIP STOP PAUSE PLAY 2, 3 5 1 Turn the power on the display. POWER 4 Select a desired disc play a designated disc only. This manual describes how to operate this unit on the front panel, use the corresponding buttons on the front panel. OPEN/ CLOSE DISC SKIP DISC 2 3 4 PLAY (On the front panel) To turn off the power...

Owner's Manual
Page 9
... power turns on the front panel, a numeric button or the RANDOM button, or by pressing the front edge of remaining tracks (and their numbers) can be seen at disc play , you can also be damaged, because the tray already has a disc, which is being played. Display information at a glance. ‘ CDC-765 and CDC-665 only Shows the level of signals output into an amplifier or the headphone level adjusted...
... power turns on the front panel, a numeric button or the RANDOM button, or by pressing the front edge of remaining tracks (and their numbers) can be seen at disc play , you can also be damaged, because the tray already has a disc, which is being played. Display information at a glance. ‘ CDC-765 and CDC-665 only Shows the level of signals output into an amplifier or the headphone level adjusted...
Owner's Manual
Page 12
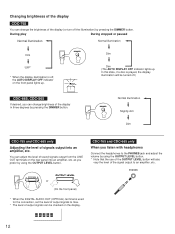
... use of the OUTPUT LEVEL button will be checked on the front panel lights up . OUTPUT LEVEL + OUTPUT LEVEL or - + (On the front panel) CDC-765 and CDC-665 only When you can change the brightness of the display (or turn off .) CDC-665, CDC-565 If desired, you listen with headphones Connect the headphones to max. * The level of output signals can adjust the level of sound signals output from the LINE OUT terminals on the rear panel into an amplifier...
... use of the OUTPUT LEVEL button will be checked on the front panel lights up . OUTPUT LEVEL + OUTPUT LEVEL or - + (On the front panel) CDC-765 and CDC-665 only When you can change the brightness of the display (or turn off .) CDC-665, CDC-565 If desired, you listen with headphones Connect the headphones to max. * The level of output signals can adjust the level of sound signals output from the LINE OUT terminals on the rear panel into an amplifier...
Owner's Manual
Page 13
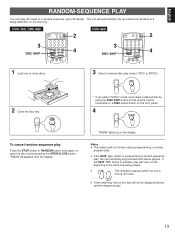
... open the disc tray by using the DISC SKIP button on the remote control transmitter or a DISC-select button on the front panel. 4 RANDOM "RNDM" lights up tracks from the display. * If you select "1DISC" mode, next select a desired disc by pressing the OPEN/CLOSE button. If the SKIP button is pressed during random-sequence play, the next randomly programmed track will be displayed during program play mode (1DISC or 5DISC). MODE 2 Close the disc tray...
... open the disc tray by using the DISC SKIP button on the remote control transmitter or a DISC-select button on the front panel. 4 RANDOM "RNDM" lights up tracks from the display. * If you select "1DISC" mode, next select a desired disc by pressing the OPEN/CLOSE button. If the SKIP button is pressed during random-sequence play, the next randomly programmed track will be displayed during program play mode (1DISC or 5DISC). MODE 2 Close the disc tray...
Owner's Manual
Page 14
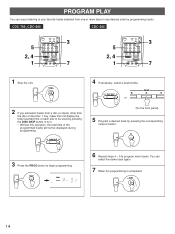
.... OUTPUT LEVEL + SKIP STOP PAUSE PLAY 3 7 5 2, 4 1 SYNCHRO 1 4 DIMMER TIME OPEN/ CLOSE CLEAR PROG 2 3 INDEX 5 6 +I0 7 8 9 0 DISC SCAN MODE REPEAT RANDOM DISC SKIP SEARCH SKIP STOP PAUSE PLAY 3 7 1 Stop the unit. DISC SKIP 2 or DISC 3 4 (On the front panel) 5 Program a desired track by pressing the DISC SKIP button in any desired order by programming tracks. CDC-765, CDC-665 CDC-565 5 2, 4 1 SYNCHRO 1 4 DIMMER TIME OPEN/ CLOSE TAPE CLEAR PROG 2 3 INDEX 5 6 +I0 7 8 9 0 DISC SCAN MODE...
.... OUTPUT LEVEL + SKIP STOP PAUSE PLAY 3 7 5 2, 4 1 SYNCHRO 1 4 DIMMER TIME OPEN/ CLOSE CLEAR PROG 2 3 INDEX 5 6 +I0 7 8 9 0 DISC SCAN MODE REPEAT RANDOM DISC SKIP SEARCH SKIP STOP PAUSE PLAY 3 7 1 Stop the unit. DISC SKIP 2 or DISC 3 4 (On the front panel) 5 Program a desired track by pressing the DISC SKIP button in any desired order by programming tracks. CDC-765, CDC-665 CDC-565 5 2, 4 1 SYNCHRO 1 4 DIMMER TIME OPEN/ CLOSE TAPE CLEAR PROG 2 3 INDEX 5 6 +I0 7 8 9 0 DISC SCAN MODE...

Owner's Manual
Page 15
... number higher than 20 is stopped. To correct program data 1. Play will not be corrected by pressing the SKIP button. 3. q Switch off the power. q The total time of the programmed tracks will begin from the memory and the new one displayed. To resume play, press the PLAY button. q Open the disc tray. The display of the track number can be used during playing, but only within the range...
... number higher than 20 is stopped. To correct program data 1. Play will not be corrected by pressing the SKIP button. 3. q Switch off the power. q The total time of the programmed tracks will begin from the memory and the new one displayed. To resume play, press the PLAY button. q Open the disc tray. The display of the track number can be used during playing, but only within the range...
Owner's Manual
Page 16
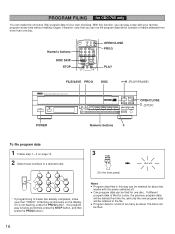
... TIME OPEN/ CLOSE TAPE CLEAR PROG 2 3 INDEX 5 6 +I0 7 8 9 0 DISC SCAN MODE REPEAT RANDOM DISC SKIP SEARCH - If different program data is filed for a disc, the previous program data will be deleted from more than one disc. If it is not flashing, press the PROG button. (If a program play a disc with the power switched off. OUTPUT LEVEL + SKIP STOP PAUSE PLAY OPEN/CLOSE PROG PLAY FILE/SAVE PROG DISC / (PLAY/PAUSE) NATURAL SOUND COMPACT DISC PLAYER CDC-765 POWER AUTO DISPLAY OFF...
... TIME OPEN/ CLOSE TAPE CLEAR PROG 2 3 INDEX 5 6 +I0 7 8 9 0 DISC SCAN MODE REPEAT RANDOM DISC SKIP SEARCH - If different program data is filed for a disc, the previous program data will be deleted from more than one disc. If it is not flashing, press the PROG button. (If a program play a disc with the power switched off. OUTPUT LEVEL + SKIP STOP PAUSE PLAY OPEN/CLOSE PROG PLAY FILE/SAVE PROG DISC / (PLAY/PAUSE) NATURAL SOUND COMPACT DISC PLAYER CDC-765 POWER AUTO DISPLAY OFF...
Owner's Manual
Page 19
... unit flashes on and off. 5 PLAY Both CD play and tape deck recording begin. * CD play automatically. This recording method needs a YAMAHA tape deck compatible with this unit's remote control transmitter at the same time. q Programmed sequence of recording an entire disc. (Refer to page 14-15 for adjusting recording level on the tape deck. (Refer to page 20-22.) 19 CDC-765, CDC-665 CDC-565 3 4 1 SYNCHRO 1 4 DIMMER TIME OPEN/ CLOSE TAPE CLEAR...
... unit flashes on and off. 5 PLAY Both CD play and tape deck recording begin. * CD play automatically. This recording method needs a YAMAHA tape deck compatible with this unit's remote control transmitter at the same time. q Programmed sequence of recording an entire disc. (Refer to page 14-15 for adjusting recording level on the tape deck. (Refer to page 20-22.) 19 CDC-765, CDC-665 CDC-565 3 4 1 SYNCHRO 1 4 DIMMER TIME OPEN/ CLOSE TAPE CLEAR...
Owner's Manual
Page 20
... your tape deck is compatible with it is replaced by pressing the TAPE button. In this unit. s Automatic tape programming The unit will pause at the same time, press the PLAY or PAUSE button on this unit's remote control transmitter. q CD synchronized recording function can be used to program tracks for recording to tape. REPEAT 2 Select the disc. Turn the tape over to page 23.) 4 Enter the tape's total possible recording time (tape...
... your tape deck is compatible with it is replaced by pressing the TAPE button. In this unit. s Automatic tape programming The unit will pause at the same time, press the PLAY or PAUSE button on this unit's remote control transmitter. q CD synchronized recording function can be used to program tracks for recording to tape. REPEAT 2 Select the disc. Turn the tape over to page 23.) 4 Enter the tape's total possible recording time (tape...
Owner's Manual
Page 21
... same time, press the PLAY or PAUSE button on the Disc 1 tray, make this case, in any other than the disc on this operation is omitted, tracks on the disc cannot be programmed. 21 English Turn the tape over to page 15. Recording automatically begins. (For details, refer to page 19.) Notes on this unit is useful for adjusting recording level on the display...
... same time, press the PLAY or PAUSE button on the Disc 1 tray, make this case, in any other than the disc on this operation is omitted, tracks on the disc cannot be programmed. 21 English Turn the tape over to page 15. Recording automatically begins. (For details, refer to page 19.) Notes on this unit is useful for adjusting recording level on the display...
Owner's Manual
Page 22
... the TIME display mode-select button. * If, during programming, the TIME display mode-select button is compatible with it is replaced by the number of the first programmed track for side A. Shows the total time of programmed tracks for each side. Ž Shows the programmed track numbers for each side in step 3 and 4, press the SYNCHRO button and then press the PLAY button on this unit's remote control transmitter. s Random sequential tape programming The...
... the TIME display mode-select button. * If, during programming, the TIME display mode-select button is compatible with it is replaced by the number of the first programmed track for side A. Shows the total time of programmed tracks for each side. Ž Shows the programmed track numbers for each side in step 3 and 4, press the SYNCHRO button and then press the PLAY button on this unit's remote control transmitter. s Random sequential tape programming The...
Owner's Manual
Page 23
... program play mode. 23 Adjust the recording level on the tape deck listening to adjust the recording level on the tape deck. 2 3 1 SYNCHRO 1 4 DIMMER TIME OPEN/ CLOSE TAPE CLEAR PROG 2 3 INDEX 5 6 +I0 7 8 9 0 DISC SCAN MODE REPEAT RANDOM DISC SKIP SEARCH - If program play is being performed, only press the PEAK button. • To search for a part where the source level peaks, and next plays the part repeatedly. STOP 4 0 PEAK (On the front panel) 2 Select the "1DISC" disc play...
... program play mode. 23 Adjust the recording level on the tape deck listening to adjust the recording level on the tape deck. 2 3 1 SYNCHRO 1 4 DIMMER TIME OPEN/ CLOSE TAPE CLEAR PROG 2 3 INDEX 5 6 +I0 7 8 9 0 DISC SCAN MODE REPEAT RANDOM DISC SKIP SEARCH - If program play is being performed, only press the PEAK button. • To search for a part where the source level peaks, and next plays the part repeatedly. STOP 4 0 PEAK (On the front panel) 2 Select the "1DISC" disc play...
Owner's Manual
Page 24
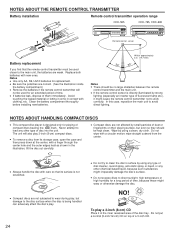
... avoid direct lighting. Do not put a normal (5-inch/12-cm) CD on their playing surface, but damage to load any other type of disc into the unit. Wipe by strong lighting (especially an inverter type of fluorescent lamp etc.), it come in contact with clothing, etc. NOTES ABOUT THE REMOTE CONTROL TRANSMITTER Battery installation Remote control transmitter operation range CDC-565 CDC-765, CDC-665 2 1 3 Battery replacement...
... avoid direct lighting. Do not put a normal (5-inch/12-cm) CD on their playing surface, but damage to load any other type of disc into the unit. Wipe by strong lighting (especially an inverter type of fluorescent lamp etc.), it come in contact with clothing, etc. NOTES ABOUT THE REMOTE CONTROL TRANSMITTER Battery installation Remote control transmitter operation range CDC-565 CDC-765, CDC-665 2 1 3 Battery replacement...
Owner's Manual
Page 25
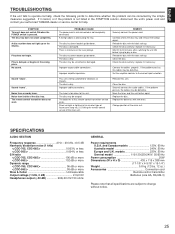
... cables may be warped. Set the amplifier controls to play a disc. and Canada models 120V, 60 Hz Australia model 240V, 50 Hz Europe and U.K. If it cannot, or if the problem is damaged. Sound "hums". The disc has been loaded upside down . Improper cable connections. Direct sunlight or lighting (of an inverter type of fluorescent lamp etc.) is moisture on the display. Clean the disc. Replace the disc. SPECIFICATIONS AUDIO SECTION Frequency...
... cables may be warped. Set the amplifier controls to play a disc. and Canada models 120V, 60 Hz Australia model 240V, 50 Hz Europe and U.K. If it cannot, or if the problem is damaged. Sound "hums". The disc has been loaded upside down . Improper cable connections. Direct sunlight or lighting (of an inverter type of fluorescent lamp etc.) is moisture on the display. Clean the disc. Replace the disc. SPECIFICATIONS AUDIO SECTION Frequency...


