Owner's Manual
Page 2
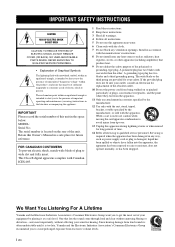
... of the obsolete outlet. 10 Protect the power cord from loud sounds is located on or pinched particularly at a safe level. A polarized plug has two blades with the apparatus. The wide blade or the third prong are provided for replacement of your outlet, consult an electrician for your sensitive hearing. Servicing is used, use this Owner's Manual in any ventilation openings. FOR...
... of the obsolete outlet. 10 Protect the power cord from loud sounds is located on or pinched particularly at a safe level. A polarized plug has two blades with the apparatus. The wide blade or the third prong are provided for replacement of your outlet, consult an electrician for your sensitive hearing. Servicing is used, use this Owner's Manual in any ventilation openings. FOR...
Owner's Manual
Page 3
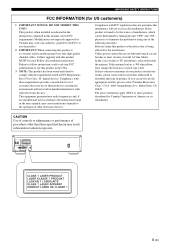
... requirements provides a reasonable level of radio or TV interference, relocate/reorient the antenna. Follow all installations. If you can be used according to the operation of product. ii En If the antenna lead-in is being affected by turning the unit "OFF" and "ON", please try to coaxial type cable. IMPORTANT SAFETY INSTRUCTIONS FCC INFORMATION (for Class "B" digital devices. The above statements...
... requirements provides a reasonable level of radio or TV interference, relocate/reorient the antenna. Follow all installations. If you can be used according to the operation of product. ii En If the antenna lead-in is being affected by turning the unit "OFF" and "ON", please try to coaxial type cable. IMPORTANT SAFETY INSTRUCTIONS FCC INFORMATION (for Class "B" digital devices. The above statements...
Owner's Manual
Page 4
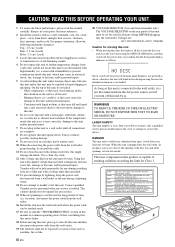
...-2O3T2CE CONTROL IN OUT OPTICAL DIGITAL OUT AC IN iii En Contact qualified Yamaha service personnel when any reasons. 15 When not planning to look into the wall outlet, do not place: - Top : 2.5 cm (1 inch) Rear: 2.5 cm (1 inch) Sides: 2.5 cm (1 inch) 3 Locate this unit away from the AC power source even if you turn off the power if the front panel display...
...-2O3T2CE CONTROL IN OUT OPTICAL DIGITAL OUT AC IN iii En Contact qualified Yamaha service personnel when any reasons. 15 When not planning to look into the wall outlet, do not place: - Top : 2.5 cm (1 inch) Rear: 2.5 cm (1 inch) Sides: 2.5 cm (1 inch) 3 Locate this unit away from the AC power source even if you turn off the power if the front panel display...
Owner's Manual
Page 5
... FUNCTIONS 2 Front panel 2 Rear panel connections 4 Remote control 5 OPERATION LOADING AND PLAYING DISCS 8 Program playback Audio CD 8 PLAYXCHANGE 8 PLAYING BACK iPod/USB DEVICE 9 Connecting iPod/USB devices 9 Playing back iPod 9 Playing back USB devices 9 Disconnecting iPod/USB devices 10 Supported iPod/USB devices 10 ADDITIONAL INFORMATION PLAYABLE DISC AND FILE FORMAT ......... 11 USING THE ADVANCED SETUP 13 TROUBLESHOOTING 14 SPECIFICATIONS 15 ■ Features • 5-Discs Carousel Auto-changer • Full Opening Disc Tray for your operation. • In this manual...
... FUNCTIONS 2 Front panel 2 Rear panel connections 4 Remote control 5 OPERATION LOADING AND PLAYING DISCS 8 Program playback Audio CD 8 PLAYXCHANGE 8 PLAYING BACK iPod/USB DEVICE 9 Connecting iPod/USB devices 9 Playing back iPod 9 Playing back USB devices 9 Disconnecting iPod/USB devices 10 Supported iPod/USB devices 10 ADDITIONAL INFORMATION PLAYABLE DISC AND FILE FORMAT ......... 11 USING THE ADVANCED SETUP 13 TROUBLESHOOTING 14 SPECIFICATIONS 15 ■ Features • 5-Discs Carousel Auto-changer • Full Opening Disc Tray for your operation. • In this manual...
Owner's Manual
Page 6
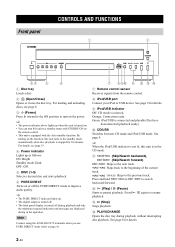
.... 4 Power indicator Lights up . • The digital output is turned off. • The front panel display is turned off the PURE DIRECT mode to the standby mode automatically when disc playback is connected and playable files have been detected (playback ready). 0 CD/USB Switches between CD mode and iPod/USB mode. y • The PURE DIRECT indicator lights up as follows: ON: Bright Standby mode: Dark OFF: Off 5 DISC (1-5) Selects a desired disc and starts playback. 6 PURE DIRECT Turns on the function...
.... 4 Power indicator Lights up . • The digital output is turned off. • The front panel display is turned off the PURE DIRECT mode to the standby mode automatically when disc playback is connected and playable files have been detected (playback ready). 0 CD/USB Switches between CD mode and iPod/USB mode. y • The PURE DIRECT indicator lights up as follows: ON: Bright Standby mode: Dark OFF: Off 5 DISC (1-5) Selects a desired disc and starts playback. 6 PURE DIRECT Turns on the function...
Owner's Manual
Page 7
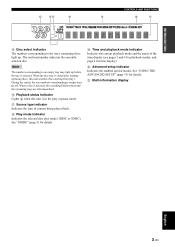
... . I Time and playback mode indicator Indicates the current playback mode and the status of content being played back. See "USING THE ADVANCED SETUP" (page 13) for details. See "MODE" (page 5) for details. K Multi-information display English 3 En INTRODUCTION CONTROLS AND FUNCTIONS E Disc select indicator The numbers corresponding to the trays containing discs light up when this unit searches discs starting from tray 1. The enclosed number indicates the currently selected disc. H Play mode...
... . I Time and playback mode indicator Indicates the current playback mode and the status of content being played back. See "USING THE ADVANCED SETUP" (page 13) for details. See "MODE" (page 5) for details. K Multi-information display English 3 En INTRODUCTION CONTROLS AND FUNCTIONS E Disc select indicator The numbers corresponding to the trays containing discs light up when this unit searches discs starting from tray 1. The enclosed number indicates the currently selected disc. H Play mode...
Owner's Manual
Page 8
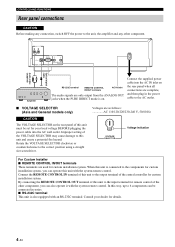
...-232C terminal. Optical digital cable Audio cable (supplied) Amplifier RS-232C terminal REMOTE CONTROL IN/OUT terminals AC IN inlet The audio signals are used for custom installation system. By connecting the REMOTE CONTROL OUT terminal of this unit to the input terminal for remote control of the central controller for custom installation system. When this unit with the system remote control. CONTROLS AND FUNCTIONS Rear panel connections CAUTION Before making any connection, switch OFF the power to the unit...
...-232C terminal. Optical digital cable Audio cable (supplied) Amplifier RS-232C terminal REMOTE CONTROL IN/OUT terminals AC IN inlet The audio signals are used for custom installation system. By connecting the REMOTE CONTROL OUT terminal of this unit to the input terminal for remote control of the central controller for custom installation system. When this unit with the system remote control. CONTROLS AND FUNCTIONS Rear panel connections CAUTION Before making any connection, switch OFF the power to the unit...
Owner's Manual
Page 9
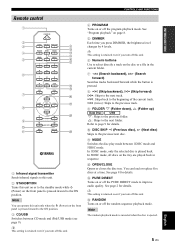
.... 4 PROGRAM Turns on the front panel is pressed inward to the ON position. A MODE Switches the disc play mode between CD mode and iPod/USB mode (see page 9). In 1DISC mode, only the selected disc is ejected. y This setting is retained even if you turn off this unit. Note The random playback mode is canceled when the disc is played back. CONTROLS AND FUNCTIONS INTRODUCTION Remote control 1 Infrared signal transmitter Sends infrared signals to this unit. 2 STANDBY...
.... 4 PROGRAM Turns on the front panel is pressed inward to the ON position. A MODE Switches the disc play mode between CD mode and iPod/USB mode (see page 9). In 1DISC mode, only the selected disc is ejected. y This setting is retained even if you turn off this unit. Note The random playback mode is canceled when the disc is played back. CONTROLS AND FUNCTIONS INTRODUCTION Remote control 1 Infrared signal transmitter Sends infrared signals to this unit. 2 STANDBY...
Owner's Manual
Page 10
... blinks in the display. Notes • You cannot set repeat A-B for a desired disc. Each time you are played back repeatedly. y Repeat play also works with program play and random-sequence play. J (Pause) Pauses playback. F DISPLAY Switches the time display. Press or to another track. • You cannot set repeat A-B from one track to resume playback. M DISC SCAN Scans loaded discs and plays a section of the current file (default) Track name (CD...
... blinks in the display. Notes • You cannot set repeat A-B for a desired disc. Each time you are played back repeatedly. y Repeat play also works with program play and random-sequence play. J (Pause) Pauses playback. F DISPLAY Switches the time display. Press or to another track. • You cannot set repeat A-B from one track to resume playback. M DISC SCAN Scans loaded discs and plays a section of the current file (default) Track name (CD...
Owner's Manual
Page 11
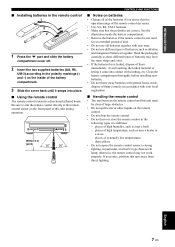
... time. • Do not use old batteries together with general house waste; INTRODUCTION ■ Installing batteries in the remote control 1 Press the part and slide the battery compartment cover off. 2 Insert the two supplied batteries (AA, R6, UM-3) according to the polarity markings (+ and -) on batteries • Change all of the batteries if you notice that the operation range...
... time. • Do not use old batteries together with general house waste; INTRODUCTION ■ Installing batteries in the remote control 1 Press the part and slide the battery compartment cover off. 2 Insert the two supplied batteries (AA, R6, UM-3) according to the polarity markings (+ and -) on batteries • Change all of the batteries if you notice that the operation range...
Owner's Manual
Page 12
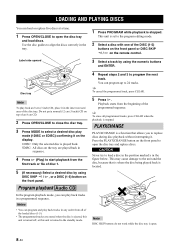
OPERATION LOADING AND PLAYING DISCS You can load or replace five discs at a time. 1 Press OPEN/CLOSE to replace discs during disc playback without interrupting it. Use the disc guides to program the next track. PLAYXCHANGE PLAYXCHANGE is a function that is where the disc being played back is turned to the standby mode. 4 Repeat steps 2 and 3 to align the discs correctly in the figure below. Disc tray Note To play back tracks in...
OPERATION LOADING AND PLAYING DISCS You can load or replace five discs at a time. 1 Press OPEN/CLOSE to replace discs during disc playback without interrupting it. Use the disc guides to program the next track. PLAYXCHANGE PLAYXCHANGE is a function that is where the disc being played back is turned to the standby mode. 4 Repeat steps 2 and 3 to align the discs correctly in the figure below. Disc tray Note To play back tracks in...

Owner's Manual
Page 13
... / on the front panel lights up . 2 Start playback. PLAYING BACK iPod/USB DEVICE Connecting iPod/USB devices Notes iPod • Use the USB cable supplied with this unit or Remote Control. Filename is ready. 2 Start playback. If no USB cable is not updated. Note iPod may not function properly with your USB device or iPod via USB cable Playing back iPod Playing back USB devices 1 Press CD/USB to select a track. 4 Stop...
... / on the front panel lights up . 2 Start playback. PLAYING BACK iPod/USB DEVICE Connecting iPod/USB devices Notes iPod • Use the USB cable supplied with this unit or Remote Control. Filename is ready. 2 Start playback. If no USB cable is not updated. Note iPod may not function properly with your USB device or iPod via USB cable Playing back iPod Playing back USB devices 1 Press CD/USB to select a track. 4 Stop...

Owner's Manual
Page 14
... same time into a card reader connected to this unit. As a precaution, it is recommended that use FAT16 or FAT32 format. PLAYING BACK iPod/USB DEVICE Disconnecting iPod/USB devices Stop playback, and then disconnect your iPod or USB device while playing back from the connected device, or while "USB READING" appears in the front panel display. Supported iPod/USB devices ■ Supported iPod models • iPod classic...
... same time into a card reader connected to this unit. As a precaution, it is recommended that use FAT16 or FAT32 format. PLAYING BACK iPod/USB DEVICE Disconnecting iPod/USB devices Stop playback, and then disconnect your iPod or USB device while playing back from the connected device, or while "USB READING" appears in the front panel display. Supported iPod/USB devices ■ Supported iPod models • iPod classic...
Owner's Manual
Page 15
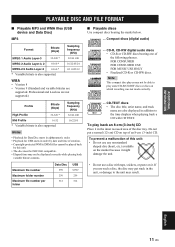
CD-R, CD-RW digital audio discs • CD-R or CD-RW discs bearing one of an 8-cm (3-inch) CD. Note This compact disc player may get stuck in the inner recessed area of the disc tray. If you use such a disc, the disc may not be able to play back an 8-cm (3-inch) CD Place it in the unit, or damage to the time displays when playing back a CD with tape, stickers, or paste...
CD-R, CD-RW digital audio discs • CD-R or CD-RW discs bearing one of an 8-cm (3-inch) CD. Note This compact disc player may get stuck in the inner recessed area of the disc tray. If you use such a disc, the disc may not be able to play back an 8-cm (3-inch) CD Place it in the unit, or damage to the time displays when playing back a CD with tape, stickers, or paste...
Owner's Manual
Page 17
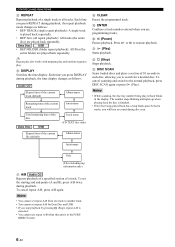
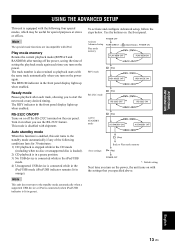
... panel display lights up when enabled. Activate Advanced setup Play mode memory POWER OFF PURE DIRECT + (Open/Close) + POWER ON / PLAY MEM OFF PLAY MEM ON / RDY mode (Stop) / RDY MODE OFF RDY MODE ON / RS-232C mode AUTO STANDBY mode (Stop) RS-232C OFF (Stop) A-STANDBY ON / RS-232C ON / / A-STANDBY OFF / (Stop) Store settings Back to Play mode memory (Play) POWER OFF * : Default setting Next time you turn on the power, the unit turns on with the settings that you turn...
... panel display lights up when enabled. Activate Advanced setup Play mode memory POWER OFF PURE DIRECT + (Open/Close) + POWER ON / PLAY MEM OFF PLAY MEM ON / RDY mode (Stop) / RDY MODE OFF RDY MODE ON / RS-232C mode AUTO STANDBY mode (Stop) RS-232C OFF (Stop) A-STANDBY ON / RS-232C ON / / A-STANDBY OFF / (Stop) Store settings Back to Play mode memory (Play) POWER OFF * : Default setting Next time you turn on the power, the unit turns on with the settings that you turn...
Owner's Manual
Page 18
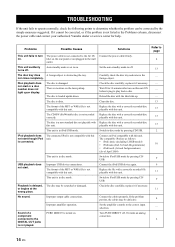
...) Switch to iPod/USB mode by pressing CD/USB. No sound. Improper output cable connections. Check the disc carefully; Replace the disc with a correctly recorded disc playable with this unit. Switch to disc mode by pressing CD/ USB. Replace the file with a correctly recorded file playable with this unit. Turn PURE DIRECT off . Refer to the correct input selection. If it if necessary. The power cable is moisture on the rear panel or not plugged in disc mode...
...) Switch to iPod/USB mode by pressing CD/USB. No sound. Improper output cable connections. Check the disc carefully; Replace the disc with a correctly recorded disc playable with this unit. Switch to disc mode by pressing CD/ USB. Replace the file with a correctly recorded file playable with this unit. Turn PURE DIRECT off . Refer to the correct input selection. If it if necessary. The power cable is moisture on the rear panel or not plugged in disc mode...
Owner's Manual
Page 19
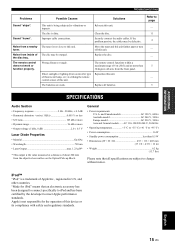
... unit farther apart or turn off -axis from a nearby tuner. Refer to vibrations or impacts. of this unit. control sensor of the disc tray. Replace all specifications are weak. iPod™ "iPod" is too close to +95 °F) • Power consumption 16 W • Standby power consumption less than 5 30 degrees off this unit. - Improper cable connections. The remote control functions within a maximum range of 6 m (20 ft) and...
... unit farther apart or turn off -axis from a nearby tuner. Refer to vibrations or impacts. of this unit. control sensor of the disc tray. Replace all specifications are weak. iPod™ "iPod" is too close to +95 °F) • Power consumption 16 W • Standby power consumption less than 5 30 degrees off this unit. - Improper cable connections. The remote control functions within a maximum range of 6 m (20 ft) and...
Wiring Instructions
Page 1
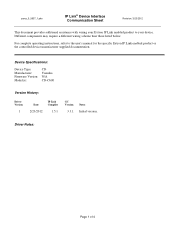
Different components may require a different wiring scheme than those listed below. For complete operating instructions, refer to your device. Device Specifications: Device Type: Manufacturer: Firmware Version: Model(s): CD Yamaha N/A CD-C600 Version History: Driver Version 1 Date 2/23/2012 IP Link Compiler 1.5.1 GC Version 3.3.1 Notes Initial version. Driver Notes: Page 1 of 4 yama_5_5637_1.pke IP Link® Device Interface Communication Sheet Revision: 3/23/2012 This document...
Different components may require a different wiring scheme than those listed below. For complete operating instructions, refer to your device. Device Specifications: Device Type: Manufacturer: Firmware Version: Model(s): CD Yamaha N/A CD-C600 Version History: Driver Version 1 Date 2/23/2012 IP Link Compiler 1.5.1 GC Version 3.3.1 Notes Initial version. Driver Notes: Page 1 of 4 yama_5_5637_1.pke IP Link® Device Interface Communication Sheet Revision: 3/23/2012 This document...
Wiring Instructions
Page 2
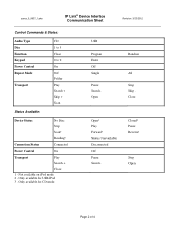
... 2 of 4 Not available on iPod mode 2 - Only available for CD mode USB Program Enter Off Single Pause Search Open Random All Stop Skip Close Open³ Play Forward¹ Status Unavailable Disconnected Off Pause Search - yama_5_5637_1.pke IP Link® Device Interface Communication Sheet Revision: 3/23/2012 Control Commands & States: Audio Type Disc Function Keypad Power Control Repeat Mode Transport CD 1 to 5 Clear 0 to...
... 2 of 4 Not available on iPod mode 2 - Only available for CD mode USB Program Enter Off Single Pause Search Open Random All Stop Skip Close Open³ Play Forward¹ Status Unavailable Disconnected Off Pause Search - yama_5_5637_1.pke IP Link® Device Interface Communication Sheet Revision: 3/23/2012 Control Commands & States: Audio Type Disc Function Keypad Power Control Repeat Mode Transport CD 1 to 5 Clear 0 to...
Wiring Instructions
Page 3
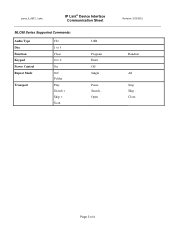
yama_5_5637_1.pke IP Link® Device Interface Communication Sheet MLC60 Series Supported Commands: Audio Type Disc Function Keypad Power Control Repeat Mode Transport CD 1 to 5 Clear 0 to 9 On Off Folder Play Search + Skip + Scan USB Program Enter Off Single Pause Search Open Revision: 3/23/2012 Random All Stop Skip Close Page 3 of 4
yama_5_5637_1.pke IP Link® Device Interface Communication Sheet MLC60 Series Supported Commands: Audio Type Disc Function Keypad Power Control Repeat Mode Transport CD 1 to 5 Clear 0 to 9 On Off Folder Play Search + Skip + Scan USB Program Enter Off Single Pause Search Open Revision: 3/23/2012 Random All Stop Skip Close Page 3 of 4


