
Owner's Manual
Page 8
Table of the AW4416 19 Mixer section 19 Recorder section 20 Sampling pad section 21 viii - Table of contents Before you begin 1 Checking the included items 1 Installing an internal hard disk 2 ... About SCSI errors 12 Installing I/O cards 13 About I/O cards 13 Installation procedure 14 Important points you for purchasing the Yamaha AW4416 audio workstation. Operation Guide In order to the world of the AW4416 19 Features of contents Thank you must observe 15 Turning the power on or off 15 Turning the power on...
Table of the AW4416 19 Mixer section 19 Recorder section 20 Sampling pad section 21 viii - Table of contents Before you begin 1 Checking the included items 1 Installing an internal hard disk 2 ... About SCSI errors 12 Installing I/O cards 13 About I/O cards 13 Installation procedure 14 Important points you for purchasing the Yamaha AW4416 audio workstation. Operation Guide In order to the world of the AW4416 19 Features of contents Thank you must observe 15 Turning the power on or off 15 Turning the power on...

Owner's Manual
Page 9
...output/headphone output 30 Chapter 2 Parts and their functions 31 Top panel 31 Analog input/output section 31 WORK NAVIGATE section 32 UNIT section 32 MIXER section 33 FADER MODE section 34 MIXING LAYER section 35 [SEL] keys, [ON] keys, faders 37 Display section 38 Level meter/counter ... 43 Transport section 44 SAMPLING PAD section 45 Rear panel 46 Front panel 50 Chapter 3 The user interface of the AW4416 51 Display 51 Level meters/counter 54 Basic operation of the AW4416 56 Accessing a screen/page 56 Using the controls of the top panel 56 ix - Operation Guide
...output/headphone output 30 Chapter 2 Parts and their functions 31 Top panel 31 Analog input/output section 31 WORK NAVIGATE section 32 UNIT section 32 MIXER section 33 FADER MODE section 34 MIXING LAYER section 35 [SEL] keys, [ON] keys, faders 37 Display section 38 Level meter/counter ... 43 Transport section 44 SAMPLING PAD section 45 Rear panel 46 Front panel 50 Chapter 3 The user interface of the AW4416 51 Display 51 Level meters/counter 54 Basic operation of the AW4416 56 Accessing a screen/page 56 Using the controls of the top panel 56 ix - Operation Guide
Owner's Manual
Page 13
... song 177 Loading a song 178 Editing the song name/comment 179 Deleting/copying a song 180 Deleting a song 180 Copying a song 181 Optimizing a song 182 Importing mixer data of an existing song 183 Chapter 12 Sampling pads 185 About the sampling pads 185 Assigning the pad outputs to channels 186 Assigning a region...
... song 177 Loading a song 178 Editing the song name/comment 179 Deleting/copying a song 180 Deleting a song 180 Copying a song 181 Optimizing a song 182 Importing mixer data of an existing song 183 Chapter 12 Sampling pads 185 About the sampling pads 185 Assigning the pad outputs to channels 186 Assigning a region...
Owner's Manual
Page 15
... preparations you need to make sure that the package contains the following items. If any items are missing, please contact your dealer. • AW4416 mixer/recorder unit: 1 • Operation guide (this document): 1 • Reference guide: 1 • Tutorial: 1 • Power supply ...All rights reserved. ❍ Yamaha website 1 - Operation Guide MS-DOS is a registered trademark and Windows is a trademark of Yamaha Corporation. Yamaha is a trademark and Tascam and Teac are registered trademarks of Yamaha Corporation. © 2000 Yamaha Corporation. Tascam Digital Interface ...
... preparations you need to make sure that the package contains the following items. If any items are missing, please contact your dealer. • AW4416 mixer/recorder unit: 1 • Operation guide (this document): 1 • Reference guide: 1 • Tutorial: 1 • Power supply ...All rights reserved. ❍ Yamaha website 1 - Operation Guide MS-DOS is a registered trademark and Windows is a trademark of Yamaha Corporation. Yamaha is a trademark and Tascam and Teac are registered trademarks of Yamaha Corporation. © 2000 Yamaha Corporation. Tascam Digital Interface ...

Owner's Manual
Page 16
...) • Thickness: no particular limitation • Capacity: no responsibility for reproducing a composition (mixer settings, recorder settings, audio data etc.) is attached to the ADP25H 2.5 inch hard disk adapter and installed in performance that Yamaha has obtained, installed in the AW4416 before using it. can use a maximum capacity of 64 GB) • Models known...
...) • Thickness: no particular limitation • Capacity: no responsibility for reproducing a composition (mixer settings, recorder settings, audio data etc.) is attached to the ADP25H 2.5 inch hard disk adapter and installed in performance that Yamaha has obtained, installed in the AW4416 before using it. can use a maximum capacity of 64 GB) • Models known...
Owner's Manual
Page 33
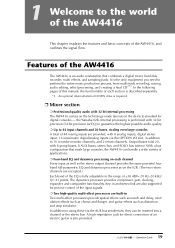
..., 16 (maximum) digital/analog inputs via the AUX bus send/return, they can handle a wide variety of the AW4416, and outlines the signal flow. the Yamaha 02R. In addition to 16 recorder monitor channels, and 2 return channels. With a bus configuration that combines... a digital mixer, hard disk recorder, multi-effects, and sampling pads. Features of the AW4416 The AW4416 is an audio workstation that rivals large consoles, the AW4416 can be...
..., 16 (maximum) digital/analog inputs via the AUX bus send/return, they can handle a wide variety of the AW4416, and outlines the signal flow. the Yamaha 02R. In addition to 16 recorder monitor channels, and 2 return channels. With a bus configuration that combines... a digital mixer, hard disk recorder, multi-effects, and sampling pads. Features of the AW4416 The AW4416 is an audio workstation that rivals large consoles, the AW4416 can be...
Owner's Manual
Page 36
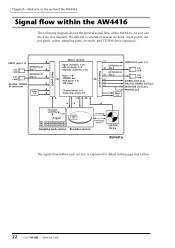
... pads section Recorder section CD Writing Data Backup/ Restore CD-RW Drive AW4416 The signal flow within the AW4416 The following diagram shows the general signal flow of several sections: input patch, output patch, mixer, sampling pads, recorder, and CD-RW drive (optional). Chapter1-Welcome... to the world of the AW4416 Signal flow within each section is explained in detail in the pages that follow....
... pads section Recorder section CD Writing Data Backup/ Restore CD-RW Drive AW4416 The signal flow within the AW4416 The following diagram shows the general signal flow of several sections: input patch, output patch, mixer, sampling pads, recorder, and CD-RW drive (optional). Chapter1-Welcome... to the world of the AW4416 Signal flow within each section is explained in detail in the pages that follow....
Owner's Manual
Page 41
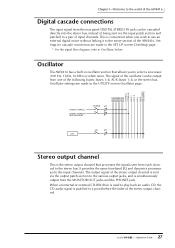
...OSC ON ATT Stereo output channel This is simultaneously output from each channel to the stereo bus. Chapter1-Welcome to the world of the AW4416 Digital cascade connections The input signal from one of the following buses: buses 1-8, AUX buses 1-8, or the stereo bus. Settings for cascade...Oscillator settings are made in the SET UP screen D.InSetup page. * For the signal flow diagram, refer to the mixer section of the AW4416. Oscillator The AW4416 has a built-in oscillator section that processes the signals sent from the MONITOR OUT jacks and the PHONES jack. The output ...
...OSC ON ATT Stereo output channel This is simultaneously output from each channel to the stereo bus. Chapter1-Welcome to the world of the AW4416 Digital cascade connections The input signal from one of the following buses: buses 1-8, AUX buses 1-8, or the stereo bus. Settings for cascade...Oscillator settings are made in the SET UP screen D.InSetup page. * For the signal flow diagram, refer to the mixer section of the AW4416. Oscillator The AW4416 has a built-in oscillator section that processes the signals sent from the MONITOR OUT jacks and the PHONES jack. The output ...
Owner's Manual
Page 44
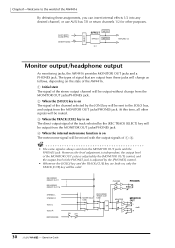
...(EFF1), 2 AUX8 (EFF2) 46 INSERT SEND SELECT EFFECT METER EFFECT METER X 2 RETURN 1/2 Monitor output/headphone output As monitoring jacks, the AW4416 provides MONITOR OUT jacks and a PHONES jack. the output level of the MONITOR OUT jacks is adjusted by the [MONITOR OUT] control, and the... only the TRACK [CUE] key will be muted. RECORDER DIRECT OUT 1 RECORDER DIRECT OUT 16 STEREO L STEREO R SOLO L SOLO R METRONOME PHONES PHONES MIXER SOLO Logic RECORDER TRACK CUE Logic DA ON ATT MONITOR MONITOR OUT L +4dB R 30 - B When the [SOLO] key is adjusted by the [PHONES]...
...(EFF1), 2 AUX8 (EFF2) 46 INSERT SEND SELECT EFFECT METER EFFECT METER X 2 RETURN 1/2 Monitor output/headphone output As monitoring jacks, the AW4416 provides MONITOR OUT jacks and a PHONES jack. the output level of the MONITOR OUT jacks is adjusted by the [MONITOR OUT] control, and the... only the TRACK [CUE] key will be muted. RECORDER DIRECT OUT 1 RECORDER DIRECT OUT 16 STEREO L STEREO R SOLO L SOLO R METRONOME PHONES PHONES MIXER SOLO Logic RECORDER TRACK CUE Logic DA ON ATT MONITOR MONITOR OUT L +4dB R 30 - B When the [SOLO] key is adjusted by the [PHONES]...
Owner's Manual
Page 46
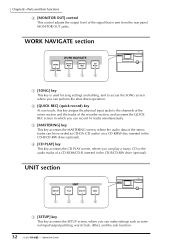
... OUT] control This control adjusts the output level of the signal that is used for song settings and editing, and to the channels of the mixer section and the tracks of the recorder section, and accesses the QUICK REC screen in the CD-R/CD-RW drive (optional). WORK NAVIGATE section WORK...
... OUT] control This control adjusts the output level of the signal that is used for song settings and editing, and to the channels of the mixer section and the tracks of the recorder section, and accesses the QUICK REC screen in the CD-R/CD-RW drive (optional). WORK NAVIGATE section WORK...
Owner's Manual
Page 47
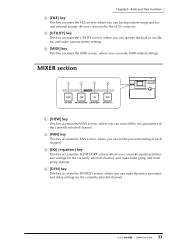
...] key This key accesses the PAN screen, where you can view all the mix parameters of each channel. MIXER section 1 2 3 4 MIXER VIEW PAN EQ DYN CH VIEW PAN / ROUTING EQ/ATT/GRP DYN/DLY/ MIXER VIEW PAN EQ DYN CH VIEW PAN/ROUTING EQ/ATT/GRP DYN/DLY/ PROFESSIONAL AUDIO WORKSTATION 1 [VIEW] key...
...] key This key accesses the PAN screen, where you can view all the mix parameters of each channel. MIXER section 1 2 3 4 MIXER VIEW PAN EQ DYN CH VIEW PAN / ROUTING EQ/ATT/GRP DYN/DLY/ MIXER VIEW PAN EQ DYN CH VIEW PAN/ROUTING EQ/ATT/GRP DYN/DLY/ PROFESSIONAL AUDIO WORKSTATION 1 [VIEW] key...
Owner's Manual
Page 55
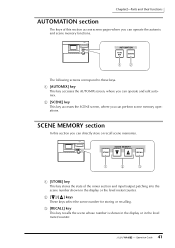
... stores the state of this section you can directly store or recall scene memories. Chapter2-Parts and their functions AUTOMATION section The keys of the mixer section and input/output patching into the scene number shown in the level meter/counter. 41 - C [RECALL] key This key recalls the scene whose number...
... stores the state of this section you can directly store or recall scene memories. Chapter2-Parts and their functions AUTOMATION section The keys of the mixer section and input/output patching into the scene number shown in the level meter/counter. 41 - C [RECALL] key This key recalls the scene whose number...

Owner's Manual
Page 70
...a screen contains two or more pages, you must first access the desired screen in the display. The keys of the WORK NAVIGATE, UNIT, MIXER, FADER MODE, RECORDER, and AUTOMATION sections of the top panel, and the [EDIT] key of the top panel 1. Each tab corresponds to select screens...screens, which you can access by pressing the appropriate key. Click the M (menu) button in step 1, you pressed in the upper right of the AW4416. The display access menu will appear. 2. Accessing a screen/page To operate the mix parameters of the screen. ❒ Using the mouse 1. By repeatedly...
...a screen contains two or more pages, you must first access the desired screen in the display. The keys of the WORK NAVIGATE, UNIT, MIXER, FADER MODE, RECORDER, and AUTOMATION sections of the top panel, and the [EDIT] key of the top panel 1. Each tab corresponds to select screens...screens, which you can access by pressing the appropriate key. Click the M (menu) button in step 1, you pressed in the upper right of the AW4416. The display access menu will appear. 2. Accessing a screen/page To operate the mix parameters of the screen. ❒ Using the mouse 1. By repeatedly...
Owner's Manual
Page 88
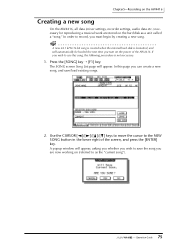
...] key ¡ [F1] key. Operation Guide If you wish to the NEW SONG button in the lower right of the AW4416. Chapter5-Recording on the AW4416 Creating a new song On the AW4416, all data (mixer settings, recorder settings, audio data etc.) necessary for reproducing a musical work are now working on (referred to record, you...
...] key ¡ [F1] key. Operation Guide If you wish to the NEW SONG button in the lower right of the AW4416. Chapter5-Recording on the AW4416 Creating a new song On the AW4416, all data (mixer settings, recorder settings, audio data etc.) necessary for reproducing a musical work are now working on (referred to record, you...
Owner's Manual
Page 89
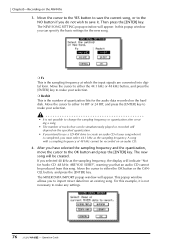
...key to make your selection. • It is the number of 48 kHz cannot be created. The MIXER DATA IMPORT popup window will appear. The new song will depend on the AW4416 3. Operation Guide Then press the [ENTER] key. This popup window allows you have selected the sampling ...frequency and the quantization, move the cursor to import mixer data from this example, it is not necessary to create...
...key to make your selection. • It is the number of 48 kHz cannot be created. The MIXER DATA IMPORT popup window will appear. The new song will depend on the AW4416 3. Operation Guide Then press the [ENTER] key. This popup window allows you have selected the sampling ...frequency and the quantization, move the cursor to import mixer data from this example, it is not necessary to create...

Owner's Manual
Page 90
Use the character palette to assign a song name of up to 64 characters. (For details on the AW4416 Tip! Chapter5-Recording on inputting characters, refer to page 60.) When you have finished inputting the song name, move the cursor to the song. 7. ...Make sure that the cursor is located at the OK button, and press the [ENTER] key. Mixer data import, name edit, and comment edit operations can also be performed later in the same way as an alternative to the OK button and...
Use the character palette to assign a song name of up to 64 characters. (For details on the AW4416 Tip! Chapter5-Recording on inputting characters, refer to page 60.) When you have finished inputting the song name, move the cursor to the song. 7. ...Make sure that the cursor is located at the OK button, and press the [ENTER] key. Mixer data import, name edit, and comment edit operations can also be performed later in the same way as an alternative to the OK button and...
Owner's Manual
Page 91
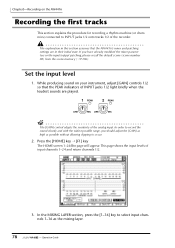
...[GAIN] as high as possible without allowing clipping to select input channels 1-16 as the mixing layer. 78 - While producing sound on the AW4416 Recording the first tracks This section explains the procedure for recording a rhythm machine (or drum mics) connected to INPUT jacks 1/2 onto ... the input level 1. This page shows the input levels of the recorder. Chapter5-Recording on your instrument, adjust [GAIN] controls 1/2 so that the AW4416's mixer and patching settings are played. 1 PEAK 2 PEAK LINE MIC LINE MIC Tip! Press the [HOME] key ¡ [F1] key The HOME ...
...[GAIN] as high as possible without allowing clipping to select input channels 1-16 as the mixing layer. 78 - While producing sound on the AW4416 Recording the first tracks This section explains the procedure for recording a rhythm machine (or drum mics) connected to INPUT jacks 1/2 onto ... the input level 1. This page shows the input levels of the recorder. Chapter5-Recording on your instrument, adjust [GAIN] controls 1/2 so that the AW4416's mixer and patching settings are played. 1 PEAK 2 PEAK LINE MIC LINE MIC Tip! Press the [HOME] key ¡ [F1] key The HOME ...

Owner's Manual
Page 92
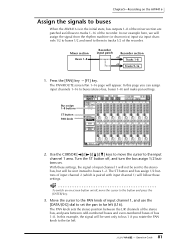
...sure that mixing layer is selected once again. 4. As you can be changed freely. Operation Guide Be careful not to page 133. 79 - The AW4416 has the following three mixing layers: 1 Input channels 1-16 B Input channels 17-24 + return channels C Monitor channels Even when you switch to...are patched to input channels as follows. INPUT jacks 1-8 I/O card I/O card OPTION I/O slot 1 OPTION I/O slot 2 Input patch ×8 ×8 ×8 Mixer section Input channels 1-8 Input channels 9-16 Input channels 17-24 Now raise the faders of channels controlled by the top panel [ON] keys 1-16, [SEL...
...sure that mixing layer is selected once again. 4. As you can be changed freely. Operation Guide Be careful not to page 133. 79 - The AW4416 has the following three mixing layers: 1 Input channels 1-16 B Input channels 17-24 + return channels C Monitor channels Even when you switch to...are patched to input channels as follows. INPUT jacks 1-8 I/O card I/O card OPTION I/O slot 1 OPTION I/O slot 2 Input patch ×8 ×8 ×8 Mixer section Input channels 1-8 Input channels 9-16 Input channels 17-24 Now raise the faders of channels controlled by the top panel [ON] keys 1-16, [SEL...
Owner's Manual
Page 94
... PAN knob 2. The ST button and bus assign 1/2 buttons of input channel 2 (which is in the initial state, bus outputs 1-8 of the mixer section are patched as follows to buses 1-2. The PAN knob sets the stereo position between the L/R channels of the stereo bus, and pans between odd... the signals to buses When the AW4416 is paired with input channel 1) will be sent only to bus 1 if you can assign input channels 1-16 to the far left (L16). Tip! Chapter5-Recording on . Mixer section Buses 1-8 Recorder input patch Recorder section ×8 Tracks 1-8 ×8 Tracks 9-16 1. Press the ...
... PAN knob 2. The ST button and bus assign 1/2 buttons of input channel 2 (which is in the initial state, bus outputs 1-8 of the mixer section are patched as follows to buses 1-2. The PAN knob sets the stereo position between the L/R channels of the stereo bus, and pans between odd... the signals to buses When the AW4416 is paired with input channel 1) will be sent only to bus 1 if you can assign input channels 1-16 to the far left (L16). Tip! Chapter5-Recording on . Mixer section Buses 1-8 Recorder input patch Recorder section ×8 Tracks 1-8 ×8 Tracks 9-16 1. Press the ...
Owner's Manual
Page 109
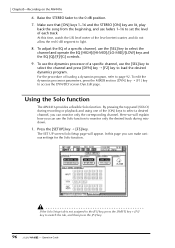
... ¡ [F2] key to load the desired dynamics program. To use the dynamics processor of each track. To edit the dynamics processor parameters, press the MIXER section [DYN] key ¡ [F1] key to switch the tab, and then press the [F3] key. 96 - Press the [SETUP] key ¡ [...fic channel, use the [SEL] key to select a desired channel, you can make various settings for the Solo function. Using the Solo function The AW4416 provides a flexible Solo function. By pressing the top panel [SOLO] during mixdown. 1. If the Solo Setup tab is not assigned to the [F3...
... ¡ [F2] key to load the desired dynamics program. To use the dynamics processor of each track. To edit the dynamics processor parameters, press the MIXER section [DYN] key ¡ [F1] key to switch the tab, and then press the [F3] key. 96 - Press the [SETUP] key ¡ [...fic channel, use the [SEL] key to select a desired channel, you can make various settings for the Solo function. Using the Solo function The AW4416 provides a flexible Solo function. By pressing the top panel [SOLO] during mixdown. 1. If the Solo Setup tab is not assigned to the [F3...


