Owners Manual
Page 4
...section on common operating errors before concluding that this unit is faulty. 17 Before moving this unit, press to set this unit in standby mode, and disconnect the power supply cable from the wall outlet. 18 Condensation will not be held responsible for any damage resulting from ... newspaper, tablecloth, curtain, etc. Disconnect the power supply cable from direct sunlight, heat sources, vibration, dust, moisture, and/or cold. Contact qualified Yamaha service personnel when any reasons. 15 When not planning to hot, and do not place: - Using this unit. - Other components, as this unit...
...section on common operating errors before concluding that this unit is faulty. 17 Before moving this unit, press to set this unit in standby mode, and disconnect the power supply cable from the wall outlet. 18 Condensation will not be held responsible for any damage resulting from ... newspaper, tablecloth, curtain, etc. Disconnect the power supply cable from direct sunlight, heat sources, vibration, dust, moisture, and/or cold. Contact qualified Yamaha service personnel when any reasons. 15 When not planning to hot, and do not place: - Using this unit. - Other components, as this unit...
Owners Manual
Page 6
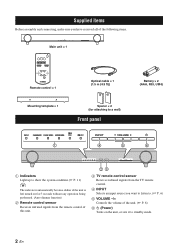
... input source you want to listen to. (☞ P. 6) 5 VOLUME -/+ Controls the volume of the unit. (☞ P. 8) 6 (Power) Turns on the unit, or sets it to standby mode. 2 En
... input source you want to listen to. (☞ P. 6) 5 VOLUME -/+ Controls the volume of the unit. (☞ P. 8) 6 (Power) Turns on the unit, or sets it to standby mode. 2 En
Owners Manual
Page 10
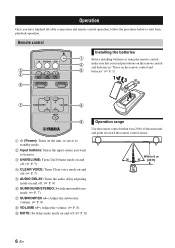
... remote control sensor. 1 (Power): Turns on and off . (☞ P. 8) 6 SURROUND/STEREO: Switch surround/stereo mode. (☞ P. 7) 7 SUBWOOFER +/-: Adjust the subwoofer volume. (☞ P. 8) 8 VOLUME +/-: Adjust the volume. (☞ P. 8) 9 MUTE: Switches mute mode on the unit, or sets it to standby mode. 2 Input buttons: Select the input source you have finished all cable connections and remote...
... remote control sensor. 1 (Power): Turns on and off . (☞ P. 8) 6 SURROUND/STEREO: Switch surround/stereo mode. (☞ P. 7) 7 SUBWOOFER +/-: Adjust the subwoofer volume. (☞ P. 8) 8 VOLUME +/-: Adjust the volume. (☞ P. 8) 9 MUTE: Switches mute mode on the unit, or sets it to standby mode. 2 Input buttons: Select the input source you have finished all cable connections and remote...
Owners Manual
Page 12
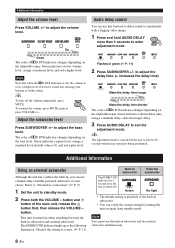
to standby mode. 2 Press both the VOLUME - Down The color of qD DTS indicator changes depending on the...a subwoofer built-in green (☞ P. 11) 2 Press SUBWOOFER +/- This unit is turned on again from standby mode. Note Note that when the qD DTS indicator is red, the volume is 0), and red a plus level. y The adjustment...light • The default setting is left for 2 seconds after the unit is turned on the adjustable range. to exit the adjustment mode. y To turn off the volume temporarily, press MUTE. Green indicates a shorter delay time, orange a medium delay, and red a ...
to standby mode. 2 Press both the VOLUME - Down The color of qD DTS indicator changes depending on the...a subwoofer built-in green (☞ P. 11) 2 Press SUBWOOFER +/- This unit is turned on again from standby mode. Note Note that when the qD DTS indicator is red, the volume is 0), and red a plus level. y The adjustment...light • The default setting is left for 2 seconds after the unit is turned on the adjustable range. to exit the adjustment mode. y To turn off the volume temporarily, press MUTE. Green indicates a shorter delay time, orange a medium delay, and red a ...
Owners Manual
Page 13
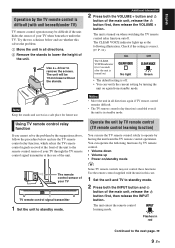
...the unit. The remote control sensor of your TV TV remote control signal transmitter 1 Set the unit to standby mode. The unit enters the remote control learning mode. Flashes in standby mode. Try the two solutions below and use . The CLEAR VOICE indicator lights up as the following functions ...by TV remote control. • Volume down • Volume up • Power on again from standby mode. Use the remote control supplied with unit beneath/under the TV. Check if the setting is correct. (☞ P. 11) The CLEAR VOICE ...
...the unit. The remote control sensor of your TV TV remote control signal transmitter 1 Set the unit to standby mode. The unit enters the remote control learning mode. Flashes in standby mode. Try the two solutions below and use . The CLEAR VOICE indicator lights up as the following functions ...by TV remote control. • Volume down • Volume up • Power on again from standby mode. Use the remote control supplied with unit beneath/under the TV. Check if the setting is correct. (☞ P. 11) The CLEAR VOICE ...
Owners Manual
Page 14
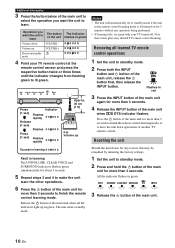
...VOLUME + Power on for more than 3 seconds. Note that screen glare may be remedied by initiating the factory settings. 1 Set the unit to standby mode. 2 Press and hold the button of the main unit for 5 minutes without any reason, this may disturb TV remote control learning. Resetting the ...unit Should the unit freeze for more than 3 seconds to lit green. Operation you want the unit to standby mode. 2 Press both the INPUT button and button of the main unit, release the button first, then release the INPUT button. Press (1 sec)...
...VOLUME + Power on for more than 3 seconds. Note that screen glare may be remedied by initiating the factory settings. 1 Set the unit to standby mode. 2 Press and hold the button of the main unit for 5 minutes without any reason, this may disturb TV remote control learning. Resetting the ...unit Should the unit freeze for more than 3 seconds to lit green. Operation you want the unit to standby mode. 2 Press both the INPUT button and button of the main unit, release the button first, then release the INPUT button. Press (1 sec)...
Owners Manual
Page 16
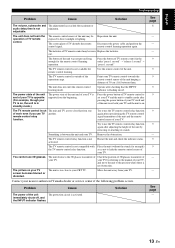
...the power cable, and then turn on each component. See page 4 - - 8 8 7 7 8 8 - 5 8 - - 6 - 6 - 8 12 En Press MUTE on the remote control to standby mode if the unit is left turned on for about 30 electricity, or drop in speaker to prevent the next playback from such equipment. No bass...into the outlet firmly. Adjust the volume level. If the problem you are firmly connected to the standby mode, disconnect the AC power supply cable, and contact the nearest authorized Yamaha dealer or service center. Make sure the power cable is not listed below, or if the ...
...the power cable, and then turn on each component. See page 4 - - 8 8 7 7 8 8 - 5 8 - - 6 - 6 - 8 12 En Press MUTE on the remote control to standby mode if the unit is left turned on for about 30 electricity, or drop in speaker to prevent the next playback from such equipment. No bass...into the outlet firmly. Adjust the volume level. If the problem you are firmly connected to the standby mode, disconnect the AC power supply cable, and contact the nearest authorized Yamaha dealer or service center. Make sure the power cable is not listed below, or if the ...
Owners Manual
Page 17
...second" → "press 1 second" The TV remote control is opposite from the beginning. Try to on. The picture on , the unit is in standby mode.) The power state of the unit and of your CRT TV. screen becomes blurred or distorted. The unit and TV are too close to your...En Disconnect the power cable and perform the remote control learning operation again. The TV remote control is outside of your nearest authorized Yamaha dealer or service center if the following problem occurs. The unit obstructs the 3D glasses transmitter of the operation range. Move the ...
...second" → "press 1 second" The TV remote control is opposite from the beginning. Try to on. The picture on , the unit is in standby mode.) The power state of the unit and of your CRT TV. screen becomes blurred or distorted. The unit and TV are too close to your...En Disconnect the power cable and perform the remote control learning operation again. The TV remote control is outside of your nearest authorized Yamaha dealer or service center if the following problem occurs. The unit obstructs the 3D glasses transmitter of the operation range. Move the ...

Owners Manual
Page 18
...) cone × 2 • Impedance Front speaker 6 Ω Subwoofer 3 Ω • Frequency Response (-10 dB, Stereo mode) Front speaker 150 Hz to 20 kHz Subwoofer 50 Hz to 150 Hz Input Jacks • Optical 2 (TV,BD/DVD) •... 1 • System Connector (for subwoofer power interlock)......... 1 General • Power Supply AC 120 V, 60 Hz • Power Consumption 22 W • Standby Power Consumption Less than 0.5 W • Dimensions (W × H × D) With stands 890 × 107 ×120.5 mm (35-1/8 ×... Digital Surround" are trademarks of Yamaha Corporation. 14 En
...) cone × 2 • Impedance Front speaker 6 Ω Subwoofer 3 Ω • Frequency Response (-10 dB, Stereo mode) Front speaker 150 Hz to 20 kHz Subwoofer 50 Hz to 150 Hz Input Jacks • Optical 2 (TV,BD/DVD) •... 1 • System Connector (for subwoofer power interlock)......... 1 General • Power Supply AC 120 V, 60 Hz • Power Consumption 22 W • Standby Power Consumption Less than 0.5 W • Dimensions (W × H × D) With stands 890 × 107 ×120.5 mm (35-1/8 ×... Digital Surround" are trademarks of Yamaha Corporation. 14 En


