
Owner's Manual
Page 2
... for future reference. We Want You Listening For A Lifetime Yamaha and the Electronic Industries Association's Consumer Electronics Group want you to the presence of uninsulated "dangerous voltage" within an equilateral triangle, is used, use this Owner's Manual in a safe place for your equipment by... radiators, heat registers, stoves, or other . This Class B digital apparatus complies with one wider than the other apparatus (including amplifiers) that lets the sound come through loud and clear without affecting your outlet, consult an electrician for long periods of time. 14...
... for future reference. We Want You Listening For A Lifetime Yamaha and the Electronic Industries Association's Consumer Electronics Group want you to the presence of uninsulated "dangerous voltage" within an equilateral triangle, is used, use this Owner's Manual in a safe place for your equipment by... radiators, heat registers, stoves, or other . This Class B digital apparatus complies with one wider than the other apparatus (including amplifiers) that lets the sound come through loud and clear without affecting your outlet, consult an electrician for long periods of time. 14...

Owner's Manual
Page 3
... corrective measures do not produce satisfactory results, please contact the local retailer authorized to eliminate the problem by using one of other electronic devices. If the antenna lead-in is being affected by Yamaha Corporation of this product is hazardous if engaged in a live socket outlet. ■ Special Instructions for the plug...
... corrective measures do not produce satisfactory results, please contact the local retailer authorized to eliminate the problem by using one of other electronic devices. If the antenna lead-in is being affected by Yamaha Corporation of this product is hazardous if engaged in a live socket outlet. ■ Special Instructions for the plug...

Owner's Manual
Page 4
... not be held responsible for your local main voltage BEFORE plugging into the wall outlet. Contact qualified Yamaha service personnel when any reasons. 15 When not planning to use this unit for future reference. 2 Install this sound system in a well ventilated, cool, dry, clean place - As long as... injury. - this unit is designed to consume a very small quantity of power. Voltages are complete. 8 Do not operate this unit upside-down. Use a clean, dry cloth. 12 Only voltage specified on switches, knobs and/or cords. 10 When disconnecting the power cable from the wall outlet, grasp...
... not be held responsible for your local main voltage BEFORE plugging into the wall outlet. Contact qualified Yamaha service personnel when any reasons. 15 When not planning to use this unit for future reference. 2 Install this sound system in a well ventilated, cool, dry, clean place - As long as... injury. - this unit is designed to consume a very small quantity of power. Voltages are complete. 8 Do not operate this unit upside-down. Use a clean, dry cloth. 12 Only voltage specified on switches, knobs and/or cords. 10 When disconnecting the power cable from the wall outlet, grasp...

Owner's Manual
Page 5
...main unit and the remote control, the names of the buttons on the remote control. Design and specifications are given in the remote control 4 Using the remote control 4 Rear panel 5 PREPARATION CONNECTIONS 6 Connecting speakers and other components 6 Connecting the supplied power cable 8 OPERATION PLAYING AND ... SPECIFICATIONS 15 ■ About this manual • y indicates a tip for your operation. • Some operations can be performed by using either the buttons on the main unit or on the remote control are subject to change in part as a result of improvements, etc....
...main unit and the remote control, the names of the buttons on the remote control. Design and specifications are given in the remote control 4 Using the remote control 4 Rear panel 5 PREPARATION CONNECTIONS 6 Connecting speakers and other components 6 Connecting the supplied power cable 8 OPERATION PLAYING AND ... SPECIFICATIONS 15 ■ About this manual • y indicates a tip for your operation. • Some operations can be performed by using either the buttons on the main unit or on the remote control are subject to change in part as a result of improvements, etc....

Owner's Manual
Page 8
... • If the batteries have leaked, dispose of them correctly in accordance with new ones. • Do not use different types of the remote control decreases. • Use AA, R6, UM-3 batteries. • Make sure that the polarities are correct. See the illustration inside of the ... the battery compartment. • Remove the batteries if the remote control is not to strong lighting, in the remote control 1 3 2 Using the remote control The remote control transmits a directional infrared beam. Clean the battery compartment thoroughly before installing new batteries. • Do not ...
... • If the batteries have leaked, dispose of them correctly in accordance with new ones. • Do not use different types of the remote control decreases. • Use AA, R6, UM-3 batteries. • Make sure that the polarities are correct. See the illustration inside of the ... the battery compartment. • Remove the batteries if the remote control is not to strong lighting, in the remote control 1 3 2 Using the remote control The remote control transmits a directional infrared beam. Clean the battery compartment thoroughly before installing new batteries. • Do not ...

Owner's Manual
Page 9
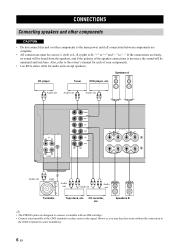
... external components, such as doing so may not be set to the impedance of the speaker must be 8 Ω or higher. • If you use two sets (A and B) simultaneously, the impedance of each speaker must be 12 Ω or higher. (Except for connection information. 4 VOLTAGE SELECTOR (Asia... you make bi-wire connections, the impedance of the speakers in the supplied power cable. See page 6 for U.S.A and Canada models) • If you use two sets (A and B) simultaneously, the impedance of each speaker must be 6 Ω or higher. • If you make bi-wire connections, the ...
... external components, such as doing so may not be set to the impedance of the speaker must be 8 Ω or higher. • If you use two sets (A and B) simultaneously, the impedance of each speaker must be 12 Ω or higher. (Except for connection information. 4 VOLTAGE SELECTOR (Asia... you make bi-wire connections, the impedance of the speakers in the supplied power cable. See page 6 for U.S.A and Canada models) • If you use two sets (A and B) simultaneously, the impedance of each speaker must be 6 Ω or higher. • If you make bi-wire connections, the ...
Owner's Manual
Page 10
... the signal. Also, refer to "-". CD recorder, etc. If the connections are designed to connect a turntable with an MM cartridge. • Connect your components. • Use RCA stereo cable for audio units except speakers. Speakers B y • The PHONO jacks are faulty, no sound will be unnatural and lack bass. Speakers A CD...
... the signal. Also, refer to "-". CD recorder, etc. If the connections are designed to connect a turntable with an MM cartridge. • Connect your components. • Use RCA stereo cable for audio units except speakers. Speakers B y • The PHONO jacks are faulty, no sound will be unnatural and lack bass. Speakers A CD...

Owner's Manual
Page 11
.... 3 Tighten the knob to secure the wire. and Europe models) First, tighten the knob and then insert the banana plug into two independent sections. y To use the bi-wire connections, switch the SPEAKERS selector to the appropriate position before connecting one set of terminals in ) high frequency drivers are complete. 1 Remove...
.... 3 Tighten the knob to secure the wire. and Europe models) First, tighten the knob and then insert the banana plug into two independent sections. y To use the bi-wire connections, switch the SPEAKERS selector to the appropriate position before connecting one set of terminals in ) high frequency drivers are complete. 1 Remove...

Owner's Manual
Page 12
...counterclockwise to the AC OUTLET(S) is controlled by POWER on the front panel of this unit is turned on. The power to the correct position using a straight slot screwdriver. Voltages are complete. 8 En (Asia and General models) Improper setting of this unit must be set for your .../230-240 V, 50/60 Hz ■ AC OUTLET(S) (SWITCHED) U.K. CONNECTIONS Connecting the supplied power cable To the wall outlet with a built-in amplifier, such as a subwoofer, etc. ■ Connecting the supplied power cable Plug the supplied power cable into the wall outlet after all other components to...
...counterclockwise to the AC OUTLET(S) is controlled by POWER on the front panel of this unit is turned on. The power to the correct position using a straight slot screwdriver. Voltages are complete. 8 En (Asia and General models) Improper setting of this unit must be set for your .../230-240 V, 50/60 Hz ■ AC OUTLET(S) (SWITCHED) U.K. CONNECTIONS Connecting the supplied power cable To the wall outlet with a built-in amplifier, such as a subwoofer, etc. ■ Connecting the supplied power cable Plug the supplied power cable into the wall outlet after all other components to...
Owner's Manual
Page 13
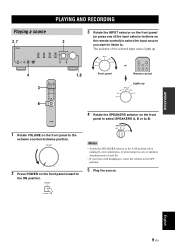
... panel inward to the OFF position. 5 Play the source. Notes • Switch the SPEAKERS selector to the A+B position when making bi-wire connections, or when using two sets of speakers simultaneously (A and B). • If you want to listen to. English 9 En Front panel or Remote control Lights up .
... panel inward to the OFF position. 5 Play the source. Notes • Switch the SPEAKERS selector to the A+B position when making bi-wire connections, or when using two sets of speakers simultaneously (A and B). • If you want to listen to. English 9 En Front panel or Remote control Lights up .

Owner's Manual
Page 14
... Control range: -10 dB to turn on the power by pressing the button on the front panel to +10 dB (20 Hz) TREBLE When you use the CD DIRECT AMP switch. 10 En Lights up Front panel Remote control y You can turn off the power. As a result, the input signals ... of the INPUT selector setting. PLAYING AND RECORDING 6 Rotate VOLUME on the remote control) to the power amplifier from your audio sources. on the front panel (or press VOL +/- Adjusting the tonal quality ■ Using the CD DIRECT AMP switch Routes input signals directly to adjust the sound output level. ■...
... Control range: -10 dB to turn on the power by pressing the button on the front panel to +10 dB (20 Hz) TREBLE When you use the CD DIRECT AMP switch. 10 En Lights up Front panel Remote control y You can turn off the power. As a result, the input signals ... of the INPUT selector setting. PLAYING AND RECORDING 6 Rotate VOLUME on the remote control) to the power amplifier from your audio sources. on the front panel (or press VOL +/- Adjusting the tonal quality ■ Using the CD DIRECT AMP switch Routes input signals directly to adjust the sound output level. ■...

Owner's Manual
Page 16
...speaker cables properly and press the is a malfunction. off suddenly or shorting out against the rear panel. after 30 seconds, then use - The The POWER ( ) button is not connected Connect the supplied power cable firmly. There is generated from the unit. ...the power off this unit normally. The speaker is turned off . Disconnect the AC power cable and contact the nearest authorized Yamaha dealer or service center. Replace the speaker set this unit does not function properly. ADDITIONAL INFORMATION TROUBLESHOOTING Refer to either position....
...speaker cables properly and press the is a malfunction. off suddenly or shorting out against the rear panel. after 30 seconds, then use - The The POWER ( ) button is not connected Connect the supplied power cable firmly. There is generated from the unit. ...the power off this unit normally. The speaker is turned off . Disconnect the AC power cable and contact the nearest authorized Yamaha dealer or service center. Replace the speaker set this unit does not function properly. ADDITIONAL INFORMATION TROUBLESHOOTING Refer to either position....

Owner's Manual
Page 17
...Causes Solutions Refer to page Sound is distorted. Press MUTE on . correct. 5 Check that the IMPEDANCE SELECTOR setting is being played on a turntable Use a turntable equipped with the INPUT selected. Connect the turntable to the correct + and - The volume level cannot be heard... is connected to this unit back on the power of bass and no ambience. Connect the stereo cable for the BALANCE control. reverse at the amplifier or the speakers. Make the GND connection between the turntable and this Turn on . The sound is turned off, or this unit. 6 The...
...Causes Solutions Refer to page Sound is distorted. Press MUTE on . correct. 5 Check that the IMPEDANCE SELECTOR setting is being played on a turntable Use a turntable equipped with the INPUT selected. Connect the turntable to the correct + and - The volume level cannot be heard... is connected to this unit back on the power of bass and no ambience. Connect the stereo cable for the BALANCE control. reverse at the amplifier or the speakers. Make the GND connection between the turntable and this Turn on . The sound is turned off, or this unit. 6 The...

Owner's Manual
Page 20
... tear. Damage resulting from: (1) Repairs performed by the customer himself or by Yamaha in the EEA and/or Switzerland. (7) Non AV (Audio Visual) related products. (Products subject to use the product for its normal purpose or in the European Union. Periodic maintenance and... repair or replacement of disposal. For proper treatment, recovery and recycling of old products and used . (4) Accidents, lightning, water, fire, improper ventilation, battery leakage or any cause beyond Yamaha's control. (5) Defects of this guarantee: a. If you wish to discard these products and batteries...
... tear. Damage resulting from: (1) Repairs performed by the customer himself or by Yamaha in the EEA and/or Switzerland. (7) Non AV (Audio Visual) related products. (Products subject to use the product for its normal purpose or in the European Union. Periodic maintenance and... repair or replacement of disposal. For proper treatment, recovery and recycling of old products and used . (4) Accidents, lightning, water, fire, improper ventilation, battery leakage or any cause beyond Yamaha's control. (5) Defects of this guarantee: a. If you wish to discard these products and batteries...


