

Owner's Manual
Page 2
...notice or obligation to update existing units. 92-469- ➀ (rear) ENVIRONMENTAL ISSUES: Yamaha strives to lack of products that are located on this plate. Disposal Notice: Should this manual is intended to alert the user to the presence of used to perform the replacement. ...SPECIAL MESSAGE SECTION PRODUCT SAFETY MARKINGS: Yamaha electronic products may have either labels similar to the graphics shown ...
...notice or obligation to update existing units. 92-469- ➀ (rear) ENVIRONMENTAL ISSUES: Yamaha strives to lack of products that are located on this plate. Disposal Notice: Should this manual is intended to alert the user to the presence of used to perform the replacement. ...SPECIAL MESSAGE SECTION PRODUCT SAFETY MARKINGS: Yamaha electronic products may have either labels similar to the graphics shown ...

Owner's Manual
Page 3
...before damage occurs. 14. sory mounting fixtures that are not spilled into the enclosure through any kind. PLEASE KEEP THIS MANUAL 92-469-3 3 1 These precautions include, but are designed to rain. cial Message Section items, and any connections, including ..., consult a local electrician. 6. This product was NOT designed for supply voltage verification and (if applicable) instructions. Some Yamaha products may exist. 12. Please make sure that described in performance; The required supply voltage is recommended by the manufacturer. Ventilation: ...
...before damage occurs. 14. sory mounting fixtures that are not spilled into the enclosure through any kind. PLEASE KEEP THIS MANUAL 92-469-3 3 1 These precautions include, but are designed to rain. cial Message Section items, and any connections, including ..., consult a local electrician. 6. This product was NOT designed for supply voltage verification and (if applicable) instructions. Some Yamaha products may exist. 12. Please make sure that described in performance; The required supply voltage is recommended by the manufacturer. Ventilation: ...

Owner's Manual
Page 6
... and easy-to-use is a new Yamaha MIDI specification which guarantees that any data conforming to read the manual thoroughly while trying out the various features described. Keep the manual in Boards • Owner's Manual Unauthorized copying of copyrighted software for purposes other...sound quality with greater functionality and open-ended expandability for later reference. This product (9000Pro) is an addition to record XG-compatible song files. The Yamaha 9000Pro combines advanced tone generation technology with state-of-the-art digital electronics and features to...
... and easy-to-use is a new Yamaha MIDI specification which guarantees that any data conforming to read the manual thoroughly while trying out the various features described. Keep the manual in Boards • Owner's Manual Unauthorized copying of copyrighted software for purposes other...sound quality with greater functionality and open-ended expandability for later reference. This product (9000Pro) is an addition to record XG-compatible song files. The Yamaha 9000Pro combines advanced tone generation technology with state-of-the-art digital electronics and features to...

Owner's Manual
Page 7
... 8 All topics, features, functions, and operations are covered here in System enables you to equip the 9000Pro with their solutions are listed here in the order they appear in the manual, for XG-Plug-in-compatible tone generators. You won't need (or want) to read everything above...easily see the relationship of Yamaha instruments and MIDI devices, including the Clavinova series. SFF - The 9000Pro uses the SFF internally, reads optional SFF style disks, and creates SFF styles using your new 9000Pro right now. Quick Guide page 16 Unless you enjoy reading manuals, you 're familiar ...
... 8 All topics, features, functions, and operations are covered here in System enables you to equip the 9000Pro with their solutions are listed here in the order they appear in the manual, for XG-Plug-in-compatible tone generators. You won't need (or want) to read everything above...easily see the relationship of Yamaha instruments and MIDI devices, including the Clavinova series. SFF - The 9000Pro uses the SFF internally, reads optional SFF style disks, and creates SFF styles using your new 9000Pro right now. Quick Guide page 16 Unless you enjoy reading manuals, you 're familiar ...
Owner's Manual
Page 8
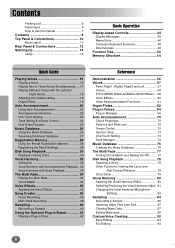
Contents Packing List 6 Panel logos 6 How to use the manual 7 Contents 8 Top Panel & Connections 10 Music stand 10 Rear Panel & Connections 12 Starting Up 14 Lamp 15 Basic Operation Display-based Controls 44 Display Messages ...
Contents Packing List 6 Panel logos 6 How to use the manual 7 Contents 8 Top Panel & Connections 10 Music stand 10 Rear Panel & Connections 12 Starting Up 14 Lamp 15 Basic Operation Display-based Controls 44 Display Messages ...

Owner's Manual
Page 11
.... !3 @0 !4 !5 !9 !6 !2 !7 @4 @1 @2 @3 !8 Liquid Crystal Display (LCD) and Related Buttons/Controls ... Top Panel & Connections Air vent Do not place objects on the instrument's air vent, since this owner's manual are for instructional purposes only, and may prevent adequate ventilation of the internal components, and possibly result in this may be different from your instrument...
.... !3 @0 !4 !5 !9 !6 !2 !7 @4 @1 @2 @3 !8 Liquid Crystal Display (LCD) and Related Buttons/Controls ... Top Panel & Connections Air vent Do not place objects on the instrument's air vent, since this owner's manual are for instructional purposes only, and may prevent adequate ventilation of the internal components, and possibly result in this may be different from your instrument...

Owner's Manual
Page 14
... no built-in which it is lost or damaged and needs to be replaced, contact your 9000Pro is rated for grounding purposes). Starting Up Use the following order: WARNING • Make sure your Yamaha dealer. Alternatively, you need to be used (as necessary. 7 After the main display appears, play and ...below appears. If you've connected any external devices to the 9000Pro, turn on the power of those devices are set to the minimum and simply reverse the above are set to the minimum. (Refer to the owner's manuals of the devices you are using for more information on those ...
... no built-in which it is lost or damaged and needs to be replaced, contact your 9000Pro is rated for grounding purposes). Starting Up Use the following order: WARNING • Make sure your Yamaha dealer. Alternatively, you need to be used (as necessary. 7 After the main display appears, play and ...below appears. If you've connected any external devices to the 9000Pro, turn on the power of those devices are set to the minimum and simply reverse the above are set to the minimum. (Refer to the owner's manuals of the devices you are using for more information on those ...

Owner's Manual
Page 36
... any music style or arrangement - quickly, easily and all by yourself! from solo piano and church organ to the corresponding tracks as listed below . MANUAL VOICE RIGHT 1 voice RIGHT 2 voice RIGHT 3 voice LEFT voice MULTI PAD 1 MULTI PAD 2 MULTI PAD 3 MULTI PAD 4 TRACK 1 2 ... 3 Select "NEW SONG." 4 Select "QUICK RECORD." 2 A B C D E 3 A B C D E 4 A B C D E 5 Set the track modes. • When MANUAL is automatically set to "REC," your own keyboard performances to disk. With multiple tracks for recording, comprehensive editing features, plus the use Song Creator feature...
... any music style or arrangement - quickly, easily and all by yourself! from solo piano and church organ to the corresponding tracks as listed below . MANUAL VOICE RIGHT 1 voice RIGHT 2 voice RIGHT 3 voice LEFT voice MULTI PAD 1 MULTI PAD 2 MULTI PAD 3 MULTI PAD 4 TRACK 1 2 ... 3 Select "NEW SONG." 4 Select "QUICK RECORD." 2 A B C D E 3 A B C D E 4 A B C D E 5 Set the track modes. • When MANUAL is automatically set to "REC," your own keyboard performances to disk. With multiple tracks for recording, comprehensive editing features, plus the use Song Creator feature...

Owner's Manual
Page 44
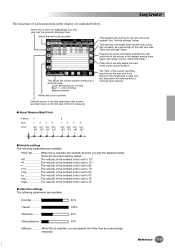
... currently shown. G [MAIN MIXER] button and [PART ON/OFF] button Refer to set the display for functions shown directly above , the 9000Pro features an exceptionally large and easy-tounderstand display. The LCD (1~8) buttons are divided into eight sets of up/down correspondingly) for optimum legibility...., the lamps switch between each display by pressing the [EXIT] button several different functions' displays in succession, you can be changed manually.) Rotating the data dial to the right (clockwise) increases the value, while rotating it to make selections or adjust settings (up or...
... currently shown. G [MAIN MIXER] button and [PART ON/OFF] button Refer to set the display for functions shown directly above , the 9000Pro features an exceptionally large and easy-tounderstand display. The LCD (1~8) buttons are divided into eight sets of up/down correspondingly) for optimum legibility...., the lamps switch between each display by pressing the [EXIT] button several different functions' displays in succession, you can be changed manually.) Rotating the data dial to the right (clockwise) increases the value, while rotating it to make selections or adjust settings (up or...
Owner's Manual
Page 45
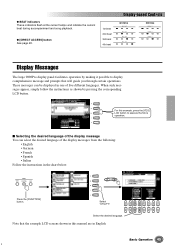
... J I J Select "UTILITY." 1 2 3 4 5 6 7 8 Select the desired language. F PAGE CONTROL G BACK NEXT H I Selecting the desired language of five different languages. F G For this manual are in this example, press the [YES] H LCD button to display comprehensive message and prompts that the example LCD screens shown in English. Basic Operation...] button See page 48. 1st beat 2nd beat 3rd beat 4th beat Display-based Controls 4/4 time 3/4 time Display Messages The large 9000Pro display panel facilitates operation by pressing the corresponding LCD button.
... J I J Select "UTILITY." 1 2 3 4 5 6 7 8 Select the desired language. F PAGE CONTROL G BACK NEXT H I Selecting the desired language of five different languages. F G For this manual are in this example, press the [YES] H LCD button to display comprehensive message and prompts that the example LCD screens shown in English. Basic Operation...] button See page 48. 1st beat 2nd beat 3rd beat 4th beat Display-based Controls 4/4 time 3/4 time Display Messages The large 9000Pro display panel facilitates operation by pressing the corresponding LCD button.
Owner's Manual
Page 57
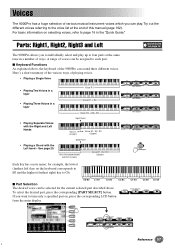
... LEFT HOLD LEFT RIGHT1 RIGHT2 RIGHT3 J LOWER PART ON/OFF UPPER Reference 57 55 for the current selected part described above , the keyboard of the 9000Pro can sound three different voices. See page 20. Auto Accompaniment section (Lower) Voice R1, R2, R3 (Upper) Each key has a note name... RIGHT3 Split Point • Playing a Chord with the Left hand - Voices The 9000Pro has a huge selection of various musical instrument voices which you can play up to four parts at the end of this manual (page 192). Parts: Right1, Right2, Right3 and Left Quick Guide on , press...
... LEFT HOLD LEFT RIGHT1 RIGHT2 RIGHT3 J LOWER PART ON/OFF UPPER Reference 57 55 for the current selected part described above , the keyboard of the 9000Pro can sound three different voices. See page 20. Auto Accompaniment section (Lower) Voice R1, R2, R3 (Upper) Each key has a note name... RIGHT3 Split Point • Playing a Chord with the Left hand - Voices The 9000Pro has a huge selection of various musical instrument voices which you can play up to four parts at the end of this manual (page 192). Parts: Right1, Right2, Right3 and Left Quick Guide on , press...

Owner's Manual
Page 65
...giving a degree of your keyboard performance. When playing these demo songs on the board is lost as soon as played from the 9000Pro. Refer to the Owner's Manual of realism that the Single Part boards can even capture some Plugin Boards (e.g., PLG150-PF, PLG100-VL, PLG100-DX) . &#...8226; Included with each Plug-in Board is turned off. G Board Preset Voices These Board Voices are the internal voices of the 9000Pro - These boards...
...giving a degree of your keyboard performance. When playing these demo songs on the board is lost as soon as played from the 9000Pro. Refer to the Owner's Manual of realism that the Single Part boards can even capture some Plugin Boards (e.g., PLG150-PF, PLG100-VL, PLG100-DX) . &#...8226; Included with each Plug-in Board is turned off. G Board Preset Voices These Board Voices are the internal voices of the 9000Pro - These boards...

Owner's Manual
Page 101
... by editing some parameters of XGworks or XGworks lite for editing the voice parameters via the panel operations. 8 Store the edited voice to the owner's manual of the Plug-in XGworks or XGworks lite. (Refer to Flash ROM. Basic Procedure 1 Press the [SOUND CREATOR] button. Creating Plug-in Custom Voices 2 Select...
... by editing some parameters of XGworks or XGworks lite for editing the voice parameters via the panel operations. 8 Store the edited voice to the owner's manual of the Plug-in XGworks or XGworks lite. (Refer to Flash ROM. Basic Procedure 1 Press the [SOUND CREATOR] button. Creating Plug-in Custom Voices 2 Select...
Owner's Manual
Page 104
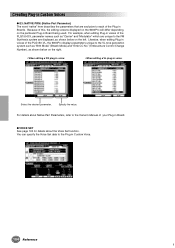
Likewise, when editing Plug-in voices of the PLG150-VL, the 9000Pro displays parameters unique to each of your Plug-in Board. Specify the value. You can specify the Voice Set data to the Owner's Manual of the Plug-in Boards. Because of the PLG150-DX, parameter names such as "Carrier" ... Control Change Number), as shown below on the left. For example, when editing Plug-in voices of this, the editing screens displayed on the 9000Pro will differ depending on the particular Plug-in Board being used. G VOICE SET See page 163 for details about Native Part Parameters, refer to ...
Likewise, when editing Plug-in voices of the PLG150-VL, the 9000Pro displays parameters unique to each of your Plug-in Board. Specify the value. You can specify the Voice Set data to the Owner's Manual of the Plug-in Boards. Because of the PLG150-DX, parameter names such as "Carrier" ... Control Change Number), as shown below on the left. For example, when editing Plug-in voices of this, the editing screens displayed on the 9000Pro will differ depending on the particular Plug-in Board being used. G VOICE SET See page 163 for details about Native Part Parameters, refer to ...

Owner's Manual
Page 106
... found in the CBX driver folder or in Board. Creating Plug-in Custom Voices Voice Editing on a computer. 2 Install the software to the 9000Pro. PLG100-VL, PLG150-VL PLG100-DX, PLG150-DX PLG150-AN PLG150-PF Plug-in Editor Software VL Visual Editor DX Easy Editor, DX Simulator AN... Plug-in Manager function (page 68). 106 Reference 104 G Plug-in Editor Software for XGworks (lite) For installation instructions, refer to the Owner's Manual of MIDI Thru Filter in XGworks or XGworks lite, when editing the Board Custom Voices. 3 If necessary, save any important voice data (Board Custom ...
... found in the CBX driver folder or in Board. Creating Plug-in Custom Voices Voice Editing on a computer. 2 Install the software to the 9000Pro. PLG100-VL, PLG150-VL PLG100-DX, PLG150-DX PLG150-AN PLG150-PF Plug-in Editor Software VL Visual Editor DX Easy Editor, DX Simulator AN... Plug-in Manager function (page 68). 106 Reference 104 G Plug-in Editor Software for XGworks (lite) For installation instructions, refer to the Owner's Manual of MIDI Thru Filter in XGworks or XGworks lite, when editing the Board Custom Voices. 3 If necessary, save any important voice data (Board Custom ...

Owner's Manual
Page 110
... Recording automatically makes track assignments according to REC, your keyboard performances (VOICE R1, R2, R3, L) and Multi Pads playback are organized as listed below . When "MANUAL" tracks are set to the simple rules below . The new data replaces the previous data. The Song Creator offers two different step recording types: Chord...
... Recording automatically makes track assignments according to REC, your keyboard performances (VOICE R1, R2, R3, L) and Multi Pads playback are organized as listed below . When "MANUAL" tracks are set to the simple rules below . The new data replaces the previous data. The Song Creator offers two different step recording types: Chord...

Owner's Manual
Page 115
... Note Shift operation. Set the desired amount of transposition for all other than the mixed note data is performed). After execution this to the Owner's Manual of the current song's tracks. XG parameters) to any of your Plugin Board. Adjust any parameter changes made in the middle of two octaves in...
... Note Shift operation. Set the desired amount of transposition for all other than the mixed note data is performed). After execution this to the Owner's Manual of the current song's tracks. XG parameters) to any of your Plugin Board. Adjust any parameter changes made in the middle of two octaves in...
Owner's Manual
Page 119
... The following parameters are available. • Normal Tenuto Staccato .......... 80% 100% 40% • Staccatissimo.. 20% • Manual When this to 33. • ppp The velocity of the entered note is actually sounded), as a percentage manually. Select the track to on (highlighted), you play only the currently displayed track. This sets the note...
... The following parameters are available. • Normal Tenuto Staccato .......... 80% 100% 40% • Staccatissimo.. 20% • Manual When this to 33. • ppp The velocity of the entered note is actually sounded), as a percentage manually. Select the track to on (highlighted), you play only the currently displayed track. This sets the note...
Owner's Manual
Page 167
...Voice List or Style List displays remain indefinitely. (You can manually return to the previous display by pressing the [EXIT] button.) I Language When this is turned on. See page 45 for use with the 9000Pro) • Type 1 Print Scroll ESC F1 F2 F3 F4 F5 F6... elapses before returning to "NEVER," the selected menu displays remain indefinitely until changed manually. To return to the original display, press the [CLOSE] LCD button (which voices and styles are not used for the 9000Pro and have no effect or function. See below for details. "£ %^ & ( )-+ 123456 ...
...Voice List or Style List displays remain indefinitely. (You can manually return to the previous display by pressing the [EXIT] button.) I Language When this is turned on. See page 45 for use with the 9000Pro) • Type 1 Print Scroll ESC F1 F2 F3 F4 F5 F6... elapses before returning to "NEVER," the selected menu displays remain indefinitely until changed manually. To return to the original display, press the [CLOSE] LCD button (which voices and styles are not used for the 9000Pro and have no effect or function. See below for details. "£ %^ & ( )-+ 123456 ...

Owner's Manual
Page 172
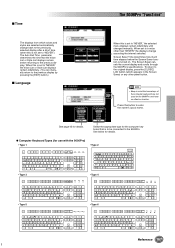
...B IN terminal; For details, carefully read the owner's manual for the MIDI B port (page 176) cannot be done in one of two ways: • Using the 9000Pro MIDI terminals • Using the TO HOST terminal I Using the 9000Pro MIDI terminals Using a MIDI interface device installed in the ...personal computer, connect the MIDI terminals of computer-generated music. For the connection cable, use the Yamaha UX256. MIDI OUT MIDI IN MIDI IN MIDI OUT 9000Pro G When using a Macintosh series computer, set to "MIDI." Set the HOST SELECT switch to "XG/GM." Computer...
...B IN terminal; For details, carefully read the owner's manual for the MIDI B port (page 176) cannot be done in one of two ways: • Using the 9000Pro MIDI terminals • Using the TO HOST terminal I Using the 9000Pro MIDI terminals Using a MIDI interface device installed in the ...personal computer, connect the MIDI terminals of computer-generated music. For the connection cable, use the Yamaha UX256. MIDI OUT MIDI IN MIDI IN MIDI OUT 9000Pro G When using a Macintosh series computer, set to "MIDI." Set the HOST SELECT switch to "XG/GM." Computer...


