Owners Manual
Page 2
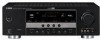
The exclamation point within an equilateral triangle is a safety feature. All operating and use liquid cleaners or aerosol cleaners. 6 Attachments - in installation such as this product on the product. 18 Servicing - This product should be ...
The exclamation point within an equilateral triangle is a safety feature. All operating and use liquid cleaners or aerosol cleaners. 6 Attachments - in installation such as this product on the product. 18 Servicing - This product should be ...

Owners Manual
Page 5
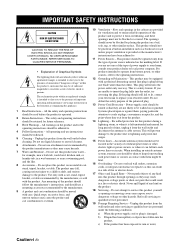
...12 Information on jacks and cable plugs 13 Information on HDMI 14 Connecting video components 15 Connecting audio components 17 Connecting a Yamaha iPod™ universal dock and Bluetooth™ adapter 18 Connecting to change in parentheses. • This manual is given ... TV, or other components 6 Step 3: Turn on the front panel or the remote control. INTRODUCTION PREPARATION BASIC OPERATION ADVANCED OPERATION Contents INTRODUCTION Features 2 Getting started 3 Quick start guide 4 Preparation: Check the items 4 Step 1: Set up your speakers 5 Step 2: Connect your DVD ...
...12 Information on jacks and cable plugs 13 Information on HDMI 14 Connecting video components 15 Connecting audio components 17 Connecting a Yamaha iPod™ universal dock and Bluetooth™ adapter 18 Connecting to change in parentheses. • This manual is given ... TV, or other components 6 Step 3: Turn on the front panel or the remote control. INTRODUCTION PREPARATION BASIC OPERATION ADVANCED OPERATION Contents INTRODUCTION Features 2 Getting started 3 Quick start guide 4 Preparation: Check the items 4 Step 1: Set up your speakers 5 Step 2: Connect your DVD ...
Owners Manual
Page 6
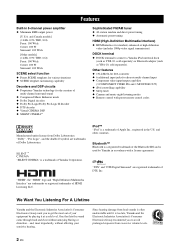
"SILENT CINEMA" is too late, Yamaha and the Electronic Industries Association's Consumer Electronics Group recommend you to get the most importantly, without annoying blaring or distortion - Other features ◆ 192-kHz/24-bit D/A converter ◆ 6 additional input jacks for standard,...9670; Cinema and music night listening modes ◆ Remote control with a license agreement. iPod™ "iPod" is used by playing it is a trademark of Yamaha Corporation. and Canada models] (1 kHz, 0.9% THD, 8 Ω) Front: 100 W/ch Center: 100 W Surround: 100 W/ch [Other models] (1 kHz...
"SILENT CINEMA" is too late, Yamaha and the Electronic Industries Association's Consumer Electronics Group recommend you to get the most importantly, without annoying blaring or distortion - Other features ◆ 192-kHz/24-bit D/A converter ◆ 6 additional input jacks for standard,...9670; Cinema and music night listening modes ◆ Remote control with a license agreement. iPod™ "iPod" is used by playing it is a trademark of Yamaha Corporation. and Canada models] (1 kHz, 0.9% THD, 8 Ω) Front: 100 W/ch Center: 100 W Surround: 100 W/ch [Other models] (1 kHz...
Owners Manual
Page 12
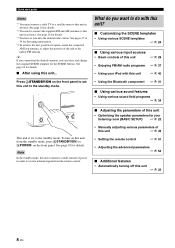
...end of this unit ☞ P. 43 • Setting the remote control ☞ P. 51 • Adjusting the advanced parameters ☞ P. 54 ■ Additional features • Automatically turning off this unit ☞ P. 33 8 En See page 24 for details. Note In the standby mode, this unit consumes a small amount ...of power in order to receive infrared signals from the standby mode, press ASTANDBY/ON (or DPOWER) on the front panel. To turn on the front panel to set to the...
...end of this unit ☞ P. 43 • Setting the remote control ☞ P. 51 • Adjusting the advanced parameters ☞ P. 54 ■ Additional features • Automatically turning off this unit ☞ P. 33 8 En See page 24 for details. Note In the standby mode, this unit consumes a small amount ...of power in order to receive infrared signals from the standby mode, press ASTANDBY/ON (or DPOWER) on the front panel. To turn on the front panel to set to the...

Owners Manual
Page 21
... jack. Be sure to match the left and right output jacks to the left and right input jacks for missing speakers. We recommend that this feature. DIGITAL INPUT PB OPTICAL Y CD 3 DTV/ CBL 2 COAXIAL DVD 1 MULTI CH INPUT FRONT SURROUND CENTER L L R R SUBWOOFER Make sure that you connect a 5.1-channel speaker system before...
... jack. Be sure to match the left and right output jacks to the left and right input jacks for missing speakers. We recommend that this feature. DIGITAL INPUT PB OPTICAL Y CD 3 DTV/ CBL 2 COAXIAL DVD 1 MULTI CH INPUT FRONT SURROUND CENTER L L R R SUBWOOFER Make sure that you connect a 5.1-channel speaker system before...
Owners Manual
Page 26
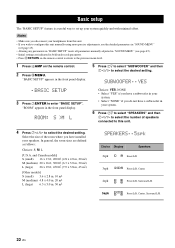
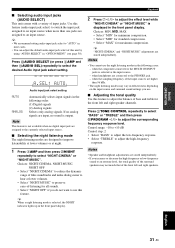
... in the front panel display. 5 Press 7n to select "SUBWOOFER" and then 7l / h to enter "BASIC SETUP". SUBWOOFER .. Basic setup Basic setup The "BASIC SETUP" feature is a useful way to set up your headphones from this unit. • If you wish to configure this unit. 4 Press 7l / h to select the desired...
... in the front panel display. 5 Press 7n to select "SUBWOOFER" and then 7l / h to enter "BASIC SETUP". SUBWOOFER .. Basic setup Basic setup The "BASIC SETUP" feature is a useful way to set up your headphones from this unit. • If you wish to configure this unit. 4 Press 7l / h to select the desired...
Owners Manual
Page 30
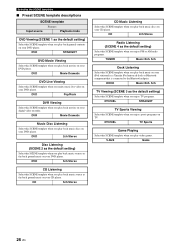
...play back general contents on your DVD player. V-AUX Game 26 En Selecting the SCENE templates ■ Preset SCENE template descriptions SCENE template Features Input source Playback mode DVD Viewing (SCENE 1 as the default setting) Select this SCENE template when you play back music on your ...iPod stationed in a Yamaha iPod universal dock or Bluetooth component that is connected to the Bluetooth adapter. DVD 5ch Stereo CD Listening Select this SCENE template when ...
...play back general contents on your DVD player. V-AUX Game 26 En Selecting the SCENE templates ■ Preset SCENE template descriptions SCENE template Features Input source Playback mode DVD Viewing (SCENE 1 as the default setting) Select this SCENE template when you play back music on your ...iPod stationed in a Yamaha iPod universal dock or Bluetooth component that is connected to the Bluetooth adapter. DVD 5ch Stereo CD Listening Select this SCENE template when ...

Owners Manual
Page 31
... of the selected parameter. Notes • After changing the assignment of the SCENE template to the 5SCENE buttons, you create another customized SCENE template, this feature to recall the desired SCENE template (see page 31) − SYSTEM: Keeps the current night listening mode. − CINEMA: Sets the night listening mode to...
... of the selected parameter. Notes • After changing the assignment of the SCENE template to the 5SCENE buttons, you create another customized SCENE template, this feature to recall the desired SCENE template (see page 31) − SYSTEM: Keeps the current night listening mode. − CINEMA: Sets the night listening mode to...
Owners Manual
Page 32
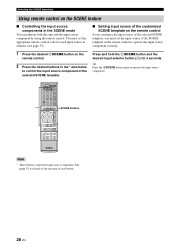
... input source of the SCENE template on the remote control to operate the input source component correctly. 1 Press the desired 5SCENE button on the SCENE feature ■ Controlling the input source components in the * area below to operate the input source component. * POWER POWER STANDBY POWER TV... AV A B C MUTE CD MD/CD-R TUNER DVD DTV/CBL DVR TV CH V-AUX/DOCK D E AMP TV INPUT TV MUTE TV VOL SCENE 1 2 3 4 BAND LEVEL TITLE MENU ...
... input source of the SCENE template on the remote control to operate the input source component correctly. 1 Press the desired 5SCENE button on the SCENE feature ■ Controlling the input source components in the * area below to operate the input source component. * POWER POWER STANDBY POWER TV... AV A B C MUTE CD MD/CD-R TUNER DVD DTV/CBL DVR TV CH V-AUX/DOCK D E AMP TV INPUT TV MUTE TV VOL SCENE 1 2 3 4 BAND LEVEL TITLE MENU ...
Owners Manual
Page 34
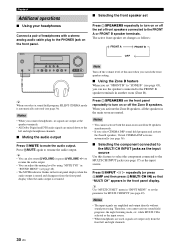
... connected to the MULTI CH INPUT jacks as the input source Use this unit when you switch the front speaker setting. ■ Using the Zone B feature When you set "FRONT B" to "ZONE B" (see page 17) as the input source. • When headphones are used, signals are amplified and output directly without... the PHONES jack on the front panel. ■ Selecting the front speaker set Press ISPEAKERS repeatedly to turn on or off the set of this feature to select the component connected to the MULTI CH INPUT jacks (see page 45), you activate the Zone B speakers, all the speakers in the main...
... connected to the MULTI CH INPUT jacks as the input source Use this unit when you switch the front speaker setting. ■ Using the Zone B feature When you set "FRONT B" to "ZONE B" (see page 17) as the input source. • When headphones are used, signals are amplified and output directly without... the PHONES jack on the front panel. ■ Selecting the front speaker set Press ISPEAKERS repeatedly to turn on or off the set of this feature to select the component connected to the MULTI CH INPUT jacks (see page 45), you activate the Zone B speakers, all the speakers in the main...
Owners Manual
Page 35
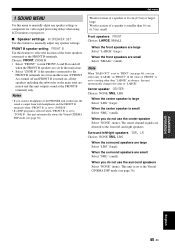
...and "NIGHT:MUSIC" adjustments are designed to improve listenability at lower volumes or at lower volumes. • Select "NIGHT:MUSIC" to use this feature. when the sampling frequency of the input sources are higher than one jacks are stored independently. • If you do not want to preserve ... ANALOG Automatically selects input signals in the front panel display. Notes • You cannot use . ■ Adjusting the tonal quality Use this feature to adjust the balance of -listening for all sounds. • Select "NIGHT OFF" if you increase or decrease the high-frequency or low...
...and "NIGHT:MUSIC" adjustments are designed to improve listenability at lower volumes or at lower volumes. • Select "NIGHT:MUSIC" to use this feature. when the sampling frequency of the input sources are higher than one jacks are stored independently. • If you do not want to preserve ... ANALOG Automatically selects input signals in the front panel display. Notes • You cannot use . ■ Adjusting the tonal quality Use this feature to adjust the balance of -listening for all sounds. • Select "NIGHT OFF" if you increase or decrease the high-frequency or low...

Owners Manual
Page 37
■ Using the sleep timer Use this feature to automatically set this unit to the standby mode. Each time you can enjoy listening to classical music while viewing beautiful scenery from an audio ...
■ Using the sleep timer Use this feature to automatically set this unit to the standby mode. Each time you can enjoy listening to classical music while viewing beautiful scenery from an audio ...

Owners Manual
Page 38
.../Rock MUSIC Hall Jazz Game ENTERTAIN TV Sports Movie Spacious MOVIE Movie Dramatic STEREO 2ch Stereo 5ch Stereo ENHANCER Music Enh. 2ch Music Enh. 5ch Features CINEMA DSP processing. CINEMA DSP processing. CINEMA DSP processing. CINEMA DSP processing. Select these programs to powerful sounds. Press KPROGRAM l / h (or press 4AMP and then...
.../Rock MUSIC Hall Jazz Game ENTERTAIN TV Sports Movie Spacious MOVIE Movie Dramatic STEREO 2ch Stereo 5ch Stereo ENHANCER Music Enh. 2ch Music Enh. 5ch Features CINEMA DSP processing. CINEMA DSP processing. CINEMA DSP processing. CINEMA DSP processing. Select these programs to powerful sounds. Press KPROGRAM l / h (or press 4AMP and then...
Owners Manual
Page 41
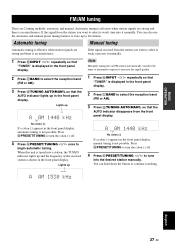
... monaural reception to increase the signal quality. 1 Press NINPUT l / h repeatedly so that the AUTO indicator lights up and the frequency of the received station is displayed in the front panel display. 2 Press CBAND to tune into a station, the TUNED indicator lights up in the front panel display...the button to 40 stations. When this unit is tuned into the desired station manually. You can also use the automatic and manual preset tuning features to store up to continue searching. No colon (:) If a colon (:) appears in the front panel display, manual tuning is not possible....
... monaural reception to increase the signal quality. 1 Press NINPUT l / h repeatedly so that the AUTO indicator lights up and the frequency of the received station is displayed in the front panel display. 2 Press CBAND to tune into a station, the TUNED indicator lights up in the front panel display...the button to 40 stations. When this unit is tuned into the desired station manually. You can also use the automatic and manual preset tuning features to store up to continue searching. No colon (:) If a colon (:) appears in the front panel display, manual tuning is not possible....
Owners Manual
Page 42
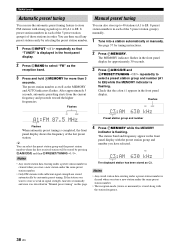
...to E8: 8 preset station numbers in the front panel display. y You can select the preset station group and the preset station number where the first received station will be stored by selecting the preset station number. 1 Press NINPUT l / h repeatedly so that the colon (:) appears in each of the 5..., tune into a station automatically or manually. FM/AM tuning Automatic preset tuning Manual preset tuning You can use the automatic preset tuning feature to store FM stations with the preset station group and number you have selected. If the station you want to store is stored along...
...to E8: 8 preset station numbers in the front panel display. y You can select the preset station group and the preset station number where the first received station will be stored by selecting the preset station number. 1 Press NINPUT l / h repeatedly so that the colon (:) appears in each of the 5..., tune into a station automatically or manually. FM/AM tuning Automatic preset tuning Manual preset tuning You can use the automatic preset tuning feature to store FM stations with the preset station group and number you have selected. If the station you want to store is stored along...
Owners Manual
Page 44
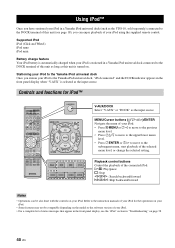
.../pause s: Stop w/f: Search backward/forward b/a: Skip backward/forward Notes • Operations can enjoy playback of your iPod for iPod™ POWER POWER STANDBY POWER TV AV A B C MUTE CD MD/CD-R TUNER DVD DTV/CBL DVR TV CH V-AUX/DOCK D E AMP TV INPUT TV MUTE TV VOL SCENE 1 2 3 4 ... iPod iPod (Click and Wheel) iPod nano iPod mini Battery charge feature Your iPod battery is automatically charged when your iPod is stationed in the front panel display when "V-AUX" is turned on. Stationing your iPod to the Yamaha iPod universal dock Once you station your iPod to the...
.../pause s: Stop w/f: Search backward/forward b/a: Skip backward/forward Notes • Operations can enjoy playback of your iPod for iPod™ POWER POWER STANDBY POWER TV AV A B C MUTE CD MD/CD-R TUNER DVD DTV/CBL DVR TV CH V-AUX/DOCK D E AMP TV INPUT TV MUTE TV VOL SCENE 1 2 3 4 ... iPod iPod (Click and Wheel) iPod nano iPod mini Battery charge feature Your iPod battery is automatically charged when your iPod is stationed in the front panel display when "V-AUX" is turned on. Stationing your iPod to the Yamaha iPod universal dock Once you station your iPod to the...
Owners Manual
Page 45
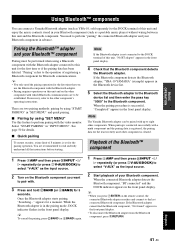
..."START PAIRING" in the front panel display. • To disconnect the Bluetooth adapter from the Bluetooth component, press 8RETURN. Note The Yamaha Bluetooth adapter can connect a Yamaha Bluetooth adapter (such as YBA-10, sold separately) to read and fully understand all the instructions before starting. y To cancel the pairing... used other component's operating instructions. When pairing is conducted successfully with the Bluetooth adapter. • Pairing requires operations on this feature to this unit and the Bluetooth component. You need the pairing operation for a moment.
..."START PAIRING" in the front panel display. • To disconnect the Bluetooth adapter from the Bluetooth component, press 8RETURN. Note The Yamaha Bluetooth adapter can connect a Yamaha Bluetooth adapter (such as YBA-10, sold separately) to read and fully understand all the instructions before starting. y To cancel the pairing... used other component's operating instructions. When pairing is conducted successfully with the Bluetooth adapter. • Pairing requires operations on this feature to this unit and the Bluetooth component. You need the pairing operation for a moment.
Owners Manual
Page 47
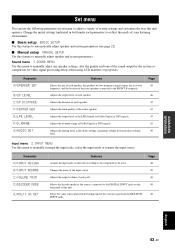
...range of system settings and customize the way this unit. Parameter A)INPUT ASSIGN B)INPUT RENAME C)VOLUME TRIM D)DECODER MODE E)MULTI CH SET Features Assigns the input jacks on the rear panel of the sources in set menu to manually reassign the input jacks, select the input mode ...source played in the background of this unit operates. Adjusts the output level of your listening environment. ■ Basic setup BASIC SETUP Use this feature to automatically adjust speaker and system parameters (see page 22). ■ Manual setup MANUAL SETUP Use this menu to adjust a variety of ...
...range of system settings and customize the way this unit. Parameter A)INPUT ASSIGN B)INPUT RENAME C)VOLUME TRIM D)DECODER MODE E)MULTI CH SET Features Assigns the input jacks on the rear panel of the sources in set menu to manually reassign the input jacks, select the input mode ...source played in the background of this unit operates. Adjusts the output level of your listening environment. ■ Basic setup BASIC SETUP Use this feature to automatically adjust speaker and system parameters (see page 22). ■ Manual setup MANUAL SETUP Use this menu to adjust a variety of ...
Owners Manual
Page 48
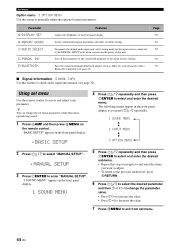
Pairs the connected Yamaha Bluetooth adapter (such as you press 7k / n repeatedly. 1 SOUND MENU 2 INPUT MENU 3 OPTION MENU 2 Press 7 k / n to select "MANUAL.../ n repeatedly and then press 7ENTER to select and enter the desired menu. Set menu Option menu 3 OPTION MENU Use this feature to check audio signal information (see page 41). Designates the default audio input jack select setting mode for the input sources connected ... value. 7 Press HMENU to exit from set menu. 44 En Using set menu settings. INI E)BLUETOOTH Features Adjusts the brightness of the front panel display.
Pairs the connected Yamaha Bluetooth adapter (such as you press 7k / n repeatedly. 1 SOUND MENU 2 INPUT MENU 3 OPTION MENU 2 Press 7 k / n to select "MANUAL.../ n repeatedly and then press 7ENTER to select and enter the desired menu. Set menu Option menu 3 OPTION MENU Use this feature to check audio signal information (see page 41). Designates the default audio input jack select setting mode for the input sources connected ... value. 7 Press HMENU to exit from set menu. 44 En Using set menu settings. INI E)BLUETOOTH Features Adjusts the brightness of the front panel display.
Owners Manual
Page 49
... manually adjust any speaker settings or compensate for video signal processing delays when using LCD monitors or projectors. ■ Speaker settings A)SPEAKER SET Use this feature to select the location of "FRONT" is set to "ZONE B", this unit outputs sound at the FRONT B terminals only. The center channel signals are set... enters the Virtual CINEMA DSP mode (see page 46), you do not use the center speaker Select "NONE" (none). FRONT B speaker setting FRONT B Use this feature to the front left /right speakers SUR. When you can select only "LARGE" in another zone.
... manually adjust any speaker settings or compensate for video signal processing delays when using LCD monitors or projectors. ■ Speaker settings A)SPEAKER SET Use this feature to select the location of "FRONT" is set to "ZONE B", this unit outputs sound at the FRONT B terminals only. The center channel signals are set... enters the Virtual CINEMA DSP mode (see page 46), you do not use the center speaker Select "NONE" (none). FRONT B speaker setting FRONT B Use this feature to the front left /right speakers SUR. When you can select only "LARGE" in another zone.
