Owners Manual
Page 2
...-out parts that may expose you to the product. If you to lightning and power-line surges. 15 Power Lines - This plug will prevent damage to the product due to the presence of important operating and maintenance (servicing) instructions in the vicinity of the product and to protect it can result in installation such as this product from the wall...
...-out parts that may expose you to the product. If you to lightning and power-line surges. 15 Power Lines - This plug will prevent damage to the product due to the presence of important operating and maintenance (servicing) instructions in the vicinity of the product and to protect it can result in installation such as this product from the wall...

Owners Manual
Page 3
... registers, stoves, or other electronic devices. If you can be used. When replacement parts are on different branch (circuit breaker or fuse) circuits or install AC line filter/s. IMPORTANT SAFETY INSTRUCTIONS 24 Outdoor Antenna Grounding - EXAMPLE OF ANTENNA GROUNDING MAST GROUND CLAMP ELECTRIC SERVICE EQUIPMENT NEC - NATIONAL ELECTRICAL CODE ANTENNA LEAD IN WIRE ANTENNA DISCHARGE UNIT (NEC SECTION 810-20) GROUNDING CONDUCTORS (NEC...
... registers, stoves, or other electronic devices. If you can be used. When replacement parts are on different branch (circuit breaker or fuse) circuits or install AC line filter/s. IMPORTANT SAFETY INSTRUCTIONS 24 Outdoor Antenna Grounding - EXAMPLE OF ANTENNA GROUNDING MAST GROUND CLAMP ELECTRIC SERVICE EQUIPMENT NEC - NATIONAL ELECTRICAL CODE ANTENNA LEAD IN WIRE ANTENNA DISCHARGE UNIT (NEC SECTION 810-20) GROUNDING CONDUCTORS (NEC...

Owners Manual
Page 5
... Exchanging preset stations 39 Using iPod 40 Controls and functions for iPod 40 Using Bluetooth™ components 41 Pairing the Bluetooth™ adapter and your operation. • Some operations can be performed by using either the buttons on the front panel or the ones on the front panel or the remote control. and Canada models only 12 Information on jacks and cable plugs 13 Information on HDMI 14 Connecting video components 15 Connecting audio components 17 Connecting a Yamaha iPod™ universal dock and Bluetooth™ adapter 18 Connecting to change...
... Exchanging preset stations 39 Using iPod 40 Controls and functions for iPod 40 Using Bluetooth™ components 41 Pairing the Bluetooth™ adapter and your operation. • Some operations can be performed by using either the buttons on the front panel or the ones on the front panel or the remote control. and Canada models only 12 Information on jacks and cable plugs 13 Information on HDMI 14 Connecting video components 15 Connecting audio components 17 Connecting a Yamaha iPod™ universal dock and Bluetooth™ adapter 18 Connecting to change...
Owners Manual
Page 10
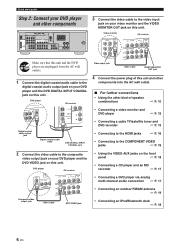
... HDMI DIGITAL INPUT PB OPTICAL Y CD 3 DTV/ CBL 2 COAXIAL DVD 1 DVD VIDEO DTV/CBL DVR IN OUT MONITOR OUT MULTI CH INPUT FRONT SURROUND CENTER L DVD DTV/CBL AUDIO DVR CD IN OUT L R R SUBWOOFER ANTENNA SPEAKERS SURROUND CENTER FRONT B R L R L AM GND FM 75 UNBAL. DVD player AV receiver • Using the VIDEO AUX jacks on this unit. Video monitor AV receiver Make sure that this unit and the DVD player are unplugged from the AC wall outlets. 1 Connect the digital coaxial audio cable to the video input jack on your DVD player...
... HDMI DIGITAL INPUT PB OPTICAL Y CD 3 DTV/ CBL 2 COAXIAL DVD 1 DVD VIDEO DTV/CBL DVR IN OUT MONITOR OUT MULTI CH INPUT FRONT SURROUND CENTER L DVD DTV/CBL AUDIO DVR CD IN OUT L R R SUBWOOFER ANTENNA SPEAKERS SURROUND CENTER FRONT B R L R L AM GND FM 75 UNBAL. DVD player AV receiver • Using the VIDEO AUX jacks on this unit. Video monitor AV receiver Make sure that this unit and the DVD player are unplugged from the AC wall outlets. 1 Connect the digital coaxial audio cable to the video input jack on your DVD player...
Owners Manual
Page 11
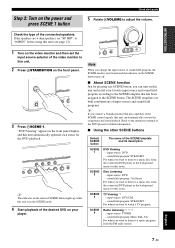
... button lights up while this unit is deactivated and the indicator on the SCENE button turns off. ■ About SCENE function Just by pressing one SCENE button, you change the input source or sound field program, the SCENE mode is in the front panel display, and this unit and recall your player. input source: DTV/CBL - input source: DVD - sound field program: STRAIGHT For when you connect a Yamaha product that has been assigned to a music disc...
... button lights up while this unit is deactivated and the indicator on the SCENE button turns off. ■ About SCENE function Just by pressing one SCENE button, you change the input source or sound field program, the SCENE mode is in the front panel display, and this unit and recall your player. input source: DTV/CBL - input source: DVD - sound field program: STRAIGHT For when you connect a Yamaha product that has been assigned to a music disc...
Owners Manual
Page 22
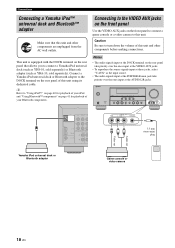
... jacks, select "V-AUX" as YBA-10, sold separately). VOLUME STANDBY /ON PHONES SILENT CINEMA SPEAKERS A/B/OFF EDIT PRESET/TUNING BAND A/B/C/D/E TONE CONTROL 1 PROGRAM PRESET/TUNING SCENE 2 3 4 MEMORY TUNING AUTO/MAN'L STRAIGHT NIGHT INPUT AUDIO SELECT EFFECT VIDEO VIDEO AUX L AUDIO R PORTABLE DOCK COMPONENT VID DVD DTV/CBL DVR PR DIGITAL INPUT PB OPTICAL Y CD 3 DTV/ CBL 2 COAXIAL DVD 1 MULTI CH INPU FRONT SURROU L R VIDEO VIDEO AUX L AUDIO R PORTABLE V L R 3.5 mm stereo mini plug Audio out Video out Yamaha iPod universal dock or Bluetooth adapter...
... jacks, select "V-AUX" as YBA-10, sold separately). VOLUME STANDBY /ON PHONES SILENT CINEMA SPEAKERS A/B/OFF EDIT PRESET/TUNING BAND A/B/C/D/E TONE CONTROL 1 PROGRAM PRESET/TUNING SCENE 2 3 4 MEMORY TUNING AUTO/MAN'L STRAIGHT NIGHT INPUT AUDIO SELECT EFFECT VIDEO VIDEO AUX L AUDIO R PORTABLE DOCK COMPONENT VID DVD DTV/CBL DVR PR DIGITAL INPUT PB OPTICAL Y CD 3 DTV/ CBL 2 COAXIAL DVD 1 MULTI CH INPU FRONT SURROU L R VIDEO VIDEO AUX L AUDIO R PORTABLE V L R 3.5 mm stereo mini plug Audio out Video out Yamaha iPod universal dock or Bluetooth adapter...
Owners Manual
Page 34
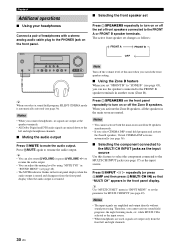
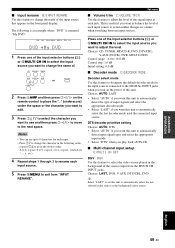
... TUNING AUTO/MAN'L TONE CONTROL l PROGRAM h STRAIGHT NIGHT l INPUT h AUDIO SELECT EFFECT VIDEO VIDEO AUX L AUDIO R PORTABLE OFF Note Turn off the volume level of this unit when you switch the front speaker setting. ■ Using the Zone B feature When you set "FRONT B" to "ZONE B" (see page 45), you select CINEMA DSP sound field program and activate the Zone B speakers, Virtual CINEMA DSP activates automatically (see page 36). ■ Selecting the component connected to the MULTI CH INPUT jacks as the input source Use this feature to select the component connected...
... TUNING AUTO/MAN'L TONE CONTROL l PROGRAM h STRAIGHT NIGHT l INPUT h AUDIO SELECT EFFECT VIDEO VIDEO AUX L AUDIO R PORTABLE OFF Note Turn off the volume level of this unit when you switch the front speaker setting. ■ Using the Zone B feature When you set "FRONT B" to "ZONE B" (see page 45), you select CINEMA DSP sound field program and activate the Zone B speakers, Virtual CINEMA DSP activates automatically (see page 36). ■ Selecting the component connected to the MULTI CH INPUT jacks as the input source Use this feature to select the component connected...
Owners Manual
Page 35
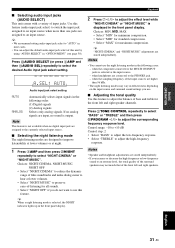
... V-AUX DTV/CBL DVD MD/CD-R TUNER CD A.SEL: AUTO Audio input jack select setting AUTO ANALOG Automatically selects input signals in most cases. • You can adjust the default audio input jack select of this feature. Choices: NIGHT:CINEMA, NIGHT:MUSIC, NIGHT OFF • Select "NIGHT:CINEMA" to reduce the dynamic range of the surround speakers may vary in effectiveness depending on the input source and surround sound settings you use this unit by using "AUDIO SELECT" in the front panel display. when headphones are connected...
... V-AUX DTV/CBL DVD MD/CD-R TUNER CD A.SEL: AUTO Audio input jack select setting AUTO ANALOG Automatically selects input signals in most cases. • You can adjust the default audio input jack select of this feature. Choices: NIGHT:CINEMA, NIGHT:MUSIC, NIGHT OFF • Select "NIGHT:CINEMA" to reduce the dynamic range of the surround speakers may vary in effectiveness depending on the input source and surround sound settings you use this unit by using "AUDIO SELECT" in the front panel display. when headphones are connected...
Owners Manual
Page 41
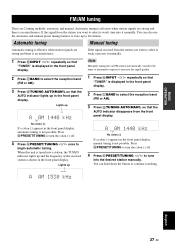
... the button to begin automatic tuning. Lights up to store up A AM 1440 kHz No colon (:) If a colon (:) appears in the front panel display, manual tuning is shown in the front panel display. 2 Press CBAND to select is tuned into it manually. Press BPRESET/TUNING to turn the colon (:) off . 4 Press EPRESET/TUNING l / h to tune into an FM station automatically switches the tuner to monaural reception to increase the signal...
... the button to begin automatic tuning. Lights up to store up A AM 1440 kHz No colon (:) If a colon (:) appears in the front panel display, manual tuning is shown in the front panel display. 2 Press CBAND to select is tuned into it manually. Press BPRESET/TUNING to turn the colon (:) off . 4 Press EPRESET/TUNING l / h to tune into an FM station automatically switches the tuner to monaural reception to increase the signal...
Owners Manual
Page 47
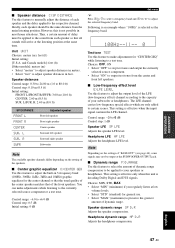
... MODE E)MULTI CH SET Features Assigns the input jacks on the rear panel of your listening environment. ■ Basic setup BASIC SETUP Use this feature to automatically adjust speaker and system parameters (see page 22). ■ Manual setup MANUAL SETUP Use this unit operates. Select the video source played in the background of Dolby Digital or DTS signals. Adjusts the distance of each speaker, the speakers for video signal processing delays when using LCD monitors or projectors. Adjusts the muting level, audio delay settings, maximum volume level and initial volume level...
... MODE E)MULTI CH SET Features Assigns the input jacks on the rear panel of your listening environment. ■ Basic setup BASIC SETUP Use this feature to automatically adjust speaker and system parameters (see page 22). ■ Manual setup MANUAL SETUP Use this unit operates. Select the video source played in the background of Dolby Digital or DTS signals. Adjusts the distance of each speaker, the speakers for video signal processing delays when using LCD monitors or projectors. Adjusts the muting level, audio delay settings, maximum volume level and initial volume level...
Owners Manual
Page 49
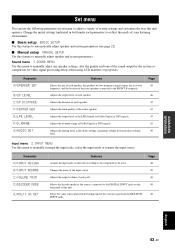
... the speakers including the subwoofer in another zone. When the center speaker is set in the main zone are muted and this unit outputs sound at the FRONT B terminals only. FRONT B speaker setting FRONT B Use this feature to select the location of "FRONT" is small Select "SML" (small). Set menu 1 SOUND MENU Use this menu to manually adjust any speaker settings. If the value of the front speakers connected to manually adjust any speaker settings or compensate for video signal processing delays when using...
... the speakers including the subwoofer in another zone. When the center speaker is set in the main zone are muted and this unit outputs sound at the FRONT B terminals only. FRONT B speaker setting FRONT B Use this feature to select the location of "FRONT" is small Select "SML" (small). Set menu 1 SOUND MENU Use this menu to manually adjust any speaker settings. If the value of the front speakers connected to manually adjust any speaker settings or compensate for video signal processing delays when using...
Owners Manual
Page 51
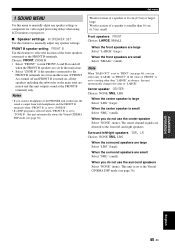
... SUBWOOFER OUTPUT jack. ■ Dynamic range F)D.RANGE Use this feature to adjust the built-in most home situations. Headphone dynamic range HP D.R Adjusts the headphone compression. This setting is decoding Dolby Digital and DTS signals. Unit UNIT Choices: meters (m), feet (ft) Initial setting: [U.S.A. L/SUR. L SUR. You can make adjustments for "CENTER GEQ" while listening to a test tone. Control range: -6.0 to +6.0 dB Control step: 0.5 dB Initial setting: 0 dB Set menu y Press 7k / n to select a frequency...
... SUBWOOFER OUTPUT jack. ■ Dynamic range F)D.RANGE Use this feature to adjust the built-in most home situations. Headphone dynamic range HP D.R Adjusts the headphone compression. This setting is decoding Dolby Digital and DTS signals. Unit UNIT Choices: meters (m), feet (ft) Initial setting: [U.S.A. L/SUR. L SUR. You can make adjustments for "CENTER GEQ" while listening to a test tone. Control range: -6.0 to +6.0 dB Control step: 0.5 dB Initial setting: 0 dB Set menu y Press 7k / n to select a frequency...
Owners Manual
Page 53
... you play back a DTS-CD. ■ Multi channel input setup E)MULTI CH SET BGV BGV Use this feature to select the video source played in volume when switching between input sources. Choices: CD, TUNER, MD/CD-R, DVD, DTV/CBL, V-AUX (DOCK), DVR, MULTI CH IN Control range: -6.0 to +6.0 dB Control step: 1.0 dB Initial setting: 0.0 dB ■ Decoder mode D)DECODER MODE Decoder select mode Use this feature to designate the default decoder mode for the input sources connected to the DIGITAL INPUT jacks when you turn on the remote control to...
... you play back a DTS-CD. ■ Multi channel input setup E)MULTI CH SET BGV BGV Use this feature to select the video source played in volume when switching between input sources. Choices: CD, TUNER, MD/CD-R, DVD, DTV/CBL, V-AUX (DOCK), DVR, MULTI CH IN Control range: -6.0 to +6.0 dB Control step: 1.0 dB Initial setting: 0.0 dB ■ Decoder mode D)DECODER MODE Decoder select mode Use this feature to designate the default decoder mode for the input sources connected to the DIGITAL INPUT jacks when you turn on the remote control to...

Owners Manual
Page 56
.... [1] POWER POWER STANDBY POWER TV AV A B C MUTE CD MD/CD-R TUNER DVD DTV/CBL DVR TV CH V-AUX/DOCK D E AMP TV INPUT TV MUTE TV VOL SCENE 1 2 3 4 [2] BAND LEVEL TITLE MENU VOLUME [3] [4] [5] ENTER RETURN REC DISPLAY [7] [8] [6] l PROG h 1 2 ENHANCER SUR. y • The remote control has 13 modes (input areas) to control components so that some buttons may not correctly operate the selected component. Be advised that the remote control can control the desired component without changing the input source of the input selector buttons (3) or...
.... [1] POWER POWER STANDBY POWER TV AV A B C MUTE CD MD/CD-R TUNER DVD DTV/CBL DVR TV CH V-AUX/DOCK D E AMP TV INPUT TV MUTE TV VOL SCENE 1 2 3 4 [2] BAND LEVEL TITLE MENU VOLUME [3] [4] [5] ENTER RETURN REC DISPLAY [7] [8] [6] l PROG h 1 2 ENHANCER SUR. y • The remote control has 13 modes (input areas) to control components so that some buttons may not correctly operate the selected component. Be advised that the remote control can control the desired component without changing the input source of the input selector buttons (3) or...
Owners Manual
Page 57
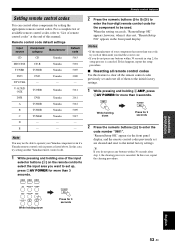
...AMP POWER AV While holding one . • If you find the correct one of this case, repeat the clearing procedure. E - - - A B C 2 Press the numeric buttons (0 to 9) (N) to enter the four-digit remote control code for 3 seconds ADVANCED OPERATION English 53 En Remote control features Setting remote control codes You can control other components by setting the appropriate remote control codes. Remote control code default settings Input source Component category Manufacturer Default code CD CD Yamaha 5013 MD/CD-R CD-R Yamaha 5001 TUNER TUNER Yamaha...
...AMP POWER AV While holding one . • If you find the correct one of this case, repeat the clearing procedure. E - - - A B C 2 Press the numeric buttons (0 to 9) (N) to enter the four-digit remote control code for 3 seconds ADVANCED OPERATION English 53 En Remote control features Setting remote control codes You can control other components by setting the appropriate remote control codes. Remote control code default settings Input source Component category Manufacturer Default code CD CD Yamaha 5013 MD/CD-R CD-R Yamaha 5001 TUNER TUNER Yamaha...

Owners Manual
Page 59
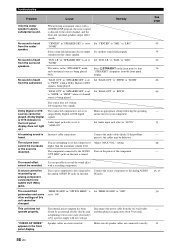
... output and then adjust the volume. Set this unit to the standby mode, disconnect the power cable, plug it normally. No appropriate Audio input jack select has Set an appropriate Audio input jack select. The front speakers to be reproduced by this unit. on the remote control to match your speakers. The protection circuitry has been activated because of the connected component. Incorrect cable connections. If the problem persists, the cables may be defective. Sound is turned on. Incorrect input or output cable connections. been set. Turn...
... output and then adjust the volume. Set this unit to the standby mode, disconnect the power cable, plug it normally. No appropriate Audio input jack select has Set an appropriate Audio input jack select. The front speakers to be reproduced by this unit. on the remote control to match your speakers. The protection circuitry has been activated because of the connected component. Incorrect cable connections. If the problem persists, the cables may be defective. Sound is turned on. Incorrect input or output cable connections. been set. Turn...
Owners Manual
Page 60
... front panel display does not light up.) The connected component is set to "ON". heard. IN jacks. Set "MEM.GUARD" to "SWFR" or "BOTH". Set "BASS OUT" to "OFF". The source does not contain low-frequency bass signals. This unit does not operate properly. "CHECK SP WIRES" appears in "SPEAKER SET" is being played back. Connect the audio cables firmly. The source component is not connected to Connect the source component to "SWFR" or "FRNT" when a 2-channel source is set to "AUTO". Set Audio input jack select to output Dolby Digital...
... front panel display does not light up.) The connected component is set to "ON". heard. IN jacks. Set "MEM.GUARD" to "SWFR" or "BOTH". Set "BASS OUT" to "OFF". The source does not contain low-frequency bass signals. This unit does not operate properly. "CHECK SP WIRES" appears in "SPEAKER SET" is being played back. Connect the audio cables firmly. The source component is not connected to Connect the source component to "SWFR" or "FRNT" when a 2-channel source is set to "AUTO". Set Audio input jack select to output Dolby Digital...
Owners Manual
Page 61
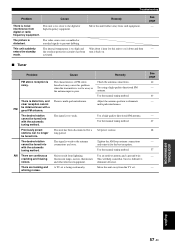
... set is too weak. Move this unit away from digital or radio frequency equipment. There is distortion, and There is too high and the overheat protection circuitry has been activated. See page - - ■ Tuner Problem Cause Remedy FM stereo reception is too close to eliminate all noise. Use the manual tuning method. Wait about 1 hour for the best reception. Use a high-quality directional FM antenna...
... set is too weak. Move this unit away from digital or radio frequency equipment. There is distortion, and There is too high and the overheat protection circuitry has been activated. See page - - ■ Tuner Problem Cause Remedy FM stereo reception is too close to eliminate all noise. Use the manual tuning method. Wait about 1 hour for the best reception. Use a high-quality directional FM antenna...
Owners Manual
Page 67
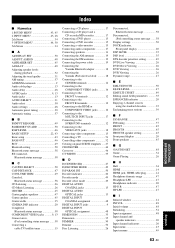
... Connecting audio components 17 Connecting speakers 11 Connecting the AM antennas 19 Connecting the FM antennas 19 Connecting the power cable 19 Connecting the Yamaha Bluetooth adapter 18 Connecting the Yamaha iPod universal dock ...........18 Connecting to the CENTER terminals 12 Connecting to the COMPONENT VIDEO jacks ..........16 Connecting to the FRONT A terminals 12 Connecting to the FRONT B terminals 12 Connecting to the HDMI or COMPONENT VIDEO jacks ..........16 Connecting to the MULTI CH INPUT jacks 17 Connecting to the SURROUND terminals 12 Connecting to the VIDEO AUX jacks...
... Connecting audio components 17 Connecting speakers 11 Connecting the AM antennas 19 Connecting the FM antennas 19 Connecting the power cable 19 Connecting the Yamaha Bluetooth adapter 18 Connecting the Yamaha iPod universal dock ...........18 Connecting to the CENTER terminals 12 Connecting to the COMPONENT VIDEO jacks ..........16 Connecting to the FRONT A terminals 12 Connecting to the FRONT B terminals 12 Connecting to the HDMI or COMPONENT VIDEO jacks ..........16 Connecting to the MULTI CH INPUT jacks 17 Connecting to the SURROUND terminals 12 Connecting to the VIDEO AUX jacks...
Owners Manual
Page 68
... 50 PCM indicator 20 Placing speakers 10 Playing video sources in the background 33 Pop/Rock 34 PRESET 54 Preset SCENE templates 26 ■R Radio Listening 26 Rear panel 9 Remote control codes iii Rename, SCENE template 27 Resetting the system 59 ■S SCENE 7 Searching..., Bluetooth status message 58 Selecting audio input jacks 31 Selecting preset stations 39 Selecting the MULTI CH INPUT component as the input source .........30 Selecting the night listening mode .......31 Selecting the SCENE templates ...........24 Set menu 43 Set this manual...
... 50 PCM indicator 20 Placing speakers 10 Playing video sources in the background 33 Pop/Rock 34 PRESET 54 Preset SCENE templates 26 ■R Radio Listening 26 Rear panel 9 Remote control codes iii Rename, SCENE template 27 Resetting the system 59 ■S SCENE 7 Searching..., Bluetooth status message 58 Selecting audio input jacks 31 Selecting preset stations 39 Selecting the MULTI CH INPUT component as the input source .........30 Selecting the night listening mode .......31 Selecting the SCENE templates ...........24 Set menu 43 Set this manual...


