
Owners Manual
Page 5
...only 12 Information on jacks and cable plugs 13 Information on HDMI 14 Connecting video components 15 Connecting audio components 17 Connecting a Yamaha iPod™ universal dock and Bluetooth™ adapter 18 Connecting to the VIDEO AUX jacks on the front panel 18 Connecting ...Bluetooth™ components 41 Pairing the Bluetooth™ adapter and your original SCENE templates 27 Using remote control on the remote control is given in part as a result of the parts on the remote control. In case the button names differ between the manual and product, the product has priority. ...
...only 12 Information on jacks and cable plugs 13 Information on HDMI 14 Connecting video components 15 Connecting audio components 17 Connecting a Yamaha iPod™ universal dock and Bluetooth™ adapter 18 Connecting to the VIDEO AUX jacks on the front panel 18 Connecting ...Bluetooth™ components 41 Pairing the Bluetooth™ adapter and your original SCENE templates 27 Using remote control on the remote control is given in part as a result of the parts on the remote control. In case the button names differ between the manual and product, the product has priority. ...
Owners Manual
Page 6
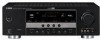
.../output capability (3 COMPONENT VIDEO INs and 1 MONITOR OUT) ◆ iPod controlling capability ◆ Sleep timer ◆ Cinema and music night listening modes ◆ Remote control with a license agreement. iPod™ "iPod" is a trademark of Yamaha Corporation. and other countries. "SILENT CINEMA" is too late, Yamaha and the Electronic Industries Association's Consumer Electronics Group recommend you...
.../output capability (3 COMPONENT VIDEO INs and 1 MONITOR OUT) ◆ iPod controlling capability ◆ Sleep timer ◆ Cinema and music night listening modes ◆ Remote control with a license agreement. iPod™ "iPod" is a trademark of Yamaha Corporation. and other countries. "SILENT CINEMA" is too late, Yamaha and the Electronic Industries Association's Consumer Electronics Group recommend you...
Owners Manual
Page 7
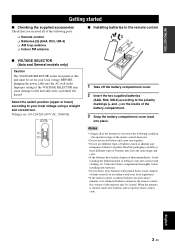
... AC wall outlet. Read the packaging carefully as alkaline and manganese batteries) together. Improper setting of the batteries if you received all of the VOLTAGE SELECTOR may be set up the remote control code. Notes • Change all of the following condition: - English 3 En Avoid touching the leaked material or letting it come...
... AC wall outlet. Read the packaging carefully as alkaline and manganese batteries) together. Improper setting of the batteries if you received all of the VOLTAGE SELECTOR may be set up the remote control code. Notes • Change all of the following condition: - English 3 En Avoid touching the leaked material or letting it come...
Owners Manual
Page 12
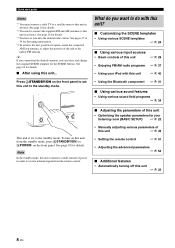
... mode, this unit consumes a small amount of power in order to receive infrared signals from the standby mode, press ASTANDBY/ON (or DPOWER) on this unit from the remote control. ■ Adjusting the parameters of this unit ☞ P. 43 • Setting the remote control ☞ P. 51 • Adjusting the advanced parameters ☞ P. 54 ■ Additional...
... mode, this unit consumes a small amount of power in order to receive infrared signals from the standby mode, press ASTANDBY/ON (or DPOWER) on this unit from the remote control. ■ Adjusting the parameters of this unit ☞ P. 43 • Setting the remote control ☞ P. 51 • Adjusting the advanced parameters ☞ P. 54 ■ Additional...

Owners Manual
Page 23
...one. y When you turn on this unit Connecting the wire of power in order to receive infrared signals from a window. English 19 En If you can reproduce sound. ■ ...delay before this unit can connect either end of vinyl-covered wire extended outdoors from the remote control. In general, these antennas should always be a 4 to the standby mode y The ...connect the antenna GND terminal to the designated terminals. Power cable (U.S.A. Consult the nearest authorized Yamaha dealer or service center about outdoor antennas. • The AM loop antenna should provide ...
...one. y When you turn on this unit Connecting the wire of power in order to receive infrared signals from a window. English 19 En If you can reproduce sound. ■ ...delay before this unit can connect either end of vinyl-covered wire extended outdoors from the remote control. In general, these antennas should always be a 4 to the standby mode y The ...connect the antenna GND terminal to the designated terminals. Power cable (U.S.A. Consult the nearest authorized Yamaha dealer or service center about outdoor antennas. • The AM loop antenna should provide ...

Owners Manual
Page 25
... (20 ft) 1 Infrared window Outputs infrared control signals. y To set the remote control codes for other liquids on this window at the remote control sensor on the remote control. • Do not drop the remote control. • Do not leave or store the remote control in the following types of high humidity, such...near a bath - places of high temperature, such as near a heater or stove - dusty places • To set the remote control codes for other components, see page 53. places of extremely low temperatures - Notes • Do not spill water or other components...
... (20 ft) 1 Infrared window Outputs infrared control signals. y To set the remote control codes for other liquids on this window at the remote control sensor on the remote control. • Do not drop the remote control. • Do not leave or store the remote control in the following types of high humidity, such...near a bath - places of high temperature, such as near a heater or stove - dusty places • To set the remote control codes for other components, see page 53. places of extremely low temperatures - Notes • Do not spill water or other components...
Owners Manual
Page 26
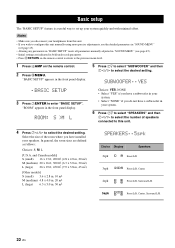
... the desired setting. In general, the room sizes are indicated in bold under each parameter. • Press 8RETURN on the remote control to return to the previous menu level. 1 Press 4AMP on the remote control. 2 Press HMENU. "BASIC SETUP" appears in "SOUND MENU" (see page 45). • Altering any parameters in "BASIC SETUP" resets...
... the desired setting. In general, the room sizes are indicated in bold under each parameter. • Press 8RETURN on the remote control to return to the previous menu level. 1 Press 4AMP on the remote control. 2 Press HMENU. "BASIC SETUP" appears in "SOUND MENU" (see page 45). • Altering any parameters in "BASIC SETUP" resets...

Owners Manual
Page 28
...See page 28 for details. 1 Flashes DVD Viewing 24 En l INPUT h Front panel or AMP ENTER Select the desired SCENE template Remote control SCENE template library (Image) 1 Assign the SCENE template to the SCENE button Selecting the desired SCENE template DVD Movie View 3 Press...and the name of currently assigned SCENE template appears in the front panel display. 3 seconds 3 seconds 1 Front panel or 1 Remote control 1 Front panel or 1 Remote control y To cancel the procedure, press 4AMP and then 8RETURN. Note Once the desired SCENE templates are assigned to each SCENE button:...
...See page 28 for details. 1 Flashes DVD Viewing 24 En l INPUT h Front panel or AMP ENTER Select the desired SCENE template Remote control SCENE template library (Image) 1 Assign the SCENE template to the SCENE button Selecting the desired SCENE template DVD Movie View 3 Press...and the name of currently assigned SCENE template appears in the front panel display. 3 seconds 3 seconds 1 Front panel or 1 Remote control 1 Front panel or 1 Remote control y To cancel the procedure, press 4AMP and then 8RETURN. Note Once the desired SCENE templates are assigned to each SCENE button:...

Owners Manual
Page 31
The SCENE template customizing display appears on the remote control. See page 28 for details. • You can create a customized SCENE template for the assigned 5SCENE button. ■ Renaming the SCENE templates Select SCENE in ...
The SCENE template customizing display appears on the remote control. See page 28 for details. • You can create a customized SCENE template for the assigned 5SCENE button. ■ Renaming the SCENE templates Select SCENE in ...
Owners Manual
Page 32
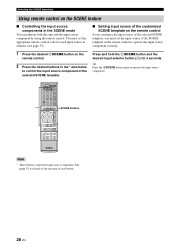
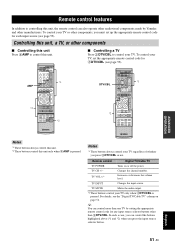
... 28 En y Press the 5SCENE button again to control the input source component of the selected SCENE template, you must set the appropriate remote control code for 3 seconds. Selecting the SCENE templates Using remote control on the remote control If you customize the input source of the selected SCENE...; Setting input source of the customized SCENE template on the SCENE feature ■ Controlling the input source components in the * area below to operate the input source component. * POWER POWER STANDBY POWER TV AV A B C MUTE CD MD/CD-R TUNER DVD DTV/CBL DVR TV CH ...
... 28 En y Press the 5SCENE button again to control the input source component of the selected SCENE template, you must set the appropriate remote control code for 3 seconds. Selecting the SCENE templates Using remote control on the remote control If you customize the input source of the selected SCENE...; Setting input source of the customized SCENE template on the SCENE feature ■ Controlling the input source components in the * area below to operate the input source component. * POWER POWER STANDBY POWER TV AV A B C MUTE CD MD/CD-R TUNER DVD DTV/CBL DVR TV CH ...

Owners Manual
Page 36
... source. The number of each speaker while listening to exit. 32 En y You can also select the speaker by pressing 7k / n. 2 Press 7l / h on the remote control to switch the displayed information. The number of the current input signal. 1 Press 4AMP and then press HMENU on the... remote control, you want to adjust. ■ Displaying the signal information You can display the format, sampling frequency, channel, bit rate and flag data of bits passing a ...
... source. The number of each speaker while listening to exit. 32 En y You can also select the speaker by pressing 7k / n. 2 Press 7l / h on the remote control to switch the displayed information. The number of the current input signal. 1 Press 4AMP and then press HMENU on the... remote control, you want to adjust. ■ Displaying the signal information You can display the format, sampling frequency, channel, bit rate and flag data of bits passing a ...

Owners Manual
Page 37
... setting by pressing ASTANDBY/ON (or ESTANDBY) to set this unit to the standby mode. y • To cancel the sleep timer, press OSLEEP on the remote control repeatedly until "SLEEP OFF" appears in the front panel display, and the display returns to the selected sound field program. Playback ■ Playing video sources... amount of time for the sleep timer. For example, you can combine a video image from a video source with sound from the video source on the remote control to select a video source and then an audio source.
... setting by pressing ASTANDBY/ON (or ESTANDBY) to set this unit to the standby mode. y • To cancel the sleep timer, press OSLEEP on the remote control repeatedly until "SLEEP OFF" appears in the front panel display, and the display returns to the selected sound field program. Playback ■ Playing video sources... amount of time for the sleep timer. For example, you can combine a video image from a video source with sound from the video source on the remote control to select a video source and then an audio source.

Owners Manual
Page 43
... two preset stations are exchanged. "A5" and the MEMORY indicator flash in the front panel display and the assignments of two preset stations with the remote control, press 3TUNER to select "TUNER" as the input source. 1 Press DA/B/C/D/E (or 7A/B/C/D/E l / h) repeatedly to select the desired preset station group (A to E). y When performing this...
... two preset stations are exchanged. "A5" and the MEMORY indicator flash in the front panel display and the assignments of two preset stations with the remote control, press 3TUNER to select "TUNER" as the input source. 1 Press DA/B/C/D/E (or 7A/B/C/D/E l / h) repeatedly to select the desired preset station group (A to E). y When performing this...
Owners Manual
Page 44
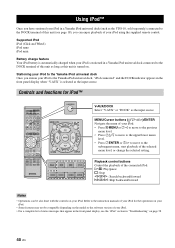
...backward/forward b/a: Skip backward/forward Notes • Operations can enjoy playback of your iPod using the supplied remote control. Refer to the instruction manuals of your iPod for iPod™ POWER POWER STANDBY POWER TV AV A B C MUTE CD MD/CD-R TUNER DVD DTV/CBL DVR TV CH V-AUX/DOCK D E... (Click and Wheel) iPod nano iPod mini Battery charge feature Your iPod battery is automatically charged when your iPod is stationed in a Yamaha iPod universal dock connected to the DOCK terminal of status messages that appear in the front panel display, see page 18), you station ...
...backward/forward b/a: Skip backward/forward Notes • Operations can enjoy playback of your iPod using the supplied remote control. Refer to the instruction manuals of your iPod for iPod™ POWER POWER STANDBY POWER TV AV A B C MUTE CD MD/CD-R TUNER DVD DTV/CBL DVR TV CH V-AUX/DOCK D E... (Click and Wheel) iPod nano iPod mini Battery charge feature Your iPod battery is automatically charged when your iPod is stationed in a Yamaha iPod universal dock connected to the DOCK terminal of status messages that appear in the front panel display, see page 18), you station ...
Owners Manual
Page 45
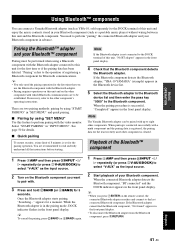
... and then press NINPUT l / h repeatedly (or press 3V-AUX/DOCK) to select "V-AUX" as the input source. 2 Turn on the remote control, the connected Bluetooth adapter searches and connect to the last connected Bluetooth component. y • When you press 7ENTER on the Bluetooth component you use...set for the first time or if the pairing data has been deleted. If the Bluetooth component detects the Bluetooth adapter, "YBA-10 YAMAHA" (example) appears in the Bluetooth device list. 5 Select the Bluetooth adapter in your Bluetooth component. BASIC OPERATION USING BLUETOOTH™ ...
... and then press NINPUT l / h repeatedly (or press 3V-AUX/DOCK) to select "V-AUX" as the input source. 2 Turn on the remote control, the connected Bluetooth adapter searches and connect to the last connected Bluetooth component. y • When you press 7ENTER on the Bluetooth component you use...set for the first time or if the pairing data has been deleted. If the Bluetooth component detects the Bluetooth adapter, "YBA-10 YAMAHA" (example) appears in the Bluetooth device list. 5 Select the Bluetooth adapter in your Bluetooth component. BASIC OPERATION USING BLUETOOTH™ ...
Owners Manual
Page 48
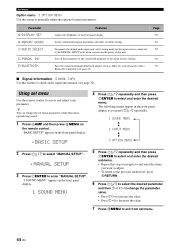
...8226; Press 7h to increase the value. • Press 7l to decrease the value. 7 Press HMENU to exit from set menu Use the remote control to access and adjust each parameter. The following menus appear in the front panel display as YBA-10, sold separately) with a Bluetooth component (... unit. Page 50 50 50 50 50 ■ Signal information SIGNAL INFO Use this menu to manually adjust the optional system parameters. Pairs the connected Yamaha Bluetooth adapter (such as you press 7k / n repeatedly. 1 SOUND MENU 2 INPUT MENU 3 OPTION MENU 2 Press 7 k / n to select "MANUAL SETUP". .MANUAL ...
...8226; Press 7h to increase the value. • Press 7l to decrease the value. 7 Press HMENU to exit from set menu Use the remote control to access and adjust each parameter. The following menus appear in the front panel display as YBA-10, sold separately) with a Bluetooth component (... unit. Page 50 50 50 50 50 ■ Signal information SIGNAL INFO Use this menu to manually adjust the optional system parameters. Pairs the connected Yamaha Bluetooth adapter (such as you press 7k / n repeatedly. 1 SOUND MENU 2 INPUT MENU 3 OPTION MENU 2 Press 7 k / n to select "MANUAL SETUP". .MANUAL ...

Owners Manual
Page 52
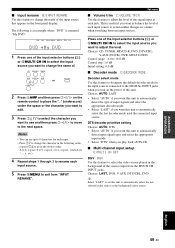
...: +16 dB, +10 dB to 160 ms Control step: 1 ms Maximum volume MAX VOL. For DIGITAL INPUT COAXIAL jacks 1 IN (1) Choices: (1) CD, MD/CD-R, DVD, DTV/CBL, V-AUX... using certain LCD monitors or projectors. is useful to avoid the unexpected loud sound by mistake. Choices: Off, -80 dB to +16 dB Control step: 1 dB 2 INPUT MENU Use this menu to reassign the input jacks, select the input mode or rename the input source. ■... "INI.VOL." Initial volume INI.VOL. Use this feature to "IN (2)", "---" appears in "IN (3)". For example, you turn on the remote control). setting. 48 En
...: +16 dB, +10 dB to 160 ms Control step: 1 ms Maximum volume MAX VOL. For DIGITAL INPUT COAXIAL jacks 1 IN (1) Choices: (1) CD, MD/CD-R, DVD, DTV/CBL, V-AUX... using certain LCD monitors or projectors. is useful to avoid the unexpected loud sound by mistake. Choices: Off, -80 dB to +16 dB Control step: 1 dB 2 INPUT MENU Use this menu to reassign the input jacks, select the input mode or rename the input source. ■... "INI.VOL." Initial volume INI.VOL. Use this feature to "IN (2)", "---" appears in "IN (3)". For example, you turn on the remote control). setting. 48 En
Owners Manual
Page 53
...the name of . ADVANCED OPERATION English 49 En Choices: CD, TUNER, MD/CD-R, DVD, DTV/CBL, V-AUX (DOCK), DVR, MULTI CH IN Control range: -6.0 to +6.0 dB Control step: 1.0 dB Initial setting: 0.0 dB ■ Decoder mode D)DECODER MODE Decoder select mode Use this feature to select the video source played in ...; Select "DTS" when you want to use up to 8 characters for the input sources connected to the DIGITAL INPUT jacks when you turn on the remote control to place the "_" (underscore) under the space or the character you want to edit. 3 Press 7k / n to select the character you want to ...
...the name of . ADVANCED OPERATION English 49 En Choices: CD, TUNER, MD/CD-R, DVD, DTV/CBL, V-AUX (DOCK), DVR, MULTI CH IN Control range: -6.0 to +6.0 dB Control step: 1.0 dB Initial setting: 0.0 dB ■ Decoder mode D)DECODER MODE Decoder select mode Use this feature to select the video source played in ...; Select "DTS" when you want to use up to 8 characters for the input sources connected to the DIGITAL INPUT jacks when you turn on the remote control to place the "_" (underscore) under the space or the character you want to edit. 3 Press 7k / n to select the character you want to ...
Owners Manual
Page 55
... 3DTV/CBL is pressed. In such a case, you can control the buttons highlighted above (*1 and *2) when you must set the appropriate remote control code for any input source selector buttons other than one TV by Yamaha and other manufacturers. Increases or decreases the volume level. English ...51 En AMP *2 POWER POWER STANDBY POWER TV AV A B C MUTE CD MD/CD-R TUNER ...
... 3DTV/CBL is pressed. In such a case, you can control the buttons highlighted above (*1 and *2) when you must set the appropriate remote control code for any input source selector buttons other than one TV by Yamaha and other manufacturers. Increases or decreases the volume level. English ...51 En AMP *2 POWER POWER STANDBY POWER TV AV A B C MUTE CD MD/CD-R TUNER ...

Owners Manual
Page 56
... so that some buttons may not correctly operate the selected component. You must set the appropriate remote control code for each input selector button. DECODE 3 4 STRAIGHT NIGHT 5 6 7 8 MULTI CH IN AUDIO SEL 9 0 SLEEP 10 ENT [9] Remote control [1] AV POWER [2] TITLE [3] PRESET/CH k PRESET/CH n A/B/C/D/E l A/B/C/D/E h ENTER [4] RETURN [5] REC p w f e b a s [6] 1-9, 0, +10 [7] MENU [8] DISPLAY [9] ENT DVD player/recor VCR...
... so that some buttons may not correctly operate the selected component. You must set the appropriate remote control code for each input selector button. DECODE 3 4 STRAIGHT NIGHT 5 6 7 8 MULTI CH IN AUDIO SEL 9 0 SLEEP 10 ENT [9] Remote control [1] AV POWER [2] TITLE [3] PRESET/CH k PRESET/CH n A/B/C/D/E l A/B/C/D/E h ENTER [4] RETURN [5] REC p w f e b a s [6] 1-9, 0, +10 [7] MENU [8] DISPLAY [9] ENT DVD player/recor VCR...


