Owners Manual
Page 4
... assure the finest performance, please read the "Troubleshooting" section on this unit must be held responsible for any service is called the standby mode. candles), as sunshine, fire or like. 21 Excessive sound pressure from cold to liquid dripping or splashing. The cabinet should never...not locate this sound system in a environment with a newspaper, tablecloth, curtain, etc. On the top of this unit. - Contact qualified Yamaha service personnel when any damage resulting from the wall outlet. 16 Install this unit in order not to this unit with high humidity (i.e. ...
... assure the finest performance, please read the "Troubleshooting" section on this unit must be held responsible for any service is called the standby mode. candles), as sunshine, fire or like. 21 Excessive sound pressure from cold to liquid dripping or splashing. The cabinet should never...not locate this sound system in a environment with a newspaper, tablecloth, curtain, etc. On the top of this unit. - Contact qualified Yamaha service personnel when any damage resulting from the wall outlet. 16 Install this unit in order not to this unit with high humidity (i.e. ...
Owners Manual
Page 12
...page 24 for details. *3 You have to tune into the desired radio station. Note In the standby mode, this unit consumes a small amount of power in order to receive infrared signals from the standby mode, press ASTANDBY/ON (or DPOWER) on the front panel to set to this unit in ... Adjusting the parameters of this unit • Optimizing the speaker parameters for details. *2 You need to connect the supplied FM and AM antennas to the standby mode. See page 16 for your iPod with this unit? ■ Customizing the SCENE templates • Using various SCENE templates ☞ P. 24 ...
...page 24 for details. *3 You have to tune into the desired radio station. Note In the standby mode, this unit consumes a small amount of power in order to receive infrared signals from the standby mode, press ASTANDBY/ON (or DPOWER) on the front panel to set to this unit in ... Adjusting the parameters of this unit • Optimizing the speaker parameters for details. *2 You need to connect the supplied FM and AM antennas to the standby mode. See page 16 for your iPod with this unit? ■ Customizing the SCENE templates • Using various SCENE templates ☞ P. 24 ...

Owners Manual
Page 16
... and Canada models only) Caution If you turn on or off this unit. 2 Press and hold JTONE CONTROL and then press ASTANDBY/ON to the standby mode. SP IMP.- 6 MIN 5 Press ASTANDBY/ON to select "SP IMP.".
... and Canada models only) Caution If you turn on or off this unit. 2 Press and hold JTONE CONTROL and then press ASTANDBY/ON to the standby mode. SP IMP.- 6 MIN 5 Press ASTANDBY/ON to select "SP IMP.".
Owners Manual
Page 22
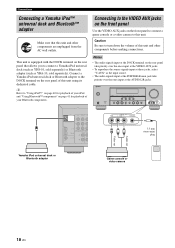
... of your iPod and "Using Bluetooth™ components" on the rear panel that this unit and other components before making connections. VOLUME STANDBY /ON PHONES SILENT CINEMA SPEAKERS A/B/OFF EDIT PRESET/TUNING BAND A/B/C/D/E TONE CONTROL 1 PROGRAM PRESET/TUNING SCENE 2 3 4 MEMORY TUNING AUTO... DVD 1 MULTI CH INPU FRONT SURROU L R VIDEO VIDEO AUX L AUDIO R PORTABLE V L R 3.5 mm stereo mini plug Audio out Video out Yamaha iPod universal dock or Bluetooth adapter Game console or video camera 18 En y Refer to "Using iPod™" on page 40 for playback of this...
... of your iPod and "Using Bluetooth™ components" on the rear panel that this unit and other components before making connections. VOLUME STANDBY /ON PHONES SILENT CINEMA SPEAKERS A/B/OFF EDIT PRESET/TUNING BAND A/B/C/D/E TONE CONTROL 1 PROGRAM PRESET/TUNING SCENE 2 3 4 MEMORY TUNING AUTO... DVD 1 MULTI CH INPU FRONT SURROU L R VIDEO VIDEO AUX L AUDIO R PORTABLE V L R 3.5 mm stereo mini plug Audio out Video out Yamaha iPod universal dock or Bluetooth adapter Game console or video camera 18 En y Refer to "Using iPod™" on page 40 for playback of this...

Owners Manual
Page 23
...of the AM loop antenna Open the lever Insert Close the lever Press ASTANDBY/ON (or D POWER) to receive infrared signals from a window. Notes • The AM loop antenna should be a 4 to AM or ...antenna is different depending on this unit, there will be placed away from this unit to the standby mode y The wire of the AM loop antenna does not have any polarity and you can ... indoor antennas are complete, plug the power cable into moist earth. Consult the nearest authorized Yamaha dealer or service center about outdoor antennas. • The AM loop antenna should provide sufficient...
...of the AM loop antenna Open the lever Insert Close the lever Press ASTANDBY/ON (or D POWER) to receive infrared signals from a window. Notes • The AM loop antenna should be a 4 to AM or ...antenna is different depending on this unit, there will be placed away from this unit to the standby mode y The wire of the AM loop antenna does not have any polarity and you can ... indoor antennas are complete, plug the power cable into moist earth. Consult the nearest authorized Yamaha dealer or service center about outdoor antennas. • The AM loop antenna should provide sufficient...
Owners Manual
Page 32
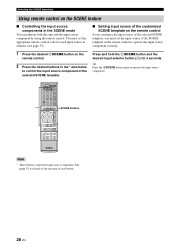
... templates Using remote control on the remote control. 2 Press the desired buttons in the * area below to operate the input source component. * POWER POWER STANDBY POWER TV AV A B C MUTE CD MD/CD-R TUNER DVD DTV/CBL DVR TV CH V-AUX/DOCK D E AMP TV INPUT TV MUTE TV VOL SCENE 1 2 3 4 BAND LEVEL TITLE...
... templates Using remote control on the remote control. 2 Press the desired buttons in the * area below to operate the input source component. * POWER POWER STANDBY POWER TV AV A B C MUTE CD MD/CD-R TUNER DVD DTV/CBL DVR TV CH V-AUX/DOCK D E AMP TV INPUT TV MUTE TV VOL SCENE 1 2 3 4 BAND LEVEL TITLE...

Owners Manual
Page 33
... some unwanted noise that may damage your listening preference, not merely on a DTS-incompatible CD player, you select an input source, this unit to the standby mode automatically See page 31 35 31 30 35 33 English 29 En
... some unwanted noise that may damage your listening preference, not merely on a DTS-incompatible CD player, you select an input source, this unit to the standby mode automatically See page 31 35 31 30 35 33 English 29 En
Owners Manual
Page 34
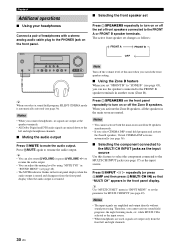
The active front speaker set changes as follows: FRONT A FRONT B VOLUME STANDBY /ON PHONES SILENT CINEMA SPEAKERS A/B/OFF EDIT PRESET/TUNING BAND A/B/C/D/E 1 l PRESET/TUNING h SCENE 2 3 4 MEMORY TUNING AUTO/MAN'L TONE CONTROL l PROGRAM h STRAIGHT NIGHT l INPUT h AUDIO SELECT ...
The active front speaker set changes as follows: FRONT A FRONT B VOLUME STANDBY /ON PHONES SILENT CINEMA SPEAKERS A/B/OFF EDIT PRESET/TUNING BAND A/B/C/D/E 1 l PRESET/TUNING h SCENE 2 3 4 MEMORY TUNING AUTO/MAN'L TONE CONTROL l PROGRAM h STRAIGHT NIGHT l INPUT h AUDIO SELECT ...

Owners Manual
Page 37
Press 4AMP and then press OSLEEP repeatedly to set this unit to the standby mode after a certain amount of time. Once the sleep timer is set, the SLEEP indicator lights up in the front panel display. • You can ...also cancel the sleep timer setting by pressing ASTANDBY/ON (or ESTANDBY) to set this unit to the standby mode. y • To cancel the sleep timer, press OSLEEP on the remote control repeatedly until "SLEEP OFF" appears in the front panel display, and the...
Press 4AMP and then press OSLEEP repeatedly to set this unit to the standby mode after a certain amount of time. Once the sleep timer is set, the SLEEP indicator lights up in the front panel display. • You can ...also cancel the sleep timer setting by pressing ASTANDBY/ON (or ESTANDBY) to set this unit to the standby mode. y • To cancel the sleep timer, press OSLEEP on the remote control repeatedly until "SLEEP OFF" appears in the front panel display, and the...
Owners Manual
Page 44
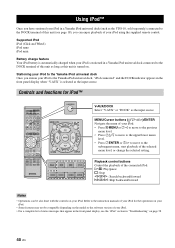
... to the subsequent menu, start playback of status messages that appear in the front panel display, see page 18), you station your iPod to the Yamaha iPod universal dock, "iPod connected" and the DOCK indicator appears in the front panel display when "V-AUX" is stationed in "Troubleshooting" on page ...58. 40 En Refer to the instruction manuals of your iPod for iPod™ POWER POWER STANDBY POWER TV AV A B C MUTE CD MD/CD-R TUNER DVD DTV/CBL DVR TV CH V-AUX/DOCK D E AMP TV INPUT TV MUTE TV VOL SCENE 1 2 3 4 BAND...
... to the subsequent menu, start playback of status messages that appear in the front panel display, see page 18), you station your iPod to the Yamaha iPod universal dock, "iPod connected" and the DOCK indicator appears in the front panel display when "V-AUX" is stationed in "Troubleshooting" on page ...58. 40 En Refer to the instruction manuals of your iPod for iPod™ POWER POWER STANDBY POWER TV AV A B C MUTE CD MD/CD-R TUNER DVD DTV/CBL DVR TV CH V-AUX/DOCK D E AMP TV INPUT TV MUTE TV VOL SCENE 1 2 3 4 BAND...

Owners Manual
Page 46
... laws in your source component is connected to provide only digital signals, you cannot record the source. • A given input source is set to the standby mode, you play back a video source that uses scrambled or encoded signals to prevent it from CDs, radio, etc. y Do a test recording before you want...
... laws in your source component is connected to provide only digital signals, you cannot record the source. • A given input source is set to the standby mode, you play back a video source that uses scrambled or encoded signals to prevent it from CDs, radio, etc. y Do a test recording before you want...
Owners Manual
Page 55
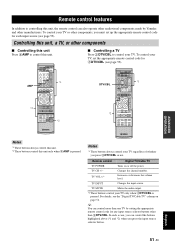
...buttons highlighted above (*1 and *2) when you must set the appropriate remote control code for any input source selector buttons other than one TV by Yamaha and other components ■ Controlling this unit Press 4AMP to control this unit, the remote control can control more than 3DTV/CBL. DECODE ... the audio output. *2 These buttons control your TV. To control your TV regardless of whether you press 3DTV/CBL or not. AMP *2 POWER POWER STANDBY POWER TV AV A B C MUTE CD MD/CD-R TUNER DVD DTV/CBL DVR TV CH V-AUX/DOCK D E AMP TV INPUT TV MUTE TV VOL SCENE 1 2 ...
...buttons highlighted above (*1 and *2) when you must set the appropriate remote control code for any input source selector buttons other than one TV by Yamaha and other components ■ Controlling this unit Press 4AMP to control this unit, the remote control can control more than 3DTV/CBL. DECODE ... the audio output. *2 These buttons control your TV. To control your TV regardless of whether you press 3DTV/CBL or not. AMP *2 POWER POWER STANDBY POWER TV AV A B C MUTE CD MD/CD-R TUNER DVD DTV/CBL DVR TV CH V-AUX/DOCK D E AMP TV INPUT TV MUTE TV VOL SCENE 1 2 ...

Owners Manual
Page 56
... component. Be advised that the remote control can control the desired component without changing the input source of this unit. [1] POWER POWER STANDBY POWER TV AV A B C MUTE CD MD/CD-R TUNER DVD DTV/CBL DVR TV CH V-AUX/DOCK D E AMP TV INPUT TV MUTE ... assigned to each input source in advance (see page 53). 52 En DECODE 3 4 STRAIGHT NIGHT 5 6 7 8 MULTI CH IN AUDIO SEL 9 0 SLEEP 10 ENT [9] Remote control [1] AV POWER [2] TITLE [3] PRESET/CH k PRESET/CH n A/B/C/D/E l A/B/C/D/E h ENTER [4] RETURN [5] REC p w f e b a s [6] 1-9, 0, +10 [7] MENU [8] DISPLAY [9] ENT...
... component. Be advised that the remote control can control the desired component without changing the input source of this unit. [1] POWER POWER STANDBY POWER TV AV A B C MUTE CD MD/CD-R TUNER DVD DTV/CBL DVR TV CH V-AUX/DOCK D E AMP TV INPUT TV MUTE ... assigned to each input source in advance (see page 53). 52 En DECODE 3 4 STRAIGHT NIGHT 5 6 7 8 MULTI CH IN AUDIO SEL 9 0 SLEEP 10 ENT [9] Remote control [1] AV POWER [2] TITLE [3] PRESET/CH k PRESET/CH n A/B/C/D/E l A/B/C/D/E h ENTER [4] RETURN [5] REC p w f e b a s [6] 1-9, 0, +10 [7] MENU [8] DISPLAY [9] ENT...

Owners Manual
Page 58
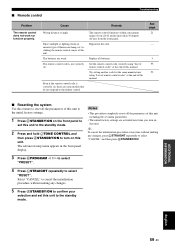
...and the advanced setup menu appears in the front panel display. 1 Press ASTANDBY/ON on the front panel to set this unit to the standby mode. 2 Press and hold JTONE CONTROL and then press ASTANDBY/ON to turn on this feature to set the speaker impedance to adjust. ... The initial factory settings are displayed in the front panel display. 4 Press LSTRAIGHT repeatedly to change the selected parameter setting. 5 Press ASTANDBY/ON to the standby mode. y The settings you made while you want to 6 Ω . Notes • This setting completely resets all the parameters of this unit. ...
...and the advanced setup menu appears in the front panel display. 1 Press ASTANDBY/ON on the front panel to set this unit to the standby mode. 2 Press and hold JTONE CONTROL and then press ASTANDBY/ON to turn on this feature to set the speaker impedance to adjust. ... The initial factory settings are displayed in the front panel display. 4 Press LSTRAIGHT repeatedly to change the selected parameter setting. 5 Press ASTANDBY/ON to the standby mode. y The settings you made while you want to 6 Ω . Notes • This setting completely resets all the parameters of this unit. ...

Owners Manual
Page 59
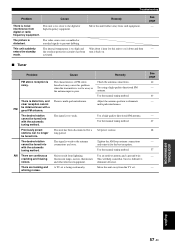
...unit, and play the source again. The volume is Make an appropriate setting following the instruction improper. Signals this unit to the standby mode, disconnect the power cable, plug it normally. Set this unit cannot reproduce are secure and that the impedance setting is incorrect...IVOLUME +/- Incorrect cable connections. The sleep timer has turned off this unit, disconnect the power cable, and contact the nearest authorized Yamaha dealer or service center. ■ General Problem Cause Remedy This unit fails to resume audio output and then adjust the volume. ...
...unit, and play the source again. The volume is Make an appropriate setting following the instruction improper. Signals this unit to the standby mode, disconnect the power cable, plug it normally. Set this unit cannot reproduce are secure and that the impedance setting is incorrect...IVOLUME +/- Incorrect cable connections. The sleep timer has turned off this unit, disconnect the power cable, and contact the nearest authorized Yamaha dealer or service center. ■ General Problem Cause Remedy This unit fails to resume audio output and then adjust the volume. ...
Owners Manual
Page 61
This unit suddenly enters the standby mode. Wait about 1 hour for this unit away from such equipment. The characteristics of FM stereo broadcasts may cause this unit further away from the ...
This unit suddenly enters the standby mode. Wait about 1 hour for this unit away from such equipment. The characteristics of FM stereo broadcasts may cause this unit further away from the ...
Owners Manual
Page 63
The remote control code is not correctly set , there are some models that do not respond to the standby mode. Reposition this unit to the remote control. Set the remote control code correctly using "List of remote control codes" at the end of this ... 21 - 3 53 53 ■ Resetting the system Use this feature to reset all the parameters of this unit including the set this unit to the standby mode. 2 Press and hold JTONE CONTROL and then press ASTANDBY/ON to set menu parameters. • The initial factory settings are weak. The batteries are...
The remote control code is not correctly set , there are some models that do not respond to the standby mode. Reposition this unit to the remote control. Set the remote control code correctly using "List of remote control codes" at the end of this ... 21 - 3 53 53 ■ Resetting the system Use this feature to reset all the parameters of this unit including the set this unit to the standby mode. 2 Press and hold JTONE CONTROL and then press ASTANDBY/ON to set menu parameters. • The initial factory settings are weak. The batteries are...
Owners Manual
Page 66
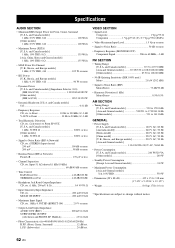
.../60/80/90/100/110/120/160/200 Hz) H.P.F. (Front, Center, Surround 12 dB/oct. and Canada models 240 W/320 VA [Other models 240 W • Standby Power Consumption [Except Asia and General models 0.8 W • Maximum Power Consumption [Asia and General models] 5ch, 10%/THD 530 W • Dimensions (W x H x D 435 x 151 x 318 mm...
.../60/80/90/100/110/120/160/200 Hz) H.P.F. (Front, Center, Surround 12 dB/oct. and Canada models 240 W/320 VA [Other models 240 W • Standby Power Consumption [Except Asia and General models 0.8 W • Maximum Power Consumption [Asia and General models] 5ch, 10%/THD 530 W • Dimensions (W x H x D 435 x 151 x 318 mm...
Owners Manual
Page 68
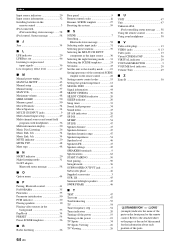
... attached sheet or the pages at the end of this manual for the information about each position of the parts. 64 En Refer to the standby mode .........19 Setting input source of the customized SCENE template on the front panel or the remote control.
... attached sheet or the pages at the end of this manual for the information about each position of the parts. 64 En Refer to the standby mode .........19 Setting input source of the customized SCENE template on the front panel or the remote control.

Owners Manual
Page 69
■ Front panel A BC D E FG H VOLUME STANDBY /ON PHONES SILENT CINEMA SPEAKERS A/B/OFF EDIT PRESET/TUNING BAND A/B/C/D/E TONE CONTROL 1 PROGRAM PRESET/TUNING SCENE 2 3 4 MEMORY TUNING AUTO/MAN'L STRAIGHT NIGHT INPUT AUDIO SELECT EFFECT VIDEO VIDEO AUX L AUDIO R PORTABLE I J K LM N OP i
■ Front panel A BC D E FG H VOLUME STANDBY /ON PHONES SILENT CINEMA SPEAKERS A/B/OFF EDIT PRESET/TUNING BAND A/B/C/D/E TONE CONTROL 1 PROGRAM PRESET/TUNING SCENE 2 3 4 MEMORY TUNING AUTO/MAN'L STRAIGHT NIGHT INPUT AUDIO SELECT EFFECT VIDEO VIDEO AUX L AUDIO R PORTABLE I J K LM N OP i

